Selection of materials by type of wood and size ↑
When building a private house, when you construct an interfloor ceiling using wooden beams with your own hands, the success of the project largely depends on the correct choice of building material. The beams, which support the entire structure, not only bear their own weight - they are pressed by the mass of the flooring and are affected by operational loads.
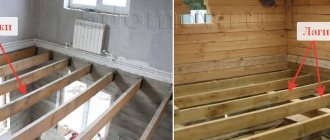
Flooring in the house
What to consider when choosing lumber ↑
For such purposes, it is recommended to choose coniferous or larch wood, since such material has better strength compared to deciduous wood. Bars, boards or logs must be dry - humidity not exceeding 14% is allowed. Typically, lumber acquires such moisture content within a year when the correct storage conditions are created.
Wood moisture measurement
Beams should not have a large number of knots; it is advisable to reject timber that has pronounced cross-grain or curling - the fibers should be located along the beam or board. It is good if the lumber has been treated with an antiseptic and a composition that increases the fire resistance of the wood.
Cross-layer
Curlyness
Selection of bars or logs by size ↑
Depending on where wooden floors are used, it is necessary to select bars or boards according to the cross-sectional dimensions, on which the reliability of the structure depends. If an interfloor platform is being built, then the same requirements are imposed on the section, but when an attic is being built, the thickness of the beams may be less. When selecting material, you can be guided by tables that make it possible to calculate the cross-section of the boards, logs or timber used.
Calculation of the beam cross-section depending on the span length with an approximate load of 350-400 kg/m²
Calculation of log diameter depending on the span length with a load of 400 kg/m²
Although you can avoid increasing the load on the floors if you do not plan to place a large amount of furniture or other interior items in the room. In this case, another table will help, helping to select the cross-section of beams, taking into account the load on the floor covering in the room.
Selection of beam cross-section depending on the load and span width
Preparing bars or boards for laying ↑
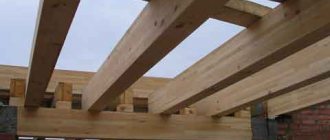
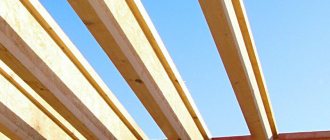
Having chosen the material correctly, we begin to install the interfloor flooring. A properly made wooden floor in a house ensures the strength of the entire frame of the building, and for this it is necessary to accurately measure the length of the beams and accurately position them.
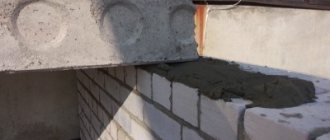
From the material selected according to the cross-section, beams with an exact size are prepared, including the “margin” distance, which will play the role of supporting the structure on the load-bearing walls. For support, it is necessary to use at least 10 cm of timber, and at least 2/3 of the wall thickness is usually used as a supporting platform.
The length of the span in which the ceiling is laid should not be more than 6 m for safety. The ideal distance to be covered should be 4-5 m. When preparing a house project, the designer tries to arrange the load-bearing wooden structures so that the beams are parallel to the smaller side of the room or buildings.
When calculating the step with which prepared bars or boards are laid, it is necessary to use the data reflected in SNiP 2.01.07-85. According to this document, you need to be guided by the following values of the permissible total load:
- for interfloor ceilings, including basements 350-400 kg/m²;
- for an unloaded attic space 130-150 kg/m²;
- for the used attic space up to 250 kg/m².
Calculation of the distribution step of bars or boards
To correctly distribute the slabs, you can use a table for calculating the pitch, which allows you to make the ceiling of the second floor on wooden beams sufficiently strong.
Distribution of beams under the floor
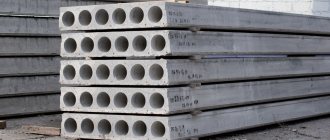
Reinforced concrete floors: advantages and disadvantages
Compared to the previously discussed type of floor, reinforced concrete is more durable and strong. They can be either solid (monolithic) or prefabricated.
The positive aspects are the following:
- you can make an overlap of any size and shape;
- reinforced concrete has a high load-bearing capacity;
- If in wooden floors you need to ensure that there are no deflections, then in reinforced concrete this situation is excluded.
The negative sides are:
- the process of creating the required ceiling is quite labor-intensive and requires assistants or additional labor;
- after pouring, concrete must be maintained until it reaches maximum strength;
- special equipment and tools are required;
- the cost of work is higher compared to wooden floors.
Briefly about technology
Monolithic floors have a metal frame made of reinforcement, which is filled with concrete mixture. The reinforcement is tied or welded, resulting in a mesh.
Important! An important factor is the diameter of the reinforcement. It is selected depending on what load should be on the floor (a certain margin of safety must also be taken into account).
To make such an overlap, you first need to build formwork. It is necessary to make special clamps along the edges of the formwork that will not allow the reinforcement to sag. To prevent the formwork from sagging, you can install spacers.
After the formwork and reinforcement are installed, you can begin concreting. Before you start pouring, you need to calculate the volume of the mixture. This primarily depends on the thickness and area of the overlap. The thickness, in turn, should be 1/30 of the span. Thus, if the span is 6 meters, then, accordingly, the thickness will be 20 cm.
Recommendations from experts when working with monolithic reinforced concrete structures
If you need to make a monolithic reinforced concrete structure, experts recommend taking into account several important points. They highlight the following:
- When choosing reinforcement, it is necessary to calculate the design loads that it must withstand. The calculations will reveal the required diameter, but it is better to purchase 1 or even two sizes larger to increase the safety margin.
- It is best not to weld the mesh, but to tie it with special wire.
- If you are not sure that you will have time to do the filling in one go, set it aside. This stage should not be interrupted.
- To prevent the structure from cracking while the concrete is gaining strength (this applies to warm periods of the year), it is recommended to moisten it.
- If concreting is done in winter, you need to think about special anti-frost additives.
How to make an interfloor concrete floor
Interfloor slabs should be selected depending on the purpose of the building, as well as design solutions.
In small houses, wooden pies are very popular, which are quite easy to build yourself. If in a reinforced concrete slab you need to calculate how thick it should be, then in the case of a wooden structure you need to think through the pie.
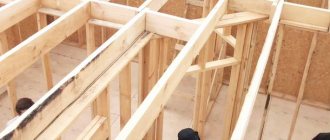
Technology for installing wooden floors ↑
The beams must be carefully distributed, positioning them strictly horizontally and parallel to each other. The spacing of the bars or boards should be the same over the entire area.
Nail plate
The permissible deflection of the flooring should not exceed 1/350 of the length of the beam, that is, for 3.5 m of the length of the beam, the deflection should not be more than 10 mm. If the span is large, and the cross-section is not enough to create the necessary strength, you can install vertical columns and build additional load-bearing walls. When installing additional columns or load-bearing walls, special perforated fasteners are used.
In places where the bed comes into contact with load-bearing elements, it is necessary to lay insulating materials, which, for example, include damper tape. You can use several layers of roofing felt or sheet rubber, which will also serve as waterproofing.
Perforated beam support
Often they began to use special brackets made of perforated metal, thanks to which the installation of beams can be carried out end-to-end with a load-bearing wall, and the joints of crossbars and short bars can be assembled. For example, it becomes clear how to make a second floor ceiling with an opening for a flight of stairs or a passage for a chimney.
This connection has certain advantages:
- The T-shaped unit is reliable;
- installation is done quickly and without cutting out a seat in the timber, which preserves the strength of the structure;
- there is no need to create a cavity in the wall to support the beam, which does not violate the thermal insulation properties of the wall;
- it becomes possible to use beams of shorter length than the width of the opening being closed.
Installation option with supports
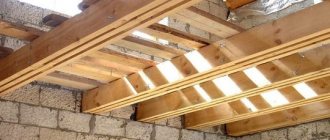
Next, they attach the flooring with the necessary layers of insulation to the installed layers. The number of layers of insulation and the type of materials used depend on the type of floor.
Types of floors and their arrangement
Types of wooden floors ↑
Houses have a basement and attic space, and often have an attic. The type of overlap depends on this, for which different requirements are imposed in different cases.
There is the following division of load-bearing vaults by type:
- An interfloor ceiling that does not require good insulation, since it separates residential areas. The main requirement is good sound insulation.
- Attic, separating living quarters from the attic. Depending on whether the attic (attic) is heated or there is no heating in the room under the roof, the flooring is made of the necessary insulating material. But a vapor barrier layer is required to prevent the formation of condensation.
- Basement or basement, serving as the boundary between the basement. Here, thermal insulation comes first, cutting off the cold coming from below.
Attic floor made of I-beams
Depending on the requirements for the flooring, layers of insulation, vapor barrier or soundproofing materials of a certain thickness are added.
Wooden floor installation
Options for improving the load-bearing capacity of interfloor slabs
It has already been written earlier about what types of materials can be used to cover the space between the rooms of the first and second and basement floors, but there is also a way to improve the load-bearing capacity of the floor, due to which it is possible to exert large operational loads.
Gain options:
- A popular option is to mount, using brackets, additional linings in the form of boards of medium thickness. Their support is made up of specially made pillars, the height of which should not be too high.
- The structure can also be made stronger with an additional U-shaped channel (the operating load increases). They are installed on the beams from the sides.
- The ideal method of strengthening is the choice of additional blocks, so the structure can withstand heavy loads and eliminate instability. The process is labor-intensive, but very effective.
Interfloor ceilings can be strengthened using metal products
You definitely need to think about finishing or applying a final coat. To do this, you can use wooden panels made according to the lining principle, plywood, OSB boards, gypsum plasterboard sheets and more. Linoleum, tiles, laminate and other coverings are subsequently placed on them.
Features of the construction of floors in a brick house ↑
If the vault is mounted to stone walls, it is necessary to wrap the ends of the beams with roofing material or treat them with resin, providing waterproofing. The opening in the wall, which is used as a support for the beams that support the wooden floors between floors in a brick house, is created in such a size that there is a gap for ventilation. This will avoid the formation of condensation and preserve the wood from destruction longer.
Procedure for DIY installation:
- During the construction of a house, not forgetting how to install floor beams, niches with a depth of 15 cm to 20 cm are installed in the walls at the required height. It is especially convenient to create niches when building walls made of double silicate brick.
- Before installation, the ends of the beams are cut at an angle of 60°-70° to improve its ventilation after installation, and additional treatment is carried out with special compounds.
Making a Beam End Cut
- The ends are lightly treated with waterproofing, without touching the ends to ensure that moisture escapes from the wood. If necessary, treat the beams with an antiseptic and an agent that increases fire resistance.
- Place beams or boards in niches in such a way that a gap of about 5 cm is maintained between their ends and the wall for ventilation.
- Every third or fourth beam is fixed to the wall with an anchor bolt.
anchor bolt
- The existing gap between the wall and the timber is filled with a sealant.
- Next, 50x50 or 40x40 bars are sewn perpendicular to the slabs, creating a lathing for attaching wooden panels or lightweight concrete panels.
- From below, boards, panels or sheet plasterboard can be nailed to the beams.
- When constructing a wooden floor between floors, the required insulating layer is placed on wooden panels. In the case of an attic, they can use loose insulation such as expanded clay. You can use the option when a clay-sand layer is poured, on top of which a layer of sand or slag is distributed.
- Logs are attached on top of the insulation in increments of 50-70 cm.
- Planed boards are nailed to the joists.
- As an alternative to joists and planed boards, you can make a concrete screed with reinforced mesh.
- The final finishing of the flooring and ceiling is carried out.
Overlapping scheme
Rules for installation in a wooden house ↑
How to make the ceiling between floors in the house depends on what material the building is built from. There are also certain nuances in the construction of a building with wooden walls.
Do-it-yourself installation of timber beams is carried out according to peculiar beacons - initially the outer beams are mounted, focusing on which the intermediate ones are then attached. When fixing the outer beams, take into account that they should be located no closer than 5 cm to the nearest wall. Using this gap, a layer of insulation is placed.
Niches for support do not need to be prepared in advance - the necessary recesses are cut out in the constructed walls using an electric or chainsaw.
Niches for ceilings in wooden walls
Step-by-step installation of flooring in a wooden house:
- Before installation, the ends of the leg are trimmed at an angle of 60°-70° to improve its ventilation after installation, and additional treatment is carried out with special compounds.
- Having treated the ends of the bars with bitumen and wrapped them in roofing felt, they are placed in niches. Starting laying from the outer beams, continue laying the intermediate beams, checking the horizontal position with a level.
- During the installation process, every third or fourth beam is attached to the wall using anchor bolts or other fasteners, such as staples.
- Then, 50x50 or 40x40 bars are fixed perpendicular to the beams, preparing the lathing for mounting wooden panels.
- Subfloors are sewn on top, for which unplaned boards or wooden panels are used.
- When installing floors, sheet material or light boards are nailed from below.
- An insulating layer is fixed to the subfloor, which in each case performs a specific task. If you are installing a 1st floor ceiling on a house, it is necessary to lay a thermal insulation layer to protect against cold from the basement. And when laying the floor on the 2nd floor, it is enough to ensure good sound insulation.
- Logs are sewn on top of the insulation, to which planed boards of the finished floor are then attached. Instead of boards, you can use OSB board.
- The final top layer can be linoleum, ceramic tiles, laminate or parquet.
An example of installing a ceiling in a wall made of aerated concrete
Articles on the topic
Strengthening the foundation of a brick house - how to do it, instructions, advice from masons
Mosaic with bricks - preparation, masonry features, instructions, advice from masons
Service life of a brick house and how it can be increased?, instructions, advice from masons
Preparing a brick surface for plastering - rules, instructions, advice from masons
Cladding the base with bricks - materials, work, instructions, advice from masons
Insulation of a brick facade - thermal insulation, thermal panels, instructions, advice from masons
Brick plinth on a strip foundation - masonry technology, instructions, advice from masons
Finishing a brick building - internal, external, instructions, advice from masons
Reviews ()
Construction of interfloor vaults in a house made of aerated concrete ↑
The main feature is that aerated concrete, despite all its positive properties, does not have sufficient strength. Because of this, it is not recommended to build buildings with more than two floors from ordinary aerated concrete.
Installation of wooden floors between floors
Step-by-step instructions for installing a vault in aerated concrete ↑
To install flooring between floors, especially when it is necessary to install the ceiling of the 2nd floor of a house made of aerated concrete, a reinforced support from a reinforced concrete belt located along the perimeter of the building or room is prepared in advance.
DIY work stages:
- The ends of the beams must be sawed at an angle of 60°-70°, creating an additional cavity for ventilation after installation.
- Next, the bars at the point of contact with the wall are wrapped with roofing material, which prevents abrasion of the structure stop. The end must be left open to remove moisture from the wood during ventilation.
- When creating niches for laying wood, it is necessary to calculate their size so that the gap between the wood and the wall above is at least 50 mm. After laying the beam, insulation, for example, mineral wool, is placed in this gap.
- Installation begins with the outer beams, mounting the ceiling along wooden beams. Then the intermediate slabs are installed, checking the correct installation according to the building level.
- The beam vault is fixed to the reinforced belt using metal corners, pins or special plates.
- The next step is the installation of boards and bars secured to the bottom of the beams.
- After fixing the bottom layer of the structure, the insulating layer is distributed, selecting its properties depending on the type of floor - providing thermal insulation, improving sound insulation or waterproofing.
Floor finishing on beams
Finishing work and recommendations ↑
Finally, logs are laid on top, on which the finished floor is mounted. The lower part of the vault is also refined, covered with clapboard, fiberboard, plywood or other finishing material.
Of all types of floors, those made of wood are more preferable when building a house on your own - wooden interfloor structures require less cost and are not very labor-intensive. Using timber, you can build any type of floor - interfloor, attic or basement (basement). You just need to correctly calculate the load and choose the right lumber for construction, which will ensure the strength and durability of the structure.
Details: floor beams (photo examples)
The best posts
- DIY curtain butterflies: manufacturing options
- We do the balcony repairs with our own hands step by step
- DIY box for small items: master class on cardboard products
- Steam heating batteries: types and purposes
- Knitting cap for a newborn: knitting patterns and descriptions for beginners, master class with photos and videos
- Ideas for decorating and filling sliding wardrobes for the bedroom
- DIY plastic bottle doll: master class with video
- Expert's answer: is it possible to glue wallpaper onto wallpaper?