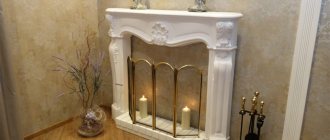
Types of false fireplaces
Oddly enough, but the fireplace can have different designs. Before you start making your own, you should decide which option is more attractive to you and, most importantly, appropriate in your apartment.
- Maximum realism - this type involves the manufacture of absolutely all elements of the fireplace, which will very realistically imitate the real structure. In this case, it is necessary to adhere to the actual dimensions of real standard fireplaces and recreate the combustion process. To do this, electric fireplaces are installed in a niche, around which high-quality portals are erected. Well, or an electronic photo frame that broadcasts the flames. This is the most expensive option, but also the most reliable.
- Partial imitation is a simpler and less expensive option. To build such a fireplace, a portal is erected that protrudes from the wall, a cover is made for it, you can even imitate brickwork and natural wood or stone. But in the firebox there are already decorative elements that only conditionally indicate the presence of a hearth. Such designs look very cozy and convincing.
- Symbolic designation – this type of execution only vaguely resembles the outlines of a real fireplace. Using wooden planks, decorative baguettes and moldings or other elements on the wall, contours are indicated that are similar in shape to the image of the original. In many cases, they use acrylic paints directly on the wall surface. In this case, flames can also be drawn. If you like these non-standard options doing the usual things, then this option is for you.
Now let’s figure out what benefits lie in using such an element in the interior and why you need to spend so much time and effort.
- First of all, this is, of course, a successful design solution that will help decorate the room and make it more comfortable, warm and homely. In addition, fireplaces are not so often found in apartment interiors, which will help make it more unusual. And given that the surface is often decorated with beautiful materials, you will further diversify the decorative elements in the room;
- If you decide to recreate the option with a built-in electric fireplace, then you will receive an additional source of light and heat. This will help maintain a comfortable temperature in the room before the central heating is turned on or after it is turned off;
- Most fireplaces are topped with massive covers. By recreating this element, you will have additional space to display your favorite collection of decorative figurines or home photos. For various holidays or memorable dates, you can decorate its surface with symbolic decor. Fireplaces decorated for the New Year with garlands, real fir branches and decorative socks for gifts look especially festive;
- And the most cunning option is for hiding communications and design flaws. For example, you can hide a large number of sockets and wires that are located under the TV area. It often happens that there is a heating radiator under the window and in the corner on the adjacent wall, which not only looks out of place, but also interferes with placing any piece of furniture there. The construction of a decorative portal around it will help turn this drawback into the highlight of the room and make use of an empty corner. In this case, the radiator will not stop heating the room.
How to make a fire for a false fireplace?
There is no question of any open fire in a false fireplace, and even using real candles is quite dangerous. Therefore, let’s figure out how and with what you can effectively simulate a hearth.
A bright orange-red LED strip runs along the contour of the niche from below. Place a transparent aquarium bowl with water or glass balls inside - and the fire will come to life with the refraction of light.
There are safe bio-fireplaces on sale that can be built into home imitations. This is an advanced alcohol burner with virtually no odor, smoke or risk of fire. In enclosed spaces without chimneys, this is the only option for a live open fire.
Lamps that imitate fire or special electronic photo frames look interesting. They display an image of a flame with characteristic sounds and crackling sounds. But keep in mind that such frames are quite expensive, because they are simplified miniature plasmas.
Initial preparation stage and size selection
To make a false fireplace with your own hands, you do not need to have any special design or construction skills. It is enough to clearly imagine the desired image of the future fireplace and choose the material with which it will be easiest and fastest for you to work. Any work must begin with a sketch and drawing. Yes, these are two completely different things. After all, the sketch reflects only the appearance with all kinds of decor. And the drawing already specifies the dimensions, based on which you can calculate the required amount of material. In order to draw a working drawing, you need to decide on the dimensions of the composition. Be careful at this stage.
The dimensions of the false fireplace should be proportional to the room in which it will be located. that is too large in a small room will look cumbersome and take away the space even more. But a small fireplace in a spacious room will simply be lost from sight. Also, it should not interfere with free movement around the room. The optimal width should not exceed 1/3 of the wall to which the structure will be attached.
Photo of a decorative fireplace with your own hands
DIY gift baskets are a universal gift for any occasion! 80 photo ideas for decorating baskets: romantic, formal, children's, Italian, Brazilian, for movie fansA DIY gift for your loved one: for Birthday, New Year, Valentine's Day, anniversary. 110 photo ideas for original and fun gifts that will surprise your loved one
Do-it-yourself lambrequins - manufacturing instructions with patterns. Types of lambrequins, choice of variety. Preparation of material and tools. Step-by-step manufacturing guide
- DIY beads are interesting photo ideas for creating original jewelry. Step-by-step master class on creating jewelry from scrap materials
- DIY Tilda for beginners. History of the toy, materials and tools for creation, step-by-step manufacturing process. Sewing tilde: secrets of mastery
DIY Christmas nativity scene: history and traditions, the main components of a Christmas nativity scene. Nativity scene using toys, plasticine figures, nativity scene made of paper and cardboard
Read here - DIY earrings: instructions on how to make jewelry. Techniques for making beautiful models (125 photos and videos)
Help the site, repost 
0
No. 1. Raised fireplace made of cardboard boxes
Having a large amount of cardboard or small cardboard boxes from shoes or small appliances, you can very easily “build” a real fireplace. In addition to cardboard, you will need:
- a lot of wood glue;
- masking tape;
- roulette;
- scissors or stationery knife;
- something heavy as a press;
- something writing.
The beauty of this method lies not only in its ridiculous cost, but in the fact that the creation process can be carried out in a playful way, in which your children will happily take part. Moreover, there is no need to drill anything, and there is nothing to spoil. So, let's begin.
For the first time, we recommend using simpler forms to make the portal. Moreover, such a false fireplace can be used as a disposable one. For example, make it for the New Year and conduct a small family photo session against its background. You will get a lot of positive and memorable moments, surprise your friends and loved ones and make the most unusual decoration from the most ordinary materials.
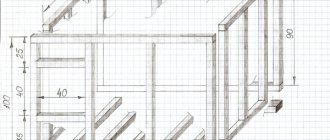
If you have a large box from large equipment, then you need to carefully unfold it and make a pattern. To do this, draw out the dimensions of the back and side walls on its surface. You should end up with a rectangle that needs to be folded into the letter P. The sides need to be made voluminous. To do this, they should be folded as shown in the figure.
If one box is not enough, don't despair.
Glue small boxes together to form a frame. If necessary, place a press on the joint. All edges and joints at the end must be taped with masking tape and secured with glue. After the structure has completely dried, it can be painted using spray paints, covered with foam bricks, or decorated in any other way. Remember that this is a decorative, very fragile structure.
Manufacturing methods
Fireplaces are made from simple materials that can be found in any hardware store. For example:
- plasterboard fireplace;
- plywood;
- foam fireplace;
- cardboard;
- chipboard;
- tree;
- brick;
- polyurethane.
It is noteworthy that for a false fireplace you can use almost any available materials. You can even make this decorative item from old furniture.
Today, there are many different materials with which you can decorate an artificial fireplace, creating an imitation of stone, wood, brickwork and much more. Moreover, its production will take little time - just a few days, but this design will delight the eye for many years to come.
Polyurethane fireplace
The fastest and easiest way to make a decorative fireplace. For this purpose, it is necessary to acquire a polyurethane portal. The main task is to choose the right style and size of the future product.
If you want to install an electric fireplace, you must take into account its dimensions, as well as the method of connecting to the power supply and ventilation features.
Do not forget that you need to choose the size for such a fireplace
To make this design you will need:
- polyurethane portal;
- glue;
- putty;
- Decoration Materials.
The most suitable place for installation is the side wall of the room. Access to the room must be free. When deciding to install an electric fireplace or decorative lighting inside the portal, you need to worry about the wiring and socket.
The firebox frame must be made of wooden blocks, and the walls must be made of plywood or plasterboard. The portal is secured using contact adhesive, and the gaps between the portal and the firebox should be filled with finishing putty. The firebox can be finished in the chosen style or an electric fireplace can be installed.
These portals are also made of wood, but this option will cost much more.
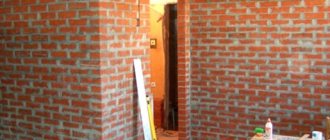
Plywood construction
This is an excellent option for hiding any defect in the room, for example, an old battery, which will cost a lot of money to replace.
All necessary calculations should be made and a drawing of the future product should be made. It is worth considering examples of ready-made versions of such fireplaces.
Initially, it is necessary to install a frame made of wooden blocks, covering it with plywood. Since there is a radiator in the middle of the structure, it is preferable to assemble the frame with screws. The fact is that nails at high temperatures do not ensure a tight fit of plywood to the bars. Along the back wall it is necessary to attach a firebox that imitates a fireplace. Surfaces that are visible from the outside, like the corners of the portal, previously covered with a wooden layout, should be covered with self-adhesive film.
You can also make the grill yourself
You should not rush to attach the back wall of the structure to the wall in order to ensure free access to the battery. The firebox itself should be decorated by placing a metal mesh on the radiator, which will subsequently act as the bottom of the firebox. It can be filled with pebbles or firewood.
You can also make a fireplace grate yourself using a copper profile. If this is not available, you can use aluminum wire inserted into a vinyl chloride tube. The grate is attached to the fireplace using copper wire in four places. The pipes going to the radiator can be hidden by making a continuation of the podium.
Use of old furniture
This option is one of the least expensive. A sideboard or an old cabinet is suitable for this purpose. To create such a masterpiece, you should have:
- plywood sheets;
- wood sanding machine;
- jigsaw;
- screwdriver;
- acrylic paint;
- putty;
- LED strip;
- stucco;
- gypsum finishing stone.
The doors of the sideboard are removed and the lower cabinet is removed. As a result, only the upper part of the structure remains, which needs to be placed on its side.
Then you should screw 2 beams in front, and attach 2 sheets of plywood at the top and bottom. The fireplace will acquire the desired thickness. In the door of the side cabinet, which is already located at the bottom, you need to cut a hole for the “blower”. You can put firewood in it to imitate a real fireplace.
Such a decorative hearth will need a pedestal and a shelf, which can be the headboards of an old bed.
At this stage you can begin finishing. The polishing should be treated with a grinding machine to obtain a rough surface, and the walls should be coated with a primer. After drying, you need to carefully putty and level the surface, and then sand all the unevenness. Acrylic paint is applied to the body, and the corners are finished with brick or imitation stone. After applying the decor, it is necessary to mount the mantelpiece, along the perimeter of which an LED strip is glued. To simulate a flame, red or yellow tape is best. The bottom can be covered with sand, pebbles or shells. The result is an excellent fireplace in a vintage style.
Plasterboard hearth
Creating such a center is not an easy task. Creating a corner fireplace is the best solution for a small apartment, since the corner is usually the freest place, most suitable for such a structure.
To build such a structure you will need:
- metal profile (13 pcs.);
- moisture-resistant plasterboard 9.5 mm (3 sheets);
- tiles (5 meters);
- self-tapping screws (200 pcs.);
- tile grout;
- LED Strip Light;
- decorative lattice.
When calculating the size, you will need to take into account the following nuance: if you need to hide the radiator, then you should ensure unhindered access to it at any time. To anticipate a possible accident, you can put the radiator through the lower opening.
After all the calculations and drawing up a diagram of the future structure, they begin installing the frame, which can be used as a profile for the ceiling.
To ensure the lighting works, it is necessary to carry out electrical wiring, providing 3 output points: 2 on the facade and 1 above the shelf. As in the previous case, the backlight is an LED strip.
It is recommended to make the opening for the firebox with double walls, between which non-flammable insulation is laid.
This is followed by plasterboard sheathing. It is necessary to make small holes in the plasterboard sheets along the entire perimeter of the structure so as not to disturb the circulation of warm air.
Now you can start tiling. The tiles are placed on a heat-resistant adhesive designed specifically for this material. All surfaces are decorated using façade ceramic tiles.
This design will take about 1.6 m². A small electric fireplace or alcohol burner is placed in the combustion hole.
No. 2. False fireplace made of plasterboard
the cost of the finished also plays an important role . Let's start with the most affordable material, not counting cardboard, - drywall. It is a pleasure to work with it due to the fact that it is very easy to cut out parts of any configuration. And the installation of such elements is very simple. To build a medium-sized fireplace, one sheet of gypsum board is enough for you, because its dimensions are 1200x2500 mm. It is better to use a wall type, which has a thickness of 12.5 mm. To work you will need:
- gypsum board sheet or trimmings;
- profile or wooden planks;
- roulette;
- level;
- stationery knife;
- putty knife;
- finishing putty;
- primer;
- perforated corner,
- painting mesh;
- screwdriver and drywall screws.
In order to most accurately imagine how much space the fireplace you have shown in the drawing will take up, mark the installation location on the wall and transfer the external dimensions to it. Move to the opposite wall and evaluate the result. You may need to reduce or increase the size a little, or change the location. At this stage, you can still make all sorts of amendments. Only after you are completely satisfied with the dimensions and space, proceed to cutting out the parts and attaching the frame, taking into account changes, if any.
- basis For frame there may be remnants of a special profile for drywall or even wooden planks. According to the markings, screw the first elements to the wall with self-tapping screws. It is not recommended to use nails - threaded connections are much more reliable. If the size of the fireplace is quite large, for its stability and reliability, make additional mounting points on the floor. Use horizontal jumpers to give designs rigidity. In case of attaching profiles to a concrete base, first simply attach it to the wall and drill a hole together with it. After this, insert the dowel and secure it with self-tapping screws. The evenness of each element is required control the building level.
- After the frame is ready, transfer the dimensions of all the walls onto the gypsum board sheet, trying to place them as close as possible to reduce waste. For cutting, you can use either a regular stationery knife or a jigsaw. True, the latter will create a lot of dust and the cardboard at the edges may wrinkle and tear if you move too quickly. All details needed previously try on and refine the edges with sandpaper as necessary. When you are sure that all the elements fit perfectly into the frame, you can start to their consolidation.
- Be careful, tightening the screws. When installed correctly, their cap should be buried in the surface of the drywall to a depth of approximately 1 mm. This will greatly facilitate the cladding process in the future. Recommended distance between fasteners – 10-15 cm.
- After covering it is necessary hide all joints and unevenness. Finishing putty is best suited for this. The surfaces must first be primed. If the wall does not consist of a single piece, then the joints between the fragments must be cover with masking tape. All corners should be leveled using perforated corners, and then the first layer of mortar should be applied. The putty should be distributed uniform thin layer. After it has dried, the unevenness and sagging must be cleaned with sandpaper or a special metal mesh. Prime again to remove dust and apply the finishing coat of putty again.
At this stage, the construction of a false fireplace made of plasterboard is considered completed. Then there is only one small matter left to do - the decor of its surface, which we will talk about a little later.
Traditional wood-burning fireplace, features of masonry in the apartment
If you do manage to obtain permits, check out the rules you must follow!
Conservative adherents of the old style, of course, will prefer a fireplace that runs on wood, pellets or other fuel. The smell of smoke, ash and soot does not frighten them at all, nor does the need to monitor the delivery and loading of fuel. At the same time, a wood-burning fireplace in an apartment is a pleasure that is not available to everyone. According to fire safety standards, the installation of fireplaces is allowed only on the upper floors of apartment buildings or in old houses with a built-in and working chimney. Using ventilation shafts as a chimney is strictly prohibited!
Traditional wood-burning fireplace - photo
If you decide to install a wood-burning fireplace in an apartment, you need to complete the required preparatory work:
- The first step will be an installation project, which indicates the material, dimensions, weight of the fireplace, as well as the location of its connection to the chimney. If you are not short on funds, it is better to entrust this step to professionals who will calculate all the necessary parameters, including the weight of the fireplace, which should not be more than 800 kg/m2, and if this value is exceeded, they will calculate the podium area for the fireplace, redistributing the load .
- After completing the project, you will need to agree with the supervisory authorities on the redevelopment of the apartment and the reconstruction of the ceilings, taking into account the installation of a chimney and fire penetrations.
- If approval has been received, you need to decide on a fireplace finish that fits into the overall design of your apartment.
- It is also necessary to provide a place for storing firewood or other fuel, fireproof finishing of the floor near the fireplace, and also consider the need for protective fire-resistant glass covering the firebox.
Once all these issues have been resolved, you can begin building the fireplace. Below is the technology for laying a brick fireplace, which is more complex. Installing a fireplace in a metal casing is much simpler and does not require bricklaying skills.
Technology for laying a wood-burning fireplace in an apartment
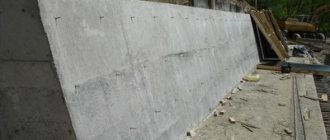
- Prepare the necessary material: 400 pieces of refractory solid bricks, clay and sand for masonry mortar, valves for a 26x13 cm fireplace pipe. The weight of such a fireplace will be about 1.5 tons, and the area taking into account the layout will be about 0.7 m2, so install a brick fireplace In the apartment you can only use a pre-made podium. Its role can be played by a reinforced screed with an area of at least 2.5 m2, made at the location where the fireplace is installed. To perform the screed, formwork is installed on the floor from boards, fastening them with self-tapping screws, reinforcing bars with a diameter of 8-10 cm are laid in the form of a grid with a pitch of 10-15 cm and filled with concrete grade M200. After the concrete has set, you can begin laying the fireplace in about 10-14 days.
- Laying begins by preparing the mortar. For laying stoves and fireplaces, use a clay-sand mixture diluted with water to form a thick dough. Experienced stove makers advise adding a handful of table salt to the solution to increase its strength, but no scientific evidence for this has been provided to date.
- The ratio of components can vary greatly depending on the composition of the clay, so it is necessary to establish it experimentally. The clay is cleaned of impurities, the sand is sifted, after which they are mixed in a small amount in a 1:1 ratio, water is added little by little and the solution is kneaded. They roll up a small tourniquet in their hands and try to roll it into a ring. If there is too much sand, the ring breaks. If you succeed in molding the ring, it is left to dry for several hours. The cracks that appeared after this on its surface indicate an excess of clay. If the ring retains its shape, then the ratio of the components is chosen correctly, and you can begin mixing a large amount of mortar and laying it.
- The masonry is made according to the order shown in the figure. Each brick is lightly tapped with a trowel handle or a rubber hammer to remove air bubbles from the top and sides. The thickness of the masonry joint is about 5-7 mm; the masonry mortar allows you to correct the masonry even an hour after completing the next row.
- Rows 1 and 3 repeat each other, as do 2 and 4. These four rows form the base of the fireplace. Rows 5 to 11 are the walls of the fireplace at the firebox level; they are laid with bandaging according to the diagram, checking each row for plumb and level. In the 12th row, the ceiling of the firebox arch from a metal corner or a concrete slab is laid on the front of the fireplace, in the 13th row on top a row of bricks is laid on it. From the 14th row, the laying of the fireplace arch and chimney begins, and if you purchased a mantelpiece made of natural stone, it’s time to install it in place. The laying of the vault is carried out according to the scheme up to the 26th row, after which it is necessary to narrow the pipe and install a valve. To do this, in the 27th row, part of the brick is moved half the width inside the vault, and in the 28th row the vault is closed by 2/3 and the first valve is installed. The 29th row forms a dressing, and in the 30th row a second bolt is placed. The pipe begins from the 31st row, and its height is regulated by the characteristics of the room and the chimney supply.
- The decoration of the fireplace depends on your imagination. Red refractory brick, laid neatly and with seams, looks solid and attractive in itself, but if you want to line the fireplace with mosaics or decorative stone, you can do so. The only condition for facing the fireplace is the use of materials with a coefficient of thermal expansion close to fireclay bricks. There are quite a lot of such materials, and the most popular is clinker tiles laid with fire-resistant glue. You can also plaster the fireplace and paint it any color.
Video - Installation of Fireplaces
Video - Laying and arranging the fireplace
Video - How to build a corner brick fireplace in a living room
No. 3. False fireplace made of foam plastic
Another quick and easy way to make a false fireplace is to use foam sheets. They can be purchased at any hardware store. It is better to buy sheets 100 mm thick. You can also use shipping foam that was left over from a purchased refrigerator, TV, washing machine or other equipment. If you are not planning to move, then you are unlikely to need it, but in terms of density, it is much superior to the finishing option. Draw a drawing and figure out whether the available amount of material is enough for you. In addition, you must have:
- adhesive solution;
- mixing container;
- putty knife;
- level;
- hacksaw;
- painting mesh:
- priming;
- finishing putty.
To avoid crumbling and uneven edges when cutting parts, use a fine hacksaw. Due to the large thickness and density, it is unlikely that it will be possible to simply cut off a fragment with a knife. It’s also not worth breaking off half-cut elements; if a crack forms, such a piece can no longer be used. We will glue the elements to the wall and to each other using a special solution for foam plastic.
It is very important to buy a mixture specifically for installing this material. Due to the very slippery surface, which is practically devoid of absorbent properties, another type of composition may simply not glue the elements together. The wall, floor and ends of the foam that will come into contact with them must first be primed and allowed to dry. Knead the mixture strictly following the instructions.
Start installation from the side parts. The solution is applied to the wall and floor, following the previously made markings. Then they lean the foam. Before the solution has set, use a level to check whether it is level and adjust position if necessary This is how all the details are gradually connected. After the frame has dried, it is necessary to plaster its surface and prepare it for subsequent decoration. This may not be necessary if you plan to glue decorative foam bricks.
The surface of the foam is very difficult to putty. To facilitate this process and ensure the required level of adhesion, it is necessary to cover the entire surface with a painting mesh. If the edges are uneven and torn, use a corner. The process of applying putty is similar to that described in the previous version. After complete drying, the false fireplace made of foam is ready for decorative cladding. If you like this manufacturing option, keep in mind that in the future the structure made from this material should not be used as a location for pots with house plants, various equipment and other heavy objects. Decorative items only.
Types of fireplaces for apartments
To install a fireplace in a wood-heated apartment, you need to meet certain requirements. This is primarily the location of your home. For the normal functioning of the device and the safety of the remaining residents of the house, the apartment where the installation of this heating system is planned should be located on the top floor, where there will be a close relationship with the chimney. To install such a structure, building permits from the fire service, district administration and written permission from the inhabitants of the lower floor apartments are required. Due to these problems, many people prefer electric or bio-fireplaces. The first type is quite easy to use. In many images of electric fireplaces you can see beautiful designs made of glass or wood, where a bright flame burns in the fireplace niche, radiating comfort. If you want to get a fireplace that is as similar in appearance as a wood-burning one, then feel free to choose an electric analogue.
Significant advantages of the design:
- There is no need to install a chimney.
- No need to stock up on wood or gas fuel.
- Excellent decorative qualities.
- The ability to provide warmth, light and fill the room with comfort.
- Low cost.
- Safety.
- Does not require special skills for installation.
Thanks to the power regulator, the operation of electric fireplaces is allowed at any time of the year.
The second most popular installation in an apartment is a bio-fireplace. This device can rightfully be considered the latest technology, since it works by receiving energy from biological fuel, which can be solid alcohol, peat, wood products, and bark. Such designs are ideal for apartment-type premises or rooms where it is not possible to install a smoke exhaust duct. When the fireplace is connected to electricity, no carbon dioxide is released, which once again argues for the absence of the need for a chimney or other ventilation system. When using a natural fuel fireplace, exactly as much combustion products are released as can be obtained by burning two to three dozen candles, so very little ash remains from the operation of the structure.
Fireplaces vary by country of production, and any company mainly focuses on producing devices for the local climate. Thus, the English manufacturer focuses on the manufacture of fireplaces that remove dampness and moisture from the room. Greek analogues have rather low utility, since the climate of this area is very dry and warm, which does not require intensive heating.
No. 4. False fireplace made of chipboard or old furniture
Another very suitable type of material for creating an artificial hearth is particle board. You can use both regular sanded chipboard and laminated chipboard. The choice is based on how the finished product will look. If you want to imitate a wooden fireplace, then, of course, it is better to give preference to chipboard. Work should begin, as in the first option, from the drawing. In this case, it is necessary not only in order to more realistically imagine the dimensions, but also so that in the place where you will purchase the chipboard sheet, you can immediately saw it into the necessary fragments. This is very convenient both in terms of easy transportation and during assembly. At home, all you have to do is fasten all the elements together using self-tapping screws.
The main difference between a false fireplace made of chipboard and a structure made of plasterboard is its mobility. It is not necessary to firmly attach it to the wall to achieve stability. By arranging a small base stand for it, you will make a completely independent structure, changing the location of which will not be difficult. And if desired, it can even be equipped with small wheels. With the proper skills, you can cut the sheet yourself. If you use laminated chipboard, you must also purchase a decorative edge that will hide the ends and make them more neat. By the way, you can also use old shelves or cabinets to make a “wooden” fireplace. And small doors can even serve as side walls. It will cost much less. The finished product must be removed from dust and sawdust and rubbed with furniture polish. A fireplace made of ordinary chipboard must be subject to further decoration.
Imitation from old furniture
Stages of rebirth of a mirror sideboard
Let's look at the stages of the most budget-friendly method for assembling a false fireplace using the example of an open glass sideboard with a mirrored back wall:
- The cabinet has drawers at the bottom of the body. We remove the containers, along with the glass partitions
- We cover the front with a sheet of plywood and cut out a rectangular hole in it for the future firebox. The height of its location is determined arbitrarily, at will
- In the lower part of the front we cut out a semicircular hole for the blower. You can neatly place logs there
- For the pedestal and mantelpiece, find old headboards. On such a podium the structure will stand stably and reliably
- The portal is ready, now we need to start finishing it
- Using a sander, go over the polished walls to make them rough. This way the putty will fit better on them
- Apply a layer of primer, and after drying, carefully fill the fireplace
- When the plaster has dried, sand down any uneven areas.
- Apply acrylic paint
- Finish with brick, stone, glue gypsum elements
- Cover the bottom of the firebox with LED strip around the perimeter
- Place stones, shells, firewood inside
- If you turn on the backlight, the contents of the firebox will be displayed in the red-yellow flames in the rear wall mirror
Choose warm colors, maybe even red. She perfectly imitates fire
No. 5. Polyurethane false fireplace
This modern material has won the recognition of many designers and ordinary consumers. This is not surprising, because in addition to its attractive appearance, it can bend and take on various shapes. You can easily find in stores or on the Internet many offers for the sale of polyurethane portals Moreover, their variety will allow you not only to choose the required size, but also the style of execution. Models are presented both in the form of strict, straight lines, and with a richer finish that imitates stucco elements and even wood carvings.
In general, you won’t have any difficulty making a choice.
Installing it is also not difficult. You just need to glue it to the wall using a special adhesive solution in the desired location. Next, you can paint the surface of the portal or add special luxury to individual elements by applying gold, bronze or silver powder.
In addition to a solid portal, you can imitate it using various moldings or semi-columns made of the same material, as if marking the hearth area, but not so clearly. Of course, this option is less realistic, but in some interiors it will be quite appropriate. Especially in rooms with limited free space that you want to diversify a little.
No. 6. False fireplace made of brick
This option allows you to achieve the most realistic appearance . But at the same time, it requires much more effort and costs than in previous options. Facing bricks are used for masonry. The only nuance of this method is the weight of the finished structure, especially if it has considerable dimensions. Therefore, before starting work, assess the condition of your floors. If you are sure that they can easily withstand a considerable load, feel free to get down to business. You will need:
- N pieces of bricks;
- mixture for brickwork;
- Master OK;
- primer;
- container for mixing the solution;
- drill whisk.
To solve the main problem , how many bricks are needed, you need a drawing with all dimensions. Knowing the size of one brick, you can easily navigate the total quantity in the store. In any case, the seller will always help you. The laying will not be difficult.
The main thing is to check the straightness of each row.
To give yourself a guideline, mark the floor and wall. This will help avoid distortions. Mix the solution strictly following the instructions and maintain the agreed proportions. Otherwise, your masonry may “crawl” and all your work will go down the drain. To achieve a more homogeneous mixture, use a whisk-style drill attachment. Do not spread the solution in a thin layer, but do not apply it in heaps either. It is necessary to maintain the same thickness, distributing the mixture evenly. A little advice - do not lay it on the entire surface of the brick, leave about 1 cm free on each edge.
When you lay the brick on top, you need to knock it a little so that it sticks well. In this case, the solution will definitely protrude and stain the bottom row. If you follow our advice, you will be able to avoid this, and the seams will turn out smooth and neat. Do not forget that the finished mixture has the necessary properties only for a certain period of time. Usually it is 60-120 minutes, read details . Therefore, you should not be distracted while working. Checkerboard laying looks most impressive, but in this case you cannot avoid the need for cutting. A grinder and a diamond wheel will help you cope with this. Don't forget about personal protective equipment. A stone fireplace will need to be covered with a lid on top. The finished brick portal does not require external finishing.
Finishing a false fireplace
Now it’s time for the most creative stage, which consists of giving the frame the desired appearance. There are a great many options for covering a fireplace. In order for the choice to be successful, it is necessary to remember that a real fireplace consists of four main elements - a portal, a lid, a firebox and a back wall. Let's consider ways to finish each element separately.
Decorating the portal
Depending on the style of the room, you can use the following techniques:
- The easiest way is painting. The advantage of this method lies in its low cost, speed of execution and the ability to choose absolutely any shade.
- The most realistic method is cladding with decorative sandstone, gypsum or foam bricks. They are glued to a special mixture. To maintain uniform seams, use plastic crosses for laying tiles. The larger the portal, the wider they should be. After installation, the bricks can be painted in the desired color.
- Wooden panels will also be very appropriate for decorating false fireplaces in a classic style. To protect the surface, it is first opened with varnish.
- Decorative elements made of gypsum or polyurethane stucco look great on plain, smooth portals. They immediately become elegant and presentable.
- You can use decorative mosaic or even tiled tiles small sizes. You can lay out a specific pattern. In principle, any facing materials can be used. Even wallpaper it in the color of the wall and create the feeling that it was squeezed out of the wall. If only the design style did not contradict the interior rooms.
What to use for lining the lid
Sturdy structures, such as plasterboard or real brick:
- Can be covered with a piece of real wood, opened with varnish or a slab of artificial stone
- You can use a piece of plywood or chipboard as a base and line it with porcelain stoneware.
More fragile structures should not be heavily loaded.
- You can decorate the lid with small pebbles. To do this, apply a thin layer of adhesive mixture to a piece of plywood and drown the pebbles in it. After drying, open with varnish.
- There are remnants of laminate after renovation - great! Feel free to use it for the final element of the design.
- You can use the same material as for constructing a false fireplace. To do this, simply paint the lid in a color or highlight it with a contrasting shade.
What to place in the firebox and how to decorate the back wall
If you decide to use an electric fireplace, then the depth of the niche for it should be at least 40 cm and have an outlet. In all other cases, a depth of 20 cm is sufficient. The following elements can be placed the firebox
- Candles that will help create a very warm atmosphere and perfectly imitate the lights of a real flame. For a more harmonious composition, use candles of different heights and diameters.
- Real logs stacked on top of each other will create the feeling that you are about to light a real fire.
- Large river pebbles mixed with multi-colored decorative stones.
- You can place a diode strip with a yellow spectrum of light on the floor, cover it with plexiglass or regular glass, and sprinkle the same pebbles or glass balls on top. The effect of a slight glow will be created, like from hot coals.
- anything at all , but leave this space free by simply placing a decorative wrought-iron grille in front of the fireplace.
- You can even put vases with flowers, various figurines or small pillows.
The back wall can be:
- A continuation of the portal and look the same;
- Lined with decorative bricks, which will give it more realism;
- Have a drawing that depicts fire;
- Covered with mirror panels or a piece of real mirrors This technique will help visually deepen the niche.
Types of decorative fireplaces
A decorative fireplace, although an imitation, can very reliably convey the play of a “living” flame, warmth, crackling and the smell of burning logs. Electronic versions of hearths with 3D technology are equipped with these functions. Simpler, but no less effective, are symbolic images of fire, candles, garlands or strips of light silk swaying in the rising air currents.
The fireplace portal can be purchased ready-made or made independently. An electrical appliance, a bioburner or any imitation of fire is installed in the “firebox”. A decorative hearth can decorate interiors of different styles; you just need to choose the right option.
Types of structures
A decorative fireplace for an apartment, house or cottage is placed in the living room, bedroom or kitchen. In the decor of the room, he occupies a dominant position. It will be good if this is a recreation area from where it is comfortable to watch the fire. By the way, just recently we wrote about how to properly glue wallpaper and the post received a huge number of views, take note, it may be useful to you.
There are no requirements for choosing a place for a “fake” fireplace, unlike a “real” one, where combustion products must be removed and fire safety must be ensured. The main thing is that the decorative object fits into the space, does not create interference and is in harmony with the interior of the room.
When placing a decorative portal, three design options are distinguished:
- wall - when located along the wall;
- corner - when installing a false fireplace in the corner of the room;
- wall-mounted - in small rooms the compact structure is mounted in a niche or hanging on the wall;
- island - the structure is installed on the floor, as a rule, these are portable devices.
It is recommended to place the fireplace perpendicular to the windows so that daylight does not reduce the visual effect of simulating fire. Lighting devices with soft diffused light are used for the same purpose.
A decorative corner false fireplace, according to the Chinese teachings of Feng Shui, cleanses the room of negative aura and contributes to the formation of harmony in the house. Even if electricity, rather than open fire, is used, the imitation brings energetic and aesthetic benefits.
If the mantel is intended to hold multimedia devices, the frame and countertop must be strong enough to support the weight of the equipment. The width and depth of the structure are selected taking into account the dimensions of the built-in fireplace and electrical appliances placed on the portal.
Design
To prevent the fireplace from looking like an alien phenomenon, the dimensions, geometry and cladding option are selected taking into account the direction in the room’s design style.
To finish the frame in a high-tech style, metal or mirror elements, plastic panels or concrete tiles are appropriate. A tabletop with a broken glass effect and decorative lighting emphasize the technical direction of the decor.
To decorate a decorative fireplace with your own hands in country style, you will need natural materials - wood, stone, plaster. Forged gratings, rough texture, untreated surfaces are mandatory attributes of this direction.
Classic is another style where fireplaces have a special place in the design of rooms. A massive portal with pilasters, a tabletop with a noble patina, and rich stucco molding are fully consistent with the classical trend in interior design.
To decorate the area next to the fireplace, use natural or artificial firewood, a stand with tools - a poker, a broom, a dustpan and tongs.
Ready-made portals are certainly convenient - they can be quickly assembled and installed, but a personally assembled and lined fireplace is a source of pride for the owner.
Important. In addition to the embodiment of creativity and imagination, making your own will help you save a large amount of money.
Materials
Portals for fireplaces are a frame covered with plywood, plasterboard or other sheet material. For the base use:
- wooden blocks 40x40 mm;
- boards;
- metal profiles.
The frame is sheathed:
- drywall;
- plywood;
- Fiberboard;
- MDF;
- DSP;
- OSB;
- plastic;
- cardboard.
The elements are fastened together with self-tapping screws and fixed to the wall. The cardboard parts are glued together. This option is considered as temporary, for creating thematic decorations. It is possible to use old furniture.
The cladding is made from finishing materials:
- decorative stone tiles;
- wood;
- plastic panels;
- polyurethane parts;
- artistic plaster.
The firebox is laid out from tiles, and mirrors are installed on the back wall, visually increasing its volume.
The surfaces are painted, covered with patina, and given an aged appearance.
If the load-bearing capacity of the ceiling allows, you can build a decorative fireplace made of clay bricks or natural stone. But such structures are rarely used in apartments due to the large weight of the material and the “dirty” work associated with mixing the solution.
Burner types
A false fireplace can act as a purely decorative object or serve as a heater. Depending on the purpose, burners are used in structures:
- symbolic - if the hearth is intended only for decoration;
- electric - with additional “live” flame effects;
- on combustible fuel - so-called “bioburners” on specially treated ethanol.
In symbolic hearths, various images of fire are used, candles, illuminated coals or logs - something that does not burn, but conveys the image of a flame.
A cold glow can be created using a steam generator, a fan and an LED lamp. The mist rising from the bottom of the container creates the appearance of a bright, vibrating fire.
The effect of swaying flames occurs in installations assembled from scraps of silk, a fan and halogen lamps. Salt lamps, Christmas tree decorations, tinsel, electric garlands - all this will help to symbolically convey the magical play of fire.
Electric hearths are made in the form of a firebox with decorative firewood, imitation flames and additional heating functions. For making your own fireplace, replaceable electric burners with different sizes are suitable.
The realism of fiery glare in electric fireplaces is created using:
- strips of light fabric;
- LCD monitor;
- reflectors;
- water vapor and backlight.
The latest generation devices are equipped with sound, fragrance, air purifiers and humidifiers.
Bioburners create real fire; liquid ethanol with additives is used for fuel. They tint the blue flame, giving it yellow-orange hues. They are the ones that people associate with a wood-burning fireplace, and not a gas burner.
When burning there are no harmful substances, water is released in the form of steam and carbon dioxide. The fireplace using environmentally friendly fuel is protected by heat-resistant glass. If you purchase a bioburner separately, you can make a false fireplace yourself.
Important. When using it, you must observe safety precautions, since the device still contains a real open fire.
False fireplace in the living room interior
Due to the fact that a false fireplace is absolutely safe from a fire safety point of view, it can be placed in any room. Even in the children's room. The exception is structures equipped with candles or electrical elements. If you really want and have space, you can install a fireplace in the dining room. But many are inclined to believe that the living room is still the most appropriate room for this. Just imagine how you sit in the evening, after a hard day at work, in your favorite chair with a cup of delicious coffee or a glass of wine, and enjoy the view of a burning fire. And all this in an ordinary apartment...
A feeling of calm, harmony and peace immediately comes.
Even without simulating fire, this element will create an indescribable feeling of comfort that will be appreciated by all your guests and family members.
Your living room will become their favorite place to meet and celebrate, because it is in this room that all friendly gatherings and warm family evenings are held. The article was written for the site.
Tags: fireplace