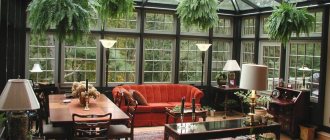
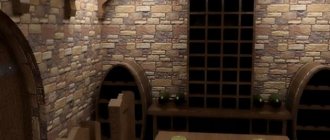
Wooden lining of the walls with clapboard adds stateliness to the room and classic elegance. But, rooms where the sun is present most of the day (southern) are not advisable to be decorated with clapboard. When exposed to ultraviolet light, it will quickly lose its color. After a few years, dark spots will begin to appear.
Walls are often lined with clapboard, especially in dachas and apartment loggias. This gives comfort, incredible coziness.
Classifying the material
When purchasing lining, the quality, cost of the material, and the room where the walls will be finished with lining will be taken into account. There are many options.
Natural lining is made from the following wood species:
- Conifers;
- Deciduous.
For example, hardwood panels are suitable for saunas and baths. Since they do not emit resin, like conifers, at high temperatures and significant temperature changes. Coniferous walls will not look neat and will be sticky. It is also easy to get burned by tar discharge.
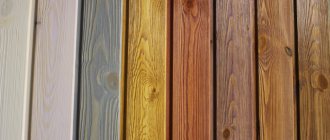
Among conifers, only cedar from Siberia is a pleasant exception. Its wood is of a high class. The cost of such panels is decent. But the quality and durability will justify all the costs. Trees such as cedar, larch, pine, eucalyptus, and spruce are considered soft. Below is the wall decoration with clapboard in the photo, which will help you choose the design that you like best.
The most persistent are deciduous (ash, aspen, linden, alder). Linden is recognized as the best for baths. When the air temperature rises, it begins to release a slight odor, which has a positive effect on the human nervous system. According to quality, wood is divided into classes: premium/extra, a, b, c.
Classification by variety
The classification of lining directly depends on quality indicators, according to which the material is usually divided into 4 grades, which, in turn, determines the price of the product.
The appearance of one variety or another clearly shows the differences
In this case, it is not worth saving, but buying too expensive lining may turn out to be a pointless waste of money. There are 4 types of lining most often found on sale: “Extra”, followed by grades “A”, “B” and “C”.
Finishing with clapboard inside the dacha is an excellent design option.
It is difficult to imagine a type of wood from which it would be impossible to make lining, and the quality of the finishing material will directly depend on the type used.
The following types of wood are usually used in the Russian construction market:
- Pine;
- Spruce;
- Birch;
- Larch;
- Oak;
- Ash and other options.
However, when approaching the choice of the type of wood from which the lining is made, one point should be taken into account - all of the above types of wood are suitable for interior finishing with lining of a house.
Important! It is worth taking into account some physical characteristics of the species, for example, coniferous varieties are not suitable for decorating a bathhouse, since at elevated temperatures the resin will begin to release from this material.
Types of installation
Naturally, before you start covering the walls with wooden lining with your own hands - an example in the video, you need to decide on its type and direction. Be it horizontal, vertical, diagonal, herringbone, diamond or brick laying, mixed.
Horizontal installation is considered a classic (in Russia, for sure). Has a positive effect on expanding room space. A small disadvantage that can be avoided (during installation, the grooves are directed downwards) is dust and moisture that collect at the joints of the boards. Following this recommendation, start laying from the top.
Vertical placement is the most popular among Finns. It makes the ceilings visually higher. This effect is especially important for low rooms. Installation of wall trim with clapboards begins from the most difficult angle.
Diagonal installation (and mixed) have differences in direction and aesthetic appearance. Installation is much more complicated than previous options. The interior, decorated with wood of different types and shades, looks especially bright and unusual.
It is easier to install wooden panels on walls horizontally with belts or vertically.
The vertical version of wall covering with clapboard is simply necessary for rooms with high humidity, places where frequent condensation is possible (bathhouse, kitchen, etc.). Because the horizontal method will not protect against excess moisture. The type of installation, when installing boards vertically, affects whether the tongue and groove will be cut, in what place, and by how much.
When mounted horizontally, the final result looks very attractive. Here the lining is installed, directing the ridges upward to protect the grooves from the accumulation of water. This will prevent the occurrence of rotting, microbes, and fungi in the future. When installing the first bottom board, the edge of its groove is cut off. This removes the pocket that will collect moisture.
The diagonal option for placing lining is used less often. This happens more difficultly, with a large amount of material waste. From the point of view of beauty, it is practically no different from previous installation methods. This DIY clapboard wall decoration will add zest to the room.
There are shaped styling: herringbone - a little difficult, but possible. A vertical sheathing is required, on which template-cut fragments of material will be mounted.
Wall cladding with diamond-shaped clapboard is more complex. The sheathing is made in the form of a framed cross. The bars are fastened diagonally in its quadrants. The labor spent on installing diamond-shaped lining is worth it. The result looks incredibly stylish and expensive.
Video “Installation of wooden lining with your own hands”
The video shows the secrets of fastening wooden lining, what screws to use, how to install the frame and secure the lining to it.
We recommend that you read
DIY wall decoration with PVC panels
Do-it-yourself insulation of bathhouse walls
Features of leveling walls with your own hands
How does installation work?
Everything happens in order.
The sheathing is being done. Without it, channels appear where moisture collects, dampness appears in the room, fungus may develop, and the wall will even begin to rot. Therefore, they carry out repair work according to all the rules. Even if the walls of the house are perfectly smooth and are themselves wooden, it is still necessary to install sheathing before covering the wall with clapboard.
The clapboard wall decoration is installed with mandatory channels for ventilation (they are specially cut out in the boards). No way without lathing. It should be made of wood, like the panels. This is important, because the material acts as a damper. Particularly important when using min. materials on the walls. The same function is supported by gaps (deformation) between the wall itself and the boards. Connectors range from 5 mm and larger.
For example, there are often cases where wooden boards are laid on steel sheathing (as when installing drywall). After a short time, the material begins to expand and cracks appear. But, having removed the plinths several years after installation, it is discovered that the seemingly smooth surface of the wooden sheathing has only slightly moved around the edges. It doesn’t matter what type of sheathing will be, the basis for its installation is the same for everyone: the sheathing bars must be positioned strictly perpendicular to the boards.
Don’t forget about the bars that are located at the edges:
- The ends of the boards should not hang;
- When installing the lining diagonally, its sheathing must have a frame (solid);
- The thickness of the bars starts from 20 mm, width - from 30 mm;
- The size of the installation step of the bars is at least 4 boards wide;
- From the ends, the fastening points are placed at a distance starting from 50 mm.
How to cover a “block house” with decorative clapboard?
Particular attention should be paid to the decoration for the house - “block house” . This finish is suitable for the living room, kitchen, hallway, and will be an excellent solution for the attic. An important advantage is that the “block house” technique allows the walls to breathe and create a pleasant microclimate for the inhabitants of the home. This type of fastening will create improved sound insulation compared to the above methods.
Read more about the “block house” in our article.
Before performing work, the calculation of fittings and quantity of material is carried out. But an even more important process is to let the freshly purchased material sit without packaging for about three days in the room where it will be installed.
Preparing the walls
The panels are installed on dry and level walls, so the surface should not contain defects. The walls must be waterproofed using a special film or deep impregnation.
Without this procedure, wooden panels may not withstand the increased moisture content, and the work will have to be redone.
Areas with fungal infections on the wall are treated with an antiseptic. It is better to treat all the walls with it. After thoroughly impregnating the walls, they will become resistant to the negative effects of fire and mold. Impregnation with a water-repellent composition is required before starting such work.
Find out how to level walls with plaster from our article.
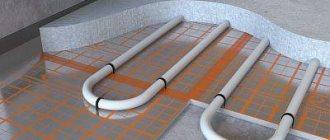
If desired, additional materials can be installed for thermal and sound insulating construction. Expanded polystyrene or mineral boards are installed as sound insulation.
A vapor barrier film can be purchased when purchasing facing material. The work begins with covering the walls with film, which in the future will serve as vapor insulation.
Frame making
The production of the frame occurs in the following stages:
- The selected vapor barrier material is attached to the wall with an overlap at a distance of 10-15 cm .
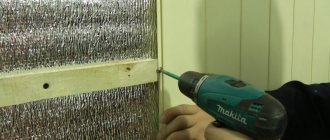
- Lathing bars are attached on top of the waterproofing material .
- Thermal insulating material is attached to the sheathing, and a waterproofing film is laid on top of it (see photo). The materials are secured with a stapler and staples.
- Another layer of sheathing is attached to the main frame, this time vertical.
Staples and a stapler will help create the desired fixation.
The sheathing will be more reliable if installed horizontally. The timber is fixed to the base using nails or self-tapping screws.
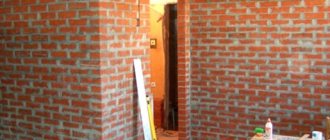
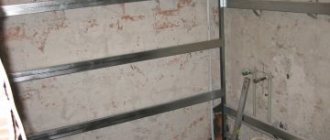
If the wall consists of brick blocks, fixation is carried out with frame dowels, and holes for fastening are made in the wall surface.
The second lathing is checked for level; it is on it that the blockhouse panels will be installed. To give the panels a smooth and finished look, a sheathing is created, since the panels are attached to it.
Wooden panels are heavy, so for high-quality sheathing you will need to make a reliable frame.
For a frame using the block house technique, a wooden base is suitable. The frame must be made of slats, the distance between which does not exceed 65 cm .
Before installing the frame, you need to mark out the places where sockets, switches and other electronics will be located. These marks are needed to make cuts in the cladding before installation.
The bars can be secured to the wall using either nails or mounting strips. After completing the frame manufacturing work, you can begin finishing it in the block house style with your own hands.
See the video for installation of the sheathing:
Panel installation
For accurate measurements, a plumb line, square and level are used. To calculate how much board will be used, you need to make simple calculations: divide the total area of the room by the area of one board.
By calculating the area of one board, it is easy to find out how much material will be needed to cover the entire surface. If there are not enough panels, additional clamps to eliminate the problem.
Fastening the wooden panels begins on the pre-installed sheathing. The initial strip is installed from below, with an indentation of up to 1 cm , this procedure is done to actively ventilate the walls and avoid further deformation of the material. A similar indentation is made at the top of the wall.
The block house is installed only in the horizontal direction. Sometimes craftsmen choose a vertical installation, but this method has a lot of disadvantages.
Fastening to the frame is carried out using self-tapping screws at an angle of 30-45 degrees. A hole is made on the surface of the panel with a thin drill, and then a self-tapping screw is screwed into it.
The screw head should not go deeper than 3 mm.
Next, the panels are gradually installed from bottom to top. The tenon should point upward when installing the panel. The wood is connected to each other using tenons and grooves. If desired, corner joints are fastened with corners.
Once the installation of the panels is complete, it is recommended to install skirting boards at the bottom and top of the walls. When the stage of fixing the main part of the sheathing is completed, you should disguise the screws to make the walls look beautiful.
There are several ways to hide screw heads:
- Using material left over from work.
- You can use “wood paste” made from PVA glue and sawdust.
- Special plugs, which can be bought at a hardware store, can easily cover the unevenness.
Plugs are formed from the scraps and secured in the recesses with PVA glue. Uneven places are smoothed with sandpaper.
The thick composition is poured into the holes. The disadvantage of this method is the possible discrepancy between the color of the composition and the wood.
Attached using PVA glue .
For detailed installation of the panels, watch the video:
Decoration of corners
Decorating corners using the block house technique makes it difficult to do it yourself.
You can purchase “boats” in advance for finishing internal corners and elements specifically designed for external corners. The finished baseboards will be in close contact with the block house only at the top point, as a result of which the cladding will have unclosed gaps, and this is unacceptable.
It is much more convenient to use planed timber measuring 5x5 . Its installation is carried out before the sheathing begins. The block house is attached to the timber and the finish will look much smoother and more professional. This method is effective for interior and exterior corners.
The final stage is grinding the surface, but such work should be done with caution. One awkward move can ruin the structure of the board.
How to carefully make corners, watch this video:
Some laying rules
In order not to spoil the finished repair, when installing the lining, follow some rules:
- Do not install lathing directly on a damp, porous wall;
- The wall must be properly prepared;
- The best option is cement plastering;
- If the room is dry, there are smooth walls plastered with concrete - the bars are secured with EC staples (which are used for drywall). These are plates that have been perforated.
To ensure that everything is done masterfully, the bars are chosen as smooth as possible. The staples are attached to the walls, the middle block is installed (placed first), along the edges of which the staples are bent, and the ends of the blocks are secured. Next comes the bending of the intermediate brackets, the block is mounted completely (without deformations). Subsequent bars are leveled with the middle one and placed evenly along this plane.
The surest preparatory method for walls under lining is to carry out a vapor barrier. For some rooms this is extremely necessary (kitchen, bathhouse, hallway, etc.).
Decorating walls with clapboard with your own hands requires care.
The wall must be completely leveled, insulation must be placed on top, with the foil side facing out. The insulating material (on special tape) is placed with an overlap (15 cm). Next comes the fastening of plywood pads (of the required thickness, at least 8 mm) to the wall under the bars. Then sheathing beams are attached to them.
This results in a well-ventilated spatial gap (between the lining and the insulating material).
The basic principle of laying lining is to start work from the most difficult small places; finish in large, simple sections.
When the wall is already covered with clapboard, the baseboards are attached. Covering walls with clapboard yourself helps you save money and find interesting solutions. An analogy with laminate flooring is appropriate here.
Preparing the lining before covering
Of course, I prefer to work with eurolining, because the plastic material does not require preliminary preparation. But if you purchased wood for clapboard wall cladding, then it should be pre-treated. The pine coating must first be degreased and resin stains removed with a 25% acetone solution. Then wipe with a damp, warm cloth and leave to dry.
To obtain an even tone, the material is bleached with hydrogen peroxide and ammonia. Dilute in proportions 1:10, 20% hydrogen peroxide solution and 10% ammonia solution, spread over the surface and after 5 minutes wipe with a rag and warm water. Then leave until completely dry. An almost universal composition for bleaching lining is hydrogen peroxide; it is suitable for any type of wood.
To provide excellent protection against mold and insects, use a bioprotective solution and let the product breathe indoors so that it adapts to the microclimate. Be sure to varnish the product before installing the material. I usually use semi-matte or clear varnishes, since the glossy composition gives off excessive shine. After applying the coating, I make sure to sand the material with fine-grained sandpaper, then repeat the procedure.
When I have prepared the material, I proceed to prepare the cladding of the walls, that is, I attach the sheathing to the walls, which will hold the material. I usually don’t bother and buy ready-made slats, which I advise you to do as well.
Fasten the slats firmly to the wall, at a distance of about 60 cm, while making sure that there is a distance between the wall and the lining so that it lasts a long time and is ventilated.
Install the sheathing horizontally if you will attach the lining vertically and vice versa. It is advisable to impregnate the sheathing with an antifungal primer mixture to avoid the appearance of mold. Use a level to level the material. Also at this stage, insulation and soundproof material are installed. After completing the preparation, you can begin fastening.
Advantages of the material
Lining made of natural wood has a number of advantages that are known to many. Let's look at the main ones:
- Environmentally friendly finishing material;
- There are no emissions of substances that negatively affect humans;
- Allowed for use in children's rooms and rooms where allergy sufferers live;
- Duration of operation (if you periodically carry out special processing of wood, it is maintained in ideal, new condition);
- Wood paneling does not burst or scratch;
- Not afraid of damage (minor mechanical);
- It is easy to realize any design fantasy (due to different wood species, their coating with varnish and paint);
- Withstands temperature fluctuations (certain types of wood);
- It is moisture resistant;
- Modern types of panels have high fire safety;
- Withstands significant influences both indoors and outdoors (one of the main differences from plastic lining).
Interior decoration of the bath
Interior decoration of a bathhouse with clapboards
A bathhouse is usually built from pine logs. Coniferous wood is not suitable for interior decoration of the steam room. When it heats up, it releases resin. With a small amount, the aroma of the Christmas tree calms and puts you in the mood for relaxation. The sauna creates an atmosphere of strong smell and heavy air. It is better to line the walls in the steam room with alder, which emits a healing aroma, or birch. The peculiarity of the bathhouse lining is the use of wooden nails. The metal has high thermal conductivity and will leave burns on the body upon contact.
Tricks, nuances
Once the material is purchased and delivered to your home, it needs to be adapted to the future location. Before finishing the walls with clapboard (example in the photo), the panels are dried for 1-2 weeks indoors or outdoors.
If the material was located outside, it will have to be left for another day or two in the room where repairs will be made to decorate the walls. This manipulation will avoid possible deformation of the boards on the wall.
Then, no longer worrying about possible unpleasant consequences, they proceed directly to work.
Craftsmen prefer to fasten the boards to the sheathing with special clips (mounting):
- Drilling;
- Starters;
- Kleimers.
Claimers are the most productive. Installing one mounting point takes a couple of seconds. They do not spoil the wooden lining.
Required protection:
- Grinding;
- Primer;
- Coating with acrylic varnish (colorless, tinted).
The varnish will not only protect against damage and radiation, but will also add fire resistance to the material.
Step-by-step finishing with clapboard
If you want to learn in detail how to sheathe the inside of a house with clapboards, you should study the step-by-step algorithm of the work process. It is not difficult to carry out this procedure with your own hands; a special video and instructions will help you, which will tell you step by step how to carry out wall cladding.
Vertical clapboard cladding inside the house
The initial stage is the choice of the method of lining arrangement, horizontal or vertical. The choice in this case should be dictated by the size of the room and the taste of the owner. For a vertical arrangement, the slatted frame is located horizontally, the opposite arrangement is for horizontal laying of the lining.
The frame for the vertical arrangement of panels is mounted on an insulating substrate
You must first prepare the slats (or buy them); you can cut boards for them, the width of which is from 25 to 30 mm. A prerequisite is that the material must be dry.
Frame installation
Arrangement of the frame under the panels
The main condition for installing the frame is to align it in the same plane. The first rail for horizontal installation should be installed strictly vertically, using a plumb line. The rail can be secured using self-tapping screws or regular nails.
Using a plumb line when installing slats
We move to the opposite corner, where the installation of a similar rail is required; several nylon threads are pulled between them to create a single plane. Then, along these threads, all frame elements are installed.
Tip: The distance between the slats is strictly maintained in the range of 50 to 60 centimeters; the lathing after installation requires treatment with an antiseptic.
Cladding the inside of the house with clapboards - fastening the ceiling elements
Fastening the lining
The main rule for placing lining of horizontal type of masonry is that the groove should be located downwards and the tenon upwards. This will prevent moisture from entering the groove if it forms on the walls. After all, the accumulation of moisture in the grooves will lead to loss of appearance of the cladding, as well as to the formation of mold, which is hazardous to health.
One of the reliable options for attaching panels to the sheathing
The lining can be assembled both from the ceiling and from below, from the floor; this moment is dictated solely by the desire of the owner. However, it is advisable to leave the lining in the room where it will be installed for a day so that the wood can adapt to future conditions.
You can attach the slats to the frame using nails driven into the groove part; here you should definitely use a tool such as a hammer (photo), or use a large nail.
The hammer allows you to hammer in a nail without damaging the surface of the panel
The rear wall of the groove requires special attention; it is important that it does not crack during installation. Moreover, a small gap (1-2 mm) is allowed between the elements; this will allow you to adjust the shape of the lining in case of deformation of the wood due to high humidity in the room.
The final stage is the installation of skirting boards, floor and ceiling, if required by the project. Sometimes it happens that the slats do not reach the end of the wall along their length; in this case, you can resort to assembling the lining, and use decorative strips for the joints.
In the photo there is a ceiling plinth hiding all the irregularities
Varnish and paint selection
Means to maintain the excellent appearance of the panels for a long time are used in the initial stages, before covering. And walls covered with natural clapboard, an example in the photo below, must be treated upon completion with additional colorful materials.
In addition to them, to give a spectacular finish to the lining laying, at the end of the repair, the wood is coated with tint compounds.
It is based on a couple of components that greatly influence the appearance of the finish. Varnish happens:
- Alkyd;
- Acrylic;
- With a water base;
- Polyurethane;
- Mixed (acrylic with polyurethane).
Alkyd takes a long time to dry. For faster drying, use special. solutions. This varnish will give the room a sharp, not very pleasant smell, which is difficult to dissipate. But these little things can be tolerated, because the alkyd will give the boards reliable protection from moisture.
Acrylic – quick-drying. Used inside and outside buildings. Moisture-resistant, tolerates high temperatures well. The presence of many shades and colors is attractive. All surfaces treated with this varnish can be washed without problems, dirt and dust can be easily removed from them.
Water-based varnish is the safest and most environmentally friendly among all products. Dries quickly, odorless. Characterized by the absence of chemicals. solvents. There are water- and dirt-repellent varnishes. Caring for materials coated with this varnish is very simple. The cost is quite high.
Polyurethane. The most versatile one today. It will prevent the wood from turning yellow. Shades are offered in brightly saturated, semi-transparent shades. The product is presented for every taste. Do not forget about the primer of the required tone, especially if the choice fell on a light varnish color.
An interesting, practical, often used when covering walls with boards yourself is impregnation of wood with oil. Thus, the panels acquire an unobtrusively shiny, beautiful tone.
For our climate, in order for the board to look perfect for more than 10 years, it must be treated with acrylic varnish in two layers.
Advantages
You can praise wooden lining endlessly. This is an environmentally friendly material.
It does not emit any harmful substances, so it can even be used in rooms where children or people with allergies live.
This is a durable material. When properly processed over time, it does not lose its original appearance. It will not be scratched or burst.
Various tree species and a variety of paints and varnishes will allow you to create a finish of any color.
Cladding with clapboard, unlike plastic panels, is not so exposed to harsh external and internal factors. She is not afraid of minor mechanical damage. It will retain its original appearance.
How to attach the lining
How to cover a room with clapboard?
The video shows what methods of fastening the material exist. After viewing it, everyone can choose the most convenient and familiar view for fixing it. Lining is planks with a recess on one side and a tenon on the other, which is inserted into the recess of the next element during installation.
Fasteners are:
- External.
- Secret.
Fixation can be done:
- With nails.
- Decorative screws.
- Stapling staples.
- Kleimers.
Types of lining fastening
Advice: With any method of fastening, you must try to do everything carefully so as not to damage the lining or split the wood, this can ruin the appearance of the surface. In this case, the head of the nail is hammered completely into the wood with a hammer, but you need to be careful not to chip the groove, this can weaken the fastener.
Methods of fixing the material:
- With the hidden method of fixing elements, the lining is mounted to the sheathing on the side where the groove meets the tenon. If it is allowed for the fasteners to be visible, the board is nailed with nails with small heads, randomly scattered throughout the cladding. This quick and easy method can be used when covering utility rooms.
- Usually a more complex but accurate method is used: nails are nailed into existing grooves on the lining. In this case, the fastening will be practically invisible, and the method itself is called hidden installation.
- High-quality fastening of the material to the sheathing is carried out with special devices, which are metal clamps for lining. The grips are made from galvanized sheet metal and come in different shapes and sizes. Their choice depends on the type of material and the thickness of its grooves. On the one hand, the parts are cut with teeth into grooves on the board, on the other hand, they are attached to the sheathing. Clasps for lining are usually purchased with a set of nails.
- Covering a room with clapboard is done using staplers using a special gun. A rigid bracket punches a groove in the lining and secures it to the sheathing.
- A reliable fastening method is the use of decorative screws. Even a beginner can do this carefully.
Tip: Before constructing the supporting structure, it is necessary to determine the direction of the cladding. This is due to the fact that the sheathing is constructed perpendicular to the sheathing of the material.
Important rules for covering the surfaces of house walls with clapboard
- You need to decide in advance on the direction in which the trim will be installed: this primarily determines how the frame will be arranged - horizontally or vertically. The material is attached perpendicular to the sheathing. Horizontal clapboard cladding will help you significantly expand the room visually, while vertical cladding will help make the ceilings appear visually higher.
- For horizontal cladding, start fastening the material from the ceilings to the floor; it is advisable to direct the grooves of the boards downwards. In this case, debris, bullets and dirt cannot get into the grooves, and the absence of such negative factors will significantly extend the service life of the casing.
- When covering interior walls vertically, start installation from the corner. Clamps are installed in the grooves on the back walls of the boards, which must be nailed to the frame rail. The first board is fixed in the corner with nails, and the fastening points will subsequently be covered with decorative slats. Further, all work is carried out in the same way as with horizontal fastening: the boards are fixed on top of each other, lining up into a single, even sheet.
- The installation is completed in the same way as it began: the last board must be nailed down, and the fastening points must be covered with decorative strips. With the help of such strips, as well as decorative corners and baseboards, all joints and corners - internal and external - must be covered. This will make the wall paneling complete.
The video clearly shows the entire installation technology:
Decorating a wooden or any other house with clapboard is a wonderful way to make interiors spectacular and fill them with an extraordinary feeling of natural warmth and comfort. A house built of stone or brick has a “cold” beauty - and such decoration can completely change the atmosphere. Give preference to high-quality natural materials for decorating walls inside the house - and enjoy the comfort and beauty of your country home!
List of required tools and materials
When starting finishing, prepare the necessary tools and materials in advance.
This will allow you to save time, since you will not be distracted by searching during installation. Here's what we'll need:
- Lining;
- Wooden beams or metal profiles to create sheathing;
- Clamps for fastening;
- Stapler or hammer;
- Tape measure (necessary for taking various measurements)
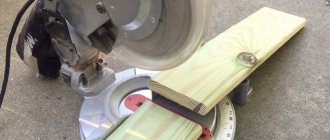
- A jigsaw or hacksaw (to adjust the lining to the desired size);
- Building level;
- Screwdriver or screwdriver (for fastening boards);
- Dowels, screws or nails;
- Sandpaper or mesh (needed to sand the surface);
- Pumice stone or hard coarse brush (necessary for cleansing);
- Sanding machine (preferable, but not necessary)
- Primer;
- Impregnation;
- Paint and varnish product;
- Insulation and vapor barrier film (if insulation is intended).
It is better to stock up on lining in advance, as it takes time to dry it. On average it takes from 3 weeks to 3 months.