What is paving stone and what types does it come in?
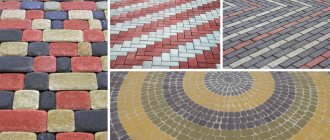
A parallelepiped made of stone is called a paving stone. The coating is strong, durable, laid out on the surface block by block, and is intended for beautifying the external space. It can be clinker, granite, concrete. The elements are different in shape, decor, color. There are many installation methods and technologies for performing work.
Laying granite paving stones is suitable for sidewalks and roads. Natural material is environmentally friendly and does not require constant maintenance. Concrete blocks are also popular; they are distinguished by high levels of stability, but it is worth considering the material’s susceptibility to acids. Clinker paving stones are durable, do not deteriorate from chemicals, and do not fade.
For a budget option, you can make paths using vibro-pressed cement-polymer paving stones. The material tolerates loads well and is moisture and frost resistant. The low price is due to the replacement of cement components with polymer ones.
There are several tips when choosing. In addition to the type and shape of the elements, it is worth paying attention to the technical characteristics of the compositions. Frost resistance is important, which takes into account the freezing-thawing cycle (for the climatic conditions of Russia this is 10 cycles). Water absorption capacity should be no more than 2%. There are 3 strength indicators for paving stones: compression, bending and abrasion. Average weight of material per 1 sq. m - 100 kg.
What are the advantages and disadvantages
The advantage of paving stones is strength, high performance characteristics, high load-bearing capacity, and resistance to temperature changes. The material is easy to install, so you can make the paving yourself. Paving stones are environmentally friendly, have high maintainability, and do not require high operating costs.
Paths made of paving stones do not retain water; the safety of people's movement is ensured by the rough texture of the elements. A geotextile separator, which is laid in the base, prevents soil subsidence and deformation of the sidewalk.
The disadvantage is the high cost of paving stones, which is why concrete-polymer block options are used in budget projects at the dacha. Paving stones are also difficult to process.
On some soils, with a high level of humidity, the base can be washed out, then the masonry sags and individual elements fall out.
Forms and purpose
Paving stones are divided into several types , depending on their shape. Different areas of the territory may require different tiles.
Chip decorative tiles
These paving stones are obtained by simply splitting them into small fragments with an uneven texture. The imperfection lies primarily in the shape of rough bars, which will make driving on them uncomfortable. The conclusion is obvious: it is not recommended to use chipped tiles to decorate driveways, parking spaces for guests and other areas that involve the passage of vehicles.
They also have an advantage - their non-smooth surface provides them with a good fit on the solution, thereby creating a reliable surface. Thanks to this, they can be used for landscaping in commercial areas where, due to various loads, there is a high risk of surface deformation. In this case, you need to be careful and keep in mind that a too uneven shape is unacceptable for sports and children's playgrounds.
Universal sawn paving stones
This type of paving slabs is a neatly processed stone product , the proper installation of which provides the area with a flat surface that is comfortable for any action. It will not be inferior to asphalt pavement, in addition giving a good decorative effect and durability. Perfect for styling for any need.
Split-sawn bars
Such paving stones are made by splitting the stone into pieces and then sawing it. This makes one edge rough and the other smooth. Thus, its purpose and type of installation depend on your preferences. The front or back side should be assessed at the purchase stage, since many slabs have significant limitations. The advantage of split-sawn paving stones is that they are securely attached to the mortar with their uneven side.
Marking paths and platforms
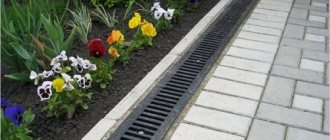
The technology for laying paving stones on sand involves marking the area. First, the paving area is calculated. At this stage, it is necessary to measure the width of the road so that the bars lie evenly and do not require modification. The thickness of the seams is also measured. For marking, pegs are installed in the corners of the future sidewalk. Beacon cords are needed to check the level of the road surface. Adjustment is also necessary for laying rainwater drains.
Tips and tricks
Laying tiles has its own subtleties. Here are some tips to help make the process more efficient:
- The distance between the tiles can be adjusted according to your preference, but it is still recommended to maintain a joint thickness of 2 millimeters;
- If there is an area on your territory that you want to decorate with something now, but communications may be laid there in the future, you can safely decorate it with paving stones. The fact is that, if necessary, it can be easily dismantled, and many of its types will not be damaged. After a while, when the work is completed, the tiles can be installed again;
- In the process of laying paving slabs, there are no secondary materials, as well as unnecessary steps. Neglecting one thing means getting a bad result overall. Therefore, you should not save on construction products;
- When compacting large areas while preparing the base, you can use a road roller. It won't be cheap, but it will improve the result;
- If you have little experience, it is better to start with pedestrian paths - working with them is the least labor-intensive.
The weak side of paving stones is its water absorption function - about 2%, that is, a 1 kg stone can absorb 20 g of liquid. Water that settles in the structure of the paving stones during the cold period will freeze and thaw and gradually destroy the tile from the inside. This is especially important for those who live in regions with high humidity and low temperatures. In some cases, it is advisable to either lay tiles under a canopy or find an alternative.
Excavation
Laying paving stones yourself involves excavation work. To create a trench, soil is removed, since the top layer of earth is often unstable and will not be able to withstand massive elements and operational loads.
The volume of soil to be lifted depends on the project, but there are general rules. The paving stones should be located 4 cm below the area adjacent to the sidewalk. The total depth of the trench for the blocks and fastening mixture is from 20 cm. If the tiles are placed on a platform for transport, it is necessary to increase the depth of the trench by 10 cm. The bottom of the earthen structure is leveled and compacted with a manual tamper or a vibrating plate.
Calculation of the quantity of materials
Do-it-yourself tiling begins with some calculations and measurements. First of all, you need to determine the perimeter of the path and estimate the surface area. If you want to install shaped elements near flower beds and other objects, you need to divide them into simple parts and carry out a number of calculations:
- The amount of stone for the border. This indicator includes the length of all perimeters minus the length of the points where the material joins the base of the building or other rooms. The role of the border will be played by the foundation itself.
- Optimal tile area. Indicates the area of the planned sites and paths plus 5% margin. Such a percentage will be justified only if simple laying technologies are used and the material is safely transported to the construction site. Therefore, experts recommend taking 10% more tiles than required so that you don’t have to go to the store after starting work. The consumption of tiles per 1 m2 can be clarified using special online calculators.
- Quantity and type of sand. Next, you should determine what kind of sand is needed for laying paving slabs and how much of it you will have to buy. To obtain accurate information, you need to take into account the expected thickness of the sand under the paving stones. So, to calculate the volume of crushed stone that will be fixed in a layer of 5 cm, the total area must be multiplied by 0.05 (5 cm). The result will characterize the number of cubic meters of crushed stone. Using a similar principle, the required volume of sand is calculated.
Laying technology
Options for laying paving stones are determined by the use of different materials and block shapes, and the purpose of the road. The elements are placed on a base made of sand, concrete or cement-sand. The rectangular classic layout of sidewalk fragments allows you to combine colors and textures.
The herringbone laying technology is performed by laying tiles at an angle of 45° or 90°. When laying out a checkerboard pattern, square bars of contrasting shades are used and the elements are placed in a checkerboard pattern. The “random mixture” technique allows you to design a path with a random arrangement of bars of different sizes and colors.
On a crushed stone base
The technology of laying paving stones on a crushed stone base includes a complex of works. A geogrid is placed on the cleared space, a layer of crushed stone of 10-20 cm is applied on top. A slope is created on the leveled mixture, and the surface is compacted. Then the curbs are installed and secured with a dry cement-sand mixture. Also, in areas of high loads, installation of a road mesh will be required. Stone bars are installed according to the sketch, gaps of up to 3 cm are left between the blocks. The seams between the bars are filled with a dry mixture.
Made from concrete
A concrete base for the blocks is required to strengthen the base. The bonding mixture is necessary when working with thin tiles and constructing sidewalks on moving soil. Laying paving stones over concrete involves installing formwork into which concrete is poured. For large areas of coverage, it will be necessary to install expansion joints every 3 m.
After grouting the joints and installing curbs, pour a 3 cm layer of cement-sand mixture. The elements of the road surface are laid out on the surface. Concrete paving stones are not damaged by strong weight and mechanical loads.
On the sand layer
To form a sidewalk from paving stones on a sandy base, you need to prepare the surface: level it, cover it with geo-textile, form a sand cushion up to 15 cm. It is important what kind of sand is used in the work. Experts recommend formulations without impurities.
The embankment is leveled and a slope is created for water flow. The base is watered and compacted with a vibrating plate. The curbs are fastened with a mixture of concrete, then the laying of paving stones begins according to a given pattern. The gaps between masonry elements should be 2-3 mm. The seams are filled with sand, then the sidewalk is compacted with a vibrating plate and cleaned with water.
Nuances
Methods for installing bars and materials are determined by the purpose of the road. For pedestrian sidewalks, 40 mm tiles are sufficient. A road with constant vehicle traffic is paved with thick paving stones. To create pedestrian paths, a pattern of blocks is laid out on a sand base or a mixture of sand and cement. The methods of laying paving stones also determine the types of loads on the road surface. The coating can be strengthened using a concrete screed.
Laying tiles on a concrete blind area
Blind areas around buildings are usually made up to 1 m wide. First, the condition of the blind area is examined, after which the following operations are performed:
- the concrete is cleaned of dirt, existing cracks in it are cut out;
- the entire surface of the old concrete is filled with a 2 cm layer of cement mortar;
- the boundaries of future paving are marked with driving in pegs;
- The location of the curb along the edge of the site is planned; the top of the curb should be located taking into account the slope away from the building of 2 cm for each linear line. m. and below the top for paving stones by 3 cm. Then a mark is marked on the base equal to the sum of the height of the tile and the thickness of the preparation for it, to which a strong cord is attached, the second end is tied to pegs at the planned height of the top of the curb;
- according to the arranged markings, a trench is developed for the curbs, then an earthen trough is developed between the edge of the blind area and the curbs;
- Then the work is carried out in the order described above when installing a concrete base and paving with paving slabs.
When performing the work yourself, the cost of paving is reduced by at least 2 times. Additionally, you can read technical literature or consult with specialists about how to properly lay paving slabs; this will help avoid damage to expensive materials and ensure the durability of the coating.
Installation of curbs
Installation of curbs occurs according to pre-made markings. Then a cement-sand mortar is mixed in a ratio of 1:3 and applied to the surface along the laying of the blocks. The curbs are placed on the bonding mixture and adjusted to the level. The finished slabs are left for 1 day so that the solution holds the elements together. In some design solutions, blocks are laid without a border.
Geotextile layer
Preparation for installation of tiles includes laying a waterproofing layer, which is placed above the drainage as a substrate. This prevents moisture from reaching the top load-bearing layer and improves the quality and integrity of the coating. A layer of geotextile is lined on the bottom and walls of the earthen structure. The artificial material does not rot from prolonged exposure to water, does not decompose even with prolonged use, and provides the road with protection from water.
Sealing and finishing work
To maintain the integrity of the coating, it is necessary to grout the joints that separate the blocks from each other. There are three main methods for sealing paving joints. The distance between the elements is filled with sand, poured with concrete mortar or rubbed with a concrete mixture. For pavements made of natural granite, sand and concrete mortar are suitable. For roads made of ceramic paving stones, it is better to use sand. The seams between the concrete blocks are rubbed with concrete mixture. Marble blocks can only be held together with sand-cement mortar.
After filling the masonry joints, excess material is removed with a broom or broom. Then the sidewalk is hosed down with water, the mixture hardens and firmly holds the blocks together. Cement-sand mortar is poured between the coating elements and left for bonding.
Step-by-step instruction
Let's talk about how to lay paving stones with your own hands. The whole process consists of several mandatory steps:
- Planning and marking the perimeter of the site with calculation of the amount of material used.
- Preparatory work with soil.
- Preparing the base to create a drainage layer.
- Laying tiles.
- Final works.
Read also: How to install curbs for paving slabs?
Scheme and marking
At the dacha, paving stones should be completed and laid sequentially, starting from the marking stage. We recommend adhering to the following simple rules:
- Preparation of a preliminary plan with a site diagram on paper. In this case, you should indicate all the objects present on it that will be involved when the paving stones are laid.
- The diagram shows future paths made of paving slabs. Be sure to place them in such a way that the distance from them to the bases of the trees is more than 1.5 m. This way the crowns will not interfere with the passage of people, and the roots will not be able to damage the tiles.
- In addition, you should note that there must be a slope. It must be present in the direction from the main construction site, that is, the house. This is how water drainage systems are organized in a competent manner.
- The width of the created path is selected arbitrarily, but must always be a multiple of the size of the paving stones.
Next, in accordance with the prepared diagram, zones with paving slabs are marked on the site by placing stakes and a cord. In this case, the curb stone will be 80-100 mm wide.
And the height of the thread or rope will be equal to the level of the coating. It usually fluctuates in the range of 5-10 cm. It is easiest to adhere to all dimensional lines, including height, when using a level for construction work.
Soil development
Next, in order to lay paving stones in the courtyard of a private house, it is necessary to remove the top layers of the soil surface, that is, to perform a number of special preparatory work. Things to consider:
- The depth of the underlying layer and its preparation in depth directly depends on the base that will be used in a particular case. Therefore, it can be built on sand, concrete or cement.
- The bottom layer is formed by creating a drainage cushion on the ground. It consists of gravel and crushed stone. Thickness is up to 150 mm.
- Additionally, another layer is laid out. It is 30-50 mm.
- But the upper component bears the main load-bearing load, so its thickness is also quite impressive and amounts to 100-150 mm.
Read also: What is tumbled stone?
The paving stones themselves are usually about 50-80 mm thick. Accordingly, the trench will have a depth of 350 mm.
Preparing the base layer
In order to properly organize the drainage support layer or base for laying paving slabs, you must adhere to the following list of simple recommendations:
As soon as the required volume of soil has been excavated, the base is compacted. Next, the canvas is lined, which is responsible for the impossibility of plants growing through it and eliminates the occurrence of breakthroughs in the prepared cushion.
A layer of crushed stone and gravel is laid on top of this canvas. The thickness should be based on the height of the curb stone. It is this layer that plays the role of a load-bearing base. It needs careful compacting.
Curbstone
To lay paving stones on a concrete or other base, you will also need to use a curb stone. There are some difficulties here that are associated with its weight. The step-by-step instructions here are as follows:
- The pegs are moved inside the previously organized tray. Now, from this moment on, the cord will act as a guide for where exactly the stone will be installed.
- To raise a stone, sand is often poured underneath it. Shrinkage in the lower direction is achieved by tapping with a regular wooden hammer.
- Heavy stone is based on a concrete mixture. It is carefully poured on both sides: external and internal. After it hardens, adding crushed stone begins.
- Once completed, a mound of sand is made on top. Here the layer will again be about 30-50 mm. The coating is specially spilled with water, since with this approach all existing cracks are filled.
Creating a base for laying
The base for correctly laying paving stones with your own hands can be created from one of the following options from the proposed list:
- coarse sand without impurities (for sand);
- cement-sand mixture (for cement and sand);
- cement mixture and gravel after compaction;
- reinforced concrete (on concrete).
View this post on Instagram
Publication from dacha, garden, construction (@dacha_garden.repair) Aug 12, 2021 at 7:21 PDT
If there are no high loads, you can install paving stones on sand. But if you plan to move a car along its surface, then you cannot do without using a layer of crushed stone. The most durable base will be concrete.
Read also: What strength should gypsum stone be?
Cement and sand
This format is used quite often. In this case, cement with a marking of over 400 is used and a solution with a high degree of homogeneity is prepared. As a rule, a concrete mixer is used for this purpose. The state of the mixture can be adjusted by adding crushed stone.
Then, in order to correctly lay paving stones on sand, it is necessary, using gentle blows with a hammer, to adjust the products to the minimum distances in relation to each other in order to achieve the required level of strength.
Gravel base
Gravel often has good load-bearing properties. To do this, perform the following set of actions:
- An additional layer of gravel is laid on the layer with previously placed crushed stone. It goes through the compaction stage.
- The paving slabs themselves are laid on a previously prepared cement-sand mixture. Often special plasticizers are added to it to achieve the desired consistency.
The gravel layer is organized by uniformly scattering the material. For compaction here you will need construction equipment.
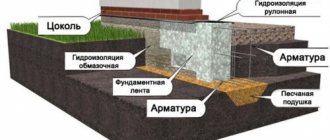
Concrete and reinforcement
To lay paving stones on a concrete base and create a much stronger foundation, you will need to follow the following simple recommendations:
- Reinforcement is laid in the inner part of the trench. Thin rods undergo a binding process using thin wire. This will provide increased rigidity.
- Bricks are used to create a reinforcement network. Therefore, as a result of this process, they rise 40-50 mm above the level of crushed stone.
- The concrete itself is mixed into the solution by combining sand, crushed stone and cement. It is recommended to fill in one stage at a time.
Sealing works
Once the paving stones have been laid, it is necessary to seal the joints. For this, the same mixture is used as for laying the paving slabs themselves. The mixture is poured onto the surface and distributed with a brush. After this, the excess is removed.
Please note that paving stones can be laid in different ways. Depending on this, the degree of complexity of the installation process varies, but it is precisely the more complex patterns that have the greatest strength. Possible options:
- classic format;
- network;
- Christmas tree
Similar articles: