The problem of poor planning is common to Soviet-era buildings. They are characterized by thick walls and high ceilings, but the doorways in them can be very narrow. In most cases, in such rooms, the load-bearing walls are the internal partitions.
This means that any work should be carried out only after obtaining the appropriate permission. It is also worth paying attention to the technique of performing the work itself, which requires increased attention and concentration.
READ ON THE TOPIC: How to properly legalize the redevelopment of an apartment without additional costs?
Construction of a doorway in a load-bearing brick wall
Before starting work, you must contact a specialist who will make a demonstration project with all calculations based on the client’s wishes. To implement the project, significant costs are required, which start from an amount of 30 thousand rubles. So when you get down to business, you need to consider a lot. Independent work on constructing a doorway will help the owner save money - it will cost approximately 15 thousand rubles .
Construction of a new opening
When constructing an interwall opening, it is recommended to take into account the following points:
- it must comply with building codes;
- It is advisable to place the hole in the central part of the supporting structure;
- it is necessary that the top part coincides with the cement seam of the masonry;
- the space between walls up to 0.9 m wide does not require reinforcement operations.
When creating an inter-wall space in a supporting wall, you need to properly create the reinforcement. When changing the structure of the walls, it is important to ensure the safety of the lives of other residents of the apartment building and the preservation of the structure of the building itself.
Calculation of strengthening of openings
In the process of preparing a redevelopment project, various engineering surveys and calculations are carried out. An important step here is the calculation of the reinforcement of openings, on the basis of which the corresponding section of the design documentation is developed.
The design engineer, having in hand the data from the technical report on the possibility of redevelopment, draws the necessary conclusions based on them, and, if necessary, goes to the site for additional measurements and research at the site of the opening.
More about the technical specifications
After processing all the information, the appropriate type of reinforcement is calculated, all diagrams are drawn, recommendations are formulated on the order of work, the tools used, welding and fastening, as well as the inclusion of metal structures in the work (mortar installation, caulking, etc.).
Work order
First of all, you need to decide where to organize additional space for entry and exit. It all starts with markup . You need to decide on the width of the hole, and then begin to determine its future location with a pencil. You need to measure the distance from the outer wall and make a mark - from here we begin to draw the outline of the future interior space.
A thick wall structure is being cut on both sides, so markings will be necessary on the reverse side as well.
For their exact match, it is necessary to drill several holes according to the pencil markings (Fig. 1). And then on the other side connect all the holes with a pencil line.
Rice. 1
The above-described manipulations should be carried out using a building level, a triangle and a ruler.
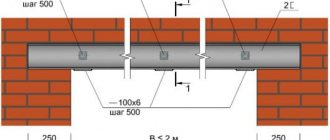
Since we will create the space in the load-bearing wall of a brick house, it is necessary to take care of auxiliary partitions and lintels in advance (Fig. 2).
Rice. 2
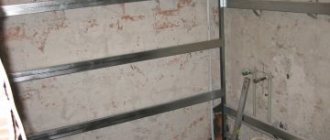
Strengthening the opening in a monolithic and panel wall.
There are several ways to strengthen such openings:
Strengthening the opening in the load-bearing wall of panel and monolithic buildings.
However, the most common way is to reinforce the doorway with a corner in the form of a frame:
Strengthening the openings with a metal frame made of corners.
Knots and cuts.
An opening in a load-bearing wall with reinforcement in this case is performed in the following sequence. Before constructing the opening, temporary wooden posts are placed in the spacer with the ceiling or formwork posts are used for these purposes. The grooves are cut out for the frame posts and the lintel. The corners of the rack are placed in the design position, and part of the shelf is cut off at the corner of the jumper, installed and welded to the racks. Next, they cut out a part of the wall for the supporting corners, install them and weld them. After that, the entire opening is cut in small parts, the frame is scalded with plates, anchored and plastered over the mesh. After all the work is completed, the opening reinforcement structure is not visible in any way and does not spoil the presentability of the repair.
Removing a section of wall
Fig. 3
Before starting work, it is necessary to free the supporting wall structure from the layer of plaster along the drawn line so that the seams of the masonry are visible. However, it is necessary to remove the plaster with extreme caution, because most likely there is wiring located underneath it - damage can lead to the failure of the entire power supply system.
When the seams at the site of the future empty space are visible, you can begin to work. You need to start removing bricks from the very top. First, the top row of bricks is removed, which will be the width of the entire door space . A jumper is inserted here on which the structure will be supported.
Next, more holes are made above the jumper. It is necessary to install a beam into the resulting hole, which will act as a support. The support beam must be supported with a jack so that the structure does not collapse during operation. The beam and jack will support the weight of the entire wall structure (Fig. 3).
Channel lintel
Then all holes are lubricated with concrete solution. After the concrete mixture has dried, you can continue working on knocking out bricks.
The structure should be strengthened if the door space is more than one meter wide.
To protect the floor from falling bricks, it is necessary to make a flooring from boards. Bricks should be removed with diamond drills to minimize damage to the wall structure.
Violation of the technology for removing bricks can lead to weakening of the structure, its premature wear and deformation.
It should be noted that the space under the door must be 10-20 centimeters larger than the door or window frame. This gap can be filled with foam.
Dangers when using load-bearing walls
Any work involving impact on load-bearing walls entails a potential danger to the structure of the entire building. Even if cutting or gating affects a small section of the wall, the load on the remaining structures of the object automatically increases. This is especially true for rooms located in close proximity to the foundation, since the walls bear the weight of the entire building.
When carrying out work even on the basis of approval and a construction permit, you must strictly follow the project:
- observe safety measures when carrying out work;
- use only the opening design option specified by the designer;
- provide for strengthening measures specified in the project;
- comply with the dimensions of the opening that are allowed to be made according to the project.
]Smart Way[/anchor] specialists will provide the best option for placing the opening to ensure the safety of the work and reduce your costs.
Strengthening the opening
Strengthening work takes the maximum amount of time, as it is carried out painstakingly. Organized empty space under a door or arch must be reinforced with channels . It is advisable to use a channel jumper with vertical posts. Channels are mounted on both sides, which are screwed into the previously installed wooden lintel using bolts (Fig. 4).
Rice. 4
If the space in the wall structure is large, then it is reinforced not only in the upper part, but also on the sides (Fig. 5).
Rice. 5
Opening reinforcement drawing
The graphic part of the section on cutting and strengthening the opening is detailed drawings along the axes with explanations.
Firstly , this is a view of the opening itself relative to its place in the wall, the upper and lower ceilings, the outer wall panel, heating risers, as well as indicating the main geometric dimensions.
Secondly , this is a metal reinforcement diagram with dimensions (overall dimensions, pitch of fasteners).
When depicting structures, a frontal view and a top view, as well as sections, are given. All drawings are accompanied by footnotes, which can clarify additional parameters - dimensions and type of fasteners, sections and dimensions of metal profiles, etc. Wall materials are indicated by different types of hatch lines. The drawings also include detailing of metal reinforcement units.
How to determine a load-bearing wall in a brick house?
The most basic way to determine the supporting wall is to familiarize yourself with the floor plan of the living space. Such a plan must be included in the registration certificate or house register. To understand diagrams and drawings, you need to have some drawing skills. Experience in construction would be helpful. Then you can easily distinguish a supporting wall from a regular partition.
Rice. 6
Typically, interior walls are no more than 18 centimeters thick. The smallest thickness of the supporting wall is 38 centimeters - a masonry of three bricks . Four-brick masonry is possible, which forms a wall 51 centimeters thick. Often the thickness of the walls in brick houses is 64 centimeters - five-brick masonry (Fig. 6).
If the plan could not be found, then you should use the general rules for determining load-bearing walls in a house:
- if the walls face the street, we can definitely say that they are supporting;
- walls shared with neighbors;
- wall thickness more than 380 mm, as mentioned earlier;
- walls facing the landing.
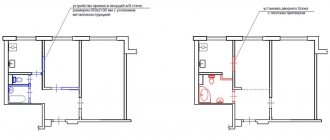
Demolition of a load-bearing wall - reinforcement is required
Complete demolition of a load-bearing wall is necessary to combine two or more rooms. For example, when renovating an apartment, they often order partitions between the bathroom and toilet to create a combined bathroom and expand its area. Complete demolition of a load-bearing wall is allowed only after load calculations have been carried out. It is necessary to coordinate such work, since the stability of the building and the safety of people depend on the condition of the structural elements.
Exterior finishing
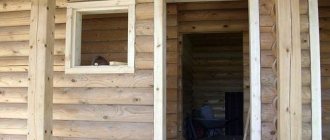
After completing the work on forming the opening in the brick load-bearing wall, everything must be decorated decoratively (Fig. 7) . What is needed for this? First of all, you need to decide on the choice of finishing material. Whether it will be wood, plastic or decorative stone – it’s up to you. Next, you need to show a little imagination and create decorative elements in the formed space of the brick wall.
Rice. 7
For self-cladding, you should have basic knowledge in the field of finishing work, and you also need to have special tools.
If you need to decorate the space for a door without having one, then you should use additional boards. This will add elegance to your new room decor and add sophistication to the interior. You can create such a cladding yourself.
The opening made in the form of an arch looks beautiful. As a rule, arches come in round or pointed shapes. To decide on the shape of the arch for the client, check out the design catalogs. The most common today is the Byzantine and Greek style. In some cases, the arch can be made with lighting.
Existing risks
Modern factory door designs very often do not fit into the interior openings of Soviet-era apartments, and only widening the openings saves the situation.
Enlarged openings in load-bearing walls
In addition, the new units have completely standard door sizes, which are very different from the older products that have been in place for the past decades. This may be the height, but more often the door opening is not satisfied with the width. In this case, the problem of decorative and functional arrangement of an interior transition can only be solved by enlarging the hole in the wall or narrowing (reducing) it.
Let's talk specifically about increasing the passage between adjacent rooms. But it turns out that it is not always safe to widen the hole under the door in different types of buildings.
For example, if you restore a partition that is not the main functional basis of the building, made of gypsum plasterboard (plasterboard), sibit (cellular aerated concrete) or other lightweight building material, then nothing bad will happen. On the contrary, the work will be somewhat troublesome, if we consider the transfer of metal profiles under the gypsum board, but it will be successful.
In gypsum plasterboard partitions, the expansion of the opening is done by transferring the profile and cutting the sheet
It’s a completely different matter to increase passages in load-bearing walls. Reconstruction of a similar plan in partitions of load-bearing value is already considered a redevelopment of the premises. This means that the work must be carried out in full accordance with a separate project, which contains an accurate engineering calculation of the redistribution of loads on the floor after the full scope of changes made.
Officially developed project for strengthening the opening
To reproduce such work in multi-apartment buildings, it is necessary to collect a complete package of documents regarding regional requirements:
- certificates from the local BTI;
- documentation of home ownership, extract from the house register;
- floor plan of the entire building;
- a plan for future reconstruction from an architectural organization;
- a plan for all stages of future work, and so on.
Related article: How to make a lampshade (plafond) at home
Minimal damage from incorrect redevelopment
If you think about it, the solution to increasing the passage in the apartment will bring a lot of red tape, but it’s worth it. After all, this list of documents, first of all, is needed not for show, but personally for the safety of you, your loved ones and the people living around your apartment. Unauthorized damage to a load-bearing partition in a multi-story building can lead, at a minimum, to the collapse of the wall, and at maximum, to collapse part of the house. We don't need irreparable consequences; we just need to strengthen the openings.
Calculations of expansion parameters for doors
If you have a door structure for which you need to adjust the size of the hole in the wall, you can calculate the exact parameters of the work. Cutting the opening by eye will not work; it is better to make precise markings. To make an opening with your own hands to the exact dimensions of the structure, it is worth making the following measurements:
- height and width of the existing door;
- thickness and width of the door frame that comes with the kit;
- remove the width of the platbands that are planned to be installed;
- pick up the threshold and remove its height, if, of course, it will be installed.
Calculation of the dimensions of the opening and the door located in it
So, the calculation of the available sizes is as follows:
- The required width of the passage in the wall consists of the following parameters: the width of the door leaf, the thickness of the frame post, the technological gaps on each side (≈2 cm).
- The height of the doorway is determined as follows: the height of the threshold is added to the thickness of the frame, plus the technological gap.
- The thickness of the passage wall is generally 75 mm. For other indicators, extensions are added if the walls are much wider, or a door frame with a narrower beam is selected.
It is recommended to carry out measurements and markings of the wall with high accuracy, since the dimensions of the gaps, taken with a reserve, may not cover even the widest platbands during decorative finishing.
Do-it-yourself arch calculation
If you want to arrange an arched vault in the transition to adjacent rooms, expanding the transitions to adjacent rooms cannot be avoided.
Dimensions of arches depending on the width of the opening
Making an opening in the form of an arch is not difficult, the main thing is to properly prepare for the work, that is, calculate the arch. An arched opening can have any type of configuration. That is, you can make any shape of the arched vault, and the curved bend can be attributed to a creative view of the matter.
Related article: Do-it-yourself single bed: assembly, tools, materials
It is much more difficult to make a classically shaped arch with an oval regular bend of 45 cm, so we stock up on the following equipment for calculation work on a scale of 1:50:
- compass;
- paper;
- Pythagorean theorem from the school curriculum: R²=L²+(R²-H²).
It has long been derived from the well-known Pythagorean formula, and construction masters use the formula to calculate the exact radius of the circle of the future arch in the opening R=L²+H²/2H.
Opening size: r is the radius of the circle, L is half the chord of the arc, h is the lifting height
You can make it a little easier when determining the radius of the classic arch shape, but not entirely accurate:
- draw a doorway of future expanded natural dimensions on paper (previously, a piece of wallpaper for the walls was used for this);
- a compass is placed on the axis of symmetry and, changing the radius, several arcs are drawn;
- the optimal option is selected, and the remaining radii are erased.
Subtleties of arranging openings
Experts divide all openings into 3 types:
- Doorway in a load-bearing wall;
- Doorway of the entrance door;
- Doorway in the interior partition.
Much also depends on the material from which the wall is made. It is harder to work with concrete and brick, but easier with wood and cellular concrete (foam and aerated concrete). The technology for arranging the first two types is almost the same. partitions , but they all have their own nuances.
How to cut a hole in a concrete wall
Of course, you can order a specialized team that will come and do everything quickly and beautifully, but the price in these offices fluctuates around 50 thousand rubles. And if you puzzle the team working for you or even do everything yourself, then you can fit in 15 - 20 thousand rubles.
First of all, remember - you can break through a load-bearing wall and a wall under the front door only after receiving permission from the relevant services. It’s easier with partitions; you can first cut an opening and then legitimize it.
Door openings are arranged only after receiving a technical report.
Let's assume we have a technical report, specification and other documents on hand and now we can start arranging the doorway. First of all, we transfer the markings to the wall; in our case, the opening should be 90x210 cm.
The marking of the wall is done according to the technical specifications.
There is a small nuance, wherever you cut the opening, there must be at least 100 mm from its edge to the nearest internal or external corner. Otherwise, problems with cladding may arise later.
Next we need to make a mirror image of this marking on the back side of the wall. The instructions are simple, drill through holes in the corners and connect them on the back side.
You need to transfer the markings to the back side of the wall.
Now we need to cut out the opening according to the markings. To begin with, we drill a series of holes with a diameter of 10–12 mm around the perimeter in increments of 3–4 cm. After that, take a large grinder with a diamond wheel and cut through the wall on both sides.
We drill a series of holes around the perimeter.
You cannot completely cut out the opening from the start. We leave several small bridges to hold the slab in place, after which we cut it into square blocks about 40 cm in size. Then, step by step, from top to bottom, we cut and remove these blocks.
When removing blocks, it is advisable to cover the floor with a wooden shield so that an accidentally falling block does not damage it.
We cut the opening into separate blocks.
Now we need to strengthen the doorway. We will do this using a metal corner strap and jumpers. The technical documentation contains a diagram of the junction units, the materials are described in detail and a drawing of the assembly of the frame from the angle is given. In our case, the parameters are:
- The threshold is made from a corner 75x75 mm, 8 mm thick;
- For fastening at the corners, a corner of 100x100 mm, 10 mm thick, is used;
- Reinforcement with a cross section of 12 mm is used as fixing pins;
- The jumpers between the corners are cut from a sheet 10 mm thick and 100 mm high. The width depends on the thickness of the wall;
- The double-sided frame itself, framing the opening, is made from a 100x63 mm corner, 10 mm thick (the short side of the corner goes into the opening).
Diagram of the door frame according to technical specifications.
When fixing the frame, the studs on both sides are driven in independently of each other at an angle of about 45º. In the diagram below, the reinforcement is attached to the edge of the frame; we recommend drilling holes in the corner and driving the reinforcement into them at an angle as well. After this, you need to scald the rod and while the metal is hot, bend it parallel to the corner. Next, we cut the rod and weld the remaining tail to the corner.
Scheme of fixing the frame with studs.
Now all we have to do is cover all the cavities with construction mixture and paint our frame so that it does not rust.
Gross mistakes
Often, unknown craftsmen undertake to quickly and inexpensively cut an opening in the wall, and here you need to watch their actions very carefully. The first common mistake of inexperienced craftsmen is that they cut out the opening completely, without dividing it into blocks.
Such an oversight can lead to damage to the ceiling. Even car tires laid on the floor may not save you from a sudden fall of such a serious mass.
High probability of damage to the ceiling.
Naturally, it is impossible to remove such a block entirely, so people take a sledgehammer and break it into fragments. Such extreme actions will almost certainly cause cracks in the ceilings and walls.
Hitting with a sledgehammer can cause cracks in the ceiling.
Making an opening in a solid brick wall
A reinforced concrete wall is monolithic and if you have a good tool, breaking through it will not be difficult, but arranging a doorway in a brick wall requires a fundamentally different approach. After all, if you cut an opening in a block wall, the upper sector of the ceiling may simply collapse.
To eliminate such a nuisance, we need to strengthen the upper sector; for this, a horizontal concrete beam about 2 m long is usually cut into the wall. Here everything depends on the width of the opening; on each side of the opening, the beam should enter the monolithic wall by about half a meter.
In thick and load-bearing walls, this beam consists of 2 - 3 sections. First you need to mark where exactly the beam will be located. Further along the height of the beam, several windows up to half a meter wide are knocked out. The width of the supports between the windows is made of brick.
The width of the supports between the windows is made of brick.
Next, part of the support is knocked out on one side. We will install a section of reinforced concrete lintel in this place. But until the jumper is inserted, the supports cannot be completely knocked out.
Some of the supports are removed from one side of the wall.
One of the sections of a reinforced concrete lintel.
Next, we take one of the sections of the reinforced concrete lintel and, using a cement-sand mortar, we embed it into the resulting niche. Keep in mind that until the mortar has set, you cannot knock out the brick supports from the back side. Typically, it takes 2 to 3 days for the solution to harden sufficiently.
A lintel embedded in the wall.
Now we knock out the brick supports on the back side of the wall and install the second section of the lintel in the same way. When the ceiling is strengthened, you can take a grinder with a diamond blade and cut the outline of the doorway on both sides.
Depending on the thickness of the wall, the lintel may have several sections, but this does not change the technology.
We cut through the outline of the doorway with a grinder.
Next, we take a hammer drill or a chipper and one by one, from top to bottom, knock out the bricks from the opening.
We clean the opening.
When the brick is completely removed, the edges of the doorway need to be cleaned, after which you can begin finishing.
The finished opening can begin to be finished.
Insertion into the partition and expansion of the opening
Expanding an opening in a brick wall is more difficult than breaking through a pier, because the piers are placed in half a brick. But the arrangement technology is the same in both cases.
As shown in the diagram below, if we simply extend the wall beyond the top load-bearing lintel, the lintel itself and everything above it will collapse. Therefore, we need to strengthen it.
Doorway expansion plan.
We will strengthen it by cutting powerful metal corners over the jumper on both sides. To do this, the horizontal seam between the bricks expands and deepens. Next, we drill through holes, insert pins into them and tighten the corners together.
We tighten the corners with through pins.
The main work is finished, now, according to the scheme described in the previous chapter, we make vertical cuts with a grinder, knock out the excess and arrange the perimeter of the opening. In this case, it is better to make a monolithic frame from the same corners.
Widened and reinforced opening.
Thin walls break through in about the same way. The standard thickness of such a wall is 75 mm; accordingly, we take a corner with a wing of up to 35 mm, so that it freely clasps the wall on both sides.
Some craftsmen, instead of 2 small corners on both sides, mount one large one with a 75 mm wing on one side. They cut through the horizontal seam of the partition and drive a corner into it. This can be done, but as you cut, you need to insert metal supports into the gap so that the ceiling does not sag.
Why is it necessary?
To prevent problems that could cause cracks or destruction of the coating, it is necessary to reinforce the wall.
When to do:
- Before creating new holes in the wall.
- If there are deformations in the structure.
- When replacing old windows or doors.
- It is recommended to strengthen the hole during the construction of the building.
- When creating a new opening for a door or window.
- If the walls near the hole cannot withstand dynamic loads.
- When partitions cannot withstand forceful hacking.
You can carry out the work yourself if you obtain the necessary permits.
What to pay special attention to
To ensure that interference with the structural integrity of a building is safe, it is necessary to remember:
- The durability of the repair is guaranteed by correct load calculations performed by specialists;
- New openings in load-bearing floors are always strengthened BEFORE dismantling the masonry;
- The upper part of the metal frame must rest on a whole brick or block;
- Reinforcement elements are welded along the entire abutment line. Spot welding does not provide the necessary rigidity and strength;
- The seams are sealed with mortar, ensuring maximum connection between the wall material and the reinforcement elements;
- The steel frame should be completely invisible upon completion of work;
- The customer’s benefit is guaranteed not by the lowest cost of strengthening the openings, but by the high-quality execution of all stages of the work.
Responsibility for uncoordinated openings in load-bearing walls
The customer, when making an uncoordinated redevelopment, risks first of all:
- Affect the operational safety of the entire building. In an apartment building this threatens major destruction;
- Change the load-bearing capacity of the floors, which will cause their deflections or collapses;
- Receive a fine from the housing inspector and an order to return the premises to its original form, in this case, you will have to further strengthen the structure of the walls;
- If the order from the Housing Inspectorate is ignored, a court decision is made to force the sale of the apartment;
- Spend colossal sums, negotiating with the author of the building project, on drawing up the necessary documentation and redoing the repairs.
Contacting specialists who provide comprehensive services will help you avoid troubles: consultations, paperwork and repair and construction work.
"AlmazorezService" - we keep up with the times!