Why is ceiling framing necessary?
The installed plinth covers defective junctions between the ceiling and walls, and also acts as a decorative element. In this case, defects in adjacent areas are considered to be technological gaps between the stretch (suspended) ceiling and the walls, the upper cut of pasted wallpaper, or an uneven line between the painted wall and the white horizontal surface. Installing a baguette allows you to hide such imperfections and give the finish a completely finished look.
What are skirting boards made of?
Manufacturers of building materials offer skirting boards made from:
- low porosity foam;
- polyurethane;
- polyvinyl chloride (PVC);
- extruded polystyrene;
- artificial rubber;
- various types of wood;
- gypsum mixtures (on order only).
The cutting technology is the same for each material, but the tool required for this is different and is selected individually. The knife is used for light and soft materials such as polystyrene foam, polyvinyl chloride, polyurethane foam, polystyrene and rubber.
For dense grades of gypsum, PVC and polyurethane, you need to take a hacksaw or other tool with fine teeth. For processing wood, there is a special hacksaw that provides a cut without burrs or chips.
Options for forming corners
In any room there can be two types of corners - internal and external (external). In most rooms you can only see the inner corners. External ones are found only in places where corridors turn, on the outside of niches and protruding structures. The technology for trimming and fitting baguettes for external and internal corners is somewhat different.
Most skirting boards have a complex configuration of the outer surface, which makes it difficult to form an angle. Some manufacturers of ceiling plinths offer special corner inserts and overlays, but often the joints of walls in rooms are not equal to 90°, which is why ready-made solutions are not suitable.
This may be due to the layout or tolerances when constructing walls and the absence of leveling plaster. Inaccurate fit of the slats to each other at the corner joint leads to the formation of visible cracks and gaps that spoil the appearance of the finish.
Several different methods are used for trimming fillets. How to join ceiling plinths in the corners? Among the main applications are:
- a special tool device - a miter box, with guide slots at certain angles;
- laser level;
- standard square, tape measure and metal ruler.
Cutting using a miter box is the easiest to perform, but is only possible for cutting at an angle of 45 or 90°. This limits its use or requires additional manual adjustment.
Joining planks at non-standard angles
If renovations are carried out in a house that belongs to the old housing stock, the room may have non-standard shapes: for example, have rounded corners. The work of joining the plinth in such rooms is considered the most labor-intensive and difficult.
In this case, the fillets are joined using parts cut from ordinary skirting boards or using ready-made polyurethane moldings.
Prepare the planks yourself as follows: cut the fillets into pieces, taking into account the degree of curvature of the angle; in total, about 5 - 6 parts may be required. First, all parts are applied to the corner and adjusted if they do not fit tightly together, or if the bend of the corner cannot be repeated.
When all the parts are glued, the part is puttied, filling the voids if there are any left, and only then they start gluing the plinth on straight sections.
Materials and tools
You need to buy:
- baseboard slats;
- adhesive composition corresponding to the baguette material and wall surface coating;
- gypsum putty;
- water-based paint and pigment if you plan to paint the baseboard;
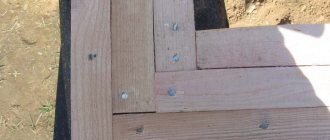
- dowel plugs and screws for wooden fillets.
From tools and equipment you should have:
- a stable, strong table or stepladder;
- miter box for cutting slats at a given angle;
- tape measure and metal ruler;
- narrow spatula;
- construction pencil;
- paint brush.
To install wooden fillets, you will need a hammer drill or impact drill.
General rules for making corners
Regardless of which technology for fitting corner joints you choose, there are several general rules that should be followed in any case:
- plinth slats with a relief pattern or colored ornament must be combined according to the pattern, achieving its visual unity;
- Even at the stage of rough finishing work, try to align the corners vertically as accurately as possible and ensure that the walls join at an angle of 90°;
- if the angle is not straight or the walls are “filled up,” then the resulting cracks can be filled with acrylic sealant or putty.
In difficult cases, it is better to immediately choose a flexible and not very wide plinth. This will ensure a tight fit, even to an uneven wall, and will not attract attention.
Installing a baguette in a corner using a miter box
First of all, you need to make sure that the angle being pasted is exactly 90°. This can be done using a professional protractor or a large square. If the measurement shows that the angle is straight or deviates very slightly from 90°, then a miter box will be the best device for adjusting corner joints.
How to cut ceiling plinths in corners? In order for two skirting boards to match perfectly, their edges should be cut at an angle of 45° in a mirror image with respect to each other. First, fix the miter box in a stationary state on a stable, solid support and then proceed with the operation, because if the rack shifts during cutting, the direction of the cut may be inaccurate and there will be a gap at the joint.
During the cutting process, the skirting boards inside the miter box should be laid in the opposite direction, and they can be processed either separately or both at the same time. In the latter case, you should lay the slats inside the device, pressing them tightly against each other with their back walls. If you lay both baguettes alternately on one side, then the first strip is cut along the right guides of the miter box at an angle of 45°, and the second - along the left grooves.
To check the correctness of the cut, align the processed planks along the joint, placing them on a flat table surface. If everything is normal, then carry out a second check at the installation site.
If there are small errors, make the necessary adjustments using a knife or sandpaper. And only after making sure of the exact fit, proceed to fixing the baseboard with glue or screws.
External corner
To cut a baguette on the outer corner, insert them into the miter box from different sides and press them against the wall farthest from you. Make the cut along two different slots of the device at an angle of 45°.
Internal corner
To properly form the inner corner, press the fillet into the near wall. Make the cut as in the previous case.
Fixing prepared skirting boards in place with glue
The technology for attaching plinth strips has already been discussed in detail earlier in the articles “How to glue a foam plinth” and “Plinth for a stretch ceiling”. Let us recall the main provisions:
- glue must be applied not only to the back side of the fillet, but also to the butt cuts;
- the rivers must be kept pressed until the glue sets;
- the curing time of the adhesive composition is indicated by the material manufacturer on the packaging;
- after fixing the baseboard, all loose areas should be sealed with putty or sealant;
- in the case of a stretch ceiling, the side adjacent to it is not smeared with glue, and fastening is carried out only on the wall.
Your task is to make the joint monolithic, without gaps and cracks. Therefore, the issue of pre-fitting is the basis for success.
How to join the corners of a ceiling plinth
How to cut ceiling plinths in corners
The quality of the ceiling finish greatly affects the appearance of the room. That’s why they try to do everything perfectly, or very close to it. The finishing touch to the design is the ceiling plinth. They give the finish a finished and holistic look. The planks themselves are easy to install on flat surfaces using special white glue, but problems arise with the design of the corners. Without knowing how to make the corner of a ceiling plinth correctly, a lot of material is spoiled. We’ll tell you how and with what to cut it in the corners.
What is it made of and what is it called?
The very first plinths on the ceiling were made of plaster. They were cast in special molds, then installed on the ceiling using mortar. Such figured decorations were called fillets. Today you can rarely see them: they are expensive, but in appearance they are almost no different from cheaper options. And this name is almost lost.
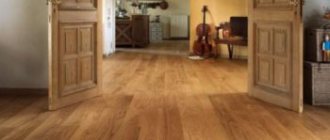
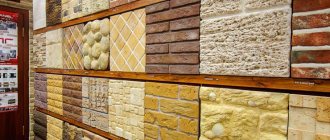
The most popular ceiling plinths today are made of polyurethane or polystyrene. They are inexpensive, look great, are easy to install, and have a wide range of profiles and patterns. The width can be from 5 mm to 250 mm. They are used in almost any room, decorated in any style. The exception is wooden houses with appropriate interiors. Wooden products are most often used here - the style dictates its conditions.
Part of the assortment in a specialty store
There is also a similar plastic finish. It is mainly installed in bathrooms. But even in damp rooms you can safely install polyurethane strips - they are not afraid of dampness.
You need to cut ceiling plinths in corners from any material using one of the methods described below. The only exception is plastic skirting boards: such a corner can only be created using ready-made corners.
What and how to cut
Working with skirting boards made of different materials means using different cutting tools. When working with wooden ceiling plinths, it is more convenient to use a wood saw. All others, including plastic, foam and other polymers, are better cut with a metal blade. This results in a smoother cut and less burr. Saws are usually used when working with a miter box.
Properly designed corners look attractive
When working with foam baseboards without special tools, cut them with a good stationery knife. Its blade is quite thin and even, the cut is smooth and not wrinkled. If you work with polyurethane or polystyrene with a saw, do not press hard: you can dent it.
In general, to get a little used to the tool and material, take a piece and practice on it: cutting, sawing, trimming. This way there will be fewer problems during work.
How to get the right angle
The most problems when working with ceiling skirting boards arise when decorating the corners. Since the surface of the products is complex, simply cutting at the desired angle will not work: it is also necessary to trim so that they fit together and, preferably, without large gaps. In fact, there are several ways to make the corner of the ceiling plinth ideal (or almost).
Using a miter box
If the corners and walls in the room are smooth, you can use a special carpentry tool - a miter box. This is a gutter in the shape of an inverted letter “P”, in which lines are marked for cutting at an angle of 90° and 45°. The part to be cut is placed inside, and a saw is inserted into the guides. The part is held in place and cut at the required angle.
This is what a miter box looks like. Can be plastic, wood or metal
In the case of baseboards, not everything is so simple: they must simultaneously adhere to two surfaces, so they need to be pressed against one or the other wall of the miter box. When working with ceiling ones, they are pressed against the side closest to you.
The sequence of actions when finishing the outer corner is to make a cut at an angle of 45 degrees. Place the miter box in front of you. You try on how the plinth will be positioned, determining which part of it will be attached to the ceiling. In order not to get confused and to cut the ceiling plinth correctly, place the plank that will be located on the right on the right, and the one on the left on the left.
How to cut a corner on a ceiling plinth: install it correctly in a miter box
Press the part that ends up on the ceiling to the bottom of the miter box. The second side is closer to you and raised. You rest it on the wall of the device so that it does not wobble when cutting. That is, the front part of the plinth turns away from you. Make the cutting direction as shown in the photo below. By putting the two cut pieces together, you get a protruding corner - an outer or outer corner.
How to make an outer corner of a ceiling plinth using a chair
First place the sawn parts in place “dry”, without applying glue. If the geometry of the corner turns out to be not so ideal, you can correct it a little with a knife. It is easier to cover up small errors with special putty.
The situation with the inner corner of the ceiling plinth is very similar. First, try on which side will be on the ceiling, press this part to the bottom of the miter box, rest the second part on the wall closest to you and make cuts as shown in the photo below.
How to make an inner corner of a ceiling plinth using a miter box
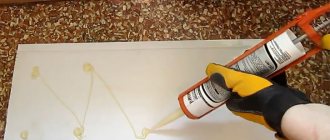
And again, first try it on without applying glue, and if necessary, adjust it slightly. Then apply a thin bead of glue to both surfaces that will be attached to the wall or ceiling.
Your version of how to use a miter box correctly is shown in the video.
How to make a corner of a ceiling plinth without a miter box
Few apartments or houses have angles exactly 90°. Small deviations can be easily corrected after trying on. But not always. Then you have to mark everything “in place” - under the ceiling.
You will need a finely outlined pencil (hard - it is not so visible on the ceiling, but leaves fairly clear marks close up), a small piece of plinth, a ruler and a good stationery knife if you are working with polyurethane (polystyrene) baguettes or a metal saw for working with other materials.
Place the plinth against the corner and draw along the outer edge with a pencil. Apply to the other side of the corner and also mark. You have a cross on the ceiling, the center of which marks the place where the ceiling plinth strips should meet (look at the photo). Having placed a piece of plinth in the corner that will be glued there and resting its end against the wall, transfer the mark to it.
How to make corners on ceiling plinths without using special tools
Now take a ruler and connect the edge of the baseboard with the marked mark. If you simply put the plinth on the table and cut it along the line, the two parts in the corner will still not fit together: the inner part will get in the way. It can be trimmed later by trying it on the ceiling. The second way is to install the piece that needs to be cut on the table with the part that will be on the ceiling. And cut along the line, but holding the knife at an angle of about 45°. You will still need to make adjustments, but much less (and less likely to make mistakes).
Repeat the same operation with the second bar. Place it against the desired wall, rest the end against the adjacent wall, mark the place where the cross is drawn, draw a line and then cut it off. Adjustment is carried out “dry” without applying glue.
You repeat exactly the same steps for the outer (protruding) corner. Now you know another way to make a corner of a ceiling plinth, without a chisel or other special devices.
Using decorative corners
There is another, easiest way. For skirting boards made of polyurethane or polystyrene, use ready-made, factory-made decorative corners. They are installed in a corner, and the strips are glued tightly to them. Trimming them if necessary is very simple: a few millimeters with an ordinary stationery knife.
Examples of finished corners for fillets
How to join in corners
If the installation of the first corner is completed, you can assume that you have already learned how to do almost everything. “Almost”, because you still need to learn how to connect the corners and cut the planks to length. When some part has already been glued and there is a small distance left to the corner, how can you not make a mistake with the length? The answer is simple: leave a reserve.
At first, you can cut a piece 10-15 cm longer: you will have the opportunity to redo it several times if something doesn’t work out right away. Then you make an angle in the manner described above, try it on dry, adjust everything so that the result suits you. Only after this can you place the already cut strip in the corner and mark the place to which it can be shortened. You need to cut exactly 90°. It is not necessary to use a miter box. Just try to place the knife (hacksaw) perpendicular to the surface.
It is important to know how to join the corners of the ceiling plinth
It is no secret that the main function of the plinth, which is fixed at the junction of the ceiling and walls, is decorative. Despite this, both the fixation itself and the joining of the ceiling plinth in the corners is a rather difficult undertaking. The plinth strip must be cut into pieces of a clearly defined length and their ends must be carefully sawed off at an acute angle, using a miter box or a fine-toothed hacksaw. Only after these procedures have been completed should the ceiling plinths be joined in the corners and along the perimeter of the room. Due to the specifics of such work, it is necessary to take a closer look at how to join the corners of the ceiling plinth correctly.
Application of skirting boards for ceilings: technical features
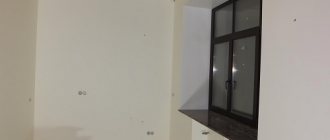
As you know, the direct purpose of the plinth is to hide the junction of the ceiling and the walls. If we are talking about a stretch ceiling, then here you need to hide the gap between the tension surface itself and the walls. In addition, ceiling plinth can also visually eliminate the problem of uneven corners in the room.
You can also use a plinth when installing hidden lighting, but here it is important to strictly follow all the instructions so that the plinth joint is made as efficiently and reliably as possible.
The production of ceiling plinths is most often made from materials such as polyurethane and foam, therefore, as a result, these elements are not very heavy. But you can also find wooden or plaster cornices. The standard length of the plinth strip is 2 meters. The surface structure can be either embossed or smooth. The most popular skirting board color is white, but if you wish, you can always purchase plastic skirting boards in almost any shade.
The ceiling plinth goes well with, for example, plastic tiles, panels and wallpaper. Often, the installation of plinths is accompanied by the installation of gypsum stucco elements, which gives the interior even greater harmony and a finished look.
How to join skirting boards on the ceiling?
It is important to remember that it is best to install the cornice before finishing the ceiling and walls, that is, before painting and wallpapering the wall. Particular difficulties may arise with how to join the corners of the ceiling plinth and its elements along the entire perimeter of the ceiling.
The length and width of the plinth strips may vary depending on who is the manufacturer of this finishing material. The width of the plinth is, as a rule, influenced by the size of the room being equipped. As for the length of the bar, it can range from one to several meters. The material itself from which the plinths are made, be it wood, plaster, foam, etc., does not in any way affect the process of joining the cornices (for more details: “How to join a ceiling plinth - options”).
Of course, the modern building materials market also offers examples of skirting boards that are completely ready for joining in the corners of the room. When installing such material, the connecting cuts will have to be made straight, not oblique. Of course, the cost of such cornices is higher compared to standard skirting boards.
The surface for installation must be properly prepared. It must first be cleaned of dust and dirt and allowed to dry. Before joining the planks, you need to level the attachment point, and also treat it with putty and primer. When installing a plinth on plaster, it is recommended to pre-treat the surface with water-based paint.
Not knowing how to join ceiling plinths in the corners, if the corners themselves are uneven, you should remember that such a device is quite possible to implement, it is only important to strictly follow all the instructions during installation (for more details, see the article: “How to cut down a ceiling plinth - methods”). You need to start installing the plinth from the corner of the room near the entrance to it. To properly cut the material at an angle of 45 degrees, it is best to use a device such as a miter box. This tool has the form of a box, which is equipped with slots at a variety of angles.
Elements necessary for joining the plinth
Joining skirting boards in the corners of a room is much more difficult than joining along the perimeter.
How to properly join the corners of a ceiling plinth
How to join the corners of a ceiling plinth: photos and instructions
The ceiling plinth performs mainly decorative functions; it allows you to hide all repair errors. It is attached after wallpapering at the junction of the walls and ceiling. A properly selected baseboard can visually expand a room. It all depends on the chosen model and size. Nowadays you can find a huge variety of ceiling plinths on the construction market. Currently, they are made from polystyrene foam, polystyrene, polyurethane, gypsum, polyvinyl chloride, which is the most economical option, and are also made from various types of wood. Wooden skirting boards look much more aristocratic than others, but they are also harder to work with. In any case, the choice will mainly depend on the style in which the room is decorated. Ceiling plinths are also called frieze, baguette or dumbbell.
A miter box is a carpenter's tool. It looks like a small tray that is made of plastic, wood or metal and has several slots for cutting at 45 and 90 degree angles. There are other types, they are designed for more complex and professional work, but they are not useful for ordinary repairs. Such a device can be purchased at any hardware store.
It is designed for cutting dumbbells at perfectly even angles, and if they are not such or the tool is not available for some reason, the element will need to be trimmed manually. To determine whether we need it or not, it is recommended to use a protractor. If they turn out to be crooked, then before installing the baguette they must be leveled with plaster or drywall.
The most difficult part of joining is cutting. The slightest mistake leads to wasted materials. Dumbbells are attached to the ceiling not like regular ones, but a little differently. It should be remembered that they are cut not only from the front side, but also along the outer edge. The simplest material to work with is polystyrene foam. It is easy to cut and not so fragile compared to other materials, so it is much easier to work with.
How to cut a baguette with a miter box
To cut a baguette, using a miter box, we fix it in the tray in the same way as it will be attached to the ceiling. Cut it along the guide groove. If it is wooden, then we cut it with a regular hacksaw. There is also a hacksaw for metal, and to cut polystyrene foam or polystyrene foam, we will use a simple stationery knife, but it must be very sharp so as not to damage anything.
How to cut a baguette without a miter box
If there is no miter box in the house, then an analogue of it is made with your own hands. Alternatively, draw on a simple landscape sheet. To do this, draw two lines on paper with marks of a certain degree. You can put them aside using a regular school protractor. They use a miter box of their own production in the same way as a purchased one. You just need to place the product correctly and cut off the excess part.
It’s also possible to make it with your own hands from three planks, making slits there that can be marked with a student’s square or the same protractor.
Simple secrets to successfully installing a baguette
When cutting, you should not use much effort, as the foam will crumble and the wood will split.
The dumbbell elements are usually tried on the wall, and if there are no gaps and everything fits tightly, then the job is done correctly.
After the plinth is fixed in the corners, it is recommended to fix all subsequent parts, but before that, treat them at the joint with sandpaper. You need to remember that the joining of each should be without cracks or irregularities.
For those who do not want to do difficult work, but are not ready to give up a decorative element of the apartment, there is the opportunity to use a special component that covers the joint. It looks very original and saves time and effort.
For a complete picture of the process of joining a ceiling molding, view it with a detailed description of the actions.
How to make an internal corner of a ceiling plinth
An internal angle is one that is no more than 180 degrees. These are the ones that most often have to be cut. Trimming the edges of a baguette is usually done with a miter box, but you can do without it.
If this happens with its help, then before joining it is necessary to take into account that the element touching the side of the tool when cutting is glued to the wall of the room, and the element touching the bottom part is attached to its ceiling.
It is recommended to measure the angle between the walls of the room, and if it turns out to be straight, then cut the dumbbell at an angle of 45 degrees. To make a cut, first place the desired element in a miter box. Then the edges are cut off.
If the walls turn out to be crooked, then the best option is to cut the baseboard yourself; you will need a ruler and a utility knife. To do this, attach two different parts to the wall and mark the cut location with a pencil, after which they carefully cut it.
To check the accuracy of the work done, the product is first tried on the wall, and only if it is cut without any errors is it attached, and if unevenness is noticed, they are very easy to correct using a utility knife and only then mounted.
Usually, if the corners of the room are even, then no problems should arise with them, but if not, then minor defects can always be eliminated, the main thing is to try hard.
How to make an outer corner of a ceiling plinth
Internal corners are much more common than external ones. Usually they are at least 180 degrees. Despite this, connecting them is not at all difficult.
To correctly cut a baguette, the first thing you need to do is draw a mark on it; to do this, we attach it to the ceiling and use a pencil to mark the place where the cut is planned to be.
Then we place the product in the miter box at an angle of 45 degrees. When it is already placed there, it is carefully trimmed. It should be remembered that if that part of the dumbbell is located more on the left side, then we cut it off according to the left designation, just like the inner corner. Next, we cut the right one according to the same plan.
When the ceiling frieze is already cut, make sure that it is done without any errors. To do this, place the two parts together and only if they fit perfectly can they be attached to the wall.
When cutting, the frieze should be kept straight, since when cutting curves, gaps appear when joining and for the same reason it must be cut only with a sharp blade.
How to make corners on ceiling plinths yourself without using a miter box
The most current method of cutting the corners of dumbbells is the use of slurry, but it is used only if the room is perfectly level. If the premises are more than 20 years old, then it is not like that. Therefore, if you use it in such a situation and cut the dumbbell at an angle of 45 degrees, a gap will form, and it will be almost impossible to hide it in the future. It is possible to cut a product without using it using available means. So, for work you will need:
- pencil;
- ruler;
- sharpened knife or jigsaw.
To cut a baguette strip without using special tools, you will need to follow several steps.
Step 1. You need to take one part of the plank and attach it to the wall exactly the same way it will look finished.
Step 2. Using a pencil, draw a line along the dumbbell itself and remove it.
Step 3. We attach the second part of the frieze to the drawn line in the place where it adjoins the first.
Step 4. Now you need to draw a line with a pencil in exactly the same way as in the first case.
There should be a marking where the baguette element will be attached.
Step 5. You need to lean one of the two plinths against the marking again, and transfer the point of contact of the two straight lines to it. This line on the bar will be the place for the cut. The exact same thing should be done with the second one.
Step 6. Once the cut lines are outlined, they need to be cut. It is recommended to cut with a jigsaw; it is easy to operate and has high precision in operation.
Step 7. Ready cut baguettes can be attached to the wall.
In order for the attached plank to look perfect, it is recommended to practice, first, on small pieces, and only after that do the final installation.
Now that the work on installing the ceiling plinths has been completed, you can begin further processing, namely painting them.
Modern style in the interior: the personification of convenience, practicality and functionality
Japanese style in apartment and house design
The brilliance and splendor of art deco in the interior of apartments and houses
Baroque: palace style in the design of modern interiors
High-tech style: from interior design to residential building construction
- How to make the outer corner of a ceiling plinth How to evenly cut the corner of a ceiling plinth When we evaluate a new renovation, we involuntarily direct our gaze to…
- How to cut off the corner of a ceiling plinth How to evenly cut the corner of a ceiling plinth When we evaluate a new renovation, we involuntarily direct our gaze to…
- How to choose skirting boards for the floor by color CHOOSE THE CORRECT How to choose a floor skirting board? — 7 basic rules “Life is like a multi-storey building...
- How to cut ceiling plinths in corners How to cut ceiling plinths in corners The quality of the ceiling finish greatly affects the appearance of the room.…
How to make a corner without using a miter box
How to join the ceiling plinth in the corners? It is possible to ensure an accurate fit using a device for cutting plinth strips at an angle of 45° only if the wall junction is strictly rectangular.
Otherwise, you will have to abandon the use of the miter box and make markings using a simple pencil and ruler. In this case, the marking procedure for internal and external corners is different.
Internal corner
Here, in the case of adjusting ceiling slats in places with a large deviation from 90°, the operations of marking and cutting the slats are performed in the following sequence:
- attach the uncut left fillet to the wall;
- draw a line with a pencil along the edge of the plank on the ceiling to the adjacent wall and set it aside;
- install the right bar in the same way, also draw a line, and at the point where the left one joins, put a mark with a pencil;
- Attach the left plinth again and put the corresponding mark on it;
- Place a ruler along the line connecting the marks you made to the bottom corner of the baseboard. This will be the conditional cutting line.
After this, check the accuracy of the markings and, if necessary, make small adjustments using sandpaper.
External corner
The technology for fitting external joints is the same, but the markings are made along the upper edge of the plank, extending beyond the corner. The mark on the baseboards is placed at the intersection of the ceiling lines.
For more information on how to glue skirting boards to the ceiling in the corners, you can watch the video presented.
It may seem strange, but fixing ceiling plinths with your own hands is often done better than it is done by professionals. Probably the fact is that the owner is not in such a hurry to finish the work and approaches its implementation more carefully.
Important to have with you!
- Sample. On a sheet of cardboard, draw a straight line along which the workpiece will be laid. Use a pencil or marker to mark it with a dot. Then, using a regular school protractor, mark the angles 90 and 45 degrees. Draw straight lines through the marks so that when using a saw you can clearly see them and it is easy for you to navigate;
- miter box. It can be purchased at the store or built from a plank and a couple of bars. A hand-made tool is no less convenient than a factory-made one. However, there are also universal miter boxes, which provide the ability to measure any angle and make an even cut on the workpiece.