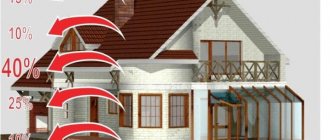
The main criterion for successful repair is visual surface symmetry, and the main condition for this will be perfectly straight walls. You can achieve excellent condition of the walls using different methods, and these primarily include leveling the walls with plasterboard. But then additional preparation is required for painting or gluing wallpaper onto drywall.
It is about how to prepare drywall for wallpaper that will be discussed in the article. For convenience, it is necessary to present the entire process as step-by-step instructions that will help you become familiar with the main set of tools and the principle of operation in the field of wall preparation.
Drywall primer
In order for the putty to lay evenly and stick well, you need to treat the walls with a primer. The same product will prevent the appearance of fungus and mold on the sheets.
The primer is applied with a brush (in corners, at joints, niches, on figured elements) or with a roller (on a smooth and even surface). Consumption depends on the composition used. As a rule, all norms are prescribed in the instructions. The primer is applied generously, then allowed to dry.
Only clean tools should be used. Otherwise, grains of sand or small pebbles may stick to the wall, and this will complicate the puttying process.
Preparing the surface for gluing after puttying
After the putty has dried, the walls are sanded with special abrasives: mesh or sandpaper.
The advantages of mesh are its wear resistance and the absence of dust accumulation, however, sandpaper is a more common choice due to its affordable price, despite its rapid grinding and frequent clogging. Also, for better sanding you will need a flashlight: a beam of light at an angle of 45° will show all the imperfections of the wall. You can do without sanding if putty is applied professionally, but even experienced craftsmen clean the finished finish with at least zero-grit sandpaper.
Sanding corners requires special attention: for this purpose, use a special sanding sponge with beveled edges.
Putty joints
Next the joints are sealed. When understanding how to prepare plasterboard walls for wallpapering, you need to understand that this is the most crucial moment. If the seams are puttied poorly, there will be bumps and holes on the wall, which looks very ugly. The depressions will be noticeable even under the wallpaper.
To do this you will need the following tools and materials:
- putty knife;
- serpyanka mesh;
- special putty for seams;
- container for working solution.
USEFUL INFORMATION: Drywall slopes: do-it-yourself installation
Work progress:
- The edges of the sheets are chamfered at the factory at an angle of 45 degrees. If the drywall is cut, you need to remove the chamfer before installing the sheet with a special plane or after installation using a sharp construction knife.
- Before puttying, the joints are especially carefully treated with a primer, which must dry completely.
- First, dilute the putty according to the instructions. Then the working solution is applied along the entire length of the joint, carefully ensuring that the gap is filled.
- The solution is also applied 5 cm to the left and to the right of the joint. Then a sickle mesh or paper tape is laid on top of the first layer, which will reinforce the joint. The mesh must be laid so that it lies flat and fits tightly to the surface of the drywall. Then the next layer of putty is applied over the mesh, leveling it to create a smooth surface without bumps.
Mesh or tape can also be used to process internal corners, especially if the walls do not meet clearly perpendicular to each other. To ensure a clear angle, the mesh must be carefully pressed with a spatula. If this is not done, the corner will turn out to be rounded.
Simplified step-by-step instructions
The putty is applied in two layers to the entire surface, so there will be enough time for practice.
To understand how to finish drywall for wallpaper, we suggest you read the simple step-by-step instructions.
- We check whether the sheets of drywall are laid evenly. They should create one plane and not protrude above each other.
- The screws are tightened if the caps are not recessed. It is necessary to move the spatula over the surface. He shouldn't cling to anything. If it catches the screw, then it needs to be tightened.
- At the joints of the sheets, a chamfer is removed if this has not been done previously. There is no need to touch the factory edge. The chamfer is cut only at those joints where the gypsum core of the sheet is visible.
- The screw heads and cut joints are primed and then puttied. The joints are additionally reinforced with serpyanka.
- The entire surface is primed, and then the starting putty is applied.
- The surface is rubbed with sandpaper.
- Everything is primed again, and then the finishing putty is applied.
- If necessary, the wall is sanded to make it as smooth as possible. This step is usually done when painting the wall further.
Next, we will consider all these stages in more detail.
Checking screws
When processing joints, check how the screws are screwed in. Their caps should be recessed into the surface of the sheet by about 1 mm. If the heads rise above the surface, then they need to be deepened. To do this, they are simply tightened with a Phillips screwdriver or screwdriver.
Finding out whether the cap is recessed enough is simple: just run a spatula along the wall. If the tool does not cling to the screws, then they are screwed in correctly.
The places where the self-tapping screws are attached are covered with a thin layer of putty using crosswise movements, so as to level the surface.
Details
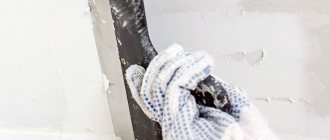
Sealing joints
The next step will be sealing the joints, and this will help you:
- Putty (finishing).
- Phillips screwdriver (if there are self-tapping screws).
- Container with wide sides (basin, bucket).
- Reinforcing mesh (serpyanka).
- Spatula (a couple of pieces).
This operation is extremely important so that the sheet of drywall will last as long as possible, because in the future you may decide to re-glue the wallpaper, or give up completely and paint the walls. It should be immediately noted that in addition to factory joints, there is usually a certain number of forced joints, which at first may not be touched at all, but such a judgment is erroneous. They need to be embroidered with a knife at 45 degrees before priming, in other words, chamfered, and then proceed as with factory-type joints. Using a wide spatula, apply the first putty layer on the gypsum board along the joint and along its entire length, and then apply the pre-finished or cut mesh in a whole piece to the joint, gradually pressing it into the solution with gentle movements of the tool. There is another method, and following it, a pre-cut mesh needs to be fixed to the joint using an adhesive compound, and putty on after drying, and in this case, preparing the walls for wallpaper will be faster.
Afterwards, you need to level the joint with a new layer of putty, leveling the surface and the sheet of drywall, the layer should penetrate extremely deeply into the seam part, but there should be no bulges or other wall irregularities on top, and the wallpaper in such places will begin to bulge. This operation should also be done with the internal corners so that the wallpaper does not tear after a while, and only after applying the mesh with another layer, be sure to press the canvas into the corner using a spatula along the entire length so that there is no “oval corners” effect. Some people use an aluminum corner with a glued mesh for this (see below), but this will become an extra expense, and such a detail will worsen the symmetry of the corner and will begin to protrude from the wallpaper. After drying at the seam, the putty will be pulled inward.
Preparing plasterboard walls for wallpaper is extremely important, because if you paste wallpaper without additional seam treatment, it will look like a depression, but do not worry, in this case you will need to apply an additional layer of putty along the recesses of all wall surfaces. There is another significant point - if you attached the sheets to the profile with self-tapping screws, then the places where the caps enter it must be processed in advance. Self-tapping screws must be recessed deep into the walls so that they do not pick on the spatula, and such places must be covered with a thin layer of the compound; otherwise, after gluing the wallpaper, they will be subject to rupture in wall areas where the gypsum board is not reinforced.
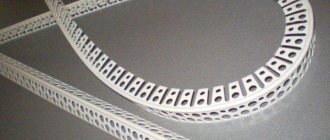
Preparatory stage for external wall corners
Providing external corner protection:
- Counter tentacles (aluminum type corner).
- Construction level (with a length of at least 1 meter).
External corners are at greatest risk for wall chipping because drywall is not the strongest. To save the outer corners, counter-tentacles help you - perforated corners made of plastic or aluminum, and there are options with sickle tape glued to it; ideally, you should use them. With strong impacts, the corners are very likely to leave the drywall intact, but you should not assume that this is a panacea, and also be careful not to allow the wall to chip! Installing the angle iron onto drywall is the most difficult part of wall preparation, and you may need an assistant.
Using even strokes, you need to apply the putty with a spatula inside the corner, and then, with extreme caution, so that there is no fracture under the weight of the applied composition, you need to bring it to the designated corner and glue it to the drywall, without fully pressing it into the wall. Remove excess material with a spatula and place a level along the overall length of the two parts of the corner, recessing it with a level if necessary. When it dries a little, you need to go over it with a new layer - covering all the holes in the corner. Make sure that the corner does not protrude beyond the gypsum board. After drying, remove all uneven areas and excess material along the walls that was applied to the drywall. Once drying is complete, you can proceed to the finishing step.
Plasterboard putty
After the completed operations, another step will come - you need to cover the entire sheet of drywall with the finishing composition. This will require all the tools used previously, except that one of all the tools needs to be taken a little wider, about 0.4-0.5 meters, for filling the walls. In an even line, you need to spread a layer of putty on a large spatula, and use it to apply it to the wall surface, evenly distributing the material.
Particular attention should be paid to the inner corners; first, putty the wall from the corner to the other side, letting it dry a little, and only then start working on the second side, which will make it possible to avoid “burrs” on the already prepared side.
It is better to finish the material as soon as possible with a finishing composition and apply it to the wall surface in a thin layer. The wallpaper sheets fit more tightly to it. At the end of the process, let the walls dry, this will take at least a day. As in the case of the primer composition, it is necessary to avoid foreign objects getting into the material, even the smallest particles that are invisible to human vision, because when you move the tool, the debris will begin to leave deep grooves, exposing the gypsum board, which are quite difficult to deal with.
Rubbing walls under wallpaper
While waiting for the surface to dry completely, you need to carefully inspect it, pay attention to all the flaws that can ruin the glued wallpaper sheets after gluing. If such are found, then you need to arm yourself with a grater with a diamond-type mesh. All irregularities must be carefully smoothed over, this will especially apply to wavy areas, and they will not be hidden by wallpaper. As always, special attention is paid to the inner corners if there is a lot of dried material on them, and it is important to remove them extremely carefully, do not go to extremes and do not leave grooves with the side of the grater, and the wallpaper will not cope with them either. When working with a diamond mesh, it is imperative to protect your eyes and respiratory tract; tie a scarf over your mouth and nose, and your eyes can be saved with glasses that fit tightly to your face. The mesh will have the ability to imperceptibly cause small cuts on your hands, to avoid discomfort, use gloves.
Processing external corners
Drywall is a rather fragile material. The outer corners are especially susceptible to destruction: chips often appear on them. To prevent this from happening, they need to be reinforced, but a simple sickle mesh will not be enough for this. For external corners, a special perforated aluminum corner is used.
USEFUL INFORMATION: Gluing wallpaper for painting on the ceiling
For work you will need:
- putty;
- putty knife;
- perforated corner;
- level;
- container for putty.
Sequence of work:
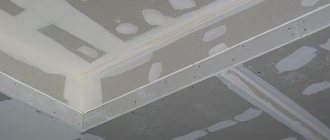
- A layer of putty putty is applied to the corner and the perforated corner is carefully placed against it.
- The aluminum product is carefully pressed into the wall. When pressed, the solution will protrude through the perforation. Excess construction mixture is collected with a spatula.
- Use a level to check how level the corner is. If necessary, it is trimmed, pressed with the level itself or the rule. The aluminum corner should stand up straight and not stand out from the general plane.
- When the putty has hardened, final leveling is carried out: the corner is rubbed with mortar, the perforation is filled with building mixture, and the plane is leveled.
Additional work with corners
Wallpaper is pasted not only on a flat surface, but also in corners, both external and internal. The outer corners are already reinforced, so you need to align them. To ensure that the reinforcing corner is not noticeable under the wallpaper, it is necessary to properly level the putty.
It is necessary to ensure a smooth transition from the edge of the corner along the wall. A level or ruler, which is applied to the wall parallel to the floor, will help here. If there are gaps, then you need to align the corners further.
Also pay special attention to internal corners. To make everything as simple as possible, they are glued with cobwebs (reinforcing tape). Moreover, the web is glued along the inner corner on both sides of the wall. This should be two separate pieces of tape. Then everything is puttied.
It is convenient to make an even angle with a special spatula
To make work easier, you can use a special angled spatula. With its help you can easily make an internal corner. You can go with the classic option, leveling one wall and then the second. As a result, the inner corner will turn out by itself.
Drywall putty
Now begin the finishing putty of the drywall. For work, it is advisable to use 2 spatulas: small and large (up to 50 cm):
- Using a smaller tool, scoop up the mixture and spread it evenly over the wider one.
- Using a large spatula, apply the solution to the wall and spread it in a thin layer.
It's better to start from the corner. It is recommended to level the second wall in the same corner only after the mortar on the already treated wall has set. This will reduce the risk of damage to the leveled coating on the finished side.
After all the walls have been puttied, you need to let the solution dry. It will take at least a day to dry.
Plasterboard wall putty
How else to treat drywall before wallpapering? of course, with putty, which is applied to the dried soil. It is needed for the following:
- to level the surface. Although the coating is already smooth, a difference in gypsum board layers is possible. It is also necessary to make smooth transitions from the outer corners. There are reinforcing corners installed there, which have a certain thickness. These corners already protrude above the general plane and must be aligned to fit the entire wall;
- to make a white backing. Drywall has its own color, which can show through under light wallpaper. Also, a layer of putty helps to completely hide the heads of the screws so that black spots are not visible under the layer of wallpaper;
- so that the wallpaper can be easily re-pasted. You can paste the wallpaper using wallpaper glue directly onto the drywall. Paper adheres to paper very well, so there will be no questions about reliability. However, such wallpaper can only be removed together with cardboard. If you glue them to a putty wall, they will come off much easier.
By applying the putty with a large spatula, you can reduce the time for repairs.
The starting putty is diluted to the desired consistency according to the instructions on the package. It should be without lumps. The process of applying the solution to a gypsum board wall is very simple. Use a small spatula to scoop up the solution from a bucket and place it on a large spatula. Then, using a large spatula, it is applied to the wall, where it is evenly smeared.
You need to mix small portions of the solution so that it does not dry out in the bucket. It is best to use gypsum putty. But cement-based material should be abandoned. In damp rooms, it is best to use acrylic putty, as well as acrylic primer.
In order for the preparation of drywall for wallpapering to be as effective as possible, it is necessary to apply putty correctly. The spatula must be pressed against the wall with equal force, spreading the solution over it. The angle of the spatula is also important. By changing the angle, you can control the amount of putty applied, and it should be the same on the entire wall.
When the solution dries, you will need to rub the wall using coarse sandpaper, eliminating all the created defects. There should be no bumps or protrusions left.
Grinding
This is the final leveling stage. To carry out the work you will need a special grater with an emery mesh.
Attention! At this stage, protective equipment is required: a respirator, goggles and gloves. When grouting, a lot of dust is generated, small particles of putty fly off, which can get into the eyes or respiratory tract. The mesh can scratch your hands, so it is advisable to work with gloves.
Use a grater to go over all the irregularities: waves, bumps, lumps of solution, stuck particles. It is important here not to overdo it and not to strip the putty down to the drywall. Internal corners require special attention, as there is a risk of leaving grooves from the trowel on the adjacent wall.
USEFUL INFORMATION: Which wallpaper is best for a children's room?
Grouting walls under wallpaper
After waiting for the surface to dry completely, carefully inspect it, pay attention to all the flaws that could spoil the pasted wallpaper after gluing. If you find any, then arm yourself with a grater with a diamond mesh
All irregularities should be thoroughly smoothed over, especially for wavy areas; wallpaper will not hide them. As always, pay special attention to the inner corners; if there are excess accumulations of dried material on them, they should be removed very carefully, it is important not to overdo it and not to leave furrows with the side of the grater; the wallpaper will not cope with them either. Important! When working with a diamond net, be sure to protect your respiratory tract and eyes, tie a scarf over your nose and mouth, and glasses with a tight fit to your face will protect your eyes.
The mesh has the ability to imperceptibly cause small cuts on your hands; to avoid discomfort, use gloves.
Primer
The final stage of the step-by-step instructions for preparing drywall for wallpaper is priming the putty surface. You can use a special mixture as a primer for wallpaper, or you can dilute the wallpaper glue to a more liquid consistency and treat the surface with it. The purpose of this layer is to ensure better adhesion of the wallpaper to the walls and strengthen the putty layer.
The base is primed in the same way as described above: the corners are coated with a brush, and the walls themselves are coated with a roller. Then the surface is dried. And only after this can we consider that the preparation of plasterboard walls for wallpaper is completed.
Preparation of materials
It is necessary to purchase all consumables and auxiliary tools in advance so that you do not have to run around for them during the repair process:
- primer. A special composition is used to improve the adhesion of the surface to the material applied to it. Since the gypsum board will be puttied, it is necessary that the putty adheres well. For these purposes, a primer for drywall under wallpaper is used. There are special formulations on sale that are designed to work with gypsum boards. The same primer will be used before applying the second layer of putty, but more on that later;
- putty. The paste-like material is applied in two layers. This is how a white backing is made for the wallpaper so that it sticks better and can be easily removed for repairs in the future ;
- a perforated corner is used for additional reinforcement of room corners;
- a special tape (paper or fiberglass) is used to reinforce joints;
- a set of spatulas is necessary for applying putty. Moreover, you need a set with different blade lengths;
- a roller and a paint brush will be required to apply the primer;
- a mounting knife is used to chamfer the joint of sheets.
Nuances
Recommendations for doing the processes yourself:
- To prevent the appearance of mold and mildew in a room with high humidity, the base and inside of the gypsum board sheet are pre-treated with an antiseptic. An alternative is to use GKLV.
- Activities are carried out using finishing putty; starting compositions require longer grouting.
- If the resulting layer of putty has waves and sagging, then the wall is treated first with coarse sandpaper and then with fine sandpaper.
- To prime the surface quickly, use a spray bottle and a roller (to eliminate drips).
Compliance with the rules and sequence of stages guarantees the achievement of the desired result.
Drywall is a common material that is often used to decorate walls with your own hands. After processing, the surface does not require additional leveling. The material is based on gypsum, which does not burn, does not contain harmful substances, is lightweight and safe for others. It’s not for nothing that the premises are decorated with it. But, after such work, it is necessary to decorate the surface, since the drywall itself does not look very attractive. The best option is wallpaper.
And no matter how strange it may sound, the drywall must be prepared before wallpapering. Although the sheets of drywall are perfectly flat and smooth, they are not monolithic. That is why after finishing the walls there are seams between the sheets. In addition, drywall is attached using screws, the heads of which must be hidden. All this prevents you from gluing wallpaper directly onto drywall. How to be? What do you need to do to hang wallpaper on drywall with your own hands? Let's find out.
Fashionable wallpaper is heavy in weight
Today the fashionable wallpaper is heavy, vinyl, with complex patterns and embossing. What can I say, they look great. The room with them turns into a real fairy-tale palace. But to stick them on, you need absolutely flat walls.
Only drywall can create such a surface. This is the only material that can help out if necessary. That is why our article is dedicated to him.
Finishing walls with plasterboard for wallpaper is not too difficult a job. But it requires patience, diligence, and attention.
First, let's look at the main stages of our activities:
- We seal the seams in the drywall.
- We putty the walls.
- We prime them.
- We paste the wallpaper.
Ready primer
How to properly seal joints and corners
Seams must be sealed carefully; these areas are often the cause of torn wallpaper and cracked putty. First, you should apply sickle tape to the joints. If the purchased glue does not glue the serpyanka efficiently, you can add PVA glue. The top of the fixed tape is covered with a starting putty solution; it is necessary to go 1-1.5 centimeters beyond its edges. The layer is leveled.
It is important to strengthen the outer corners of drywall, because they are fragile. For this purpose, aluminum or plastic corners are purchased. The corners need to be covered with a thick layer of putty mortar, the corners are applied to it, and the evenness of their position is checked with a building level. Any excess solution that appears must be rubbed, fixing the profiles.
You should not choose metal profiles; over time, moisture can cause rust to form on them, and as a result the wallpaper will turn yellow.
It is important to strengthen the outer corners of drywall, because they are fragile.