Why do you need to concrete the floors and walls?
The basement is deep underground, so cementation and waterproofing of floors and walls should be done. The construction of a concrete screed is advisable in the following cases:
- heating the basement;
- use as a living room;
- applications for arranging a workshop, gym, garage, sauna;
- placement of a boiler room or similar technical premises;
- placing a cellar for storing food;
- increased soil moisture.
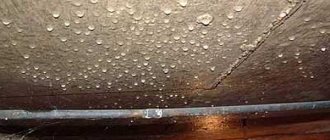
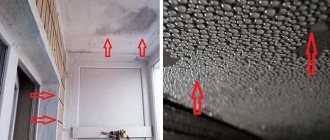
When exposed to damp fumes from damp earth, pipes, furniture, equipment, wall and ceiling decorations deteriorate. The house may fall into disrepair.
Return to contents
Design features
To build a concrete cellar with your own hands, you should take into account:
- external size of the structure – 2.4*4.7 m;
- height above ground level - without insulating soil layer - about 1.2 m, vestibule - 2.2 m (at the top point);
- internal dimensions: 2.0*3.3 m, height at the top point of the arch – 2.1 m, vestibule – 2.4*1.0 m, height 2.1 m;
- reinforced concrete staircase, 1.0 m wide, concrete platform 1*1 m, six steps 150*300 mm;
- floor and wall material – adapted concrete with partial reinforcement;
- natural ventilation - implemented through ventilation ducts.
To build a cellar made of monolithic concrete, you will need the following tools:
- concrete mixer;
- carpentry supplies - hammers, tape measure, cord, axe, crowbar, etc.;
- power tools – jigsaw, grinder, screwdriver/drill, circular saw;
- entrenching tools – shovels, picks;
- wheelbarrows, trowels, buckets, etc.
In the absence of a concrete mixer and power tools, you can carry out all the work using hand tools.
Tools and materials
To complete the process you will need the following tools:
- bucket;
- shovel;
- grater and trowel;
- base rammer;
- container for concrete solution;
- sander;
- level;
- waterproofing;
- construction tape;
- reinforcement or steel mesh;
- beacons;
- rule for leveling concrete;
- grinder with stone discs;
- ironer
Materials you will need:
- cement M400;
- standard crushed stone;
- quarry sand;
- tap water;
- chemical additives that increase hydrophobicity and strength of concrete (if necessary).
Instead of a shovel or a container for mixing concrete mortar, a concrete mixer is suitable. With its help, the process of preparing a high-quality mixture will go faster.
Return to contents
Technological process
The concrete floor in the basement is done in six stages:
- Digging a pit with a width that takes into account the dimensions of the walls and formwork.
- Creating a sand cushion with crushed stone.
- Installation of formwork.
- Laying a waterproofing layer.
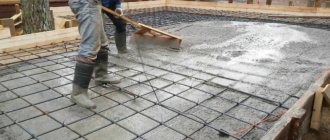
- Reinforcement with reinforcement.
- Pouring concrete.
Return to contents
Preparing the floor for cementation
Concreting on the ground is an ideal option for screeding.
The ideal option for laying screed in the basement is concreting on the ground. Preparatory work is kept to a minimum: get rid of debris and vegetation, compact the soil and you can start screeding. When new floors are installed over old ones, you should:
- cleaning of the old coating and subsequent identification of flaws;
- eliminating cracks and chips by expanding them and treating them with sand-cement or a polymer composition;
- dismantling areas beyond repair;
- adjustment of differences in the height of the base using a milling machine;
- cleaning the surface from dust, otherwise the adhesion of concrete to the old floor will deteriorate.
If it is not possible to create a perfectly flat base from the old coating, it is recommended to lay a sub-concrete layer.
Return to contents
Filling the pillow and compacting it
When laying the floor directly on the ground, it is immediately tamped, then a cushion of crushed stone or small stone is laid. The layer will give the base hardness and prevent the possibility of cracks. Next, a sand cushion is laid in a layer of 0.5-1 m, which can lose up to 25% during further compaction with a roller or vibrator. This fact must be taken into account when backfilling. After compaction, the sand is watered.
Return to contentReturn to content
Waterproofing
After constructing the cushion and compacting it, waterproofing is carried out. The moisture resistance of the future floor depends on the quality of this work. The height of this parameter will protect the room from fungus and mold, and damage to property. For waterproofing, rolls of bitumen, polymer material or dense polyethylene film are used.
The selected material is overlapped over the entire floor and secured with tape. There should be no gaps or cracks. The excess is cut off. The overlap of the waterproofing on the wall is 25 cm. This will protect the joints from moisture. The first layer of concrete can also be insulated from moisture. For this purpose, coating insulating materials are used.
Return to contents
Laying metal mesh
If the basement area is large, it is recommended to lay a reinforcing layer on the floor to strengthen the structure. Initially, the surface needs to be divided into squares. Then you should mark with boards 2-2.5 cm thick.
The fittings are selected depending on the purpose of the room and the expected load. You can use thick metal rods or reinforcing mesh (knitted, welded). As a rule, a road mesh with a core diameter of 0.5 cm is used.
For heavy loads, it is recommended to additionally use a steel rod with a cross-section of 1-1.6 cm. As an alternative, reinforcing fiber is suitable - steel fiber mixed with a concrete mixture.
Return to contents
Placing beacons and performing screeds
Before pouring the floor, it is important to position the beacons correctly. How smooth the surface will be depends on the work done. The formation of beacons is carried out at the stage of laying the first portion using half the volume of the mixture. Hills are created at a distance of 1 m from each other, and a rail with a notch is placed on top. Using the level established by leveling, the top of the beacons is adjusted to the bottom of the rail.
For floor screeding, a grade of mortar no lower than M400 is used. Fine marble or granite is mixed in as a filler. For the first layer of masonry, a hardener or plasticizer is added. Depending on the area of work, a vibrating screed or deep vibrator is used for leveling.
Return to contents
Drying
When the concrete has set, you can begin pouring the walls.
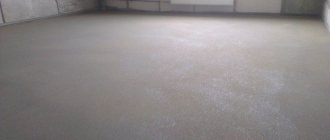
After laying each layer of concrete, you should wait some time during which the screed gains strength and dries. This process can occur without intervention for at least a day. To speed up the hardening process of the concrete screed without loss of strength, it is recommended to use a vacuum operation. To do this, filter material is laid on flat concrete and covered with an airtight mat. A vacuum pump is attached to the center of the mat, which draws off excess moisture without damaging the quality of the screed. Drying using this method will only take 7 hours.
Drying of concrete is complete if a trace of up to 4 mm remains on its surface.
When the concrete is sufficiently strong, you can remove the beacons and fill the furrows with sand-cement. It is better to walk on the surface of fresh concrete using a sheet of plywood. After this, the floor is covered with plastic film. Full maturation of concrete is 28 days.
Return to contents
Sanding and grouting
Grouting starts from the walls and doorways to the middle. To do this, it is recommended to use a topping or concrete hardener. The process is considered complete when the surface has completely absorbed the grouting material. The process is repeated three times. The final stage is considered to be the one when a trace of up to 1 mm remains on the concrete. For a screed with a small load you will need 5 kg, for medium sizes - 8 kg, for colored floors - 8 kg of grout per 1 m2.
Return to contents
Which concrete cellar design option to choose?
The foundation of a basement or basement can have two types of construction:
- monolithic;
- made.
A monolithic structure is created by filling the formwork with concrete mortar. This option is more difficult to implement, but it has many advantages. The design has reinforced rods that increase their strength.
The monolithic structure is able to withstand very high stress created by water and heaving soil, which contains loam. Freezing water will crush foundations made of wood or concrete blocks.
Unlike a monolithic structure, concrete blocks for basement walls cannot provide the same strength and water resistance, but they will require less cost and are quick to install. Therefore, many people prefer a DIY concrete basement.
Any of the above options requires the addition of waterproofing and a drainage system. Concrete mortar up to 25 cm high is filled on top of the coating.
Monolithic
The technology for constructing a basement floor using a monolithic method appeared more than 100 years ago. It allows you to build reliable basement walls from FBS and a cellar floor that is dry and durable.
The base can have different heights. It is necessary to take into account whether there will be an underground floor, an underground floor, a sewer system, as well as the design of the roof and other elements. As a rule, the final value is in the range of 1.5-2 m. The monolithic concrete plinth is reliable.
In order for the room to be used for various purposes, it is necessary that the structure have vents and openings for communications. Creating ventilation holes is not difficult, so you can do it yourself. The height of the holes should be from 25 cm.
Advantages of a monolithic design:
- The likelihood of moisture getting into the room is reduced to zero.
- It has high mechanical strength.
- If you know the technology and follow the rules, creating a design is not difficult.
Each type of construction has its own nuances.
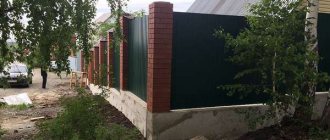
The basement, which has a monolithic structure, is suitable for creating a sauna, garage or room for any other purpose. Good water resistance should not make the wearer feel relaxed. It is imperative to take care of creating a waterproofing layer.
Made
Concrete blocks for basement walls have a relatively low cost. With their help, you can quickly create a foundation; you don’t need to think about the composition of concrete and adding various components for reliability.
The prefabricated design option is better suited for people who are creating the foundation of a basement floor for the first time. The main thing is to take care of waterproofing and openings for all communications.
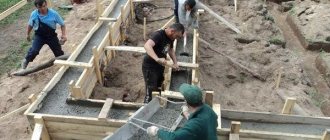
How are walls poured with concrete?
Installation of formwork for pouring concrete.
For basements, it is recommended to construct monolithic walls using solid strip foundation technology. The structure can be filled in several stages:
- preparation of trenches;
- laying sand cushions;
- installation of formwork;
- laying a waterproofing layer;
- reinforcement;
- pouring concrete.
It is necessary to install the formwork for the walls after the concrete floor has completely dried, otherwise the fresh masonry will be pressed through and beveled.
Return to contents
Selecting wall size
When constructing monolithic walls, their thickness is selected depending on the expected number of storeys of the house and the type of soil. Thickness can vary between 20 and 40 cm.
Return to contents
Preparing the trench
When using monolithic casting technology, it is necessary to dig trenches under the walls of the future basement. One of their parts will be a strip foundation. The depth of the trenches should be 150-200 m, width - 0.4-0.6 m.
Return to contents
Installing a sand cushion
The layer of sand cushion should be at least 20-40 cm. This value depends on the expected size of the walls and the total load. The sand layer is compacted. For complete compaction you need to wait three days.
Return to contents
Installation of formwork
To install removable formwork, wooden or aluminum panels are used, for non-removable formwork, polystyrene boards are used. The latter option further acts as a thermal insulation layer.
Waterproofing
The walls need waterproofing. The process is carried out at the stage of medium hardening of concrete. To do this, the joints between the walls and the floor, the seams are cut into grooves measuring 3 x 3 cm with a grinder. These grooves are filled with a penetrating waterproofing substance.
No less important is the final waterproofing of the walls. Using a brush or spray, the penetrating substance is applied to the surface, previously cleaned of traces of grease and cement laitance. After which the joints and seams on the wall are covered with a polymer film and periodically moistened for two to three days.
Return to contents
Reinforcement and concrete masonry of the wall
Despite the strength of high grades of concrete, there is a risk of partial destruction of the structure due to soil vibration. To avoid this, it is recommended to strengthen monolithic walls with a metal frame made from an assembly of steel rods in the form of vertical columns, transverse beams and reinforcing mesh.
Reinforcement is carried out in 2 or 3 layers depending on the size of the wall. Sometimes the reinforcement is laid in the middle, and the mesh and thick wire are placed at a distance of 15% from the edges on each side. We fill the walls with waterproof concrete W10 and higher. The M300 grade with strength B22.5 and workability P1 or P2 is suitable. When constructing a wall, it is important to connect a new portion of concrete with the unhardened layer that was previously laid inside the formwork.
Return to contents
Why is a concrete cellar better than an earthen or brick one?
When choosing material for creating a cellar, you must be guided by the groundwater level at the construction site. Dry soil and lack of water give the developer 3 options at once: a basement made of foam blocks, wood, brick. The high groundwater level leaves no alternatives. Concrete would be a suitable option.
A concrete cellar has a number of advantages
Concrete and metal are materials that are characterized by low hygroscopicity. This means that they do not absorb water and do not change structure even when left in a damp place for a long time. Using concrete and reinforcement elements, you can build a perfectly reliable and durable basement.
Properties of concrete cellar material:
- The presence of additives increases the hygroscopicity of concrete, making it impermeable.
- Hygroscopicity can be reduced by using a concrete vibrator. It compacts the structure, which directly affects the reduction of hygroscopicity.
- The use of special impregnations blocks the access of water even through the capillaries that are present in the material.
- The inside of the cellar is treated with rubber paint, adding water resistance.
Using at least a few of these means, you can create a durable monolithic or prefabricated structure through which groundwater will not enter the house.
In this video you will learn how to make a concrete basement: