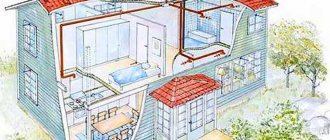
The durability of a private house made of any building material largely depends on regular ventilation of the space located under the lower ceiling. The ideal option is when underground ventilation in a private house is designed and implemented during the initial stage of construction. Then it is calculated and arranged correctly.
You will learn everything about the competent organization of a system designed to remove excess moisture from structures partially or completely buried in the ground in the following article.
We will talk about the important functions performed by ventilation. We will show you how to correctly position and install components designed to remove exhaust air and supply fresh air.
The need for underground ventilation
Organization of underground ventilation in a private building is mandatory for the following reasons:
- Due to the temperature difference outside and under the floor, condensation settles on the joists with the floor beams and on the base. Without proper ventilation, drops of water containing acid destroy concrete, brick, and wood, causing corrosion of building materials.
- Humidity contributes to the appearance, spread and development of mold and mildew, affecting wood, metal and concrete. Mold that has already appeared does not disappear when the moisture level naturally normalizes, and with its subsequent increase it will begin to develop more actively in the affected areas;
- The enclosed underground space accumulates carbon dioxide, especially if autumn preparations with the harvest are stored in it.
The humidity of the underground increases due to contact with soils, which always contain water in different proportions.
Humidity is especially felt at the soil level, i.e. soil-vegetative layer up to 40 cm thick, actively absorbing precipitation and regularly irrigated during irrigation.
If the ventilation system is absent or insufficiently effective, the underground will be damp. Due to the lack of oxygen, a favorable environment for the development of anaerobic bacteria will be formed. In addition to this, carbon dioxide will begin to accumulate
Underfloor ventilation is necessary for almost any design solution. An exception is the construction of a floor on the ground, according to which beams or slabs are laid directly on the sand or crushed stone fill, and do not cover the spans between the foundation walls.
Supply and exhaust ventilation device
Now let's look at how to make ventilation in the basement. The easiest way would be to make ventilation in the cellar or basement of the supply and exhaust type or forced.
First, let's do the calculation.
For 1 m2 of area there should be 25 cm2 of the cross-section of the air duct.
As the ceiling height or humidity increases, the diameter of the duct increases. A wooden box can be divided into two halves for supply and exhaust ventilation, but it is best to use plastic pipes or metal corrugated boxes.
Wooden ventilation parts must be treated against mold and painted.
The supply and exhaust ventilation device can be supplemented with a deflector on the roof of the house. It will create additional vacuum in the pipe and improve the release of warm air.
A controlled forced system will be much more effective with comparable labor costs. To do this, we will need special duct fans that operate on a voltage of 36 V. This feature is associated with the category of all basements that allow the use of only such currents.
Therefore, a transformer is installed in the electrical panel, reducing the voltage from 220 V to 36 V. And the wiring must be laid in cable channels. These and other rules can be found in SNiP 41-01-2003 heating, ventilation and air conditioning.
For small rooms, only one such fan per exhaust arm will be sufficient. The flow of fresh air will be carried out due to the vacuum in the basement. But the efficiency of the system will be much higher if you install a second supply pump and combine their work into one control panel.
Now on sale you can find programmable control panels with temperature and humidity sensors, and the duct fans themselves are available in all sizes and are compatible with almost any ventilation ducts. For convenience, they are already built into the body, have a protective grille and replaceable filters.
It is preferable to use PVC as pipes for ventilation ducts in your own home. They are strong and lightweight enough to be attached to walls and ceilings using regular dowels. They are not afraid of moisture and temperature changes, and the cost is lower than steel structures.
Condensation will always form in the exhaust ventilation ducts, which must be removed periodically. To do this, you can provide a special hole for draining water. Excess moisture leads to corrosion of metal structures and increases the likelihood of air duct freezing in winter. If this happens, you should definitely clean and defrost the channel.
Functionality check
Determining air circulation is quite simple. To do this, you can use the open flame of an alcohol burner or candle, or attach a sheet of paper to the opening of the exhaust duct. A good hood will hold the leaf securely. A thermometer installed in the area of the supply air duct will not do any harm.
The following signs indicate poor ventilation in a basement or garage:
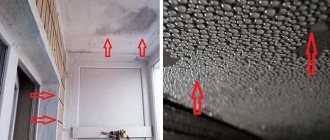
- Condensation appears on the walls , and humidity exceeds 95%. The permissible maximum humidity for storing workpieces and crops is 85-90% at a temperature of 3-40C. For residential premises and garages, humidity levels should not exceed 40-50%;
- Mold and fungal growths on walls and ceilings;
- Unpleasant smell in the room and heavy stale air;
- Sudden changes in temperature indicate an incorrect design of supply and exhaust ventilation or errors in calculating the cross-section of the channels;
- In warm weather, condensation may not be noticeable, but in winter the walls will be covered abundantly with frost;
- Carbon dioxide can accumulate in the cellar with vegetables. You can identify it by a dying candle or match. In this case, it is necessary to open all the dampers and ventilate for 24 hours, without going into the room without protective equipment.
Ventilation in the bathroom and toilet: selection and installation of an exhaust fan - detailed article.
How to flush the heating system in a private house with your own hands: instructions.
The installation of ventilation systems will be much more effective if, together with it, measures are taken to maintain the microclimate:
- Periodic ventilation with the opening of all doors and hatches. This requirement is especially relevant for cellar owners. It is best to do this in the summer, and remove all wooden objects from the cellar;
- Regularly treat walls with lime or special compounds. They will protect against mold and unpleasant odors in the room. An approximate recipe for this composition: 3 kg of lime and 50 g of copper sulfate per bucket of water;
- Excess moisture in the air can be dealt with using a box of sand , sawdust, salt, and quicklime. Periodically, the box is taken out and thoroughly dried in the sun. In the cellar, you can leave the hole unlocked and cover it with old blankets or mattresses to improve air circulation;
- Installing an additional heat source (small stove, brazier, air heater, lamp) or just a burning candle helps;
- Waterproof the basement or cellar with bitumen compounds;
- Install adjustable dampers for supply and exhaust ventilation. With their help, it will be possible to eliminate drafts and freezing of the basement in winter;
- If the cellar is located in a garage, then it should have a separate ventilation system. High humidity in a vegetable cellar is contraindicated for a car;
- Install a regular home fan.
Features of the ventilation device
If there is space left under the floor of the house, its ventilation is most often organized by installing vents inside the base. Ventilation openings are designed at precisely calculated distances from each other, from the ground level, from the corners of the building and taking into account other factors.
Ventilation openings are covered with ventilation grilles to protect against rodents. This is a traditional solution for organizing a natural ventilation system
For greater efficiency of the ventilation process, vents are selected on the leeward side and in the wall of the base/foundation located opposite. The ventilation holes should be opposite each other. With this solution, cravings increase naturally.
The wind, flying into the hole on one side, will fly out into the ventilation hole on the other side, taking with it moisture, volatile carbon dioxide molecules and a musty smell. During further operation, you just need to make sure that the ventilation openings are not blocked by any objects from the inside and are not overgrown from the outside.
In a strip foundation, the vents are located opposite each other to ensure a stable natural air flow
If there are partitions inside the foundation, ventilation holes are also made in each of them. To ensure that the movement of air masses is stable and free, the internal vents are located directly opposite the vents selected in the external walls.
If it is impossible to select the required number of holes in the walls of the plinth or foundation, increase the area of each mini-opening. It is important that the total ventilation area meets regulatory requirements.
For normal ventilation of the subfloor, it is necessary to ensure sufficient air flow - the dimensions of the ventilation holes must meet regulatory requirements
You can make a series of holes of the same size, or you can make one wide window with a grille or an opening sash. When installing a window, there must be a passage or hatch inside the structure that can be opened for periodic burst ventilation.
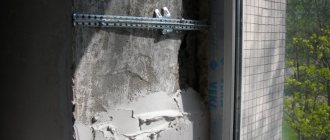
You can cut ventilation openings in the foundation/basement of an already erected structure using a mobile drilling machine designed for horizontal drilling and drilling walls. To form a hole, you will need a projectile equipped with a diamond crown.
Ideally, vents in the external and internal walls of the foundation, passages and large openings for ventilation pipes should be laid before pouring the mortar into the formwork.
If there is an additional foundation inside, for example, for a brick oven or a massive floor-standing gas boiler, then inside the outer base the number of holes must be increased by 1.5-2 times.
Vents can be not only round, but also square, rectangular and even triangular. The main thing is not to reduce the total cross-section specified in the building regulations. The size of the hole should not impede the flow of the required amount of air.
It's never too late to make vents in the foundation or basement. They can be punched with a hammer drill or drilled with a mobile machine with a drill with a diamond bit.
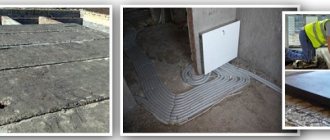
The second method of organizing a ventilated space is more labor-intensive and more resource-intensive. Exhaust is arranged from the underground through a ventilation pipe to the roof. In this case, air enters the system through grilles in the rooms.
In this case, there are no vents in the foundation, but external insulation of the foundation, basement and blind area will be required. This is the best option if you plan to build a well-insulated eco-house, the construction of which used energy saving principles.
Ventilation of the underground in a wooden house
The frame of a wooden house is most often built on a columnar foundation. A lower crown is mounted on it, which served as a kind of grillage for laying floor beams. The gaps between the foundation pillars are most often not filled with anything at all, which ensures natural ventilation.
Houses made of logs or timber are now placed on strip foundations made of brick and concrete sides. When building a foundation from piece materials, openings are formed during the laying process
If the floor in the house is decided to be finished with a non-wooden floor covering, then it is installed using floating technology, i.e. the subfloor has no connection with the walls. In this case, a small gap remains between the covering and the crown, through which the underground and floor will be ventilated.
The gaps are covered with baseboards, but the presence of small gaps allows for full ventilation. On opposite sides of the rooms you can place special baseboards with ventilation holes.
The flooring in a wooden house is laid according to a floating pattern, i.e. with a gap around the perimeter. Moist air escapes from the underground through this gap. In addition, ventilation vents with grilles are installed in the floor.
In addition, in the corners near the walls you can leave slots in the floor for ventilation, covering them with ventilation grilles. This solution will also help improve air circulation under the floor of the building.
Air exchange standards
How to organize underground ventilation? It is necessary to lay holes for ventilation at the foundation construction stage.
To ensure stable air exchange in the space under the lower ceiling, the following rules should be observed:
- When installing vents 15-20 cm below the top edge of the tape (if the base is low), a pit is made in front of the hole.
- The step between adjacent openings should not exceed 3 m.
- The holes in the base/foundation are located at a distance from the corner to 1 m.
If the house is built on a hill, it is likely to be well ventilated from any side. In this case, the number of ventilation holes can be slightly reduced.
If the house is built in a region with little wind activity, is located in a lowland or is surrounded by forest, the number or size of ventilation openings should be increased
In the basement or foundation of a house built in a low area, the total cross-section of the ventilation holes should be increased: either in number or in area.
The dimensions of the openings for ventilation of the foundation and underground are regulated by SNiP number 41-01-2003 or an updated version of the rules SP 60.13330.2012.
The area of all vents must be at least 1/400 of the total area of the subfloor. That is, if the house measures 9 m by 9 m, then the underground area is 81 m2. In this case, the total area of vents in the foundation should be 81/400 = 0.20 m2 or 20 cm2.
The minimum ventilation area should not be less than 0.05 m2. That is, rectangular holes should have a size of 25x20cm or 50x10cm, and round holes should have a diameter of 25cm.
If in a private house such vents look too large, they can be made 2 times smaller by increasing the number of ventilation holes so that their total area is no less than the calculated one.
Sleeves for forming ventilation holes, as well as for the passage of all types of pipes, are placed in the reinforcement frame before pouring the solution into the formwork
When installing vents in a strip foundation, the mortgages are secured after installing the reinforcing frame. These can be plastic or metal pipes or asbestos cement pipes. Their edges are brought to the same level as the formwork and are well secured.
To prevent concrete from flattening the plastic when pouring, sand is poured into the pipes and closed with plugs. After demoulding, such mortgages remain in place. Rectangular vents are made using boxes from knocked down boards. A wooden box is also installed in a reinforcing frame; after the concrete has hardened, it is removed.
It is easier to make ventilation holes in a brick base. In this case, you can trim the bricks or install a half brick instead of a whole one. In plinths built from concrete blocks, you can take several blocks with a couple of large holes, make them through and put them instead of normal ones. If the construction material is reinforced concrete blocks, vents are made at the joints.
If the house is installed on a bored, pile or columnar foundation, there is no need for ventilation. Even if the perimeter is covered with siding, ventilation is carried out through seams and gaps in the structure or perforated elements
If in a columnar foundation the gap between the supports is closed with brick or concrete blocks, the required number of holes is left in the building material. It is necessary that their area is equal to one four hundredth of the area of the subfloor.
How to improve air exchange in an already built house?
If the house is already standing, and the available ventilation is not enough, high humidity is constantly felt in the underground and fungus has begun to form, measures can be taken.
To increase air flow and improve ventilation, you need to:
- Drill new vents or increase the size of old ones. The easiest way is to drill many holes around the perimeter of the vent using a hammer drill with a thick drill bit. Then drill out the remaining gaps and level the walls. However, a more productive method is drilling with a diamond core without shock loads, which leaves smooth and neat holes;
- Improve ventilation draft by extending several pipes from the exhaust openings to the roof. The thrust will increase due to the greater pressure drop;
- Install automatic forced ventilation with a timer;
- Build a channel at the base of the stove, combined with a blower. Then the air will be drawn from below, providing the stove with the oxygen it needs for combustion. However, this option is applicable only for buildings with brick stoves, and then only at the stage of construction or alteration of the unit.
- Reduce groundwater penetration by installing powerful waterproofing. A method that does not allow one to abandon ventilation, but reduces the level of humidity characteristic of structures buried in the ground.
Waterproofing materials, thick construction polyethylene or a polymer membrane, must be laid with an overlap of 10-15 cm, overlapping the walls by 20-30 cm and secured with a plank. To prevent the film from being damaged, a thin 3cm screed is poured onto it.
With an insulated foundation, plinth, and blind area, the effect in combination with a ventilation pipe will be multiple. Without insulation, condensation will collect on the film, which, by making a slope, can be diverted away from the subfloor.
To reduce the temperature difference within the underground, it is better to fill the soil base with expanded clay. It is undesirable to lay polyethylene on the ground; anaerobic bacteria will breed under it and a persistent swamp smell will appear.
But expanded clay, due to its hollowness, will itself draw water from the surrounding soil. Therefore, this material can be filled only if the hot water level does not rise above 2.0 m from the day surface. If not, you will have to arrange underground ventilation in the house according to the scheme described above, adhering to standard principles.
Forced ventilation device
Natural circulation of air flows cannot in all cases provide the necessary drying of the underground space. Then a mechanical ventilation unit or supply ventilation valves are installed.
Mechanical forcing of air to move is required:
- If the house is built in a valley between the hills.
- If the natural movement of air masses is impossible due to the climatic characteristics of the area (high humidity, for example).
- If the base of the building is buried in soils with low filtration properties, due to which atmospheric water weakly seeps into the underlying rocks. It can be identified by stagnant puddles after rains and poorly drained flood waters. In this case, in addition to ventilation, you need effective wall drainage, which can be built after the construction of the house.
Forced ventilation systems are characterized by the presence of installed supply/exhaust fans in the air openings, which promote more intense circulation of air masses. The most common and economical option is to install one exhaust fan.
If the owners of the house are not limited in funds, it is better to install a forced system with fans for complete air exchange within the subfloor
It is enough to turn on such fans for half an hour once a day. You can install a system for automatically turning on/off ventilation devices. When there is periodically increased humidity - for example, during the spring melting of snow - heating equipment can be used to quickly drain the subfloor.
Features of the combined system
A combined ventilation system in the basement is installed if the natural type ventilation system does not cope with its tasks, and using only a mechanical one is too expensive. A huge advantage of the combined system is that it is not influenced by natural factors and temperature differences and can operate all year round.
Combined ventilation, like natural ventilation, is arranged using supply/exhaust openings. A fan is installed in the exhaust opening to quickly remove stale air from the underground. If the underground area is large, the fan is also installed in the supply air duct.
The natural type of ventilation can easily be converted into a combined version by installing a wall ventilation valve on the supply or exhaust opening
In small underground spaces this is not economically feasible, as there will be excessive energy consumption. A fan will help quickly dry the space if natural ventilation cannot cope with this problem.
Most often, fans with a power of up to 100 W are used to equip a combined system. You can choose both centrifugal and axial devices. Axial ones are more economical, and also provide a fairly powerful air flow, while consuming a moderate amount of electricity. When installing axial devices, you need to install a check valve in the pipe.
What should be the vents in the foundation and how to position them
Ventilation holes in the foundation are made of round or square cross-section. If desired, it can be triangular or any other shape. If only they were large enough in area to effectively remove moisture from the subfloor.
Dimensions
The dimensions of ventilation holes in the foundation are regulated by SNiP (SNiP 31-01-2003). Paragraph 9.10 states that the area of the vents must be at least 1/400 of the total area of the subfloor. For example, if you have a house measuring 8*9 m, the underground area is 72 square meters. m. Then the total area of vents in the foundation should be 72/400 = 0.18 sq.m. or 18 sq. cm.
The same paragraph of the standard specifies the minimum ventilation area - it should not be less than 0.05 sq.m. If we translate into dimensions, it turns out that rectangular holes should not be less than 25*20 cm or 50*10 cm, and round ones should have a diameter of 25 cm.
Larger holes can be made
In multi-storey buildings this is done, but in private buildings such holes look too large. Usually they are made two times smaller, while increasing the number of vents so that the total area of the vents is not less than the recommended one.
How to position
Make vents in the foundation 15-20 cm below the top edge of the tape. If the base is low, a recess is made in front of the vent - a pit. But ventilation of the underground is required.
The vents in the base are placed evenly on all sides of the foundation opposite each other. This is necessary for the foundation ventilation to work properly. The wind, “flying” into one hole, will fly out into another, taking with it water vapor and radon.
Place the vents in the foundation opposite each other
The distance between two adjacent vents in the basement is about 2-3 m. If there are any partitions inside, at least one vent is needed for each “room”. It is also necessary to make vents in the partitions themselves to allow air masses to move and form a draft. This is exactly what we need. In order for movement to be more or less free, the area or number of holes in the internal partitions must be larger and better, if it is 2-3 times larger. You can make several holes the same size as in the base, or you can make one, but wide one. The second option, by the way, is preferable - the resulting passages can be used to service the underground.
If you don’t find a grate of a suitable diameter, you can do this
Vents in the foundation of any format must be covered with gratings to prevent living creatures from entering the underground. It is desirable that the grilles are metal and the holes are small. For mice, plastic is not a problem, and keeping them out is easier than dealing with them later.
This option improves ventilation conditions and protects against rodents
Seasonal maintenance of the ventilation system with vents
The main controversy when caring for the ventilation system is the question of whether to close the vents for the winter or not.
There are 2 points of view here:
- With open vents. Moisture that falls in the form of condensation in heated, overly insulated rooms will be removed through them. The floor in them that is directly connected to the ground will always be cold, which means that during the heating season the formation of “dew” will increase. However, if you invest in floor insulation, this can be avoided.
- With the vents closed for the winter. Warm, humid air from the living space will hit the cold surfaces of the subfloor (basement walls). Condensation will drain into the ground. In spring/summer it will evaporate, increasing humidity, so it will be necessary to dry the subfloor with heating devices.
The vents will have to be closed if the house is made of wood and the flooring is made using floating technology, i.e. There are gaps near the walls, and there are also ventilation holes with grilles in the floor. Otherwise, the floor will become very cold.
It is not recommended to close the vents for the winter; underground ventilation should be carried out in all weather conditions. It makes sense to reduce the air flow using the method shown in the photo.
In other cases, you can consider both options. In addition, in winter it is necessary to regularly clear the snow from the base so that the ventilation openings do not become completely blocked. After all, even in a closed state, they will contribute to ventilation, even if in a reduced state.
At other times of the year, caring for the ventilation system is simple:
- in the spring - open the vents and dry the underground;
- in summer - make sure that the ventilation openings are not filled with debris and are not obscured by grown plants;
It is necessary to install ventilation grilles (preferably metal) on all types of vents so that rodents and raccoons do not get inside, and regularly clean them of debris so that the air flow is not reduced.
Work order
In a building under construction with a strip base, vents are installed during the pouring of the foundation or laying an asbestos-cement pipe in the base. Let's reveal the details of the work.
- Using a grinder, we cut a pipe/shell with a cross-section of 0.15 m into small pieces equal in thickness to the base. The shells can be either round or rectangular, the main thing is to correctly calculate their number
- We place the pipe fragments in the base, making sure that they are around the entire perimeter and opposite each other. The central point of the ventilation duct should be at a distance of 30 cm from the ground.
To create natural ventilation, you can take the advice of experienced craftsmen and make vents as follows: when pouring the foundation, observing the distance according to the project, lay wooden beams or plastic, metal, asbestos pipes measuring 0.05–0.85 m2. Wrap the pre-selected pipe or beam in roofing material or film. After the concrete solution has set, the inserted fragments are removed and serve as ventilation gaps.
How to make a ventilation duct in an already erected foundation and building? In this case, there is a proven method for correcting the mistakes of would-be builders.
- We are preparing the necessary set of materials: pipes for air supply and exhaust, caps, nets and clamps, a hammer drill with a nozzle.
- We make holes for the ventilation ducts using a hammer drill with a cylindrical attachment equipped with Pobedit or diamond cutters.
- We install a supply/exhaust pipe with a cross-section of 12 cm on opposite sides of the basement.
- The exhaust pipe exits externally at a distance of 50 cm from the end of the roof of the house, the second part is located in the basement, right at the ceiling. The supply pipe rises 50 cm above the ground, and the inner part is lowered into the basement, not reaching the floor by about half a meter.
Tip: If the reinforcement of the reinforced base prevents you from making a hole, then use a welding machine to remove the interfering fragments.
Additional humidity reduction
To ensure that the ventilation system does not have to be strengthened by increasing the total cross-section or installing fans, the following work must be carried out:
- Installation of an effective drainage system - removal of water from the foundation.
- Waterproofing the base of the house and the basement. There are many types of waterproofing: it can be rolled, built-up, coated, etc.
- Performing insulation. The best material in terms of economy and efficiency is EPS. This is a good heat insulator that does not allow water to pass through. It is not of interest to rodents and does not rot. EPS can also insulate the blind area.
The listed measures do not cancel, but simply supplement ventilation. Only in combination can you achieve ideal drainage of the space in the basement compartments.
If the house is built on a soil foundation that does not drain water well, in addition to the ventilation system, drainage and storm drainage are required. The drainage system will collect water from the soil and upper layers of soil, the storm drain will collect and drain precipitation
When installing a system according to a forced scheme, the costs for installation, maintenance and service will be higher than when organizing a natural type. It should be taken into account that in winter condensation can form on the walls of the ventilation pipes themselves, and in cold weather the cross-section can become completely clogged.
To avoid this, pipes can be thermally insulated with penofol. At the bottom turn of the pipe, you can come up with a condensate collector - for example, drill a hole or install a tee instead of an angle.
Forced ventilation
Natural air circulation is not always able to provide the required drying of the underground space:
- spring melting of snow increases the amount of moisture inside the soil;
- close location of groundwater to the surface of the earth;
- lowland area where the building is located;
- the presence of other factors that contribute to the saturation of the soil with excess water.
The ventilation device in this case will be carried out by force. For this purpose, supply and exhaust fans are installed inside the ventilation openings. They promote more intense movement of air masses under the ceiling of the first floor, thus facilitating effective drying of the structure.
It is enough to turn it on several times a day for 20-30 minutes. In addition, to quickly dry the underground space, it is possible to use heating equipment for a certain period of time until the humidity level returns to normal.
Features of ventilation in a hairdressing salon >>>>
Which ventilation scheme should I choose?
So, we have figured out whether an underfloor ventilation system is needed, and now it remains to decide which scheme to choose for specific conditions. There are several important points to consider when choosing a system. The operation of ventilation largely depends on the type of climate in a particular area, average street temperature, etc.
When installing natural ventilation, the main rule must be observed: the supply openings are located below the exhaust openings. The greater the altitude distance between them, the more efficient the system is.
Natural ventilation is more effective in winter, since it is at this time that a large difference is recorded between the temperature inside the underground and outside, which ensures good circulation of air masses.
However, with an even greater drop in temperature, there is a possibility of an excessive increase in air exchange, which is also not particularly good, as it can lead to freezing of structures. Therefore, if the temperature drops significantly, the vents must be closed.
In summer, the difference in temperatures inside the underground and outside is minimized, so air circulation may stop. Therefore, natural ventilation, even with a supply and exhaust system, is not the best option for hot regions. A combined ventilation system with pipes should be installed here.
If the house has supply and exhaust ventilation, it makes sense to connect the exhaust from the basement to the general circuit. This way, the outflow of air will be stimulated in any weather.
To install a combined ventilation system for a small underground area, it will be enough to install one pipe. In order for it to provide both output and reception of air masses, it needs to be divided vertically into 2 channels.
Such ventilation pipes are sold in hardware stores. Each channel has its own valve to adjust the flow intensity. The functioning of such ventilation is checked quite simply: you need to attach a sheet of paper to the outlet holes one by one.
How to make floor ventilation in wooden houses?
It all depends on the type of foundation. If a wooden structure is erected on a concrete strip base, you need to do it as described above. There is no difference; a wooden floor is installed on a reinforced concrete slab or wood panel. You still need to make a system of ventilation holes.
Ventilation device for a plank floor in a wooden house
If a pile foundation is used, there is usually a ventilation gap between the soil surface and the wooden base of the floor. Often such foundations are made for small wooden houses in dachas. Here it is enough not to completely cover the available space when finishing the exterior of the base with your own hands. Ventilation holes must be made in the basement cladding.
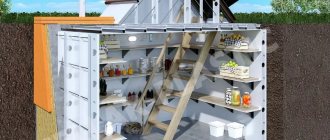
In old wooden houses, which is especially typical for dachas, a small basement is often built underground for storing canned food and grown vegetables. In this case, you should install full basement ventilation using two pipes. One of them starts half a meter from the wooden floor and extends above the country house, the other starts not far (30-40 cm) from the floor of the basement, and its top should be located a meter from the surface of the soil. All this can be done with your own hands; as a result, the basement will have a favorable microclimate for storing the gifts of nature, and the wooden floor in the dacha will not deteriorate from moisture and the activity of microorganisms.
Important! To create a basement ventilation system, it is undesirable to use ordinary or even galvanized iron pipes, since in such conditions the metal oxidizes (corrosion) very quickly and quickly becomes unusable. Here it is better to use a stainless or plastic pipe.
Materials for the system design
For the arrangement of supply and exhaust ventilation air ducts, 3 types of pipes are used:
- Asbestos-cement ones are durable, resistant to corrosion and withstand frost well. They are of sufficient length, so during installation you can do without connections;
- Galvanized steel – resistant to corrosion, easy to install, and light weight. However, the price for metal components of ventilation systems is usually higher than for plastic and asbestos-cement ones;
- Plastic ones have a smooth inner surface, which ensures easy and fast air flow. Plastic pipes do not rust, they do not need to be cleaned, and their service life exceeds a couple of decades. One of their drawbacks is flammability.
The determining factor in the effectiveness of the ventilation system is the proportionality of the cross-section of the installed air duct to the area of the room in which it is installed. Heating engineers recommend adhering to the following norm when making calculations: 26 cm2 of section is required for 1 m2 of subfloor.
The most practical option for laying the exhaust part of the ventilation system in the cellar is an assembly of polymer pipes. In addition to the affordable price, the opportunity to build a pipeline with your own hands is also attractive.
There is the following formula for calculating the required pipe diameter:
(S cellar × 26) ÷ 13.
That is, if the underground area is 9 m2, then a pipe with a diameter of 18 cm will be required: (9 × 26) = 208 ÷ 13 = 18 cm. For single-pipe ventilation, the diameter should be even larger, for example, 20 cm.
Types of air exchange systems
Ventilation in the basement can be forced or natural. If the ventilation in the basement or cellar is natural, then the air will independently enter the basement through pipes and then be discharged in accordance with the laws of physics. In other words, natural circulation will occur without the use of any special devices. In a small wooden private house, such ventilation seems to be the most acceptable. In this case, the hood will be sufficient.
Exhaust air ducts under the ceiling.
Forced ventilation speaks for itself - air will circulate in the room using special fans. They will pump fresh air into the basement and also remove stagnant air after some time. Such ventilation will be an ideal solution for organizing air exchange in any cellar.
Of course, here you can also consider modern ventilation systems, which will not only be responsible for the inflow and outflow of air, but also for heating and cooling it if necessary, as well as for the level of humidity and temperature. Such ventilation systems are very complex, because their operation must use filters, split systems and other devices that can rarely be found in a wooden private house.
Simple natural or forced ventilation can be installed with your own hands. In this case, the hood will be quite sufficient and inexpensive.
Natural supply ventilation
The simplest, vent system in the foundation or basement. It is installed during the construction of a house and consists of small holes in the upper part of the basement.
If the basement is located below ground level, then the hood is equipped with plastic or asbestos-cement pipes with a diameter of 10-15 cm. They are brought above the surface to a height of 30 cm and covered with grates to prevent debris and rodents. This method is natural and depends on fluctuations in street temperature, wind strength, and humidity.
When calculating its throughput, 1/400 of the total area of the basement is taken - this way we get the total area of all vents.
The holes should be located on the leeward side, least susceptible to precipitation. Houses with a complex foundation shape and located in low-lying areas can have up to one hole every 3-4 meters. We close the vents with gratings on the outside.
This inexpensive option is well suited for ventilation of garages and non-residential basements or as an additional means to the main ventilation system.
Natural exhaust ventilation
Supply and exhaust type. For proper operation, you will need to install two pipes for ventilation, and the supply and exhaust ventilation device looks like this.
- The first pipe is located under the very ceiling of the basement and is intended for the outflow of warm air. We place the exhaust pipe as high as possible, preferably at the level of the roof ridge. This is necessary to ensure good traction. The part of the pipe that is located in the open air must be insulated to prevent freezing in winter and covered with a canopy from precipitation.
- The second pipe for the supply of fresh air is located at a height of 30-40 centimeters from the floor level , and its entrance is located on the street a meter above the ground and covered with a grill. Convection will occur due to the temperature difference between the street and basement air. Such a system will work most effectively when the supply channels are spaced on different sides of the basement.
All natural exhaust ventilation systems have one drawback - their dependence on weather conditions and prevailing winds. It will not work if the temperature in the basement and outside are equal.
Forced
It is used if natural supply ventilation cannot cope or there is no physical opportunity to use it. Typically used in the following cases:
- The basement area is from 40 m2 or has several rooms isolated from each other;
- High room humidity, when condensate in the exhaust duct freezes in winter and impairs the permeability of air masses;
- The architecture of the house does not provide for high ventilation pipes;
- A sauna, cafe, gym, workshop or other source of unpleasant odors .
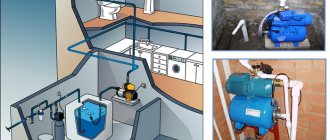
The forced supply and exhaust ventilation device has a system of channels and fans that circulate air.
The main condition is to force the air to constantly circulate , which is ensured by the synchronous operation of exhaust and supply fans. Their number is calculated depending on the volume of the cellar or basement and the throughput of the air ducts.
Supply and exhaust ventilation with heat recovery
For a basement floor in which permanent residence is planned, it is not enough to simply install a forced ventilation system. The room must be insulated and waterproofed. The issue of heating and heating is also resolved.
Increasingly, supply and exhaust with heat recovery is being built into such schemes.
Well-heated air enters the exhaust pipe, and in order not to release ready-made calories into the atmosphere, the air is passed through a special ceramic recuperator. When heated, it gives off heat to fresh air. The air flows do not intersect. The efficiency of such a device is 50-90% depending on the design of the heat exchanger. All heat recuperators are very reliable, do not require additional maintenance and can last for decades.
Equipped with moisture traps, dust filters, sensors that monitor humidity and air temperature. For a residential premises, these indicators lie in the range of 50-65% relative humidity and 18-220C. Such systems are most often found in “smart homes”, and their installation is complex and should only be carried out by professionals.
How to install an air duct?
Most often, 2 air ducts are used to organize a supply and exhaust ventilation system. To make the circulation of air masses more uniform, take pipes of the same diameter. To speed up air removal, you can install an exhaust pipe with a slightly larger cross-section.
Install the air ducts at the greatest possible distance from each other on opposite walls. Along the route of the pipes, it is necessary to minimize the number of bends.
The exhaust pipe is mounted in one of the corners and its lower end should be near the ceiling so that all the warm air going up is removed through it. The air duct can be combined with a kitchen exhaust ventilation system and brought to the roof one and a half meters above the ridge.
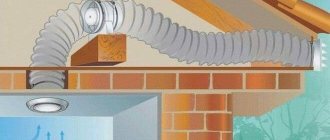
The street air duct must be insulated, we wrote about this above. The most aesthetic option is to put another pipe on the pipe, but of a larger size, and lay any insulation in the resulting space. It is better to install a special ventilation deflector on the head of the pipe, which helps to increase traction.
Mechanical ventilation ducts passing through the basement should be insulated so that due to the temperature difference between the air passing through them and the air mass inside, condensation does not form on the pipes
The supply air duct is mounted in the opposite corner of the subfloor, and its open end should be as close to the ground as possible. The supply opening must be lower than the exhaust opening. In the same way, a pipe can be run through a house.
If the supply air duct is ducted through the roof, its intake opening should be located below the exhaust pipe. The outer edge of the draft pipe is raised on the roof to 20-25 cm.
Also, the supply pipe can be installed near the wall of the house outside. In this case, the hole should ideally be raised above the ground by 80cm. Inside, dampers are installed in each air duct to regulate the intensity of air movement.
The following article will introduce you to the rules for installing a ventilation system in the attic of a private house, covering in detail the principles of the device and the nuances of the structure.
DIY ventilation
The simplest approach to organizing air exchange in a room is to punch special holes in the basement through which the basement will be saturated with oxygen. In the cellar of a private house, completely buried in the ground, it is difficult to make such holes, so this solution is only relevant for semi-buried basements. The holes should be located at opposite ends of the room. Their size must be sufficient to ensure effective ventilation. It is recommended to protect the openings with nets from insects and rodents.
Ventilation windows (closed with grilles).
Without a doubt, such simple ventilation is much better than no ventilation at all. But its effectiveness is low. A more effective solution is to install a ventilation system made of two pipes.
What is required to create such ventilation in a private house?
- 2 pipes, the diameter of which can vary from 8 to 15 cm.
- Metal protective grilles and canopies.
- Thermal insulation material.
Which pipes are suitable?
Two pipes (air supply and exhaust) made of asbestos or galvanized iron. What should be the length of the pipe is calculated as follows: the exhaust pipe runs along the corner of the cellar, starting one and a half meters from its floor (approximately 20 cm below the ceiling) and ending on the roof, at least 0.5 m above the ridge. The correct height affects the level of traction.
The pipe diameter is selected based on calculations
The supply pipe is installed in the opposite corner from the exhaust pipe, at a height of up to 0.3 m from the floor level. The diameter of the pipes is calculated based on the values approved by standards, so per 1 sq. m of cellar area – 26 sq. cm pipe section.
Let's say the cellar area is 10 square meters. m, then using the formula for the area of a circle, we will find the pipe cross-section we need.
R= √S/π = √(26x10)/3.14= 9.1 cm. This means that the cross-section of the required pipe is 18 cm.
When making calculations, keep in mind that if the calculated diameter is, for example, 12.8 cm, you need to take a larger value - 14.
Important! In order to obtain proper ventilation of the cellar, the cross-section of the exhaust pipe must be calculated with a coefficient of 1.15. That is, for a cellar with an area of 10 square meters
m - 20 cm (18x1.15), and for 5 sq. m – 16 cm.
Preparation
To install natural ventilation in the basement, it is necessary to carry out a number of preparatory work.
One of the most important preparatory stages is drying, which is usually carried out in the summer in an empty basement and can be done in different ways:
- All possible ways for air to enter and exit are opened, thus the room is ventilated for the time necessary for complete drying.
- A container with hygroscopic substances is installed in the basement, which intensively absorb surrounding moisture. This could be a box of dry lime or regular coarse salt.
- To speed up drying, you can place a household fan in the cellar. Two or three days of fan operation with open hatches and dampers is enough for complete drying.
- It is possible to dry out the basement using various heating and heating devices, for example: a heat gun, an electric heater or a small portable wood stove.
The second, mandatory stage after drying, should be waterproofing the walls and floors.
There are many options for protecting basement surfaces from moisture; their choice depends on the purpose of the room and the financial capabilities of the owner. Walls in the simplest brick or concrete design are impregnated with waterproofing compounds, the choice of which is very large in the trade. Waterproofing floors can be done in an effective and inexpensive traditional way:
- The floor surface is covered with a layer of stones with a tamper.
- A thick solution of approximately equal proportions of clay and sand is mixed.
- The mixture is applied in a layer of up to 10-15 cm to the floor surface with tamping and careful filling between the stones.
- The layer is leveled and covered with a compacting layer of coarse sand.
Clay insulation naturally dries within 30 days. For food storage, clay packing is the best option in terms of environmental friendliness, safety and cost.
You can begin installing ventilation in the basement yourself after complete drying and waterproofing.
How to calculate pipe diameter
The diameter of the pipes is determined based on the area of the basement. The cross-sectional area of the air duct must be at least 26 cm2 per 1 m2 of cellar area.
A practical calculation for a 20 m2 basement would look something like this:
- total area of inlet supply pipes in cross section 26 X 20 = 520 cm2;
- the total area of the exhaust pipes should be 15% larger than the supply pipes 520 X 1.15 = 598 cm2;
- cross-sectional area of a pipe with a diameter of 150 mm = 177 cm2;
- the need for supply pipes with a diameter of 150 mm will be 3 pieces, and for the exhaust - the same plus one pipe per 100 mm.
The length of the inflow pipes depends on the location of the inlet openings. The length of the exhaust pipes is calculated based on the height of the house plus 1.5 m.
Mandatory thermal insulation
Insulating the exhaust pipe where it passes through the attic is mandatory when installing it. The pipe, which performs the function of removing warm air, forms condensation on its inner surface in cold weather. It freezes in the cold, reducing, and sometimes completely blocking, the path of exhaust air. It is also necessary to protect the exhaust and supply pipes with canopies that will not allow precipitation to get inside.
Attention! Adjust air exchange using dampers that are built into the pipes. Thanks to such devices, it is possible to change the intensity of incoming and outgoing air masses
Installation
For a small cellar, there are several basic rules and standards for ventilation design, tested in practice and easy to understand and implement:
- A general diagram of the ventilation system is drawn up.
- Holes are punched in the base or elsewhere for air flow.
- An inlet duct is installed with the lower opening located near the floor no higher than 0.5 m.
- If necessary, turns of no more than 90° are made in the channel.
- The pipe is attached to the wall or in another way, the joints in the opening are hermetically sealed.
- The upper end of the supply pipe is flush with the outer surface.
- Exhaust products are mounted under the ceiling at maximum height.
- Several exhaust pipes will be connected into a common channel over the total area.
- The outer part of the pipe is arranged strictly vertically, at least slightly above the roof ridge, and a deflector is mounted on top.
Accurate calculation of diameters, reliable pipe fastening, protective grilles, correct location of air inlet and outlet guarantee reliable air circulation.
Ventilation from boards
For small rooms, ventilation in a cellar with one pipe is advisable. It is made two-channel. You can make a ventilation pipe for a free-standing cellar from boards 3-4 cm thick. It is a hollow rectangular structure with sides of 18 cm each. Inside there is a diagonal partition. To regulate the inflow and outflow of air, each channel has a valve.
Wooden ventilation also happens
Important! Supply and exhaust pipes should not be located at the same level. This rule does not apply to single pipe ventilation.
Tips for using ventilation ducts
External ventilation outlets must always be open and protected with a mesh to prevent small animals and debris from entering the underground space. For full operation of the canals, it is necessary to exclude adjacent buildings, weeds and clutter.
When there are seasonal temperature changes and precipitation, you should not tightly close the vents with insulation, cover them with clay, etc. This disrupts air circulation, increases dampness under the floor, and develops an environment for the appearance of fungus and mold. The only correct solution for protection from snow and rain is to make the ventilation outlets higher and cover them with a visor. At the same time, place a 2 cm thick thermal insulation material on the floor.
How to avoid the appearance of rodents in the basement: in winter, these animals move to warm and comfortable places; the only way to get rid of unwanted guests is to install bars with small holes. This way you will avoid damage to wooden structures, destruction of the base and the transfer of diseases.
If the ventilation does not cope with the task and a musty smell is felt even in the rooms, you should additionally install electric ventilation and turn it on regularly.
You can increase air circulation by connecting a tin pipe to the ventilation holes to stimulate draft. The higher the pipe is installed, the better the effect. In addition, you can cut an additional hole in the base.
Purpose of ventilation under the floor
Ventilation of the underground space is necessary to keep the boards from rotting
Ventilation of the floor and underground space performs an important protective function. An area closed on all sides has high humidity, which affects the formation of fungus and mold on the structure of the house. They can cause serious damage and property damage. To avoid this, ventilation is created, thanks to which excess water evaporates and does not settle on the building.
Water is formed from soil that has a high degree of moisture. On top of the house there is a concrete slab or wooden panel. This design promotes the formation of condensation. Water vapor settles on cool surfaces (internal walls of the basement), and microorganisms form in these places. Good ventilation will help create natural circulation of air masses and prevent the formation of fungi. A ventilation grille for the underground space will protect your cottage or bathhouse from pests.
Particular attention should be paid to ventilation under the stove. It is a source of heat; during its operation, a temperature difference is created. This also leads to condensation. Here you need to think in advance about a high-quality ventilation system, which should work with greater efficiency than in other places.