Home |Construction |How to properly pour a slab under a house?
Date: June 13, 2017
Comments: 0
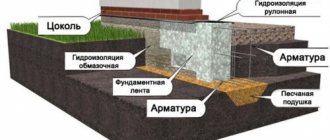
The most important part of any building is the foundation, which ensures the stability of the structure. Despite the possibility of constructing a building on various types of foundations, many developers prefer a slab base, which compensates for the reaction of heaving soils and ensures the reliability of the building. You can prepare a solid foundation yourself, knowing how to pour a slab under the foundation. When laying the foundation for a house, a solid foundation slab, reinforced with a steel frame, is formed up to 40 cm high on a compacted crushed stone-sand cushion. Possessing increased spatial rigidity, the monolithic base is superior in performance characteristics to the strip version and the prefabricated structure.
Let us dwell in detail on the advantages of the slab base and design features. Let's look at how to properly prepare a concrete solution for pouring a foundation. Let's look at the technology for doing the work.
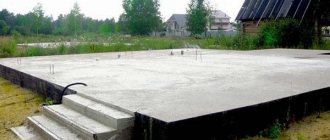
Every structure needs a high-quality and durable foundation
How to pour a slab under the foundation of a house?
Once the type of foundation for the house has been selected, the location and depth of its foundation has been determined, and all ground work has been completed, you can proceed to the last, most important stage of laying the foundation - pouring the foundation slab.
Scheme of a monolithic foundation slab.
Ideally, a reinforced concrete monolithic foundation should be poured all at once (that’s why it is called monolithic).
There are several options with which you can pour the foundation for a house.
Laying concrete mixture into formwork
Before filling the formwork, it is necessary to properly prepare the concrete or order delivery by mixers from a reliable manufacturer. For a monolithic foundation slab, the concrete mixture must satisfy the following parameters:
- density – 1.8 – 2.5 t/m³;
- brand – M100 and higher;
- class - from B7.5.
Ready-mixed concrete with characteristics of 196 kg/cm², W4, F100, P3 is excellent for these purposes. It has sufficient mobility for distribution in formwork, withstands 100 seasonal cycles, and does not allow water to pass through at a pressure of 4 bar.
When freezing, water droplets inside the mixture increase by 9%, internal stresses exceed the strength of the slab many times over. The frost resistance of the material depends entirely on the presence of reserve pores in the concrete structure. When freezing, some of the moisture fills them, preventing cracking.
Therefore, when making the mixture with your own hands, it is necessary to ensure frost resistance F75 - F150 for regions with winter temperatures below -20 - -40 degrees, respectively. The technology for preparing ready-mixed concrete BGS B20 (M250), BGS B15 (M200) meets these conditions. For economical consumption of cement, taking into account soil conditions, construction technologies should be chosen:
- M350 – M400 – for monolithic, brick buildings on heaving, slightly heaving soils, respectively;
- M300 – M350 – for buildings made of expanded clay, foam, aerated concrete;
- M250 – M300 – for log, timber frame houses;
- M200 – M250 – for panel and frame houses.
For concrete preparation (unreinforced cushion under the slab), the recommended proportions are 6/3/1 (crushed stone, sand, cement, respectively). To fill the slab, the proportions change to 3/1.5/1.
Before laying concrete in the formwork, the reinforcement must be free of peeling rust, dirt, and oil stains.
Pouring the slab under the foundation using a ready-made mixture in mixers.
The fastest pouring option, which, among other things, ensures very good quality concrete, is to order delivery of concrete from a local construction company. Delivery is carried out in mixers. Typically, about 6-8 cubic meters of ready-mixed concrete can be delivered at a time. In this case, the foundation for the house can be poured within a few hours. The work will require about 4-5 people. From the mixer, concrete is fed into a trench, which is about 1.2-1.5 m long. If the mixture is fed into one place, it will then be very difficult to rake it throughout the entire formwork. Secondly, the concrete may begin to delaminate: the more liquid mixture will begin to penetrate into the farthest areas of the formwork, and the more rocky, dense part will settle in the pouring area.
Therefore, you need to direct the mixture to different places on the formwork to make it easier to distribute over the entire surface. To do this, it must be possible to allow the mixer to approach from all sides of the foundation being created. If this cannot be done, then a long trench is made in advance to supply the concrete mixture from the mixer to different points of the foundation. You can put it together from boards. Linoleum or plastic film is laid inside the gutter. By alternately moving this trench to different corners of the foundation, you can ensure uniform filling of the formwork with concrete mixture. This option for pouring a slab is the most acceptable for most independent builders and has an average cost: not too much and not too little.
Pouring the foundation for a house using a concrete pump.
Calling a concrete pump is the most expensive pouring option. The concrete pump is equipped with a special sliding boom with a concrete pipeline, with the help of which the concrete mixture is supplied over a distance of 30 to 50 m. Thanks to this, using a concrete pump, you can pour the foundation from a great distance, even when access to it is impossible for some reason. Concrete pumps are usually used during the construction of large reinforced concrete buildings and structures, but in the construction of summer cottages they are usually not used due to their high cost.
How to pour a foundation for a sauna slab.
Scheme of the Swedish stove.
The most budget-friendly option is to prepare the concrete mixture with your own hands right at the construction site. To do this, you can use ready-made concrete mixers, with which it is much easier to mix the concrete mixture. Concrete mixers operate on electricity and have a power of 200 W or more. During one batch, you can produce from 50 to 200 liters of concrete mixture. The use of this device will significantly speed up the process of mixing all components and improve the quality characteristics of the mixture. You can do without a concrete mixer and make it into concrete in a barrel or bathtub. In this case, kneading is done manually using a shovel.
Using even the smallest concrete mixer with a working volume of 50 liters to pour 1 m² of concrete requires about 20 working cycles. Mixing time for the foundation mixture is 3-5 minutes. It will still take time to deliver sand, crushed stone, cement and water to the concrete mixer, and then take the prepared concrete mixture to the foundation for pouring. One cycle will take about 10-15 minutes, that is, one cube of concrete can be poured in 5 hours. If the work is coordinated and a sufficient number of people are involved, then everything can be done faster: someone will bring materials, someone will make the mixture, someone will pour it into the formwork and compact it.
Construction materials and a concrete mixer should be as close as possible to the foundation being poured, so that there is no need to carry the mixture far and waste time and effort. For convenience in work, various shovels and buckets are used for wet and dry materials. Otherwise, dry sand and cement will begin to remain in the buckets and stick to the wet tool.
Be that as it may, it will not be possible to manually pour the foundation in one day, especially with large volumes. Filling will have to be done in parts. In this case, there are two options:
How to pour a slab under the foundation.
Foundation slab reinforcement diagram.
- If the pouring needs to be interrupted for a short period of time (up to 12 hours), then there is nothing to worry about. Part of the foundation is poured - a layer of a certain thickness over the entire formwork, then a pause is made, while the concrete should be covered with film or roofing felt. The next day, concrete milk is washed off from the surface of the concrete (if any appears on the surface) and the pouring of the foundation continues. This connection of layers is called a hot joint (a method of pouring in which the layers of concrete do not have time to harden).
- If the pause between pours is more than a day, then it is necessary to make a cold joint: lay a new layer on the previous layer only after it has hardened. Under no circumstances should you lay a new layer on slightly hardened concrete, because on the one hand it has hardened, but on the other it is only gaining strength and may not withstand the pressure of the new layer. As a result, when a new layer is poured, the crust on the old one is destroyed and a very fragile crumbling area appears at the seam site. From this it is worth concluding that if pouring cannot be continued as soon as possible, then it is better to let the first layer of concrete dry completely and gain strength.
How to properly divide the foundation when pouring in parts?
Diagram of a slab foundation.
You can fill the entire foundation, but only half the entire height. You can install vertical partitions and fill the foundation halfway, but to the full height of the formwork. Some experts believe that it is better to make an inclined seam, that is, place the partition at an angle. There is no clear answer to this question in official documents. This is most likely due to the fact that professional builders do not consider pouring the foundation in parts to be correct. However, this does not mean at all that if you are building a low-rise house yourself, you cannot do it. After all, the requirements for the strength of the foundation being created in this case are not the same as for the construction of a high-rise building.
You should not make a horizontal seam where the horizontal rod of the reinforcement frame passes. It will be better if the reinforcement is located in one layer, and not at the joint. You cannot make the layers too thin: when pouring the foundation in small portions, it is better to make vertical joints rather than horizontal ones.
Features of the technology of pouring a slab under the foundation.
Scheme of a monolithic slab on a strip foundation.
The parameters of the monolithic slab and its thickness are determined in the design of the future construction. If the structure is light enough (for example, when building a garage), the minimum thickness of the slab will be about 100 mm. When building a country one-story house, you will need to create a slab with a thickness of about 200-250 mm. Increasing the thickness of a monolithic slab too significantly is not advisable, since the load on unstable soil will increase and the main advantages of creating this type of foundation will disappear.
As with the creation of other types of monolithic foundations, when pouring a slab, it is necessary to carry out a series of waterproofing works. You need to protect the slab from moisture on all fronts:
- Waterproofing in the lower part of the structure is carried out using rolled materials even during the assembly of the formwork. Preference should be given to bitumen-polymer materials that are laid overlapping after the sand cushion has been prepared. The joints between the sheets are sealed by fusing the edges of the waterproofing material using a gas torch. You should also first leave a supply of material to protect the ends of the slab.
- Waterproofing of the side parts is carried out using waterproofing materials of the sole.
- Waterproofing of the upper surface of the slab is carried out using rolled, coating and sprayed building materials.
Diagram of the installation of a foundation slab on the ground.
In order to reduce heat loss, the slab base must be insulated using various materials. Most often, insulation is used under the foundation, which involves placing the slab on a layer of thermal insulation. It will be even more effective to use thermal insulation when installing floors - directly under the screed. Polystyrene foam or polystyrene foam is most often used as a thermal insulation material.
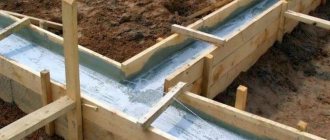
For the manufacture of formwork, boards with a thickness of about 50 mm are used. Shields are knocked down from them and installed along the entire perimeter of the future slab, fixing the structure with pegs and struts.
To create a reinforcement frame, you need to use ribbed steel rods with a diameter of about 12 mm. The diameter of the rod is selected based on the loads on the foundation being created and the nature of the soil. The reinforcement is knitted using welding or wire. When choosing concrete, it is necessary to give preference to mixtures with a grade of at least M-300, which have a strength class of 22.5.
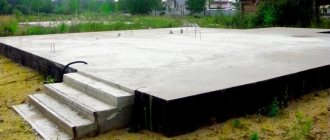
Pouring the base slab
Construction of a slab foundation
Despite the simplicity of a slab foundation, the technology for its construction must be followed as strictly as possible. Before pouring a slab under the foundation, you should familiarize yourself with a number of nuances that will allow you to obtain a truly high-quality and durable foundation.
Below are instructions on how to properly pour a monolithic base slab. If a private developer wants to do all the work with his own hands, a step-by-step guide will provide him with invaluable assistance.
Design
Before making a foundation, it is necessary to make technological calculations and create a project for the future structure on paper.
A construction project is being made with the fullest possible consideration of all aspects that may have an impact on the construction and further operation of the foundation. Errors made in the calculations can have a very negative impact on the entire further process of building a house.
Among the main factors that need to be taken into account when drawing up a project, special mention should be made:
- soil characteristics: its strength, height of groundwater, relief;
- possible external influences on the foundation: erosion by rainwater, pressure from heaving forces, shrinkage of the structure;
- dimensions of the building. The more massive the building is built on a monolithic slab, the greater the thickness of the slab should be and the more rationally the load should be distributed over its entire area.
When constructing small buildings, such as a bathhouse, garage, light country house, calculations can be made by eye. Even a small layer of reinforced monolithic concrete will be enough to support their weight. But if a permanent residential structure is being built on a slab base, it is best to seek help from specialists with an engineering education.
Due to the complexity of the calculations, there is a high probability of making design errors, which will be very difficult to correct in the future.
Site preparation
The marking is done on a leveled, cleared area.
This stage of work includes leveling the area, excavating and dumping soil. First of all, it is necessary to clear the construction site of vegetation: cut down trees and bushes, uproot stumps. After this, the top fertile layer of soil, rich in organic matter, should be removed.
Organic inclusions in the soil tend to rot over time, as a result of which the volume of the soil decreases, so a slab poured on top of organic matter sooner or later ends up in a suspended state, which does not have the best effect on its load-bearing capacity.
After removing the black soil, it will be necessary to level the area - leveling it in a horizontal plane. For this, a level is usually used, through which the horizontal is determined. But, since not every land owner has this tool, and not everyone knows how to use it, you can use a laser level.
The lowest point of the foundation of the future building is taken as “zero” and the entire site is leveled along it. You can also use a combined excavation and fill method, when the soil selected from the high part of the site is used to raise its low part.
When pouring the foundation base, fill must be used very carefully, since fill soil has low bearing capacity. The filled part of the site should be carefully compacted to avoid subsidence of the foundation in this place after construction.
Formation of a protective cushion
The sand and gravel cushion will soften the impact of the soil on the slab.
The next step is to create a multi-layer protective cushion, which acts as a buffer between the concrete pour and the soil. A layer of coarse sand, gravel or crushed stone 10-15 cm thick is poured on top of the soil. It is necessary to mitigate the pressure on the concrete base from the seasonal forces of soil heaving.
After filling, the sand and gravel cushion is compacted for greater density with a vibrating plate or a manual tamper in the form of a block with handles attached to it. When constructing a foundation on clay or marshy soils, before pouring gravel, the soil is covered with geotextiles, which will prevent the protective layer from deepening into the soil.
A protective leveling screed made of “lean” concrete - grades M-100 ... M-200 - is poured on top of the gravel. This solution received its name due to the small percentage of cement in relation to fillers.
Place a layer of insulation on the gravel layer
A heat-insulating layer is laid above the leveling screed to prevent freezing of the subfloors in winter. It is made from high-density foam or extruded polystyrene foam.
Between the insulation layer and the sand and gravel cushion, a layer of waterproofing is constructed from rolled materials - roofing felt or its modern analogues. Waterproofing stops the penetration of moisture from the soil into the insulation layer. A second layer of waterproofing is laid on top of the heat-insulating materials, after which the base slab is directly concreted.
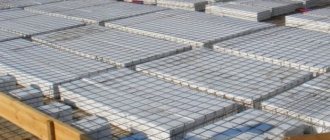
Installation of formwork and reinforcement
Install a metal frame inside the formwork.
Formwork for a monolithic slab, compared to formwork for strip foundations, is simpler in design. Along the entire perimeter of the future foundation, boards are installed, which are secured in a vertical position with stops. A volumetric reinforcing frame is installed inside the formwork above the waterproofing layer. Structurally, it consists of two meshes of reinforcement, located one above the other.
Grids are made of steel or fiberglass reinforcement. For these purposes, reinforcement with a diameter of 10–16 mm is taken, and it is desirable that the lower mesh be made of thicker reinforcement than the upper one.
Between the mesh and waterproofing on one side and the surface of the slab on the other, there must be a protective layer of concrete of at least 3-5 cm. Therefore, metal or stone embeddings are installed under the lower mesh, and the upper mesh is attached so that the surface to be poured is above it .
The size of the mesh cells should be 2 x 2 or 3 x 3 cm. Metal fittings can be connected to each other by electric welding or tied with wire. Fiberglass reinforcement is attached to one another using special clips. The upper mesh is connected to the lower mesh using vertical posts, resulting in a spatial structure. See this video for all the details of the installation process:
Stages of work on pouring the foundation slab
- First of all, the area where land work will be carried out is marked out. It will be necessary to dig a pit about 300 mm deep, into which a sand cushion will be laid. The sand must be compacted and compacted.
- Next, all incoming parts of communications are installed: sewerage, water supply, etc.
- To prevent damage to the sand cushion, it can be covered with a cement screed.
- Afterwards the formwork is done. Before doing this, you need to take care of thermal insulation.
- After the screed has hardened, its surface is covered with a layer of waterproofing, ensuring good tightness of all seams between the sheets. It is better to do 2 layers of waterproofing. For the top layer, you can use thick polyethylene film.
- Next, the reinforcement frame is mounted in 2 levels.
- After laying the reinforcement, concreting can begin. The concrete must be cured so that it can gain strength. Regardless of the method of pouring the foundation. It is necessary to compact the concrete to remove air bubbles. This can be done in 2 ways: using a deep vibrator or using the bayonet method.
- After pouring, the entire surface of the concrete must be covered with film or roofing felt. To ensure that the foundation dries evenly, the surface must be watered several times a day. Construction of a house on a new foundation can begin only a month after pouring.
As you can see, the technology for pouring a foundation slab is quite simple; all work can be successfully carried out without the help of special teams.
What kind of slab base can there be?
There are two types of foundation structures:
- Regular concrete pad;
- A foundation with stiffening ribs.
The remaining types are classified as compatible structures. For example, pile slabs or strip-tile structures.
How to pour a slab foundation for a house.
The latter type is most in demand in buildings containing basements. A pit is dug and a concrete pad is installed. The base is installed on it. The main load is carried by the strip foundation.
The most durable base is a slab, which includes stiffening ribs. Its construction requires a variety of building materials and significant labor resources, but the resulting result is pleasing with the reliability of the design.
How to pour a slab foundation for a house.
Types of slab base
In construction there are two types of slab foundations, these are:
- a simple concrete pillow;
- base with stiffening ribs.
Other types are already compatible, for example, a foundation on stilts, or a strip-slab foundation.
Tape slabs are used in the construction of structures with basements. A recess is dug, a concrete pad is placed, and a base is installed on it. The entire load falls on the strip foundation. The best option is a slab base with ribs; it is quite strong. It is not so easy to build; it requires a huge number of building materials, so its characteristics exceed the desired result.
What are the advantages of monolithic slabs?
The advantages of these designs include:
- Low cost of materials;
- Ease of construction;
- Good load-bearing characteristics resulting from a large perimeter of contact with the soil;
- With large temperature fluctuations, the structure does not deform. It can rise and fall evenly. This is a consequence of the rigidity of the platform;
- A slab foundation can be used to cover basements. There will be savings in monetary resources. You can do without floor coverings;
- Such structures can be erected on soil with a complex composition.
Pour a slab under the foundation calculator.
Features of monolithic slabs.
The structure must have a reliable foundation. To do this, it must include high-quality concrete mixture and durable reinforcement.
You can learn more about the advantages of monolithic slabs and the nuances of preparing for pouring the foundation by watching the video:
The slab base is well suited for buildings with a low floor relative to the ground. Then there will be no need for basement floors and grillages. If the foundation is located at a shallow depth, the cost of building materials will be significantly reduced.
When deciding how to pour a slab under the foundation, you must follow certain rules. Often, deformation of a structure occurs as a result of poor-quality foundation construction.
The reason for such situations is human errors during the construction of the foundation slab.
How to calculate the thickness of a foundation slab
Having decided on the type of slab foundation, we begin to calculate the parameters of the reinforced concrete slab. Its thickness is determined in such a way as to ensure optimal specific pressure on the ground. It is extremely important to achieve balance in this matter, otherwise, if there is excessive load on the ground, the house will shrink, and if there is insufficient load, it will warp.
Several factors are taken into account when calculating:
- soil type and characteristics;
- the mass of the slab foundation itself;
- the weight of building materials needed to construct the building;
- payload in the form of equipment, furniture, utilities and infrastructure elements;
- snow and wind load.
Determining the thickness of the foundation slab for large-scale construction is a topic for a separate article. If you need to calculate the foundation for a small residential building, then use a simplified method.
- The total weight of the building with finishing and communications is calculated, after which the climatic (snow, rain, wind) and operational (furnishings, equipment, people) load is added to the obtained value.
- Based on the total weight and area of the structure in plan, the pressure on the ground is calculated (the weight of the foundation is not taken into account).
- Using the data from the table below (numbers in parentheses), the weight that is not enough to achieve the optimal load on the ground is determined.
- Considering that the density of reinforced concrete is 2.7 g/cm3, and also based on area data, the thickness of the slab is calculated.
- The resulting number is rounded to the nearest 5 cm. In this case, the permissible deviation from the optimal pressure should be no more than 25%.
Table: calculation of the thickness of a slab foundation
| Priming | kgf/cm2 |
| Crushed stone, gravel | 5 |
| The sands are large and gravelly | 4 |
| Medium sand | 3 |
| Sands are fine and dusty, dense | 2 (0,35) |
| Sands fine, medium density | 1,5 (0,25) |
| Sandy loam is hard and plastic | 2,5 (0,5) |
| Loams are hard and plastic | 1,5 (0,35) |
| Hard clays | 4 (0,5) |
| Plastic clays | 1,5 (0,25) |
It is possible that the calculated value exceeds 35 cm. This indicates that a mistake was made when choosing the type of foundation and the house can easily stand on a strip or column foundation. If it turns out that the thickness of the slab should be 15 cm, then this indicates the excessive weight of the building - in this case it is better to entrust its construction to specialists.
How a monolithic slab is poured.
Usually the slab is poured in one go, so before starting work you should prepare a sufficient amount of concrete solution. It should be enough for the entire process. The operations are quite complex.
The concrete composition is supplied through the construction chute. In order to cover the entire area of the formwork, it is necessary to use a large gutter.
How to pour a slab foundation for a house.
A monolithic foundation is constructed using the method of continuous reinforcement, therefore it is characterized by high strength. It is guaranteed not to sag and will be able to withstand heavy loads and temperature changes. The thickness of the structure will be influenced by the type of structure.
Stages of foundation construction.
The technological process of pouring the base consists of several stages:
- At the initial stage, the soil surface is examined. Locations with height differences are determined;
- Uneven ground surfaces are removed. Carefully level the construction site;
- Sand and crushed stone are being prepared for the construction of a concrete pad;
- Waterproofing elements are being laid;
- The formwork device is being manufactured;
How to pour a slab foundation for a house.
- A frame is constructed from double reinforcement. It is connected using a special wire;
- The foundation slab is poured with concrete. The final layer must be filled in a short period of time. It is better to carry out the work using a concrete pump or mixer. The resulting surface should be carefully smoothed and leveled;
- To set the structure, it is covered with film and left for a month;
- Installation of insulation.
In order for the building to retain heat well, the slab foundation should be insulated using various insulation materials.
Sometimes during the construction of buildings the space under the foundation is insulated, but in most cases the insulation is laid directly into the floor covering. In order to carry out thermal insulation of concrete slabs, polystyrene foam is used.
Watch the video to learn more about the stages of pouring a slab monolithic foundation:
Proper execution of concrete batches.
Considering the question of how to pour a slab under the foundation. You should familiarize yourself with the methods of preparing concrete mixture. To save money, you can do the mixing yourself at the construction site.
Having a working concrete mixer will make the process less labor-intensive. The device consumes power of 200 W or more. In one operation, you can prepare up to 200 liters of concrete composition.
How to pour a slab under the foundation with your own hands.
Using a concrete mixer will improve the quality of concrete. All ingredients are mixed evenly in it without lumps forming. It is good to place the concrete mixer next to the pouring object.
As a result, the expended forces are reduced. In order for the work to be comfortable, you should use convenient tools adapted to interact with dry and wet substances, otherwise they will stick to the wet surface.
How to pour a slab under the foundation with your own hands.
Advantages and disadvantages
When choosing a foundation for a house, you should pay attention to the following advantages of a tiled structure:
- Possibility of installation in the above difficult conditions, incl. on unstable soils.
- Increased reliability due to the monolithic structure and reinforced reinforcement. High resistance to temperature changes.
- Possibility of arrangement with high groundwater and severe flood conditions, with frequent flooding.
- Simplicity of technological methods. Possibility of construction with your own hands without the use of special equipment.
- Minor amount of excavation work. The foundation pit for the slab is shallow, which speeds up construction work.
- Possibility of use as a concrete floor screed.
The prevalence of the reason under consideration is limited by the following disadvantages :
- high requirements for construction site preparation. It should be perfectly flat, i.e. no slope;
- increased consumption of materials, because the slab covers the entire area under the structure, which makes the foundation quite expensive;
- limiting the number of floors (height) of a structure;
- problems with arranging a cellar inside the house.
Analyzing all the pros and cons of a tiled foundation, it is not difficult to come to the conclusion that its choice is most often determined by specific circumstances. It is erected in cases where the strip base is unreliable.
We recommend reading: Scheme and methods of planning a construction site for a private house
Correct filling.
When pouring a slab with concrete mortar, it is better to use one pass. For some builders, this process is divided into several operations and half of the foundation is poured first. This will require the creation of vertical partitions.
A prerequisite is to fill the full height of the formwork.
It is believed that an inclined seam is necessary. For this purpose, a corner partition is made. When constructing low-rise buildings, the partial filling method can be used. In these cases, special stability of the foundation structure is not required.
Diagram of the foundation slab for the foundation.
It is not recommended to make horizontal joints next to horizontal reinforcement. Ideally, the metal should not be located at the joint. If filling is carried out in small areas, the presence of vertical seams should be provided.
How to properly pour a concrete base for structures?
The slab should be poured in one go; you can also lay the concrete solution to half the volume along the full height of the formwork. The solution should be laid immediately after preparation and, during the pouring process, ensure uniform coverage of the working surface. After the mixture is laid, you need to remove excess water and air bubbles from it. Compaction is carried out with a deep vibrator. A well-compacted concrete mixture has high strength characteristics, which improves the quality of the constructed structure.
When pouring a slab foundation, you will need the following tools:
- building level;
- roulette;
- drill;
- pencil;
- screws;
- hacksaw;
- screwdriver;
- concrete mixer;
- shovel;
- pliers.
Return to contents
How to pour a slab under the foundation.
Every structure needs a high-quality and durable foundation. Today there are several types of foundations. Before starting work, a soil analysis is carried out. This process allows you to quickly determine the type of future foundation, since the choice of foundation depends on the composition of the soil. Recently, developers have given preference to a tiled base - a shallow or non-buried foundation. This monolithic slab copes well with moving soils. It does not require pouring additional surface screed, since it already has a completely flat surface and finishing floor work can be carried out directly on the base. But carrying out such work has its own nuances - you need to know exactly how to pour the slab under the foundation.
How to pour a slab under the foundation with your own hands.
Foundation Features
What is a monolithic foundation slab? In general, this is a shallow foundation in the form of a concrete monolith covering the entire area under the building. An important condition for the construction of this structure is the presence of a cushion, which serves as a damper layer between the foundation and the ground, and also plays a drainage role.
A typical monolithic slab foundation design involves a multi-layer structure. The following is laid alternately on top of the sand-gravel (crushed stone) cushion:
- geotextiles;
- concrete preparation;
- waterproofing;
- insulation.
Only after this is the concrete poured. The reliability of the base is ensured by the thickness of the layers: the cushion is at least 30 cm, the concrete slab is 40 cm or more.
The main feature of a monolithic slab is a large support area, which allows you to evenly distribute the load on the ground and reduce the specific pressure to 100 g/cm² with a slight roughening of the foundation. It is this ability that determines the scope of application of this foundation.
Despite the high material consumption, it becomes indispensable when building a house on unstable soils, with an excessively large depth of soil freezing and close proximity to groundwater.
In particular, such a regulatory document as SP 50-101-2004 indicates the need to use a shallow or non-buried slab foundation in case of excessive heaving of the soil and excessive sensitivity of structures to deformations.
Such structures include brick and foam block walls, for which deformations already within 2-3 mm are dangerous. The document recommends, as a mandatory element, the arrangement of a pillow from materials that are not subject to swelling.
Tiled foundations are most popular in the construction of country houses with walls in the form of brick, stone and block masonry. It is especially often used in the construction of frame-type buildings. In principle, it can be used for any one-story buildings (maximum two-story buildings).
We recommend reading: Types of foundations for a private house
Type of tiled base.
There are two types of foundation slab design:
- standard monolithic slab;
- slab with stiffening ribs.
A standard monolithic slab is most in demand in buildings with a basement. To do this, you need to dig a pit, and then install a concrete pad. A foundation is installed on it, which carries the main load of the building. A more durable base is a slab that has stiffening ribs. To build such a foundation slab, a variety of building materials and significant labor resources will be required, but the end result is a very reliable structure.
How to properly pour a slab foundation for a house.
Smooth concrete floor on your own
To make concrete with your own hands, which will be characterized by increased smoothness and high aesthetic qualities, you need to use microcement. This is a special modern material, which is a special polymer-cement plaster. It has increased wear resistance and is impermeable to moisture.
After using microcement, a high-quality coating is obtained, which in appearance resembles concrete, but has a smoother and more uniform structure. But as a result of using this material, it is not possible to obtain a mirror surface. It will always have some unevenness and roughness.
Properties of microcement and comparison with other materials
To apply this technological scheme yourself, you must adhere to the following instructions:
- A special primer solution, UniPrimer, is applied to the concrete.
- The surface is treated with Durocret-Deco Flex microcement. The thickness of the working layer is 5 mm.
- The solution must be reinforced with fiberglass mesh with a density of more than 160 g/sq. m.
- After the solution has set, the coating is treated with another layer of primer.
- Durocret-Deco Finish microcement is applied to the wet primer. This is what ensures the smoothness of the coating.
- To give the finishing layer increased wear resistance, it can be coated with polyurethane varnish.
Features of the construction of a slab foundation.
Basically, a tiled base is erected for structures with low floors. To construct it, you do not need to build basement floors and grillages. A slab foundation is not a deep foundation, which will reduce the cost of building materials by approximately 30%, but the cost of the basement by approximately 40%. In order to properly pour a slab under the foundation, you must follow certain rules. Mainly due to poor-quality foundation, the structure of the house is damaged - distortions, cracks, as well as other emergency situations. Also, such problems may be associated with non-compliance with the rules of construction technology. But if you follow all the rules and construction technologies, you can build a high-quality, strong foundation for any type of structure.
Advantages of a tiled base.
- Low cost and fairly simple installation.
- It is installed flat on the ground, so it has excellent load-bearing capacity.
- The structure is not deformed, so future walls of the building will not collapse or crack. When the soil freezes, the slab base rises and falls evenly, which makes it possible to prevent deformation of the foundation.
- The tiled base has a fairly flat plane, which allows significant savings by eliminating the need for additional screed.
- The foundation slab can be used to cover the basement floor - this method will be less expensive than purchasing ready-made concrete floor slabs.
- The base can be laid on any type of soil.
Such significant advantages make the tile base quite popular among all types of foundations.
How to pour the foundation correctly
The concrete slab should be poured in one go. But some builders still do the pouring in several stages. You can fill the entire base, but only half. It is necessary to create vertical partitions, and then fill them halfway, but always to the full height of the formwork.
Professionals believe that for pouring you need an inclined seam, it is necessary to make a corner partition. Although official sources cannot give a specific answer. Most builders do not consider it correct to fill in parts. But this does not mean that if you decide to build the foundation yourself, you cannot fill it in parts. This method is perfect for low-rise buildings; it does not require special foundation stability.
Horizontal joints should not be made near horizontal reinforcement. Ideally, the metal will be in one layer and not at the joint. If you are pouring in small areas, then make vertical seams.
Scope of application of the slab foundation.
How to properly pour a slab under the foundation.
A special feature of a slab foundation is a concrete pad that can easily cope with soil mobility. This type of foundation is suitable for the construction of buildings using rigid building materials. When soil moves, almost all types of foundations begin to crack, so small buildings should be erected on a slab foundation, this will prevent the foundation from splitting.
Tools and building materials needed to pour the foundation slab.
As with any construction work, to pour a slab foundation, you will need tools and materials for manufacturing:
- area measuring instruments;
- tools or equipment for digging a pit;
- cement, water, gravel, sand;
- lumber, nails, hammer (for formwork construction);
- materials for waterproofing, thermal insulation;
- reinforcing rods, wire;
- concrete mixer or other equipment for mixing concrete;
- vibrating rammer;
- polyethylene or roofing felt.
With such a set of tools and building materials, you can build a high-quality tiled foundation.
Filling with ready-made mixture.
How to pour a slab under the foundation.
In this way, you can fill a monolithic slab in the shortest possible time. To do this, you need to carry out all the preparatory work, as well as order the services of a company that delivers concrete mixture using a mixer machine. Such a mixer can deliver from 6 to 8 cubes of concrete at a time, which allows you to pour a tiled base in a matter of hours. For work you need 4 – 5 people. The mixer delivers the concrete mixture through a chute 1.2 - 1.5 meters long. It is not recommended to supply concrete at one point, as it will be problematic to stretch it around the entire perimeter in the future. This may also lead to uneven laying - the liquid part of the concrete mixture will flow along the formwork area, while the crushed stone will remain in place. Proper pouring of a slab foundation consists of supplying concrete mixture along the entire length of the formwork. This will make the work easier, allowing you to lay a uniform tile base. To do this, it is necessary to provide and clear a mixer entrance on each side of the formwork. If for some reason it is not possible to organize an entrance, then it is necessary to lengthen the concrete supply chute. It can be made from scrap materials such as wooden boards or a large diameter plastic pipe cut lengthwise. This pouring option has an average cost and is therefore popular when laying a foundation.
Pouring using a concrete pump.
How to pour a slab or strip foundation.
This is the most expensive and most convenient foundation pouring. Concreting occurs as follows - a specialized machine, using an extendable boom, can deliver the concrete mixture over a distance of 30 to 50 meters, which allows pouring even in places with difficult or impossible access to the formwork. Due to the high cost, concrete pumps are mainly used only in construction on large projects.
Do-it-yourself filling.
How to pour a slab under a foundation using a concrete pump.
You can pour the slab under the foundation yourself. This is the cheapest method of filling, but quite labor-intensive and time-consuming. To do this, you can use one or more concrete mixers, it all depends on how many people are involved in pouring the foundation slab. You can do without them by mixing the concrete mixture with shovels in a trough, but the concrete will not have the same quality as when using a concrete mixer, and the time costs will increase significantly. If you use a small concrete mixer with an operating volume of up to 50 liters, then pouring one cube of the finished mixture will require approximately 20 completed cycles. Mixing concrete takes approximately 3 – 5 minutes. But in order to make a batch, you need to put sand, cement, water and crushed stone into a concrete mixer, and then deliver the finished concrete to the formwork. Then the approximate cycle will be 10-15 minutes. It follows from this that one cube is filled in 5 hours of work. The whole process can be sped up by more people using a larger concrete mixer. Sand, crushed stone, water and cement, as well as the concrete mixer itself, should be located next to the formwork. This will save time and effort spent on delivering building materials and the finished mixture, which will be poured into the formwork.
Classification and features of slab foundations
As already noted, slab foundations are divided into several types depending on the laying depth. As for the design differences, the specifics of construction in different climatic conditions contributed to the emergence of several options for reinforced concrete foundations. Due to its simplicity and efficiency, the simplest “floating” foundation, as well as the Finnish and Swedish slabs, have gained particular popularity in our country.
Floating base device
In principle, any slab foundation can be called “floating”, but builders most often use this word to designate a flat concrete foundation of a shallow type. Its thickness is influenced by the weight of the building, taking into account the operational load, as well as the type of soil on the site, so the height of the concrete structure varies from 15 to 35 cm.
A floating foundation is resistant to loads of varying severity that occur during freezing or thawing of the soil, as well as during soil subsidence
The design of a floating foundation includes:
- drainage pad;
- waterproofing layer;
- reinforcing frame;
- concrete filling.
To create a drainage cushion, dig a pit 30–40 cm deep, fill it with 10–20 cm of sand, and fill the remaining space with crushed stone. When constructing the frame, metal or fiberglass reinforcement with a diameter of 12–20 mm is used. If the rods of the armored belt are connected using knitting wire, then a steel rod of any type will do. If you use a welding machine, you should choose class “C” fittings.
Concrete for a slab foundation is selected based on the requirements of strength and reliability, so when ordering a solution you should focus on the following indicators:
- strength class - the higher the better (at least grade M-300);
- waterproof coefficient - not lower than W8;
- mixture mobility indicator - P-3;
- frost resistance - F200 and higher.
When building in areas with high groundwater levels, it is recommended to use sulfate-resistant concrete, but finding it on sale will not be easy. As for protecting the concrete slab from moisture, you can use any type of roll waterproofing. If there is a choice, then preference is given to bitumen-polymer materials.
Table: composition and proportions of concrete made from M-400 cement, sand and crushed stone
| Concrete grade | Mass composition, C:P:SH, kg | Volumetric composition per 10 liters of cement, P:SH, l | Amount of concrete from 10 liters of cement, l |
| 100 | 1:4,6:7,0 | 41:61 | 78 |
| 150 | 1:3,5:5,7 | 32:50 | 64 |
| 200 | 1:2,8:4,8 | 25:42 | 54 |
| 250 | 1:2,1:3,9 | 19:34 | 43 |
| 300 | 1:1,9:3,7 | 17:32 | 41 |
| 400 | 1:1,2:2,7 | 11:24 | 31 |
| 450 | 1:1,1:2,5 | 10:22 | 29 |
Table: concrete made from M-500 cement, sand and crushed stone
| Concrete grade | Mass composition, C:P:SH, kg | Volumetric composition per 10 liters of cement, P:SH, l | Amount of concrete from 10 liters of cement, l |
| 100 | 1:5,8:8,1 | 53:71 | 90 |
| 150 | 1:4,5:6,6 | 40:58 | 73 |
| 200 | 1:3,5:5,6 | 32:49 | 62 |
| 250 | 1:2,6:4,5 | 24:39 | 50 |
| 300 | 1:2,4:4,3 | 22:37 | 47 |
| 400 | 1:1,6:3,2 | 14:28 | 36 |
| 450 | 1:1,4:2,9 | 12:25 | 32 |
Advantages of a Swedish slab foundation
The basis of the Swedish foundation is also a reinforced concrete slab. In this regard, the design has an undoubted resemblance to a shallow foundation, including its inherent advantages and disadvantages. At the same time, if a floating support platform is built directly on a sand and gravel bed, then the Swedish slab is installed on a layer of insulation.
The design of the Swedish slab combines the construction of an insulated monolithic foundation and the possibility of laying communications
This technology allows:
- use the structure as a floor base;
- install a heated floor system directly into the slab array;
- reduce heating costs due to increased thermal insulation.
The effectiveness of an insulated floating foundation has been proven by more than half a century of construction history on the Scandinavian Peninsula. Today it is perfectly suited to the harsh Russian conditions.
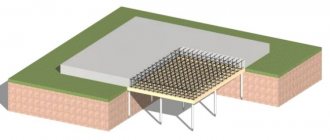
Design and specifics of the Finnish slab foundation
Finnish engineers improved the technology developed in Sweden, as a result of which they were able to further adapt the foundation to harsh climatic conditions. The structure received additional stiffening ribs under the load-bearing walls, which made it possible to build on highly heaving soils. In addition, the slab was made multilayer, thereby improving the thermal insulation and performance characteristics.
Structurally, the foundation consists of a concrete slab with an internal metal frame, under which a drainage sand and crushed stone cushion is installed. The variable cross-section allows you to significantly increase the rigidity, and therefore the load-bearing capacity of the structure. A layer of thermal insulation is laid on the reinforced concrete slab, so that the cold circuit in contact with the ground does not come into contact with the base of the floor. A screed is made on top of the insulation, into which, if necessary, a heated floor system is integrated. Insulation of the blind area is carried out using polystyrene foam boards, which are laid around the perimeter of the slab at a depth of 30–40 cm.
The Finnish plate differs from the Swedish one in the presence of additional stiffening ribs around the perimeter, as well as in the peculiarities of laying insulation
The main differences between the Finnish slab foundation and other technologies:
- the reinforced concrete structure is decoupled from the base of the floor, so the latter is subjected only to operational loads;
- due to the high stiffening ribs, the Finnish slab can be buried by 0.4–0.7 m;
- The multilayer structure allows the integration of engineering communications not during the manufacture of the slab, but at the stage of finishing work.
The Finnish foundation could be considered ideal, if not for the higher cost. The budget increases the volume of excavation work, and in addition, when pouring a slab, it is necessary to install not only external, but also internal formwork.
Stages of pouring a slab base.
How to pour a slab under a garage foundation.
To obtain a high-quality and functional foundation, you need to go through the following stages:
- Before starting work, you need to examine the soil surface for differences in height.
- It is necessary to carefully level the construction site - remove uneven areas along the entire plane where the foundation will be installed.
- Fill in a concrete pad consisting of sand and crushed stone.
- Install waterproofing.
- Make formwork.
- Mount a double reinforced frame.
- Pour the concrete mixture. It is necessary to lay the last layer in a short period of time so that the surface can be smoothed, making the plane more even.
- In order for the tile base to dry evenly, which will make it better and more durable, it must be covered with plastic film and left for 1 - 1.5 months.
- The last stage is the installation of thermal insulation.
Pour a slab under the foundation price calculator.
The work carried out in stages will result in a strong and reliable slab foundation. If you make correct and accurate calculations, while calculating the physical and time costs, this will not only save significant money and time, but also get a good result of the work performed. To do this, you need a minimum amount of knowledge, namely, to understand how to properly make a strong and reliable foundation.
Recommendation: A good review article, from it you will learn how to pour a slab under the foundation. Pay special attention to ensure that the slab is poured 1 day in advance. If this is not possible, then to prevent the slab from cracking in the future, it is necessary to ensure a reliable connection between the old and new layers of concrete. Otherwise, you will build a defective slab.