Currently, a rational approach to the construction of residential buildings is clearly visible. The priority is to reduce the cost and speed up the process, and use energy-saving technologies.
Building a house from foam blocks fits well with modern trends. This material is one of the characteristic representatives of cellular concrete and fully satisfies high requirements.
Before starting construction work, it is necessary to understand the features of foam concrete and recommendations for its practical use.
Foam block: characteristics of building materials, standards
Several technologies are used to produce foam concrete. In all cases, mix cement, sand, foam or foaming agent and water. Additives are added to enhance certain properties.
The result is lightweight or cellular concrete, in which air bubbles are evenly distributed throughout the entire mass of the hardened solution. The latter, depending on the purpose of the material, may be in larger or smaller quantities. Because of this, different types of foam blocks have different purposes (D – brand):
- D200-D600 – thermal insulation;
- D600-D900 – structural and thermal insulation;
- D900-D1200 – construction material.
There is no strict gradation between them. For example, D600 can be used for both thermal insulation and masonry. Performance characteristics (ranges - from D200 to D1200):
- strength, kg/sq. cm: from 7.7 to 90.0;
- compressive strength class, MPa: from B0.5 to B12.5;
- density, kg/cub. m: from 200 to 1200;
- thermal conductivity, W/m*K: from 0.05 to 0.38;
- mass humidity,%: 25;
- vapor permeability, mg/m*h*Pa: from 0.26 to 0.1;
- sorption humidity%: 8 (up to D700), 10.
The density of the material is indicated in its brand. Regulatory documents for cellular concrete: GOST 31359-2007 for autoclave curing, GOST 25485-2019 for non-autoclave curing.
Characteristics of foam concrete blocks for building a house
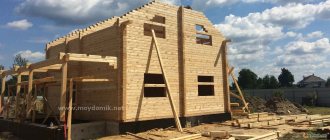
Possessing strength and excellent thermal insulation qualities, the foam concrete block is lightweight. In addition, thanks to its porous structure, it is able to easily remove excess moisture out. Foam concrete is not yet popular enough, and therefore its suitability for building houses is not obvious to everyone. However, the characteristics of foam concrete blocks make it possible to use this material as a full replacement for brick or cinder blocks. The difference lies in the technology of building the house.
Foam concrete blocks of non-autoclave production are available in four varieties:
1. Thermal insulating foam concrete is a material of grades D150-D400 (respectively, with a density of 150 to 400 kg per cubic meter). The strength class of foam concrete grade D400 is in the range from B0.5 to B0.75, which corresponds to a tensile strength of 9 kg per square meter. see. Compositions of grades below D400 are not standardized in any way for strength. Also, the frost resistance of all brands of thermal insulating foam concrete is not standardized.
2. Structural thermal insulation foam concrete - material of grades D500-D900 (respectively, with a density of 500 to 900 kg per cubic meter). The strength class and frost resistance of foam concrete grade D500 are not subject to standardization. Moreover, the strength of this brand is 13 kg per square meter. see. Other brands are standardized for strength as follows:
- grade D600: B1-B2 (strength 16 kg per sq. cm), frost resistance coefficient F 15-35;
- grade D700: B1.5-B2.5 (strength 24 kg per sq. cm), frost resistance coefficient F 15-50;
- grade D800: B2-B3.5 (strength 27 kg per sq. cm), frost resistance coefficient F 15-75;
- grade D900: B2.5-B5 (strength 35 kg per sq. cm), frost resistance coefficient F 15-75.
3. Foam concrete of grades D1000-D1200 is called structural (respectively, with a density of 1000 to 1200 kg per cubic meter). The distribution of strength classes by brand is as follows:
- grade D1000: B5-B7.5 (strength 50 kg per sq. cm),
- grade D1100: B7.5-B10 (strength 64 kg per sq. cm),
- grade D1200: B10-B12.5 (strength 90 kg per sq. cm).
The frost resistance coefficient F is 15-50 for all brands.
4. Structural porous foam concrete - material of grades D1300-D1600 (respectively, with a density of 1300 to 1600 kg per cubic meter). The characteristics of these foam concrete blocks are not standardized due to low production volumes.
The strength of each type of foam concrete block is affected by temperature, humidity during the production process of the product, the filler used and the brand of cement used. An approximate value of strength (albeit slightly underestimated) is obtained by dividing the number of the material grade by 20. For example, for foam concrete grade D1600, the strength limit with a margin will be 80 kg per square meter. see. In this case, the reserve will not be superfluous.
The table below shows the thermal conductivity values and vapor permeability coefficients for each brand of dry foam concrete blocks:
| Brands of foam concrete blocks | Thermal conductivity, (W*m*0С) | Vapor permeability coefficient, (Kg*m hour*Pa) |
| D300 | 0,08 | 0,26 |
| D400 | 0,1 | 0,23 |
| D500 | 0,12 | 0,2 |
| D600 | 0,14 | 0,17 |
| D700 | 0,18 | 0,15 |
| D800 | 0,21 | 0,14 |
| D900 | 0,24 | 0,12 |
| D1000 | 0,29 | 0,11 |
| D1100 | 0,34 | 0,1 |
| D1200 | 0,38 | 0,1 |
The dimensions of foam concrete blocks for building a house also depend on the type of material. For D600 and D800, the standard dimensions are 20x30x60 cm, the D600 brand can have dimensions of 10x60x60 cm.
Recommended reading:
- Service life of a wooden house
- Pros and cons of a house made of rounded logs
- Building material for a country house
Comparative characteristics of foam concrete and other building materials:
| Options | Ceramic brick | Ceramic block | Silicate brick | Gas block | Foam block |
| Dimensions, cm | 25x12x6.5 | 38x25x24 | 25x12x6.5 | 20x30x60 | 20x30x60 |
| Wall weight, kg/sq. m | 1200-1800 | 600-800 | 1450-2000 | 100-900 | 100-900 |
| Density, kg/cubic. m | 1500-1750 | 700-900 | 1700 -1950 | 300-1200 | 300-1200 |
| Water absorption,% | 12 | 12-14 | 16 | 20 | 14 |
| Thermal conductivity, W/M*k | 0,4-0,7 | 0,1-0,2 | 0,8-1,1 | 0,1-0,4 | 0,1-0,4 |
| Frost resistance, cycle | 25 | 50 | 25 | 35 | 35 |
| Ultimate compressive strength, MPa | 2,5-25 | — | 5-30 | 0,5-25 | 0,25-12,5 |
| Consumption, pcs./cubic. m | 400-500 | 34-45 | 400-500 | 21-27 | 21-27 |
| Price, dollars/cubic meter M | 63-112 | 62-90 | 17-90 | 60-94 | 49-68 |
There is ongoing debate in the media regarding the comparison of autoclaved and non-autoclaved foam concrete. Consumers of products are often lost in trying to figure out which material is best suited for construction. Manufacturers only point out the shortcomings of the competing camp. Gas silicate and foam concrete blocks do have disadvantages, but the properties of these foam blocks are not very different from each other.
Pros and cons of houses made of foam blocks. Tips for choosing
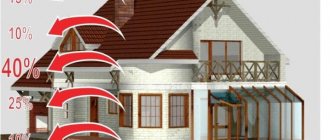
Foam blocks have numerous advantages that make them one of the best choices as a construction material. They have low thermal conductivity. The rooms will be warm, heating costs will be reduced, and the house will meet heat saving standards. Foam blocks are lightweight, which is why a full-size foundation is not necessary; you can get by with a light version. Thanks to their large size, laying is done quickly. Due to the use of glue instead of cement mortar, the walls are obtained without “cold bridges”.
Foam blocks last a long time. Moreover, a study of buildings 40-50 years old showed that their strength characteristics only improve over time. They are not afraid of fire and frost, and absorb noise well. The porous structure facilitates processing, providing ample opportunities for original design solutions, and the rough surface simplifies finishing work. And finally, foam blocks are inexpensive and harmless to health.
True, foam blocks also have disadvantages. They do not allow air to pass through, because... cells are closed. This is a small minus, it can easily be solved by installing artificial ventilation, but it needs to be mentioned. In general, only round timber and timber truly “breathe”. Insulation materials also do not allow air to pass through well, so, for example, a frame house also needs ventilation.
A wall made of foam blocks looks unpresentable, and it is desirable to protect it from moisture, so façade cladding is required. Special masonry adhesive is more expensive than cement mortar. The fact that, due to the porosity of foam concrete, fasteners do not hold well is not a problem; there are special anchors and dowels for this.
The strength of the most popular brands of foam blocks in private construction is sufficient to build houses up to 10 m high (1-3 floors).
When buying foam blocks, you should remember that their quality is crucial. If they are cheap, it means the raw materials were of low quality, or “economical” technology was used. In this case, the characteristics may not match, and the plaster will not stick; you will have to nail down the mesh. And if the geometric shape is not maintained, it must be placed on the solution. In general, it is better to buy from large, long-running manufacturers - with documents and a guarantee.
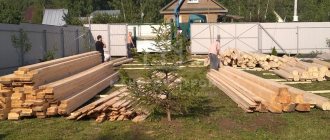
It is not advisable to buy fresh blocks, because... After production, they require 3-4 weeks to dry completely, with mandatory shrinkage.
Features of representatives of cellular concrete and their impact on construction time
Foam block is one of the varieties of cellular concrete, which, of course, determines some features of the construction process.
Let's consider point by point what the developer should take into account, and what advantages await him when choosing this material as the main one:
- One of the most important features of foam block is its hygroscopicity. It absorbs moisture slightly less than its competitor, the aerated block, but the figure of 10-16% is not so small. Therefore, the product needs to be protected from moisture, including in cases where the unit is to be temporarily stored.
Excess moisture can not only reduce the physical and mechanical properties of products, but also partially destroy the structure of the material. For example, when it crystallizes during frost, irreversible consequences can occur.
Cellular structure of the foam block
- It is also worth noting the material’s tendency to shrink. Developers often complain about the appearance of cracks on finished walls. Therefore, you should not start finishing immediately. The products should settle a little.
Shrinkage of the foam block
Note! The appearance of cracks can be caused by other factors, such as: errors in foundation construction, the use of blocks from different manufacturers, and so on. This indicates that precise execution of construction technology is the key to a good result.
- Experts recommend starting to decorate the building from the inside.
- When transporting and working with blocks, you should be careful due to the fragility of the products. They are easy to process, but also quite easy to split.
- When designing a building, pay attention to fastening points in places where it will be necessary to secure heavy objects. This is the weak side of the foam block and, most likely, these nodes will have to be strengthened.
- When choosing a material, be sure to keep in mind that it comes in several types. Familiarize yourself with the product classification, which often determines the scope of application. This is especially true for dividing the foam block according to density. Pay attention to the types of products depending on the hardening method and their differences in characteristics.
One of the classifications of foam block
On a note! Avoid cottage industries. Products manufactured using them are not subject to control, and the values of their characteristics may not comply with GOST requirements.
- It is worth noting one of the main advantages of the foam block: it has an extremely low thermal conductivity coefficient, which means that you may be able to save on insulation, and, in the future, on heating the finished building.
Thermal conductivity of foam concrete in comparison with other materials
- Be prepared for additional costs associated with increasing the level of adhesion of products with finishing materials.
Stages of building a house from foam blocks
The step-by-step scheme for constructing a foam block house is practically no different from the construction of buildings made of other materials:
- Conducting geological surveys to study the potential of the site.
- Development of a house project, drawing up an estimate.
- Determination of technical conditions for utilities: water, gas, electricity, sewerage.
- Marking the boundaries for the foundation pit (if there is one).
- Laying or pouring the foundation (for a pile foundation, a grillage is made).
- Laying load-bearing walls and partitions, installing interfloor beams.
- Installation of mauerlat, installation of rafters, roof decking.
- External cladding of the house.
- Laying utility lines.
- Interior decoration of all premises.
These are the main steps. In each specific case, the general scheme may have slight changes.
What materials and tools are required
The main materials you need to build your home include foam concrete blocks, special glue and reinforcement rods. You also need to take into account that you will have to make the foundation and roof out of something. Depending on the type, you will need wooden beams, concrete or reinforced concrete blocks, tiles or slate, etc.
Tools and equipment: drill with drills and nozzle for mixing glue, grinder for cutting blocks and reinforcement, wall chaser, rubberized mallet, plane for foam concrete, hacksaw, notched trowel for glue, construction cord (mooring), level, plumb bob, trowel .
You will also need auxiliary accessories, for example, a larger container for mixing. To prepare the solution, a concrete mixer will not be superfluous.
Stages of construction work
Since we have studied some of the features of the material, it is worth starting to consider the stages of construction work. Let's start with preparing, designing and installing the foundation of the building.
Preparation and installation of the base
The very first stage will, of course, be drawing up a project and its approval. It must take into account all the features of the future building, its technical characteristics, architectural solutions, in general, everything related to construction work and the required materials.
The next stage will be preparing the area and laying the foundation. Rhizomes and vegetation are removed, the top layer of soil is removed. The area must be marked before work can begin.
Cleaning and preparing the area
As for choosing the type of foundation, it depends on some factors, which include:
- Soil type;
- The material chosen as facing. For example, brick requires the construction of a reinforced foundation, since it has considerable weight;
- Availability of a basement;
- Number of floors of the building.
When you have decided on the type of foundation, you should start digging a trench in accordance with the markings.
Trench for a strip foundation
Its width and depth also depend on a number of factors. Builders, as a rule, focus on the type of soil and its level of soil freezing. Also important is the location of water (groundwater).
Some features of the foundation for a foam block house are as follows:
- The most popular type of foundation for buildings made of foam blocks is a strip: monolithic or prefabricated monolithic. In the latter case, the points and angles of intersection with the wall are laid out using FBS blocks. In this case, the straight sections will be monolithic or laid with bricks.
Prefabricated monolithic foundation
The main advantage of this type of foundation is that there is no need to wait almost a month. Wall laying can begin a few days after the areas filled with the monolith have hardened and removed the formwork.
- If we talk about the width of the trench, then it should exceed the base of the foundation by about 30 cm. The most common tape width is 60 cm.
- The depth is usually set at 1.5 meters. The presence of a basement or basement floor directly affects the depth of the foundation.
- The pillow can be monolithic or prefabricated. Often, builders use permanent formwork to increase the speed of construction.
Let's consider the main stages of constructing a foundation strip:
- As mentioned above, the first stage will be digging a pit;
- Next, a sand-crushed stone cushion is laid;
- Next, the formwork is installed, which will keep the concrete from spreading;
- The next stage is reinforcement and filling, which is carried out in stages;
- Finally, after the solution has hardened, the formwork is removed.
Formwork for the foundation
Pouring concrete
Foundation poured with concrete awaiting strengthening
Do not forget that the concrete should be compacted. This is done using the bayonet method; you can also use special equipment called a deep vibrator.
Using a deep vibrator
If the building is planned to be heavy or its number of storeys exceeds 2 floors, you should pay attention to the slab type of foundation. It is extremely expensive.
The price is approximately 1.5 times higher than the type described above. The advantage is that shrinkage occurs evenly, that is, not in separate parts.
Monolithic slab foundation
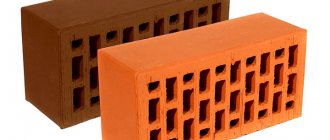
When the foundation is ready, you can begin constructing the base. Typically, the most popular material used is ceramic red brick.
As it becomes clear, the chosen type of foundation and some features of the work will directly affect the construction time of a house made of foam blocks.
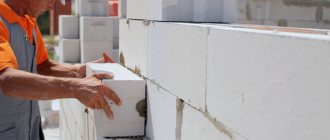
Masonry work
Masonry work using foam concrete blocks is not difficult. You can do them yourself, without the help of specialists.
Some of the images below show an aerated concrete block, but this does not matter, since the laying of two types of cellular concrete follows the same principle.
The instructions look like this:
- Begin laying products from the corners, choosing first the highest point.
Start of masonry
- A construction thread is pulled between them, which, like the blocks, serves as a guide during laying.
First stage of work
- Experts recommend laying the first row using cement mortar. This will improve the strength of the structure and the level of adhesion to the base.
- Blocks are easy to process, so if you need to fill a gap that is not equal in size to the block, you should use a hacksaw and saw, cutting the product to the desired size.
Block cutting
- The second and subsequent rows are laid on glue (see How to lay foam blocks on glue).
Application of adhesive composition
- It is necessary to shift the seam by approximately 25%.
Seam displacement during laying
- Reinforcement is carried out when laying the first row, as well as every 3-4th.
Reinforcement of a foam block wall
- The work is completed by installing an armored belt.
Armopoyas
- If the required number of storeys has been reached, when installing an armored belt, it is worth fixing special elements - studs - into it. When installing the roof, the Mauerlat is attached to them.
When installing door and window openings, lintels are used. They can be purchased ready-made or made independently from blocks. In the latter case, such products are used only when installing narrow openings.
Jumper installation
Roof installation
Now let's talk a little about roof installation. After all, the time it takes to build a house made of foam blocks depends on its type and the time spent on the device.
First, a few words about floors. They come in several types:
- Prefabricated monolithic;
- Slab;
- Monolithic;
- They also install metal or wooden beams.
The most popular among developers is slab flooring. It can be of different sizes and withstand different loads.
Installation is carried out using construction equipment. And most importantly, it takes a minimum of time to install such an overlap!
Slab floor
Note! Keep in mind in advance that a heavy slab will create a corresponding load on the walls of the structure! The blocks must have a density capable of providing an appropriate level of resistance to the applied load.
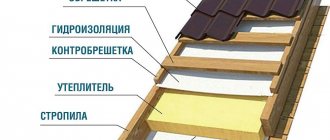
The stages of roof installation are as follows:
- The first step is to install the rafter system;
- The second stage will be the installation of hydro- and thermal insulation;
- Next, the sheathing and counter-lattice are attached;
- Finally, the finishing roof covering is installed.
House roof diagram
The most popular types are: gable, single-pitch and hip. Shed is used to cover small buildings, often household ones.
When building private houses, as a rule, the choice is given in favor of one of the other two types. Hip - the most technically difficult to perform, as a result, the construction time for a house made of foam blocks will be increased.
Types of pitched roof
Gable roof
Rafter system for hip roof
Interior and exterior finishing options
Interior and exterior decoration can be made using almost any materials. The main thing is not to forget when choosing about the main features of the foam block and the compatibility of materials with each other in technical terms.
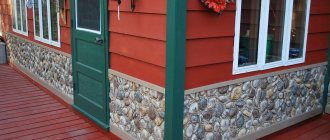
Facade cladding can be done in the following ways:
- Plastering followed by painting;
Partially plastered foam block
- Installation of a ventilated facade;
Ventilated façade installation diagram
- Brick cladding of various types;
Brick cladding of a foam block house
- Protective painting;
Painted foam block house using decorative elements, photo
- Combined finish.
Combined finishing option
Interior decoration should be selected taking into account the chosen method of finishing the facade, or vice versa. For example, if you decide to install siding with foam insulation, then it is better to install drywall from the inside, followed by plastering and painting.
If the outside of the wall is faced with brick without a gap or ventilation device, then the interior decoration must be airtight. This is necessary to prevent condensation from penetrating from the inside into the layer between the block and the brick.
Many more examples can be given. Most importantly, remember that compliance with the requirements of the standard and installation technologies will provide you with a reliable structure with high durability and no less high performance characteristics.
Option for interior wall decoration made of foam block
Performing calculations
When drawing up a plan, it is necessary to calculate the amount of materials. In particular, how many foam blocks will be needed. To do this, you need to know the dimensions of the future house and its layout. They depend on the area of the construction site, the wishes of the owner and his financial capabilities.
The algorithm for calculating the number of foam blocks for load-bearing walls is as follows. The length of the perimeter is determined and multiplied by the height of the house. We get the area. Openings (windows, doors) are subtracted from it. What remains is divided by the area of the side of the block. To the resulting number of units you need to add 20-30 units for additions and defects. The same applies to walls.
You can do it differently. Knowing the length of the foam block, as well as the length and width of the house, you need to calculate how many blocks will lie in one row of masonry. The height of the building and the block determines the number of rows and the total number of blocks. You need to subtract from them how much is needed for windows and doors, and add the technological reserve.
Selection of design documentation
The first stage is project analysis. To do this, you need to draw up requirements for future documentation - the total and living area of the cottage, dacha, number of floors, plan of rooms, utility and utility rooms. The peculiarity of the project for the construction of houses from foam blocks is that the height of the building cannot exceed two floors. There are also requirements for mandatory reinforcing belts in the load-bearing walls of the structure.
What you need to know about project documentation:
- Dimensions and characteristics of foam blocks used. For load-bearing walls you need to use the most massive ones. Interior partitions are made from smaller bricks, often plasterboard or similar material.
- Analysis of the architectural part. It includes the layout of the rooms, their area, and ceiling heights. The ergonomics of the premises are taken into account, the minimum size of rooms (bedrooms) is from 15 square meters.
- Engineering part. It describes the main components of the building, the diagram of the foundation, and the roof. Construction is carried out according to this document. Additionally, an estimate may be attached, but it is recommended to insert prices into it before starting construction, taking the current cost of materials.
- Communications - water supply, sewerage, electricity, gas supply. The project may specify elements of systems, but the future owner of the cottage must deal with the registration of permission independently.
Before construction, it is necessary to select components for the construction project of a house made of foam blocks. The maximum load on load-bearing walls and their thickness are checked. Thermal insulation depends on the latter. Additionally, a scheme for insulation and soundproofing of the premises is drawn up. The final stage of analysis is the external and internal decoration of walls and rooms.
Construction companies can carry out construction. The cost of implementing a turnkey project is from 1.5 million rubles. The price depends on the complexity of the documentation and customer requirements. An alternative is to select a ready-made project from the catalog and study its photo. Its implementation is simpler than the individual one. Important: the design of a house made of foam blocks must comply with the requirements of building regulations. So, for Moscow and the Moscow region it is necessary to make an additional layer of wall insulation.
Selection and construction of the foundation
The foundation for a foam block house can be of different types. More often they are made tape or monolithic. Often they choose piles or reinforced concrete blocks. The choice of base is influenced by the load (calculated approximately) and soil characteristics. Freezing levels and groundwater levels must also be taken into account.
Step-by-step instructions for laying a strip foundation
- The outline of the future house is marked on the site.
- Plants and topsoil are removed.
- The surface is planned.
- A trench is made according to the location of the external and internal walls. Depth – 50 cm. On heaving soils – below the freezing point. Width: the more moisture in the soil, the wider.
- A mixture of sand and gravel is poured onto the bottom. Thickness – 15-20 cm. Watered with water and compacted.
- The formwork is installed and secured. Material: unplaned boards.
- The cracks are sealed. For waterproofing, it is recommended to install roofing felt from the inside.
- Next, you need to prepare the rods for reinforcement.
- The cut rods are assembled into a frame, which is laid in a trench.
- Concrete (M400-M500) is mixed and poured into the formwork.
- To remove air from the mixture, it is advisable to compact it with a vibrator.
- The foundation of the house is covered with polyethylene.
- The final hardening period of concrete is 28 days. During this time, the structure should not be subject to loads.
- After full strength has been achieved, the formwork is disassembled.
- To construct the base, two rows of bricks are laid on the concrete, leaving holes for ventilation.
- Reinforcement is located on the bricks; it is evenly filled with solution.
- On top of the rods are two more rows of bricks (an option is reinforcement between the 1st and 2nd rows, and then also on the last row).
- After checking the horizontality of the base, the base is waterproofed with roofing felt or mastic.
In cold regions, the foundation of a house can be insulated. To do this, sheets of expanded polystyrene are attached to its outer side, after which the pit is filled with crushed stone. If the soil is too wet, drainage pipes are laid around the perimeter.
Foundation for a house made of foam concrete blocks
Many developers are misled by the relatively low weight of a porous concrete block, and by online calculators that calculate foundations based on the weight of structures on top. And all blocks made of lightweight concrete work well in compression, but in fracture, on the contrary, they work extremely poorly. Therefore, with unjustified savings on the foundations of such houses, you can get a certain number of through cracks, because no matter what any thermal conductivity tables dictate, 90% of all foam concrete houses in our country are built in 1 block with a maximum width of 400, or even 300 mm.
You can choose any foundation design, it is advisable to compare it with the quality of the soil, the level of groundwater, etc. But observe the following conditions - the spatial frame, connected from steel reinforcement 10 -12 mm, must provide maximum bending rigidity, well-prepared concrete of a grade not lower than M200 and scrupulous execution of all necessary procedures during its maturation.
Make the width of the foundation strip no less than the thickness of the wall. Foam block is a fairly fragile material, so if you leave an edge hanging over the foundation strip, it is guaranteed to break off in many places over time.
The foundation must be well waterproofed so that moisture from it does not flow to the foam blocks. The best way to do this is by gluing a couple of layers of roofing material to it with a bitumen primer. Separately about the foundation.
Recommendations for building a box
Foam blocks are laid with glue, on a flat foundation covered with roofing felt with an overlap of 150 mm. If it is not too level, then the first row is laid on the solution, starting from the highest angle, to achieve horizontality. The maximum deviation from the horizontal is 30 mm. If more, the foundation must be leveled.
Foam blocks are placed in the corners, a cord is stretched between them. The first row is laid out according to this guideline. Glue is applied to both the bottom and side parts. The placement density is maximum, so each block is tapped with a mallet and checked for level. Openings for doors are immediately left. If necessary, the excess block is sawed off with a hacksaw. Abrasions are removed using sanding paper.
If you plan to build a one-story house, the need for reinforcement depends on the size and load on the foundation. Buildings with 2-3 floors are a must, otherwise the masonry will crack. Reinforcement with a diameter of 8-10 mm is needed. On the upper plane of a row of foam blocks, grooves are cut out using a grinder or a wall cutter. After cleaning the grooves, rods are placed in them and filled with glue or mortar. The next row is placed on top. Reinforcement is performed for the 1st row, then every 4 rows.
For a one-story country house, the rods are placed in 1 row; for taller ones, they can be made in 2 rows with a distance to the edges of the wall of 60 mm. Window and door openings are necessarily reinforced at the top (in the lintels) and at the bottom. This can be done with metal corners from 5x5 cm to 10x10 cm. Their length is at least 50 cm longer than the opening.
The next rows are placed similarly to the first. The upper foam blocks relative to the lower ones are usually placed with a bandage to ensure the necessary strength of the wall. The displacement is made by 50%, but not less than 100 mm. There may be other methods of laying, but dressing is required. Openings for windows usually start from the 4th row.
After the walls are laid out to the design height of the building, an armored belt is placed on top. To do this, a formwork is made on the last tier, into which a spatial welded reinforcement frame is placed with threaded rods extended upward to fasten the Mauerlat. Concrete is poured and the surface is leveled.
If you decide to build a house of foam blocks with 2-3 floors, interfloor ceilings are installed. If they are made of reinforced concrete slabs, they cannot be placed directly on the blocks. To do this, an armored belt similar to that described above is performed.
Step-by-step instructions for do-it-yourself technology
How to properly build a house from foam blocks yourself? To build a reliable house, you first need:
- carefully prepare the site,
- conduct a soil study and determine the occurrence of groundwater,
- choose the optimal ready-made project or make the calculations yourself.
It is important to correctly calculate the base. For a block house, as a rule, a strip foundation is built from concrete or structural foam blocks. After it has been manufactured and gained strength, you can proceed to the next stages of construction.
Masonry
Laying walls made of foam blocks includes the following work:
- Waterproofing is applied around the entire perimeter of the foundation. First, it is recommended to apply a layer of bitumen, and then lay 1-2 layers of roofing felt.
- The first row of blocks is laid on a cement-sand mortar (proportion 1:3). With its help, the foundation surface is first leveled, and the horizontalness is checked by the building level. The layer thickness is at least 10 mm. The blocks of the first row are laid on the solution. Before laying, the solution is applied to the vertical walls of each element.
- Laying blocks starts from the highest angle. Here an angular ligament 3-4 rows high is formed. Similar actions are carried out in other corners. Twine is stretched between the laid out corners to control the boundaries of the wall and the horizontality of the rows. After this, the bottom row is laid around the entire perimeter of the house.
- All subsequent rows are laid on special glue for foam blocks. It is applied to the bottom surface and side walls using a notched trowel. The thickness of the seam does not exceed 5 mm. Before laying, the surface of the lower blocks is treated with a grinding machine to ensure better adhesion. The block is placed on the prepared surface and pressed by hand. Leveling is done with a rubber hammer. The blocks are laid close to each other (the gap is no more than 5 mm).
- Linking rows. Oka means that the joints between the blocks in each row do not match. To do this, in each subsequent row the elements are shifted at least 8 cm relative to the previous row.
- If necessary, the blocks are cut (cut) using a special saw, grinder or ordinary hacksaw with fine teeth.
- Masonry reinforcement. It is done along the bottom row and every 4-5 rows. Reinforcement is provided using a special reinforcing mesh or steel reinforcing bars with a diameter of 10-12 mm. When using reinforcement, a longitudinal groove is cut on the upper surface of the blocks (for a thickness of more than 250 mm - 2 grooves). The rods are placed in it. Then, the channel is filled with adhesive or cement mortar.
- The final stage of masonry is sealing and grouting the joints. For sealing, the same glue is used, which is introduced using a rubber spatula.
The glue dries quite quickly, and therefore alignment and correction of errors must be done immediately. The horizontality of the rows by the level and the verticality of the wall by the plumb line must be strictly controlled.
Openings
When laying a wall of blocks, door and window openings are formed. Each opening is carefully processed with a grinder and a grinder to give it a strictly rectangular shape. The verticality of the walls is checked with a plumb line.
The side walls of the openings must be strengthened . To do this, 2 vertical channels are cut on them using a wall chaser or grinder. Steel reinforcement with a diameter of 10-12 mm is placed in these grooves. Then they are filled with cement-sand mortar, and after it hardens, the surface is polished.
Partitions
The technology for constructing internal partitions in a house made of foam blocks is similar to the laying of the main walls. Work begins with markings, with lines drawn on the wall, floor and ceiling. Then the installation site is cleared of dirt and dust, and a strip of waterproofing material is laid on the floor covering (screed).
An important feature of the construction of partitions is their fastening to load-bearing walls . It can be carried out with rigid T-shaped anchors. Such fasteners are installed every 3-4 rows of blocks.
A flexible (soft) ligament made of perforated metal tape is often used. It is bent in half in the longitudinal direction and attached along the entire joint line. The tape is secured to the blocks using special dowels.
The partition is laid out with rows linked up to the ceiling. A compensation gap of about 12-15 mm is left on top. For reliability, you can additionally secure the top row using L-shaped elements. All gaps at the joints are filled with polyurethane foam, which has a certain elasticity.
Jumpers
It is imperative to lay a reinforced lintel over all openings . You can use ready-made reinforced concrete beams 20-30 cm longer than the width of the opening.
You can make jumpers with your own hands from U-shaped blocks. To do this, they are laid out on a board with a length equal to the length of the lintel. The blocks are connected to each other with glue and pressed tightly against each other.
2-3 steel reinforcement rods with a diameter of 12-14 mm are placed in the channel. Then it is filled with cement-sand mortar (proportion 1:3). After the glue has hardened, the lintel is lifted above the opening and secured. When laying it, it is installed so that the reinforcement is at the bottom.
Interfloor armored belt
Interfloor or ceiling beams cannot be installed directly on foam blocks. Concentrated load will lead to their cracking and gradual destruction.
To eliminate this, an armored belt is formed on top of the last row; it is made as follows:
- Permanent formwork is assembled. To do this, 2 rows of 100 mm thick foam blocks are laid along the edge of the wall and secured with glue so that a channel is formed between them.
- Steel reinforcement with a diameter of 12-16 mm is laid in the channel in 2 rows.
- The rods are fixed vertically in increments of 50-70 cm, onto which the Mauerlat will subsequently be attached. It is best to use ready-made threaded studs.
- The channel is filled with concrete mortar. During the pouring process, the mass is compacted.
After the solution has hardened, the surface is leveled and the horizontalness is checked with a level. The armored belt must be continuous around the entire perimeter of the house.
Roofing a house made of foam blocks
The roof of the house can be single- or double-sloped, as well as attic, hip, etc. The ceiling is made of beams and boards, metal or reinforced concrete slabs.
The procedure for making the roof of your house:
- Installation of rafter beams.
- Packing of battens and counter battens.
- Laying thermal insulation material.
- Installation of roofing.
To cover the roof, metal, soft (shinglas and cathepal) or natural tiles, ondulin, galvanized corrugated sheets, modified roofing felt or polymer membranes (PVC, TPO, EPDM) are used. The choice is large. In private construction, materials are attached mechanically or with adhesive.
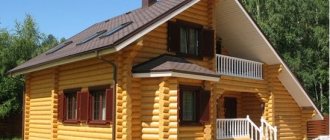
Examples of completed projects
You can build a house from foam blocks with your own hands. The main thing is to build it correctly. Yes, building it yourself can be cheaper. But the important thing is that such responsible work should be done by professionals. This is a “father’s house”, not a technical building. Such a house is built for a long time - for oneself, children and grandchildren. It will please the eye and warm the soul.
We invite you to view images of our completed projects. Think about what kind of house you would choose for yourself if you entrusted this work to the experts of AgropromStroy. Remember that we are always ready to listen to your suggestions and take into account the wishes of all family members, developing a unique project according to your parameters.
- This:
- Moderate prices (not low - good things don’t come cheap).
- Taking into account the customer’s wishes + recommendations for reducing the cost of the project without compromising appearance and quality.
- Great experience.
- Carrying out the entire range of work and delivering the facility on a turnkey basis.
Talk to our managers and make sure that we have very interesting offers.
Laying walls from foam blocks
We begin the construction of foam block walls with the installation of all corner blocks. At the same time, we check the diagonals, the height of the row, and the directions. And if your foundation does not have an ideal level, then the first row should be mounted on a cement mortar prepared according to the recipe described above. And reinforce it.
When laying walls from D500 blocks that are fairly weak in strength, it is necessary to use the correct reinforcement.
It is the same as when building a house from aerated blocks, and its entire process is described in detail in this article.
Any blocks made of lightweight concrete are perfectly grooved, cut with large-toothed hacksaws and processed with plasterboard planes. It remains to add that the reinforcement in the blocks should also be fixed with a cement-containing mortar, which will not interfere with laying them on foam.