This option has many advantages, but if ventilation openings were not taken into account during its construction, this situation can lead to problems in the future - both the wooden and concrete coverings in the room will collapse due to an excess of moisture combined with a lack of air.
Floors on the ground in a strip foundation help to avoid troubles of this nature.
What is it: concept, application, device
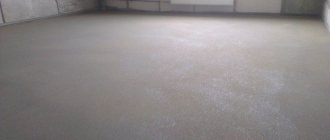
The installation of floors on the ground on a tape is a monolithic concrete screed, which helps prevent heat leakage and reliably serves for a long time.
This solution is relevant for any type of soil . The created concrete or dry screed is in no way connected to the foundation, and therefore does not experience loads from load-bearing walls or roofing.
Floors on the ground will be an excellent solution for a modern energy-saving house, which is equipped with a “warm floor”.
The damper layer, for which slab-type insulation is used, is installed so that the floor screed does not come into any contact with the base tape, which provides additional strength to the floor structure.
Concrete floor on the ground
| Fig.4. Floor construction on the ground. 1 - Concrete preparation; 2 - Hydro-gas insulation; 3 and 4 - Thermal insulation; 5 – Floor screed with “warm floor” system; 6 and 7 - Finish floor; 8 - Separating edge layer. |
Floors on the ground are a multi-layer structure, Fig. 4
. Let's go through these layers from bottom to top:
- is placed on the soil cushion that prevents moisture
contained in freshly laid concrete from filtering into the soil (for example, a plastic film with a thickness of at least 0.15 mm). The film is applied to the walls. - Along the perimeter of the walls of the room, to the total height of all layers of the floor, a separating edge layer
of strips 20 - 30 mm thick, cut from insulation boards, is fixed. - Then a monolithic concrete preparation of the floor
with a thickness of 50-80 mm is arranged.
from lean concrete class B7.5-B10 to a crushed stone fraction of 5-20 mm. This is a technological layer intended for gluing waterproofing. The radius of concrete contact with the walls is 50-80 mm. Concrete preparation can be reinforced with steel or fiberglass mesh. The mesh is laid in the lower part of the slab with a protective layer of concrete of at least 30 mm. To reinforce concrete bases, steel fiber with a length of 50-80 mm and a diameter of 0.3-1 mm can also be used. During hardening, the concrete is covered with film or watered. Read: “Composition and preparation of lean concrete class B10” - onto the hardened concrete floor preparation .
Or two layers of rolled waterproofing or roofing material on a bitumen basis are laid on mastic with each layer placed on the wall. The rolls are rolled out and joined with an overlap of 10 cm. Waterproofing is a barrier to moisture and also serves as protection against the penetration of ground gases into the house. The floor waterproofing layer must be combined with a similar wall waterproofing layer. Butt joints of film or roll materials must be sealed. - on the hydro-gas insulation layer .
Extruded polystyrene foam will probably be the best option for insulating floors on the ground. Foam plastic with a minimum density of PSB35 (residential premises) and PSB50 for heavy loads (garage) is also used. Polystyrene foam breaks down over time upon contact with bitumen and alkali (these are all cement-sand mortars). Therefore, before laying foam plastic on a polymer-bitumen coating, one layer of polyethylene film should be laid with an overlap of sheets of 100-150 mm. The thickness of the insulation layer is determined by thermal engineering calculations. -
(for example, a polyethylene film with a thickness of at least 0.15 mm) is laid on the thermal insulation - Then a monolithic reinforced screed
with a “warm floor” system (or without a system) is laid.
When heating floors, it is necessary to provide expansion joints in the screed. The monolithic screed must be at least 60 mm thick. made from concrete of class not lower than B12.5 or from a mortar based on cement or gypsum binder with a compressive strength of at least 15 MPa (M150 kgf/cm2). The screed is reinforced with welded steel mesh. The mesh is placed at the bottom of the layer. Read: “How to properly make a concrete floor screed.” To more thoroughly level the surface of a concrete screed, especially if the finished floor is made of laminate or linoleum, a self-leveling solution of factory-made dry mixes with a thickness of at least 3 cm is applied on top of the concrete layer. - The finished floor is mounted
on the screed .
This is a classic ground floor. Based on it, various design options are possible - both in design and in the materials used, both with and without insulation.
Advantages and disadvantages
This design has a number of advantages. The following are distinguished:
- does not require large financial costs;
- withstands significant mechanical loads;
- does not increase the load on wall structures;
- can be easily repaired and lasts a long time;
- suitable as a base for any finished floor option;
- allows you to install a “warm floor”.
A fairly simple solution to construct can answer a number of basic tasks during the construction of a building. However, you need to take into account some nuances:
- requires high-quality insulation;
- not suitable for large backfill layer thicknesses (it cannot exceed 60 cm);
- the floor is dependent on the groundwater level - not recommended for use in areas where it is high.
In addition, the floor on the ground requires a serious approach and attention to detail. However, existing technologies are well established and, if strictly followed, problems usually do not arise.
The depth of the aquifer can affect the condition of the finished floor, so the area must be surveyed first.
What it is?
Floors on the ground are a special technology for arranging a subfloor that rests on the underlying soil layer.
This method is allowed in the absence of a basement or basement, and due to its cost-effectiveness it is implemented during the construction of buildings for utility and auxiliary purposes. In the construction of private houses, the technology is not in demand, since it obliges people to install an insulating and waterproofing layer or install a “warm floor” system.
Another option for installing floors is intended only for traditional types of strip foundations, but is not suitable for combined options, including pile-strip and others.
Depending on the specifics of installation, the following types of subfloors on the ground are distinguished:
- Screed with concrete supported on load-bearing wall structures.
- Screed with concrete supported on the soil.
- Boardwalk on joists.
- Dry screed with floating floor technology.
Each type requires the use of its own construction methods and correctly selected soil composition. It is prohibited to pour concrete mixture onto the backfill. Before this, it is necessary to apply preparatory layers that promote optimal rigidity and resistance to intense loads.
Wooden structures are easy to install, but require a number of preparation measures.
The right “pie”: layer-by-layer guidance
If wooden subfloors do not require much effort - a sand backfill with a layer of geotextile is enough for them, then for a concrete screed you will need to create a more multi-layered “pie” .
Experts advise reinforcing the finishing layer, as this helps prevent cracking after hardening. In the finishing layer you can place communications of the “warm floor” system.
Experts recommend following this technique:
- The first layer is compacted sand.
- Next, a gravel cushion is poured.
- A reinforcing mesh is installed, which can be made of either fiberglass or metal.
- A ten-centimeter layer of concrete mortar is poured.
- A waterproofing layer is created.
- A layer of insulation is laid, for which expanded clay or penoplex, or other insulating materials can be used.
- Another layer of waterproofing is laid.
- A clean concrete screed is poured.
The last layer of the “pie” can hide any utilities, for example, sewerage or water supply , but it is recommended to provide a backup system that will help avoid destruction of the concrete layer when repair work is required.
Manufacturing technology
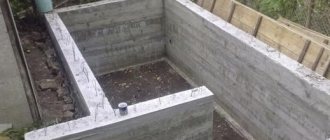
Before making a PG according to the above scheme, it is not enough to know its design. The nuances of construction at each stage, given below, should be taken into account. The main misconception is that PG is only suitable for strip foundations of a private house.
In fact, a floating screed can be poured into houses with a low grillage on screw and bored piles, classic and TISE pillars. In this case, the thickness of the structure and its structure remain the same, and the PG is adjacent to the walls on a grillage.
Backfill MZLF for floors on the ground.
Preparation
The structure of the floor on the ground must have a base with normal load-bearing capacity. The PG is made inside a grillage or MZLF, the beams of which rise above the ground, creating the base part of the foundation. Therefore, it would be correct to fill the internal cavities with soil taken from the trenches of the strip foundation, leaving 0.4 m for non-metallic material.
If there is a topsoil containing a large amount of organic matter, it must be removed. Even if you compact the chernozem with a vibrating plate, after 3–12 months the organic matter in it will rot and the soil will certainly sag, which is extremely dangerous for concrete, even if reinforced, but not connected to the foundation.
Important! At this stage, the elements of the grillage, plinth or foundation should be treated with waterproofing materials (plaster, built-up or coating), if this has not been done previously.
Communications
Unlike a floating foundation slab, the input nodes for engineering systems are installed before backfilling the underlying layer. The exact location of the walls is already known, since the grillage or MZLF has already been made. Therefore, it is impossible to make a mistake with the passage of risers in close proximity to the enclosing structures.
Even with a minimum screed thickness, the maintainability of communications inside the steam generator is practically zero. Therefore, the following technology is used:
- the water supply system is buried by 1 - 1.5 m, since the soil under the cottage cannot freeze (only for all-season housing), sewerage by 0.7 - 1 m, since the wastewater leaves the house warm;
- the pipes run in sleeves or corrugated pipes of larger diameter, so that if they fail, part of the circuit can be pulled out from outside or inside the house and replaced with new ones;
- If necessary, you can run a power cable into the cottage at a depth of 0.5 m, laying red warning tape on top of it.
Communications inside the underlying layer.
You can maximize the quality and service life of engineering systems in a private house by installing an underlying layer:
- trenches are dug for water and sewer pipes;
- geotextiles are laid, the edges of which are attached to the sides of the excavation;
- a 5–10 cm layer of sand/crushed stone is poured;
- communications are laid out;
- covered with the same non-metallic material on top and sides;
- covered with the remains of geotextiles and covered with soil.
This will compensate for possible heaving forces and maintain the integrity of engineering systems.
Substrate
Filling the top layer with nonmetallic material is a technology that eliminates heaving forces. Crushed stone and sand have drainage properties, serve as a damper layer of the floor on the ground, are normally compacted by a vibrating plate and do not sag over time.
Sand preparation of the floor on the ground.
However, these materials absorb cement laitance from concrete and do not allow the joints of rolled waterproofing to be properly sealed. Therefore, on top of the underlying layer you need to pour a footing - 3 - 5 cm of screed from a mixture of grade B 7.5.
Waterproofing and insulation
After the footing has gained strength, rolled bitumen materials are fused onto its surface with overlapping strips of 10–15 cm. The edges are launched onto the vertical surfaces of the grillage or strip foundation of a private cottage to the height of the floor along the ground.
Waterproofing and insulation of PG.
The optimal insulation option for the SG design under consideration is high-density extruded polystyrene foam of the XPS or EPS grades. It does not sag, retains its properties in water and has high vapor barrier properties.
Important! With the specified “pie” of the floor along the ground, the insulation remains under the concrete, the structure has high thermal inertia (it accumulates heat, but also increases the energy consumption in the heating boiler during initial heating).
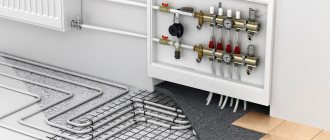
Reinforcement and heated floor
Due to the fact that a concrete floor on the ground absorbs exclusively compressive loads, its lower layer must be reinforced to compensate for destruction from tensile forces. For this purpose, a wire mesh made of rods with a diameter of 4 mm with a cell of 10 x 10 cm is used, in accordance with SP 63.13330 (reinforced concrete structures).
Reinforcement of the floor on the ground.
According to the regulations of the above joint ventures, concreting of the steam generator must be carried out in compliance with the following conditions:
- lower protective layer of concrete 1.5 cm minimum;
- to ensure this, the mesh is laid on polymer or concrete bosses; the use of metals and crushed stone is prohibited;
- when extending the mesh, the overlap is 10 cm minimum (one cell).
If the project includes a heated floor (HF), its contours are laid on top of the reinforcing mesh, and the thickness of the floating screed automatically increases.
Concreting
Experts recommend making the screed in one step, since installing vertical partitions is a very complex operation:
- the mesh must not be cut;
- to pass the rods through the partition, you will have to cut the required number of grooves in the shield;
- install the formwork in place and foam the remaining cracks;
- nail a beam on one side of the partition to create a ledge in the concrete for connection with the next piece of screed.
Before pouring, a damper layer must be installed. To do this, along the perimeter of the PG, pieces of thin (1 cm) polystyrene foam are installed vertically, close to the foundation of a private cottage, protruding beyond the design floor level, or the perimeter is covered with damper tape, which performs the same function.
Damping layer for floating screed.
The mixture is placed from the corner farthest to the concrete mixer with a ledge. Then it is compacted with a vibrating screed and leveled using the beacons.
Preparing for work
The preparatory stage includes studying the soil on the site, calculating the depth of the aquifer and possible fluctuations throughout the year. It is necessary to provide the building with a drainage system, thanks to which moisture from the ground will drain to a safe distance.
During the preparation process, the thickness of the backfill is calculated. The sand and gravel cushion should have good density, and the greater the thickness, the more difficult it is to compact the layer.
Experts recommend carrying out the rough screed over geotextiles , this way the concrete solution will retain moisture, which is needed to ensure normal hardening. If pouring is carried out on the preparatory layer, it will absorb moisture, which will ultimately weaken the strength of the resulting screed.
The amount of shrinkage of the preparatory layer is usually proportional to the selected thickness.
Before starting work, it is recommended to introduce all communications that will be located below floor level; at subsequent stages this will be much more difficult to implement.
When pouring concrete layers, it is necessary to withstand the entire hardening layer in order to prevent deformation or complete destruction in the future. Otherwise, there is a risk that the overall pie will lose strength or geometry defects will appear.
Points to consider
The floor design is selected depending on the operating conditions. There are several leading factors:
- Level of operational loads. If they are over 200 kg, then the reinforcing mesh should have a rod diameter of 4 mm; if the load is less than the specified value, then 3 mm is sufficient.
- The distance from the surface of the earth at which groundwater flows. It is recommended to take the highest value into account (during floods or seasonal snow melting).
- The purpose of the design is with coolants (warm floor system) or conventional. A floor with water or cable coolant involves creating a 2 cm gap around the perimeter of the room between the finished concrete coating and the wall. The lower layers are adjacent to the walls.
Now there are several types of “warm floors” on the construction market. They differ in the type of coolant and operating efficiency. How to choose a heated floor? We'll tell you in our article.
Polystyrene foam as insulation
Question answer
Table 2. Most popular questions
| Question | Answer |
| Are broken bricks and construction waste suitable as a replacement for crushed stone in the bedding layer? | Crushed bricks will not cope with protecting the slab from moisture. They are also not suitable as leveling bedding due to the difference in the sizes of individual elements, which cannot be compacted well and do not ensure the normal operation of the entire floor structure. |
| Is it possible to abandon the mesh for reinforcement and replace it with untied rods? | Reinforcement will “work” correctly only when using rigidly fixed rods that form mesh cells of 10 x 10 cm. |
| Is it possible to use expanded clay in bedding instead of crushed stone? | Expanded clay is not suitable as a material that protects the floor from below from the capillary action of moisture, since it itself absorbs moisture and is modified under its influence. Although this lightweight, inexpensive material is quite suitable as a leveling layer in dry soil and can replace crushed stone. |
| Is it possible to do watering instead of installing a concrete footing? | If the purpose of laying crushed stone and sand is to create a layer that prevents the passage of moisture, then spilling will prevent the crushed stone from coping with its function. |
| Can polyethylene under a rough screed replace a waterproofing layer? | No, since this layer is technological, protecting the backfill from cement laitance. |
| Is it possible to refuse screed reinforcement? | No. This process can only be abandoned when constructing a concrete footing. |
| Is it possible to refuse to make a concrete base and lay the waterproofing and insulation layer directly on the base? | Lay the waterproofing layer on a flat, solid base - this allows you to extend its service life. The same applies to the installation of insulation, which must be fixed motionless and not provoke the formation of cracks on the floor surface. |
Features of heat and waterproofing
The role of the thermal insulation layer is as follows:
- To reduce or eliminate heat loss.
- To protect the structure from moisture coming from the ground.
- Soundproof the room.
- To exclude the process of vaporization.
- In creating optimal microclimatic indicators.
Thermal insulation and mesh reinforcement
When installing a simple floor on the ground, it is possible to use ordinary polyethylene film. The process goes like this:
- When laying polyethylene (150 microns) on a finished, compacted base, the film sheets are laid overlapping (15-20 cm) and the joints are carefully taped with tape. The edges around the perimeter of the room are placed on the walls to a height of 10 - 20 cm. To be sure of the reliability of the waterproofing layer, the procedure for laying the film can be done twice, carefully fixing the material each time.
- The thickness of the insulation (foam or expanded polystyrene) should not be less than 10 cm. Due to the fact that foam is susceptible to moisture, it is protected on both sides using the method described above.
- A reinforcing mesh with cells of 10 x 10 cm and a wire diameter of 3 mm is laid on top of the insulation.
- After this, the screed is poured to a height of 5 cm.
Floating screed with penoplex
Important! Do not neglect the external insulation of the foundation, blind area and organization of water drainage from the base.
This method of organizing the floor has its pros and cons. Among the positive qualities, the following can be noted:
- Suitable for most soil substrates.
- High-quality insulation of the foundation increases its resistance to loads during frost heaving of the soil.
- The solution consumption is less than when installing a slab foundation.
- This flooring is durable.
- There is no need to perform additional insulation of pipes and other communications running in the floor structure.
- Suitable for laying finishing material.
- There is no need to create high-quality ventilation of the underground space.
The disadvantages are that the cost of work may increase when constructing a high base.
Floor reinforcement
The location of the reinforcement in the screed mass depends on the presence of coolants in it. If it is a warm floor, then the reinforcing mesh is placed above the pipes and about 3 cm of screed layer is provided on top. In a regular floor, the mesh is placed approximately in the middle of the screed array (3 cm to the top).
Regular floor screed
Warm water floor screed
How to do it yourself?
There are three main methods for creating floors on the ground if the building was erected on a strip foundation. Each of them has its own advantages and nuances, but they all have good load-bearing capacity.
Wood flooring
The simplest method that requires the least financial costs . To support the structure, you will need columns placed on the surface of the ground so as to create a support system for wooden logs.
Expanded clay must be poured between the posts; sometimes you can leave the space empty, but then you will need holes for ventilation.
The logs must be leveled so that the plane of the supports is absolutely level , after which the subfloor is laid. A film is placed on it, providing vapor and waterproofing, and a standard substrate.
Laminate, linoleum can be used as a final floor covering, or a floor made from a material at the owner’s request can be installed.
Dry screed
This option provides good results in the shortest possible time. Work required:
- A sand and gravel cushion is poured, where the components are arranged in layers twenty centimeters thick, carefully compacted, after which a sheet of geotextile material is laid on them.
- A reinforcing mesh is installed onto which the concrete mixture for the rough screed is poured.
- The next layer is a waterproofing film - the canvases are placed ten to fifteen centimeters above each other, the joints are sealed with construction tape, the edges are brought out onto the wall to a height of twenty centimeters.
- Plaster profiles or other structures are installed that will act as beacons allowing the formation of a flat surface.
- Expanded clay is poured in and leveled according to the previously installed beacons.
- The subfloor is being installed. Drywall or plywood sheets are used for it. Experts consider tongue-and-groove plasterboard to be the most suitable, which is reliably connected into a single sheet thanks to a special profile.
Next, all that remains is to install the finished floor covering, using any materials that the owner likes - from laminate to tiles.
Concrete screed
This method turns out to be more labor-intensive than others. It is recommended to use it if the air temperature does not drop below five degrees, the sun will not shine on the surface, and the site is prepared for work.
The screed algorithm is as follows:
- About ten to twenty centimeters of sand are poured out to create a pillow. The layer can be larger, but not exceed 60 cm. Compaction is carried out for maximum density, for example, like on a well-traveled road.
- A layer of gravel or crushed stone is formed on the resulting cushion, the thickness of which is similar to that of sand. Compaction is being carried out.
- The geotextile fabric is laid overlapping, with an overlap of fifteen centimeters. The same is done on the foundation walls.
- A damping layer is installed around the perimeter.
- Reinforcement is carried out with a special mesh of fiberglass or metal reinforcement, after which the concrete composition is poured. Now you will need to wait until the mixture completely hardens.
- Waterproofing is being installed. Suitable as roofing felt in combination with bitumen mastic, or modern impregnations.
- A layer of insulation is laid. Experts recommend penoplex, as it is dense and copes well with loads.
- A steam-waterproofing film is placed with an overlap on the walls. Overlap up to fifteen centimeters, on walls - up to twenty. All joints are sealed with construction tape.
- A reinforcing mesh is installed for finishing pouring. The concrete layer does not exceed ten centimeters.
If the owner of the building has planned to install a heated floor, then pipelines and other necessary communications are laid before pouring concrete. It is necessary to make sure that all connections can withstand the load and are made with the required safety margin.
Required tools and materials
Necessary materials for pouring concrete on the ground
Before starting concreting the subfloor, an individual developer needs to take care of the availability of tools and necessary materials.
The gravel-sand bed consists of gravel, sand and crushed stone.
To prepare the solution you will need:
- Portland cement grade M200-M500 – 1 part;
- river sand – 2 parts;
- crushed stone of fine fractions - 4 parts;
- water – 0.5 parts.
To mix the solution, you will need a concrete mixer or a container of appropriate volume.
Excavation and concrete work will require entrenching tools.
To prevent the floor from cracking, it is necessary to install a metal reinforcing mesh
Materials for arranging formwork:
- boards;
- plywood;
- bars
To make a reinforcing mesh you will need:
- steel rods;
- net;
- wire;
- welding machine.
It is necessary to take care of the availability of waterproofing materials (film or roll) and insulation of organic or mineral origin.
As far as control and measuring instruments are concerned, a tape measure and a building level will suffice.
Composition of the concrete “pie”
Concrete floor with waterproofing and insulation
A concrete floor on the ground consists of several functionally important layers made of different materials. This “pie” includes:
- layer of sand;
- crushed stone layer;
- waterproofing material;
- rough concrete floor;
- heat and vapor barrier layer;
- finishing layer;
- finishing floor covering.
Concrete cannot be poured directly onto the ground, otherwise moisture may penetrate from the soil. The result should be a high-quality sealed coating that can withstand fairly heavy loads.
Tips from the experts
To avoid adverse consequences, you should remember some points:
- drainage protection protects against excess moisture, which cannot be avoided after melting snow or heavy rainfall;
- a floating concrete screed not fixed to the foundation will help you forget about the negative aspects associated with soil shrinkage;
- The geotextile fabric does not allow the sand cushion to absorb moisture from the concrete, which ensures complete hardening of the layer.