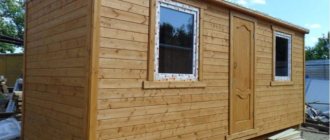
The change house is perfect for temporary living during the construction of a full-fledged house. But even after the completion of the main construction work, the change house will not remain out of use. It can be equipped as a budget country house, a place to store various equipment, work clothes, bicycles and other household supplies.
DIY change house
Ready-made cabins are relatively inexpensive. But why spend money if you can build such a structure on your own by purchasing only the necessary materials and tools? We present to your attention instructions for arranging a cabin made of wood, a finished trailer and a metal profile. Choose the option you like and get to work.
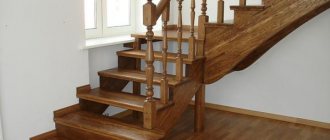
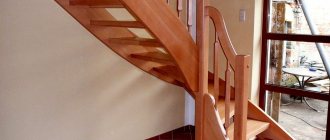
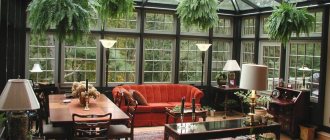
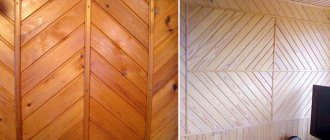
DIY change house (interior)
DIY change house (interior)
DIY change house (interior)
Planning Guidelines
The change house is a secondary utility room, but you should not take the process of its construction and arrangement too lightly.
First, prepare a drawing. You can make it yourself or find a ready-made version in available sources. The drawing will allow you to imagine how the finished building will fit into the surrounding landscape, as well as calculate the required amount of building materials.
Select the dimensions of the structure and its layout at your discretion. As a rule, industrial structures intended for living are about 5-6 m long, about 2.5 m high and similar in width. Otherwise, regarding the dimensions of the house and its layout, be guided by your needs and preferences.
Choosing a place to build a shed
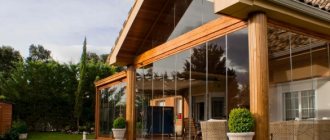
Country house from a change house
When choosing a place for our house, we take into account a couple of important points.
Firstly, we think about whether we will transport the structure somewhere in the future. For example, you are going to build a lightweight house for a couple of seasons, and then remove it to another place. If moving is part of your plans, it is best to place the change house as close as possible to the exit from the site.
Loading the cabin
Delivery of cabins
Secondly, we decide on the purpose of the room. If the shed will be used only as a shed for storing various tools and other household supplies, it is best to install it approximately in the center of the long side of the main house so that it can be easily reached from any side of the site.
The change house can serve as a place to store equipment
Helpful advice! If you do not rule out that in the future the shed will be converted into a bathhouse, build it in a remote, secluded corner of the site, keeping in mind the fire safety rules.
Layout and drawings
Despite the fact that the building is considered temporary, it often turns into a bathhouse or guest house. That’s why even in a change house there is such a thing as a layout. Even temporary housing should be relatively comfortable.
Cabin trailer
There are two main types of cabins: trailer and vest. In a “trailer” type building, the entrance is on the side, there is no separation inside; in extreme cases, they put a partition - 1.5-2 meters from the entrance. This room is used as a vestibule-dressing room and a warehouse for storing instruments. This is the simplest possible option.
Drawing of a trailer cabin with dimensions
The drawings will contain graphic and digital symbols, their explanation is in the photo below.
Designation on drawings
Baby vest
The most popular layout is the vest. This is when the entrance is in the middle. Moreover, the middle is fenced off and used as a vestibule, storage room, etc. The purpose of the other two rooms may be different. Some people use both as bedrooms, others use one as a kitchen.
Two rooms and a vestibule
With a fenced-off small storage room
Only vestibule without storage room
Change house with toilet and shower
Not everyone agrees, even at a construction site or at a dacha, even temporarily, to lead a Spartan lifestyle. At least basic amenities are required. Although, it is probably better to build them separately.
Read how to build an outdoor toilet here, and read about how to make an outdoor shower in this article.
The sanitary block is located on the edge - a wiser decision, especially if you make a separate entrance
With toilet
Having chosen a drawing, do not forget, when developing a frame for a change house, that racks must be installed at the junction of the walls. If doors are attached to the racks, they must be reinforced - double.
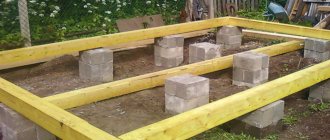
Making the base
Our foundation will be the same for all three cabins. The only exception would be a ready-made trailer on wheels - there is no need to build a foundation for it.
Foundation
Foundation
Foundation
We make the basis as follows:
- we get rid of the top fertile layer of soil;
- compact the bottom and walls of the resulting pit;
- cover the hole with geotextiles;
- pour a layer of sand over the geotextile and compact it thoroughly;
- We place the cinder blocks symmetrically on the resulting pillow;
- We wrap each support with a layer of roofing felt.
Important! If you plan to attach a small porch to the shed, consider installing supports for it at the same stage.
We are building a wooden cabin
Wooden cabin
Wooden change house
Let's start building the frame of our change house. First, we lay a wooden beam around the perimeter of the future structure, as well as in its center to further strengthen the structure.
Bottom harness
Attaching the bottom harness
Bottom harness
Methods for connecting beams at corners
Lags
We connect the opposite sides of the beam. To do this, we fasten the logs to the beam of the lower trim. You can connect in any suitable way. Connections using the tongue-and-groove method, using metal corners and anchors, have proven themselves well. We made preliminary selections to connect the elements and additionally strengthened the fastening points with nails.
We install vertical corner and intermediate posts. We install intermediate supports in meter increments. To do this, we use timber with a cross section of 15x15 mm. Don't forget to leave an opening for the door. To securely connect the frame elements, we use metal corners and self-tapping screws. At the same stage, we install support pillars for the future porch, if its presence is provided for by the design of the cabin.
Corner support posts
Corner support posts
Vertical rack mounting options
Important! The height of the vertical supports on the rear and front sides of the cabin should differ by approximately 50 cm. Such a difference will ensure an optimal slope of the roof and precipitation will not linger on it.
We mount the beam of the upper trim. The support posts of our cabins have different heights, so we work as follows: first we lay the timber on the tops of the higher supports, then we connect the low posts and install the side crossbars perpendicular to them. We make connections using the already familiar method with samples and nails.
Upper harness
Laying floor beams
As a result, our frame will be divided into a number of rectangular sections. To strengthen the structure, we connect the opposite lower and upper corners of each such section with jibs made of boards.
We attach the rafter beams to the top roof sheathing. We use the boards that are as even as possible to make lathing easier in the future. We install the rafters in increments of about 500-600 mm. We pay special attention to the strength of connections on roof beams.
Rafter beams
Rafters of a lean-to cabin
Rafter pitch
We construct the roof so that it protrudes slightly beyond the boundaries of the frame. This will allow us to arrange a base for drainage on the back side of the cabin, and mount a canopy on the front part.
Ondulin roof
Ondulin installation instructions
Ondulin installation instructions
We choose the material for the finishing roofing at our discretion. For example, ondulin is good. We lay it with an overlap, starting from the bottom of the slope. Before laying ondulin, you should lay out a continuous sheathing of boards and attach a waterproofing film on top of them. Instead of ondulin, you can use slate or other material of your choice.
Prices for various types of timber
timber
Types of frame cabins
If we proceed from the criterion “price – quality – comfort”, then the best option is temporary housing built using a frame scheme. The popularity of cabins on a supporting frame is explained by two factors:
- Flexibility of the construction scheme. You can choose materials for insulation, room decoration and exterior cladding to your taste, without being tied to a specific type of wall construction;
- High comfort and relatively simple construction technology that forgives mistakes even for inexperienced workers.
If you make a defect or make a mistake in calculations during the work, you can always correct the defect, although this will require additional costs and resources.
Change house with wooden frame
A residential trailer with a frame made of timber and boards can be built on almost any soil. According to the technology for constructing a trailer cabin, it is usually necessary to make a small foundation of brick, concrete blocks or piles, on which, like on a pedestal, the following are successively built up and installed:
- The base of the floor of the future living space;
- Wall frame posts and horizontal ceiling beams;
- Insulation is laid and wall cladding is made of wooden lining, siding or corrugated sheets.
Thanks to the separation of processes, a frame change house can be built simultaneously by a team of two or ten people, everyone will find a task to do. The shed can be done in one go or assembled gradually over several weeks or summer months.
The only problem with the frame structure is the protection of insulation and wood from rain and ground moisture. Therefore, they either try to build residential blocks with a wooden frame and put a roof on them in the shortest possible time, or use special expensive oil-varnish impregnations for protection.
Change houses with a metal frame
In addition to wood, you can use a metal corner or a square pipe of any profile to assemble the frame base. Most often, cabins on a steel frame are built for mobile trailers with a base on metal supports.
If a suburban area is located in swampy areas or on soils with a high groundwater level, the use of a metal frame avoids deformation of the building body due to frost heaving.
The most popular option is to use a frame from a steel railway container. In order to build a change house, sheets of walls and ceiling are cut out, leaving only the frame. The floor and ceiling are reinforced with a 60x60 mm square pipe, and boxes made of steel angle are welded in places where windows and doorways are installed.
After laying the insulation, the walls are sheathed with profiled sheeting.
Portable cabins
Construction on a suburban site does not always require the arrangement of a full-fledged, albeit temporary, living space; a team of workers can come to the site on a separate schedule. But even in such a situation, you will need to make a temporary trailer to organize the simplest living conditions, where you can shower, wash, and go to the toilet.
The version of the change house shown in the diagram can be made from wooden lining, or built from galvanized steel profile. Plastic panels are best suited for bathroom cladding; the material is not afraid of moisture and does not absorb odors.
Change house from a construction trailer
The scheme for making a temporary shed from a mobile construction box is no different from using a wheeled version of the shed. Most owners of suburban areas do not even try to remodel or refurbish the premises.
The box is simply delivered and installed on a prepared, planned site on concrete blocks. Construction sheds and wagons are usually used as temporary housing mainly in the autumn-winter season, since the cabin box lined with corrugated sheets or plastic does not get wet and does not lose its thermal insulation even in heavy rain and wind.
DIY cabin projects
The most popular are frame cabin cars made from the hulls of sea containers or assembled using timber technology.
The change room is divided into two sections - sleeping and living. The dimensions of the container allow you to make a small kitchen.
A container shed, in fact, remains the only option when you can build an entire house to accommodate 7-10 people without any problems.
If necessary, you can build a non-residential change house, make a shower stall and install wardrobes or hangers for clothes.
Wooden shift cabins are considered more comfortable when it comes to staying for several weeks or months. It is clear that the perception of a metal box and a wooden house is different; a room made of wood is still more convenient and pleasant.
In this case, you will need to make a comfortable bathroom inside the room, build a small steam room and a covered terrace at the entrance to the room. All these are little things, but it is thanks to them that you can maintain the proper level of comfort.
Change house from a construction trailer
Cabins on wheels
Cabins on wheels
Don't want to bother with assembling the frame and other related activities? You can buy a ready-made trailer and equip it for a cabin. Such trailers do not even need their own foundation - you just need to carefully level the site and install the container (trailer).
If you equip a used trailer as a cabin, carefully examine its condition. Clean off traces of rust, replace heavily damaged cladding elements with similar ones, weld patches onto the through holes, coat the metal with a special primer and paint.
The installed structure must be insulated. The rest of the arrangement is at the discretion of the owner. These points will be discussed separately below.
You can also buy a trailer on wheels. The option is mobile and very easy to use. After completing all the measures for arranging such a trailer, it is installed on the frame of the trailer.
We build a shed from metal profiles
Country house from a change house
Change house
Construction of a frame made of metal profiles will require more effort compared to the construction of a wooden analogue. But the iron change house will last much longer.
The set of necessary tools includes:
- hammer;
- welding machine;
- drill;
- screwdrivers;
- corner;
- grinder;
- tassels;
- construction stapler;
- roulette;
- hacksaw
We also buy the following materials:
- profiled pipe measuring 2x2 cm, 4x2 cm, 4x4 cm and 4x6 cm;
- mounting rail 2x4 cm;
- galvanized sheet steel;
- corrugated sheeting;
- primer for metal;
- self-tapping screws for fastening corrugated sheets;
- screws for metal;
- staples for a construction stapler;
- rivets;
- OSB boards;
- polyurethane foam.
Making the base
We will assemble the base of the frame from a pipe measuring 4x6 cm. We cut the pipes in accordance with the dimensions of the structure being built.
We weld the pipes according to their external dimensions and get a rectangular edging. In total we need to make 2 identical rectangles. We will make the floor from one, and the upper part of the cabin from the other.
To make the floor reliable, we create a grid inside the rectangle from the same profiled pipes. We are making a change house with a width of 250 cm. With such dimensions, it is enough to weld 2-3 longitudinal pipes along the entire length inside the edging. We weld cross pipes every 50 cm.
Floor for change house
Next, we take a galvanized sheet and fix it with self-tapping screws to the base of our change house. We turn the base over and lay it with the galvanized sheet down on cinder block supports or simply a leveled area. The structure does not need to be attached to the cinder block - the cabin will be sufficiently supported by its own weight.
We mount the racks
Installation of racks
Installation of racks
Installation of crossbars
The bottom of the floor is covered with steel sheet.
The racks are mounted. We make vertical supports from a 4x4 cm pipe. We cut it into pieces in accordance with the planned height of the change house. Usually it is 250 cm.
We place the first supports in the corners of the foundation constructed at the previous stage. We check that the angle at the junction of the posts with the base is strictly straight.
We fix the leveled rack by welding. Similarly, we set up the racks in the remaining corners.
Additionally, we will need to install intermediate racks. To do this without disturbing the geometry of the structure, we take the second rectangular pipe base made in the previous step and lay it on top of the corner posts.
We scald the resulting “cube” with intermediate posts and spacers. First, we take pieces of corrugated pipe 4x4 cm along the height of the structure and weld them vertically between the lower and upper bases. The recommended installation step is 100 cm. At the same stage, we provide an opening for the door.
We weld the horizontal cross member around the support structure. The pipe must be welded to the vertical posts at a height equal to half the height of the change house.
We make the spacers from a 2x4 cm profiled pipe. We cut it into 30-centimeter pieces. We cut each edge of the workpiece at a 45-degree angle. We scald all the corners of the structure with the resulting spacers. Additionally, we can scald the floor with them.
We make the roof
Frame for the roof
We made the lower part of the frame and the wall. Next we are engaged in the manufacture of the “skeleton” of the roof.
We make trusses in the form of isosceles triangles. We use a 2x4 cm pipe. The recommended installation step for the trusses is 1 m. We weld them along the length of the frame. We cover the roof with corrugated sheets. If you wish, you can use another material of your choice.
We cover all metal elements of the frame with a special primer, and after it dries, we apply paint of the desired color.
Self-assembly according to drawing
The easiest way is to make a wooden structure using frame construction technology. The difference between a frame change house and an ordinary small frame house will be the lack of a foundation and its size. The role of a columnar foundation can be performed by placed bricks.
Frame of a cabin made of timber with a pitched roof
First of all we will make the floor panel. It will consist of chipboard or OSB-3 panels, boards, between which we place insulation and waterproofing. You can save money on a vapor barrier, since this room is not intended for permanent residence.
Instead of expensive synthetic insulation (mineral wool), you can use sawdust. Instead of waterproofing - a regular film.
When the floor is ready, we proceed to the walls. We make the frame of the cabin from timber or boards 100x150. The easiest way is to make a wall separately on the ground, in this case it is much easier to check the geometry, the evenness of the corners and diagonals. When the wall frame is ready, we install it and check the verticality again. The angle between the wall and the floor should be exactly 90 degrees.
Scheme of the frame of a cabin made of timber
We install all 4 walls one by one according to the drawings. The finished frame of the change house must be connected into one structure using the upper frame. We perform the strapping with a board or timber. For it to be level, the walls must be the same height. If some wall is lower, we place a wooden chip, block or part of the board under the lining board.
After installing all the walls, we begin to make the roof. The roof can be gable or single-pitch, for which we attach several boards or beams to the top of one of the walls. Thus, by raising one of the walls, we form a roof slope.
Approximate view of a wooden frame for a change house
If you plan to use the change house only in the summer, the roof can be made flat without slope.
Tip: Use foam sheets along with mineral wool. They will serve not only as insulation, but also as complete wind protection.
The roof must be insulated with foam sheets or mineral wool. For waterproofing we use cheaper roofing felt. Roofing material for a change house can be as follows:
- slate
- ondulin
- tiles
- metal
If the building will be used for overnight accommodation in winter, it is recommended to install a stove with a chimney. Instead of a stove, you can use a potbelly stove.
A change house with a window and a pitched, almost flat roof
Equip the building with a simplified drainage system mounted on bars. Exterior finishing can be done with lining, followed by painting with an antiseptic, or siding.
Making the floor
First, we construct a subfloor from boards treated with an antiseptic. We lay them out as tightly as possible to each other and attach them to the frame with self-tapping screws.
Subfloor in a shed
Flooring film
Minvata
On top - another layer of film
Finished floor boards
We spread a waterproofing film over the boards. We attach it to the joists using a construction stapler with staples.
We nail additional logs to the base for laying thermal insulation and attaching the second layer of boards. We fasten the logs in increments equal to the width of the selected thermal insulation material. Mineral wool, a relatively inexpensive and time-tested thermal insulation material, is well suited for floor insulation.
We lay insulation in the space between the joists. We fix a layer of vapor barrier material on top. A stapler with staples will help us with this again.
We lay the finished floor boards. We attach them to the joists using self-tapping screws. Finally, we varnish or paint the floor.
Construction of a change house at the dacha with your own hands
We offer step-by-step instructions on how to build a shed from scratch using frame technology with your own hands.
How to make a frame for a country house with your own hands
- Prepare a site on the land. Ideally, this should be a horizontal surface with solid soil. This will save time and money on excavation work.
- Before installing the foundation, carry out preparatory work. They include removing 30 cm of soil over the entire area of the future shed with removal of half a meter beyond the perimeter. Replace the removed soil with compacted sand, preferably laid on geotextiles.
- The choice of foundation is yours; it can be a cast concrete option for a steel support, cinder block or brick pillars, or concrete blocks. Lay the pillars to a depth of more than 30 cm; be guided by the cords, marked according to the drawing of the cabin frame and aligned horizontally. A typical foundation for a 6x3 cabin consists of 15 pillars every 1.5 meters (3 pieces in width, 5 in length).
- Construction work cannot be carried out on a fresh, damp foundation for a whole week.
- Saw the wood according to the drawing parameters, treat with hydrophobic and antiseptic compounds. Fire protection treatment is also desirable.
- Before installing the base of the cabin frame, supplement the pillars with 2-layer roofing material waterproofing. The base will consist of 150x100 timber: three longitudinal ones and a pair of transverse ones. Based on the drawing, lay the beams with the wide side down, then level them and secure them with reinforcement ties or anchors to the columns.
- Next will be the installation of the lower trim of the frame cabin. Strictly along the perimeter of the structure, a 100x100 beam is attached to the crown. There is no need for strapping on the middle beam. In the final stage of this stage, a 50 mm step appears along the entire inner edge.
- Install the logs on the floor correctly, that is, on 3 longitudinal beams of the base, edge down, with a pitch of 60 mm. The timber will fit into the 30mm slots in the bottom trim of the cabin frame. The logs are made from 100x50 timber.
- If desired, you can install an underground floor . This is done in order to extend the life of the cabin, as well as for additional insulation of the structure. Place construction waste in the gaps between the posts around the perimeter, and then fill the subfloor with expanded clay.
- Next, all that remains is to install and level the vertical corner posts (beam with a section of 100x100) using a level, organize the top trim and strengthen the frame of the cabin with vertical additional posts (they require a 100x50 beam).
Useful: DIY sandwich panels
Further stages of arranging a country house
After erecting the frame, perform the following types of work:
- limit windows and doors with horizontal bars 50x50mm;
- Replace the temporary rack braces with permanent ones (40x100mm boards will be needed);
- install rafters, sheathing and roofing material;
- lay the subfloor in a continuous flooring of 30x150 tongue and groove boards, complete with a waterproofing and vapor-proof membrane;
- insulate the space between the joists with mineral wool or expanded polystyrene, lay a polyethylene membrane on top;
- Lay the flooring from a 40x150 edged board across the joists;
- sheathe the outside frame of the cabin with vapor-proof material, cover it with clapboard or plywood panels;
- install doors and windows;
- carry out engineering communications;
- the ceiling and internal lining are covered with polyethylene and thermal insulation, then with sheet building materials in the form of plywood, chipboard, OSB or fiberboard;
- After the construction of the frame cabin, decorative work awaits you.
We carry out external cladding
We cover the frame with film
Fastening the external cladding
The cabin trailer can be left without cladding, but a structure made of wood or metal will require mandatory external finishing. We won’t just leave the “bare” frame, will we?
We cover the frame with waterproofing film. Carefully seal the joints of the waterproofing strips with tape. Many different materials are suitable for external wall cladding:
- wooden boards;
- composite panels;
- siding, etc.
Choose at your own discretion. The cabins covered with a block house also look very nice.
External cladding of the cabin with siding
Exterior finishing of a metal cabin
Insulation of metal sheds
Sheathing a metal shed with corrugated sheets
Important! The area of the frame allocated for the porch is not sheathed.
Interior decoration
Wall insulation
Wall insulation
Interior decoration of the cabin (hardboard)
Internal cladding with clapboard
We lay insulation in the space between the frame posts. We cover it with a layer of vapor barrier material. We attach the vapor barrier to the frame using a suitable method.
We fill transverse slats on top of the frame to secure the insulation. We attach the selected internal lining material to the same slats. Most often, lining is used for interior decoration. For the rest, focus on your preferences and available budget.
Recommendations for assembling modular premises
Change houses can be erected without a permanent foundation
The strength of factory-produced modular containers is designed so that they can be installed without a foundation. Their equipment is designed for different climatic regions. The products comply with sanitary, technical and fire safety requirements.
The assembly technology is determined taking into account the type of blocks used. There are modules that are delivered and installed ready-made. In another option, individual parts are transported in packaging, then they are joined at the construction site. The panels in the collapsible model have built-in windows, doors, and other positions.
For connections, special hooks, steel studs with nuts, and bolts are used. Place the corners at rectangular joints with holes on the plate and profile for proper fixation. For internal cladding, MDF, PVC panels, and chipboards with moisture-repellent impregnation are used.
Electricity
Electricity in the cabin
Electricity in the change house
We will not install full-fledged wiring into the change house. Such buildings are not permanent and do not require such equipment. But how, in this case, can at least organize lighting and heating? A good extension cord with a cord of suitable length will help us with this. We turn it on to the nearest available source of electricity and pull it into the change house.
In a change house, we can include a tee in such an extension cord for greater convenience and the ability to use several electrical appliances at once.
Lighting
We arrange it at our discretion. In general, a few simple lamps installed in the main functional areas will be enough for a change house.
Lighting in the cabin
Water supply
For maximum ease of use of the cabin, we run water into it. We will not build a major expensive water supply system. It is enough to connect a flexible hose to a water supply source, insert it into the household through a pre-prepared hole in the wall and equip it with a tap to shut off the water.
We can install a compact water heater near the hose attachment point. Special bulk models are available on the market. It is enough to remove the top cover from such a tank, fill the container with water from a hose, plug in the heating unit, and after a short time use warm water at your discretion. If desired, a hose with a shower head can be easily connected to such a water heater.
A compact sink wouldn’t be out of place in your household. We attach it to the wall in a convenient place. We connect a corrugated pipe to the sink drain to drain water. We remove the corrugation through a pre-arranged hole in the floor and connect it to the sewer pipe. Water will flow through the sewer pipe into a drainage hole or other designated place.
DIY change house (interior)
Heating
The heating is done electrically. A budget option is a pair of fan heaters. More expensive and efficient - an oil heater or convector. We select the power of the heating unit in accordance with the area of our shed.
Heating the cabin with electricity
Oil radiators
At the end, all we have to do is furnish the room. At this point, we focus entirely on our preferences and needs.
| Parameter | Wooden cabin | Metal shed |
| Price | Cheaper. To further reduce the cost, natural wood can be replaced with wood boards. | Expensive. Metal has a higher cost. |
| Durability | Lasts less than metal ones. Wood does not tolerate moisture well. | Lasts for decades. |
| Mobility | It is easier to transport, but there is no guarantee that the wooden structure will withstand transportation normally. | Transporting is more difficult, but safer. |
| Possibility of installing communications and additional elements | Can. More difficult. | Can. Easier. |
| Environmental friendliness | Eco-friendly | Less environmentally friendly when compared with wooden cabins. |
Good luck!
Prices for popular models of electric heaters
Electric heaters
Finishing and insulation
Mineral wool is recommended for insulation of cabins
The lining is assembled over wooden frame elements, which serve as support for the lamellas. Pay attention to the design of the walls around window and door openings. After finishing the cladding, decorative trims are installed on windows and doors.
For finishing you can use profiled sheets, cement mortar panels with shavings. The latter material is durable, but creates additional load on the foundation, so the base of the cabin is reinforced.
Interior arrangement
Before covering the inner plane of the walls, insulation is installed, then the surface is lined with finishing material. Chipboard panels are used, then you can install any material that will be appropriate under operating conditions.
Plastic finishing is common; washable wallpaper is used in residential areas. A simple option is to paint the walls with oil, acrylic, latex, and pentaphthalic compounds. Sometimes they use stain with several layers of varnish.
Insulation of floor and roof
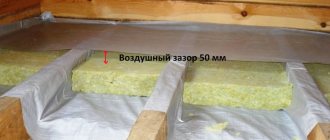
For the floor, mineral wool is used, which can be represented by glass wool, slag wool, or stone wool. The material requires that it be isolated from contact with moisture and condensation. To do this, create a ventilated gap to allow drying.
Polystyrene foam, polystyrene foam, and polyurethane foam are used on the roof. They are placed in the elements of the roof sheathing or installed when installing a false ceiling. At the same time, a vapor barrier and waterproofing are installed.
Heating options
A potbelly stove is used for heating
In wooden buildings, fire-safe equipment is used that does not have an open flame.
Common methods of heating cabins:
- wood-burning stove;
- multi-pass furnace structures;
- electrical units (oil radiators, blowers, electric boilers);
- gas convectors using liquefied gas;
- liquid fuel equipment.
The choice of heating method depends on the preferences of the owner and his financial capabilities.