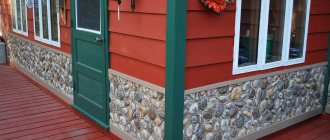
Installation of a brick plinth on a strip foundation
The operating characteristics of strip foundations are much better than all other alternative options for support designs for structures and buildings. The tape makes it possible to create basements or a ground floor, something that is completely excluded, or is significantly difficult on other types of foundations.
At the same time, a feature of the material used to create a brick plinth on a strip foundation is its instability to indirect or direct contact with water. If the first problem can be dealt with quite easily through waterproofing, then settling of airborne moisture on cool brick or concrete is much more difficult to deal with.
We invite you to consider the most effective method of solving the issue - tape-type insulation of the base.
Why do you need a brick plinth for the foundation?
The basement is also called the above-ground part of the foundation. This is a smooth transition from the base to the main walls of the building. Whatever material is chosen during manufacture, the purposes for using the base are the same. Why do you need a brick base:
- Elevation of the building;
- protection of main walls from precipitation.
Such material has its own nuances.
It is the part of the house where the upper part of the foundation is located that is exposed to the negative effects of rain, melted water in the spring, and snow during the winter. The main building should not be exposed to such moisture. A lot of moisture negatively affects the working life of a building. Together with low temperatures, water will cause great damage to the building. It won't last long.
In order to protect the building from the negative impact of excess moisture, a brick plinth is made, erected on a strip foundation. It is made from durable and at the same time moisture-resistant materials: ceramite or concrete. In addition to durable raw materials, additional insulation is made for the base, insulating it from water.
With climatic conditions such as in Russia, plinths for buildings are necessary. Buildings without an upper extension of the foundation are useless and cannot stand for long. Without it, the floor is at ground level, which means that heat will go into the ground and there will be dampness in the structure.
This structure helps eliminate capillary leaks. To achieve this, there are several waterproofing layers between the upper extension of the foundation and the main wall. This part of the building takes on the whole problem. The wall itself remains dry and is not damaged.
In this video you will learn how to choose a brick for a plinth:
Brick plinth laying technology
Laying bricks on the surface of the foundation must be carried out taking into account certain rules, which will ensure the high quality of the created structure.
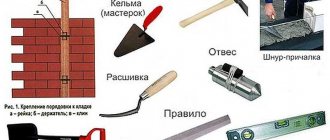
Preparing the necessary materials
The solution must be prepared immediately before performing the main work. It must be used within 3 hours as it quickly hardens and loses its properties. The preparation of cement-sand mortar can be done in a concrete mixer or done manually.
Take a basin of a suitable size and fill it with sand and cement (4:1), using a special mortar shovel. After mixing the dry ingredients, add water and 2-3 drops of liquid soap (this will give the solution additional plasticity). All ingredients are thoroughly mixed to obtain a mixture with a homogeneous consistency.
Experts recommend pre-soaking the brick in plain water for 15 minutes. Laying such material will be much easier and will allow you to easily eliminate minor defects that appear during work. After pre-soaking the material, seams are obtained that will be much stronger than usual. This is achieved by the absence of penetration of capillary moisture from the solution into the masonry.
Brick laying technology
For high-quality bricklaying, use the following instructions:
- First, the corners are set, which should be at the same level. A cord is stretched between them for laying the next bricks.
- The solution for the bottom row is applied directly to the roofing material, spread with a trowel so that it does not reach the edges by 2-3 cm.
- The thickness of the seam is usually 12 mm, and with reinforcement it reaches 16 mm (metal mesh is used).
- The corner is formed from two bricks laid at right angles. For reliable fixation, use a construction hammer.
- Excess solution is removed with a trowel. It is applied to the side faces of red brick to form vertical seams.
- The position of each brick is checked using a level and plumb line.
- All masonry elements are carefully pressed to the surface, which ensures the reliability of the created structure.
- The bricks at the corners are laid several rows higher, which allows a cord to be pulled between them to form the entire masonry.
- During work, the quality of masonry corners is checked with a square, level and plumb line.
- in the vertical plane up to 10 mm;
- in horizontal – 5 mm.
If small defects are detected, they can be eliminated by varying the thickness of the seam. But if the differences in level are large, it is impossible to get rid of them in this way. Therefore, in the process of laying each row, it is necessary to pay due attention to each brick. Particular care must be taken to form the corners, which affect the quality of the entire structure.
Related video: How to lay bricks correctly
Material for the construction of a brick plinth
If you are going to build a brick plinth located on a strip foundation, choose the right quality material.
Not all species are suitable for this. This is interesting: laying a brick plinth with your own hands.
Each type is made from different components using different manufacturing techniques. For this reason, they have different areas of application. Some are used for lining an internal wall, others for external load-bearing walls, others can withstand high temperatures and are used to line a fireplace.
Be more careful about your choice. Sand-lime brick is very affordable, but by using it you will only create problems for yourself, because... it is fragile.
Below is a list of materials from which ceramite is made:
- Clinker. The most durable. It looks aesthetically pleasing and no additional finishing is needed. It is expensive, so it is not used often.
- Dry pressing. Similar to ceramics, but more practical. Costs much less.
- Made from clay. Not very aesthetic, requires additional finishing. Popular due to its frost resistance. It's inexpensive.
- Porous. Easy. Does not require cladding. The cost is average.
- Ceramics. It looks very aesthetically pleasing. The price varies depending on the manufacturer. There are voids.
Basement waterproofing
An important process is waterproofing the foundation at the basement level. The question arises of how to protect the basement from the effects of groundwater. Most often, roofing felt is used for this. It closes the base in two ways:
- Lay on a well-heated bitumen composition;
- installation is ensured using a burner, which partially melts the material and ensures good adhesion to the surface of the base.
It is best to do cladding on the ground floor. Today in the construction market the choice of facing materials is quite wide.
Requirements for a brick plinth and materials for its manufacture
The main requirement is persistence. After all, this structure will have to hold the entire room. But there are other preferences:
- The closer to the ground, the more moisture will enter the room. All precipitation falls on the lower part of the building.
- Due to frequent exposure to moisture, sudden temperature changes should not be allowed.
- This part of the structure should have vents for natural ventilation. For this reason, this structure is not used like the rest of the building.
- Some do not use this room at all, and some dig out an entire working floor there. In this case, the manufacturing material should not conduct heat well. But in this case, do not forget about the required strength.
All construction requirements are specified in SNiP II-22-81.
Choosing a brick for the base
The use of ceramite with dry technology for the base is unacceptable. They not only have low strength, but also low moisture resistance. Laying a plinth made of this type of brick will lead to destruction. The choice of brick for the plinth must be approached responsibly.
There are many types of bricks
There are main types of ceramite that will cope well with this task. We will look at what kind of brick is needed for the base below.
Red brick
This choice will be the most thoughtful and optimal. Due to its characteristics, this ceramite is best suited for laying load-bearing walls of an underground floor. It will serve you for a long time regardless of the amount of moisture and other vagaries of the environment.
But water absorption into ceramite cannot be avoided. When purchasing, be sure to check the brand of material. Brand M-150 will not survive more than 60 times of freezing. Look for more frost-resistant options. Better buy the M-250 brand.
Why is moisture resistance and strength preferred when choosing between red and silicate ceramite? Silicate is fragile and absorbs moisture. Water gets into the cracks and pores of the brick. When it freezes, it increases in volume and begins to destroy ceramite from the inside. For this reason, it is important to choose the right material.
Even when building the main house with silicate, it is better to cover the upper part of the foundation with red. After all, the entire structure is supported by the lower structure, and for this you need durable material.
Red ceramite is also chosen for financial reasons. It is relatively inexpensive and finding it in every city is not a problem.
Important! When purchasing bricks, be sure to ask for documents for this material! After all, you need to make sure of its quality.
Red ceramite for the base is the right choice.
Clinker brick
This is the strongest brick currently available. It has great compressive strength, lasts a long time and looks aesthetically pleasing. Does not require additional cladding. Moisture resistant.
It meets all the characteristics, but is not used as often because it is too expensive. Mainly used for lining stoves and fireplaces.
Sand-lime brick
Silicate ceramite is not the best choice. The manufacturing technology of this product will not allow the material to be moisture resistant. If moisture acts on silicate for a long time, it will swell and lose all its performance characteristics. After a while it will collapse. You can use such a brick if the climate is arid and there is not much rainfall.
But even when laying with such material, additional waterproofing will have to be done. Silicate is quite durable, so under these conditions it will last quite a long time. The design will be reliable. Laying with sand-lime bricks will cost much less than any other. In addition to your finances, you will save energy and time.
Acid resistant brick
Very complex composition. To make it, specialized clays with the addition of dunite are used. This is a mineral rock.
It is poured at a temperature of 1300 °C. The result is a material that can withstand harmful substances. Neither acids nor alkali will harm acid-resistant ceramite.
This type of brick is one of the most durable
Very durable. It is not affected in any way by temperature changes and high humidity. Does not conduct heat or sounds. Does not absorb moisture. The size is equal to a regular brick.
Important! To lay this brick you will need a specialized putty made from acid-resistant powder. It contains reagents. It cannot be fixed with ordinary cement mortar.
Keep powder away from children and pets.
Types of bricks
Base brick is a conventional name that is used to designate ordinary masonry bricks in the context of facing an old base and building a new base. There are a number of requirements for it:
- Resistant to water, snow, temperature changes. This is due to the fact that it is located on the outside of the building, often without additional protection from a plaster layer or siding;
- Unified sizes. An important parameter that is used at the project creation stage;
- Environmental safety, no unpleasant odor;
- Affordable price and satisfactory appearance.
Sand-lime brick
White in color, made from a mixture of lime and sand. Rarely used for cladding the base. It's all about the high water absorption rate. For sand-lime brick it reaches 16%, which is unacceptable for the construction of structures that will come into contact with water during operation. After being saturated with moisture, it darkens, internal connections begin to break down and the brick literally “crumbles.”
In rare cases, sand-lime bricks are used to cover plinths in areas with a dry climate, with improved waterproofing and a protective layer of cement-based plaster.
Red clay brick
A common building material for arranging a basement. It is made from clay in special ovens. Red brick has a lower moisture absorption coefficient than silicate brick.
Saturated with moisture, it freezes in winter and thaws in summer. As a result, its structure gradually changes. The brick begins to collapse, small surface and through cracks appear. There is a high probability that the base, separated by simple ceramic bricks, will lose its attractive appearance after a few years of operation.
To increase service life, you must use brick grade M250 and higher.
Hyper-pressed brick
Durable finishing material with low water absorption coefficient. For its production, screenings of marble, dolomite and shell rock are used. High quality Portland cement is used as a binder. The ingredients are mixed together and pressed in special forms.
Hyper-pressed brick is often used to finish the base not only because of its high strength, but also because of its beauty. The outer side of the stone can be smooth or made to resemble a “ragged stone”.
Clinker brick
A variety of red ceramic stone. It is made by firing, only clinker clay is used instead of the usual one. As a result, the brick has a very low percentage of water absorption, up to 6%. It is also stronger than its plain clay counterpart.
Since clinker bricks practically do not absorb moisture, they do not crack in the cold. The service life of a structure made from it can reach 100 years.
Recommendations for choosing bricks for the plinth
All recommendations do not apply to residential buildings. They are built strictly according to plan. Each project specifies requirements for the quality of material for construction. The recommendations apply not to residential buildings, but to outbuildings. What are the main characteristics taken into account when choosing ceramite?
- strength;
- durability;
- appearance.
The appearance must be consistent with the overall construction. Depending on the material from which the construction will be constructed, the width of the base is also taken into account. Usually it is placed in 1.5-2 bricks.
For good strength, durability and moisture resistance of the base, install additional waterproofing.
Base width
To select the overall width of the plinth, you should refer to the building design drawing to determine the material that will be used to construct the walls. For example, for gas silicate bricks (commonly known as foam concrete) with a side size of 600 X 300 X 200, the thickness of the masonry should be 30 cm, and if additional wall insulation is planned in the future, then a width of 38 cm is what is needed. But when using brick as a decorative element on top of foam concrete blocks, the thickness increases to 60 cm.
Which brick is better for building a basement?
Usually, when building a basement, the choice is between red and sand-lime bricks. Which brick is better for the plinth?
When choosing, you need to be guided by the idea that it is very close to the ground. All melt and groundwater will affect the condition of ceramite.
Therefore, you need to carefully study the technical characteristics of each type. These include: strength, durability and moisture insulation.
Remember! Cost is the last point that needs to be taken into account when building a basement. If you choose a cheap and low-quality option, think about your home in ten years. Repairs will cost much more than bricks!
Be careful when purchasing bricks. Take into account all the features of the climate and soil, then you can’t go wrong!
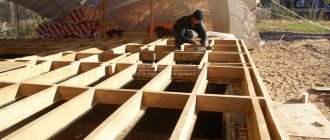
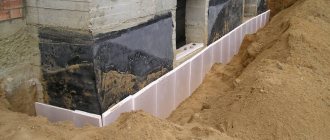
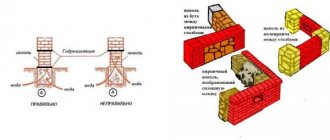
Hydro- and thermal insulation
The basement insulation in the building deserves special attention. The outer soil differs from the ground located under the house structure in that the latter does not freeze even at low ambient temperatures. To organize this moment, the foundation is fenced off from the soil with a waterproofing layer of roofing felt or other metal. For high-quality installation of waterproofing, it is necessary to lay two layers of roll, film or membrane. The side concrete basement wall is also treated with protection from melt and ground water. The upper part of the waterproofing on a concrete foundation is applied overlapping, mainly in the areas of joints and protrudes 2 cm beyond the perimeter.
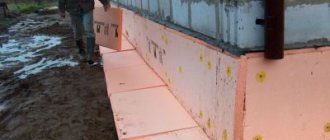
The work of arranging the basement of a house does not end with waterproofing alone. Buildings also need to be insulated. The best material for layout is foam block. The operating technology involves fixing the structure to the outer part of the base device. It is important to choose the right fastening material. To hold the foam blocks together more tightly, use glue or mastic. In this case, the material should not contain solvent or acetone that dissolves surfaces. Often the base is built on aerated concrete. This material has many advantages. But it is important to take into account the type of soil (laying on weak soil is not recommended) and the temperature of the area. If the thermometer drops below 10 degrees below zero, it is not recommended to use aerated concrete.
Calculation of the number of bricks
Calculating the number of bricks per plinth is not difficult. When drawing up a construction plan, take into account the required thickness and height of the structure. You will need these parameters to calculate the amount of brick required for the foundation plinth. These calculations must be done before construction. This is necessary in order to know in advance how much the entire construction and the amount of materials will cost you.
You need to know this: how to calculate the amount of brick for the base yourself.
To do this you need to perform simple calculations. The thickness and height of the base are calculated according to the parameters of the brick. When calculating, take into account the thickness of the seams between the ceramites. They are approximately 10 mm.
To find out the number of bricks, you need to add the length, width, height and thickness of the seams. The result is the dimensions of one row, for example, 254 * 127 * 81 mm. There are many calculators for bricks per plinth on the Internet.
Don’t forget to calculate the required amount of bricks
Calculation of material for the base
Before you start laying the plinth, you need to calculate the required amount of brick. Firstly, this will allow you to purchase material from one batch. Secondly, you can save money on this without buying too many products.
Only an experienced specialist can calculate the exact amount of brick taking into account the thickness of the mortar and the percentage of defective material. However, there are several ways that allow you to carry out the calculation yourself.
Method 1
To do this, you need to know the volume of one brick, the dimensions of the building and the height of the base.
Brick calculation
- First we calculate the volume of the brick. The standard product has the following dimensions: 25*12*6.5 cm. Therefore, its volume will be 0.25*0.12*0.065=0.00195 m3.
- Now we determine the volume of the base. For example, a building has a size of 9*10 m, the optimal height of the plinth is 1 m, its minimum thickness should not be less than half the length of the brick. This means that the volume of the base will be equal to (9+10)*2*1*0.12=4.56 m3.
- Next, divide the volume of the base by the volume of one brick: 4.56/0.00195=2338.46. That is, to build a basement for a 9*10 m house, 2339 bricks will be required.
Method 2
In this case, the length of the brick, the length and height of the base are taken into account. https://www.youtube.com/embed/7eMW4EYB_uE
- We calculate the number of bricks required for one row of masonry. To do this, divide the length of the building by the length of the brick: (9+10)*2*0.25=152.
- To determine the number of rows, you need to divide the height of the base by the height of one brick: 1/0.065=15.38.
- Next, the number of bricks in one row for the resulting number of rows of masonry: 152 * 15.38 = 2338.
Comparing the results, we get approximately the same number in both cases.
Features of arranging a brick plinth
Before starting work, please read these recommendations:
- First, determine the thickness of the base. It depends on the material from which the house and the upper part of the foundation are made.
- Before laying ceramite, install waterproofing in the brick basement on a strip foundation. Thanks to it, moisture will not penetrate into the room.
- The bricks are laid flat. So that the next row overlaps the previous seams. When laying, you need to ensure evenness using a level.
- The brick for the base must be thicker than the material from which the load-bearing walls are built.
Take these features into account and avoid mistakes.
Waterproofing and marking
Waterproofing and marking the foundation for the plinth must be carried out at the initial stage of work. The service life and appearance of the created structure depend on the correct execution of these processes.
Foundation waterproofing
Waterproofing the foundation along a horizontal surface is necessary to prevent the penetration of capillary moisture into the brickwork and wall structure. In this case, experts recommend installing the waterproof layer twice. The first time the waterproofing is laid on the surface of the foundation, the second time - on the finished base.
Roofing felt is most often used for this purpose. It is best to lay it in two layers, so that the first overlaps the seams of the second by 10–15 cm. Installation of roofing felt can only be done on a perfectly flat surface, on which there are no dents or bulges.
The maximum permissible difference in height should be 1.5 cm. If it exceeds 2 cm, it is necessary to level the surface. This can be done using a thickened masonry joint or a thin screed made of ordinary cement-sand mortar.
Installation of waterproofing in the form of roofing felt is carried out in several ways:
- directly onto the surface of the foundation without the use of additional adhesives;
- using hot bitumen;
- heating the surface of the roofing material with a burner.
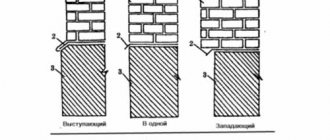
Foundation marking
Experts lay the brick on a cement-sand mortar, but it is first recommended to lay it out dry. This is necessary in order to determine the thickness of the vertical seam. The standard value is 1 cm. If after laying out it turns out that the row protrudes or is shorter from the foundation, it is recommended to increase or decrease the width of the seam by 0.2 cm.
This approach will help to carry out masonry from solid elements without halves or quarters. Such a base will look more attractive. If you cannot do without halves and quarters, you need to accurately determine their size and placement.
After laying out the materials without mortar, it is necessary to mark the locations of the vertical joints on the foundation. After this, each element is carefully removed and installed using an adhesive. The bricks are laid in the same order. Otherwise, the vertical seams may move due to deviations from the standard dimensions of the materials used.