The technologies and sequence of actions for most finishing works have long been known. In view of this, many people try to save on paying qualified specialists and carry out the finishing themselves.
This approach is quite sound, but requires thorough preparation and all the nuances of the work. How to make a floor screed in an apartment, in what ways this can be done and what is required for this - this and much more will be discussed in this material.
What is a screed and its types (briefly)
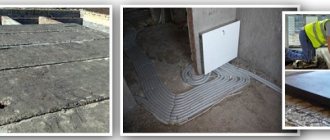
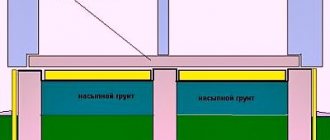
A screed is an intermediate layer between the base (ceiling) and the finishing materials of the floor. They can be divided into two groups - leveling and leveling-thermal insulation. A screed with a thermal insulation function is used on the ground floor, above a basement or unheated room. It is also made under a warm floor - to reduce heating costs.
The overlap will never be so smooth
There are two screed technologies:
- Monolithic. To lay a monolithic screed, various grades of concrete are used. Both heavy (CPS, with crushed stone) and lightweight (foam concrete, with polystyrene, expanded clay concrete and other lightweight fillers). They can be liquid or semi-dry - depending on the amount of water in the solution.
- Prefabricated screed. This is when there are many layers, they can be made of different materials. This includes dry screeds, along joists, with insulation and sound insulation.
There are two types according to the method of connection to the base:
- Regular. This is if the solution is poured over the floor slab, for example. What's the disadvantage? The fact is that if the house begins to “sink”, the floor will crack along with the foundation.
- Floating. When the base and screed are separated by an intermediate layer. For example, if a polyethylene film, thermal insulation (expanded polystyrene boards), waterproofing or any other separator that separates the screed material and the base is laid under the concrete layer.
All requirements and standards are specified in regulations. SNiP 3.03.01-87 “Load-bearing and enclosing structures”, SNiP 2.03.13-88 “Floors”, SNiP 3.04.01-87 “Insulating and finishing coatings”. To accurately navigate what and how to do, study these rules. Then screeding the floor with your own hands or supervising the work of the team will not be a problem.
The most popular types of screeds:
Experienced experts say that each of these methods is good enough to create a perfectly flat surface without differences in height, suitable for further installation of finishing floor coverings. When to install floor screed?
All floor leveling work should be done only after you have completely dismantled the old wall and ceiling coverings. If the apartment is undergoing redevelopment, it is also necessary to dismantle the old partitions and erect new ones from plasterboard, and then carry out all the electrical work. Only after the work with the electrical and partitions has been completed, and the walls and ceiling have been rough-finished, can you work on the floor in the room.
If you are using a non-dry screed, it usually takes about thirty days to dry. The level of moisture in a screed is determined differently by everyone, but professionals recommend starting to walk on a fresh surface no earlier than a couple of days, and laying the flooring no earlier than a month later.
A thin layer of self-leveling flooring, which is also often used to hide small differences in height, dries much faster. It usually takes two weeks for a self-leveling screed to dry. In this case, it is necessary to do waterproofing before screeding.
Self-leveling flooring has a lot of advantages: its small thickness makes it suitable even in apartments with low ceiling heights.
If you plan to lay parquet as the final covering, you must additionally cover the screed with moisture-resistant plywood. If another coating is planned, it is enough to lay a layer of foamed polyethylene backing on top of the dried screed.
How to choose the type of screed and what layers are needed
Making a floor screed with your own hands is not such a problem. The problem is to choose the type, not to make a mistake with layers, mass, choose the right materials and calculate their quantity. And the best screed for each case is different. Repairs in a new building are one thing, major repairs in a residential building are another. In addition, everyone has their own requirements and ideas about “the best”. But there are technical issues that determine the boundaries of your desires. These points must be monitored.
The composition of the floor screed depends on the requirements and tasks
Weight
When creating a floor and foundation, a certain load is laid down that the floors can bear. It must be looked at in the project or clarified with the operating organization (usually the chief engineer). The average design load is 300-400 kg/m², but it can be more or less.
If the floor is made of wood, it will not withstand a large load. The specific value depends on the cross-section of the logs and the step of their installation. But on wooden floors, most often, they make a dry screed along the joists. The gaps between the joists are filled with heat and sound-insulating material, and a floor board or sheet materials are placed on top. To improve sound insulation, sound-absorbing pads are used when assembling the screed.
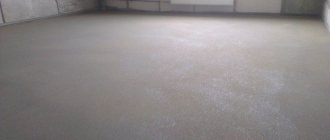
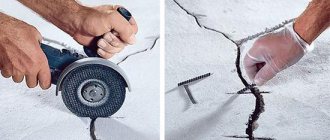
Even a well-made screed will not be perfectly level.
If the load-bearing capacity of the floor allows, you can make a screed from cement-bonded particle boards (CPS), with or without gravel filler. But a leveling layer is needed on top of concrete with gravel. Although, it is almost always needed. The floor screed rarely comes out perfectly level; you have to add a layer of leveling agent on top.
Don't want to overload the structure? Use lightweight concrete with lightweight aggregate. Any one you like best. I like wooden floors - do not make a wet screed, install joists, lay the floor from boards. Anything that fits within the load capacity limits can be done.
Waterproofing
In residential premises from the 2nd floor and above, waterproofing is not needed. This layer is required on the ground floor if there is no basement in the house, as well as in all “wet” areas on any floor. These include shower, toilet, bathroom, kitchen, balcony and loggia. Sometimes, to be on the safe side, they can capture the corridor. Screeding a floor with your own hands in a bathroom or toilet is a good experience to start with.
Do-it-yourself floor screed in the bathroom: starting with waterproofing
There are roll waterproofing materials, and there are liquid compositions - mastics, rubber paints, compositions based on copolymers. In basements or on the first floors of houses without a basement, a layer of waterproofing is laid under the screed. In wet rooms - under and on top of the screed, under the floor covering (regardless of the number of floors). Most often, waterproofing is laid in two layers to increase the level of reliability. You can combine different materials, for example, roll + mastic.
Noise insulation
Residents of apartments know well how poor sound insulation interferes with their lives. Especially if you have violent or inappropriate neighbors. Moreover, the noise from above is no less disturbing than from the side. Sometimes even more. To keep your neighbors from being aware of all your affairs, you have to be quiet. And all because the screed is made ordinary, without sound insulation.
There are two ways to reduce noise - absorption and decoupling. It’s easier with absorption - in screeds and not only you need to use low-density porous materials. Carpets made of building materials - polystyrene foam/expanded polystyrene and low-density mineral wool - cope best with this task.
When you are tired of noise, it is better to make floors on joists with good noise protection
The second way to reduce the level of noise transmitted through the ceiling is decoupling the structure. In simple words, in a screed this is the use of layers of different densities, the use of porous gaskets that prevent direct contact of the screed with rigid structures. In our case, these are walls. That is, if you don’t want to tiptoe around so as not to disturb your neighbors, it’s better to make a floating screed. Under the concrete layer, place not a plastic film (or not only it), but a layer of mineral wool or polystyrene foam. And lay porous materials around the perimeter that will separate the concrete from the walls. Density - the minimum allowable for the design mass of concrete laid on top.
If you are making a dry screed, soundproofing pads are also placed under the joists. They must also be placed in places adjacent to the walls. And fill the gaps between the joists with material with good insulating characteristics. The good thing about screeding a floor with your own hands is that you do it for yourself and can spend more time to get a better result.
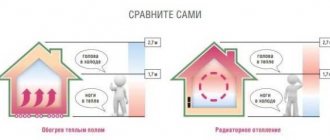
Thermal insulation
Residents of high-rise buildings do not need a layer of thermal insulation in the screed. Unless under a warm floor. In this case, it is better to make thermal insulation - so as not to warm the neighbors from below and reduce heating costs. The most common materials for this layer are expanded polystyrene foam and mineral wool. Their density depends on the type of screed. More dense ones are placed under a layer of concrete (expanded polystyrene with a density of at least 25 kg/m³, mineral wool - 160-190 kg/m³). In floors on joists, the density may be less - everything is decided by the thermal insulation and sound insulation characteristics.
Thermal insulation is important for the first floors and on balconies/loggias
Using expanded clay as insulation is ineffective. Compared to the above materials, its thermal insulation characteristics are, to put it mildly, not impressive. They are 3-4 times lower. In practice, this means that 35 cm of expanded clay can replace 10 cm of expanded polystyrene.
Main types of installation
Depending on the technology used, several options for making semi-dry screed can be used:
- installation without the use of a substrate with direct laying on a concrete base;
- floating type of screed with laying on a polyethylene backing without adhesion to the base of the floor and the surface of the walls;
- laying screed with surface installation of a soundproofing membrane;
- screed using heat-insulating materials as a substrate.
The most functional and in demand option is a semi-dry floating screed using fiberglass, which allows you to obtain the highest quality and reliable screed without the use of reinforcing components.
The simplest device for a semi-dry screed (without thermal insulation and/or expanded clay)
Composition of floor screed
As you understand, the composition of the floor screed can be different even in two apartments located on the same floor. It all depends on what the owner wants to achieve. Let's give a few examples.
- In its simplest form, the floor screed consists of only two layers. To simply level the ceiling, just lay the mortar. The minimum layer thickness is 3 cm. Simply clean the base, coat it with primer, apply the solution, and wait for it to mature. All. Disadvantages - low sound insulation; when the house settles, there will be cracks.
- A little more complicated. Floating screed on film. The base is removed, leveled (it is better to level holes and potholes), a dense film is laid out (at least 150-200 microns). The edges of the film are placed on the wall so that they are 2-3 cm above the level of the screed. The solution is laid on the film. The appearance of cracks is unlikely.
The composition of the screed can be complex. Depends on the requirements and desired result - With insulation and improved sound insulation. Instead of film, polystyrene foam or mineral wool mats are placed, and thin polystyrene foam or other elastic-dense material is laid around the perimeter. A welded reinforcing mesh is placed on this base, and then the solution is laid out.
In any case, the result is a relatively smooth concrete base. With different characteristics and properties, but outwardly the same. You can lay tiles and parquet on such a base. All imperfections will be smoothed out when laying the tiles. But even here the differences should not be too large. According to the tile laying technology, differences of 2-3 mm are acceptable.
Stages of pouring screed in a graphical representation
Some coatings require a perfectly flat surface. These are laminate, carpet, linoleum, art vinyl and other soft floor coverings. Under such materials you need another layer - from a finishing or leveling mixture. It is poured on top of the finished floor screed. For this purpose, self-leveling mixtures are usually used. Just don’t think that you just need to close them and pour them on the floor, and then they will spread on their own. Not at all. They also need to be distributed over the surface, but you just don’t need to level them so carefully. After distribution, the composition itself will “become the horizon.”
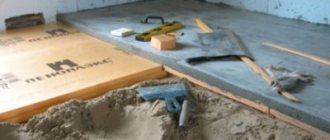
Semi-dry screed device
The entire list of works for semi-dry screed is completely identical to the list of works for traditional screed. The only difference is in the amount of water that is added to the cement-sand mortar. It should be such that the finished mixture is moist, but not runny. This is done in order to speed up the drying time of the finished screed. Since the ready-made mixture for semi-dry screed is much less plastic, it is more difficult to level it. Therefore, after leveling is completed, it is additionally rubbed. This is done using a special disk installation, or using a broad rule. After this, the surface of the screed is covered with a film so that the surface does not dry out and cracks do not form on the screed. After 12 hours, the beacons can be removed and the grooves filled with solution.
Stages of work
To make a screed with your own hands, you need to know when and how to do it. During the repair process, the screed is poured before finishing work begins. That is, first they level the ceiling, walls, and install windows. Only then do they pour the screed. Not earlier. Because all leveling mixtures, plasters, putties weigh a lot. Stepladders and other equipment are required for work. All this leaves marks on the floor. And the screed matures for at least 28 days. During this time, it gains design strength (subject to certain conditions). It is unlikely that you will wait that long before leveling the ceiling or walls. So all the hard and dirty work must be completed before pouring the screed.
When the walls are already plastered, pour the screed
Painting the ceiling, gluing wallpaper, applying decorative plaster - these works are no longer so dirty, they do not require heavy materials. They can be started when the concrete reaches 50% strength. At a temperature of +20°C and sufficient humidity, this occurs a week after pouring.
Floor screed laying technology
We are talking about the procedure for pouring concrete mortar. It can be any loaf - from heavy to light. It can also be a semi-dry screed - a solution with a minimum amount of water.
- Preparing the base. Too large irregularities - depressions or protrusions - are removed. This will minimize costs, since the minimum layer thickness is determined by the most protruding point.
- Cleansing. Remove all construction debris and use a construction vacuum cleaner (a household vacuum cleaner will quickly clog) to remove dust.
- Primer. When installing a conventional (cohesive) screed, the surface is primed. When floating, put a film or insulation.
Leveling the solution is one of the last operations - The guides (beacons) are installed level (strictly horizontally or at an angle, if necessary).
- Reinforcing mesh is laid out. For household screeds, a welded steel mesh of 100*100 mm, made of 3 mm wire, is recommended.
- The screed is poured.
- The surface is covered with film. We wait until the required level of strength is reached.
This is a step-by-step instruction on how to make a screed with your own hands in general form. There are also points that depend on the specific composition of the screed and the selected materials, but in general, the sequence of work is exactly the same.
Care after pouring
Don't think that once the concrete is poured and leveled, the job is finished. In order for concrete to “mature” and not dry out, it needs certain conditions. Firstly, you need a temperature of at least +17°C. Secondly, a certain humidity is required. And these conditions must be created and maintained.
If you poured the screed in winter in an unheated room, you will need either:
- more time for ripening;
- special additives in the solution, which make it possible for the solution to normally gain strength at lower temperatures;
- heating.
At low temperatures, but not in frost, the easiest way is to add some additives and cover the laid solution. First with film, then with something that retains heat.
The screed is covered with film
If the temperature is above +25°C, you must ensure that the solution does not dry out. To protect against evaporation, you need to curtain the windows - so that there are no areas of local overheating, cover the surface with film. And, every two to three days, moisten the concrete generously. Abundantly - until puddles appear. In this case, care must be taken not to erode the surface. Such hydration is desirable for at least two to three weeks.
Tips for arranging dry and semi-dry methods
The process of leveling the floor of an apartment using a semi-dry mortar is almost identical to a wet screed, with the exception of preparing and working with the mixture.
Fiber fiber is added even to semi-dry mixtures and perfectly reinforces the leveling layer
The solution for semi-dry screed is mixed in the same proportion - 1 to 3. If desired, the required amount of fiberglass is added, calculating 500-600 g per 1 m3. The amount of water is determined experimentally - the mixed solution should not be fluid.
To check the quality, you can use simple rules - when compressed, moisture should come out of the mixture, and the solution itself should retain its shape. Once applied to the surface, the semi-dry mixture should not adhere to the rule or grout, but should form a smooth layer of wet mixture.
The mixture is supplied, as in the previous case, from the far corner of the room. After filling the solution, it is distributed and compacted. This can be done using an ordinary shovel - the solution is supplied in excess to certain places, slightly leveled and compacted with feet.
The compacted solution is leveled using a rule. After leveling, the surface is rubbed with wooden grout. The process is repeated until the floor is completely leveled. Next, follow exactly the same recommendations as for the wet method.
After filling and leveling the dry aggregates, I lay the gypsum fiber boards
Dry floor screeding is performed using expanded clay with different fraction sizes - 1-5 mm. To carry out this work, all the steps described above are repeated, up to the installation of the guides. Next, fill with dry aggregate to the “zero level”. Expanded clay should be lightly compacted and leveled along the guides.
After filling the area of the entire room, gypsum fiber sheets are laid. This coating is characterized by increased strength and ease of installation. The joining of the canvases occurs along the folded edge, which is coated with special glue and fixed with self-tapping screws.
Laying of sheets begins from the entrance to the room. To lay the first canvases, you should carefully place the gypsum fiber board on the embankment at some distance from the entrance, so that you can stand on it and mount the first two or three canvases. Next, the canvas is removed and further installation of the slabs is carried out.
Material on the topic: Knauf loose floor technology.
For both methods, after completing the work, the damper tape is trimmed and a suitable floor covering is laid. As an example, we recommend watching a video on how to make a floor screed in an apartment.
What materials are needed for floor screed
The basis of a wet or semi-dry screed is a solution. Both a simple cement-sand mixture (CSM) and with aggregates are used. You can add plasticizers that speed up the maturation period of concrete and make it more plastic. For screeding, use cement grade M400 or M500. Concrete for screed class M150 or M200 (do not confuse with cement grades).
For screeding in an apartment, concrete grade M150 or M200 is optimal.
You can also use higher classes of concrete (with a higher cement content). The surface will be more durable, but there will be too much shrinkage and the likelihood of cracks appearing when drying. A floor screed made of concrete grade M150 for an apartment or house is more than sufficient in strength. You will not drive a car... Any other load is not dangerous for such a floor.
Proportions of concrete for screed, mixing order
To obtain a cement-sand mixture for M150 concrete, take 1 part sand and 3 parts cement (M400 or M500). Water - 0.48-0.55 liters per kilogram of cement. You can add medium or fine gravel. The proportions are given in the table.
Cement/sand/gravel proportions for self-production of concrete for floor screed
When kneading, first dry mix the bulk components until smooth, then add water in parts. Its exact amount is difficult to determine - it depends on the moisture content of the sand and gravel. Therefore, it is added in small portions, stirring constantly. It is more convenient for the screed if the solution is of low plasticity - it slides off the inclined shovel.
Plasticizers can be added to the composition, which make the solution more plastic. A solution with increased plasticity is easier to distribute. The cheapest additive of this kind is PVA glue, but there are specialized ones. No more than 1% by weight of additives is added to the solution. Fiber fiber can also be useful. These are short fibers that prevent the development of cracks during shrinkage of the screed itself and minor deformations during shrinkage of the foundation. There are other additives that change the properties of the solution, but they increase the cost, and there is no particular need for them to fill the screed in an apartment or house.
How much concrete and cement is needed?
How to determine how much concrete is needed? You can roughly calculate. You know the area that will need to be filled, you know the thickness of the layer. We convert all values into meters and multiply. We get cubic meters - this will be the required volume of concrete.
Let's do the math with an example. We will fill an area of 45 square meters, a layer of 5 cm. Convert 5 cm to meters. This is 0.05 m. Now we multiply 45 m² * 0.05 m = 2.25 m³. You will need approximately 2.2-2.5 cubic meters of cement mortar. Knowing the required volume of solution and the grade of concrete, you can determine the cement consumption. It can be taken in the table.
Using the table it is easy to determine how much cement is needed per cubic meter of concrete
Please note that the table shows the cement consumption for CFRP, that is, without crushed stone. Having decided on the volume of concrete, you can calculate the mass of sand. It needs 3 times more. It is better to take construction sand rather than river sand. Quarry sand has sharp edges, while river sand has smooth edges. It seems that the difference is small, but this is not so - with quarry sand, concrete is stronger.
General recommendations
Considering that the solution hardens quickly and loses its workability, work in one room should be carried out within one working day.
The laid mortar gains design strength within 28 days. During this period there should be no drafts in the room. This is fraught with the appearance of cracks in the top layer of the coating, which indicate a violation of the setting and hardening regime of the working mixture.
Filling the screed with step-by-step photos
The first tie you make yourself will give you more confidence. The matter is not too complicated, but the work is physically difficult, even if you have a concrete mixer. And if you mix it with your hands, it will be very difficult. Try it on a small volume first. It may well be that you then decide to order concrete in a mixer.
Look at the example of a floating screed; the separator is an industrial thick film. The following tools are required for pouring:
- The rule (emphasis on the “and”) is about 2 meters long. 1.5 m is possible, but beacons will have to be placed more often.
Do-it-yourself floor screed: step-by-step instructions will not hurt - Laser level with horizontal scanning function.
- Roulette.
- A long ruler or a perfectly straight bar.
- Roulette.
- Pencil.
The most expensive tool is a laser level. If floor screeding is not the only type of work you can do yourself, this tool will be very useful to you. So it’s better to buy it, and you should choose good quality.
How to calculate the minimum layer, where to make the zero level
If the base were level, screeding would be a very simple matter - pour in the mortar and level it out in an even layer. All. But the fact is that this is extremely rare. Usually there are humps somewhere, depressions somewhere, a few corners may be higher, some lower. Since the minimum screed layer is 30 mm, it is necessary to find the most protruding part of the base and relative to it (plus these 3 cm) draw the zero level.
To work, you will need a laser level with the ability to construct planes. We expand the horizontal plane at any distance from the floor. Let it be 10 cm. Next, take a ruler or tape measure and move around the perimeter of the room, measuring at what distance from the floor we “catch” the laser beam. It is displayed as a bright strip around the perimeter, so you can immediately see how things are going with the corners. If there is 10 cm to the beam in each corner, you are incredibly lucky. But usually the picture is different.
Determination of the zero level and thickness of the screed
If the floor screed is being done throughout the entire apartment, you need to check all the rooms and look for the highest point of the apartment. The zero level should be the same throughout the entire apartment, however, taking into account the characteristics of the floor covering. For example, floor tiles are thicker than art vinyl, and this must be taken into account when pouring screed. In rooms intended for laying tiles, the level should be slightly lower - then you will not have differences in the floor level in the apartment.
When we find the point at which the distance to the beam is the shortest, this will be the highest point of the base. It will become decisive in applying the zero level. This is the level at which the screed will end. To this point we add the planned thickness of the screed (but not less than 3 cm). At this level we unfold the laser plane. Rays are displayed on the walls, which indicate the level of the screed. Take a ruler, a pencil and draw a line. Now we determine the average thickness of the screed - we again walk around the room, checking what distance is obtained to the zero level. Now you can more accurately determine the consumption of the solution and the required amount of cement.
Not all models of laser levels allow you to change the height of the unfolding plane. If you can’t set it at the desired level, you’ll have to work a little. It is necessary to calculate how much higher the plane goes, set this distance down from the laser line, and draw a straight line.
Preparing the base
If there are cracks, we seal them, clean off all excess from the walls (leave the lines). We remove the garbage, it is advisable to vacuum it, but when using film this is not critical, you can just sweep it. We spread the film. It should go on the walls. The overlap height is 3-5 cm above the zero level. If the width of one sheet is not enough, one piece of film overlaps the other by at least 15 cm. For reliability, the joints can be taped with double-sided tape.
We spread the film and attach its edges to the walls
The film can be glued to the walls with tape, but such fastening is unreliable - it constantly falls off. It’s better to take a strip, press the film with it, and nail it to the walls. Yes, they are plastered, but filling small holes will not be difficult.
We display beacons
The concrete solution will need to be leveled. The reference points are beacons - special strips that are set exactly at the same level as the zero mark. There are special metal films that are called lighthouses in hardware stores. These are planks of a special profile, 3 meters long, the height of the protruding part is from 3 mm to 15 mm. For floor screeding, take 10-12 mm.
Any flat planks made of any material can be used as beacons. For example, pipes - round or profiled, profiles for drywall, even even wooden planks. The only condition is that the material must be perfectly smooth. Any beacons can be placed on the solution, or on screws. There are also special adjustable stands for displaying beacons. But they are expensive, they are needed only for a while, since after reaching 50% strength, the beacons are removed from the concrete, but the stands remain.
An example of the location of beacons for floor screed
The distance between the beacons is determined by the length of the rule - 30-50 cm less than its length. We place the planks along the long side of the room, from one wall to the other. When installing the first beacon, we retreat about 30 cm from the wall. That is, the outer planks should be approximately 30 cm from the walls. We divide the rest of the space into equal parts so that the distance is less than the length of the rule.
For example, the width of the room is 4.3 m, we will work as a rule of 1.5 m. We calculate like this: 4.3 meters - 0.6 m (twice 30 cm), it will be 3.7 m. You can put two beacons. They will divide the remaining space into three parts - 1.2 m + 1.3 m + 1.2 m. The distance may be equal, you can move the outer profiles a little closer/further.
For solution
The arrangement of the screed begins with the installation of beacons. The final result will depend on how evenly they are set. First, let's look at how to place beacons on the solution. The solution is mixed from standard CPS with the addition of one part of gypsum. This will make it more flexible. Mix the thick solution. It should lie in a “heap” and not float. Add minimal water.
Along the wall, in the right place, at a distance of 50 centimeters, we lay out piles of mortar. In height they should be above the zero mark. To make it easier, turn on the laser level and ensure that the plane coincides with the mark applied to the walls. Place the bar on the solution and press it in so that it is in the same plane as the laser.
We place beacons on the solution
Doing this is not as easy as it seems. Sometimes higher, sometimes lower than necessary. Even if your profile is filled up in only one place, you need to start all over again. It’s a little easier if you press the beacon as a rule - hold it in length and press smoothly, watching the laser beam. This makes the efforts easier to control and the beacons easier to set.
We leave the leveled planks alone for a day. During this time, the solution will set and you can continue.
For dowel screws
To attach beacons to screws, take fasteners with a rod length greater than the height of the tie. The head is selected so that the selected type of beacon holds well on it. We draw a line on the floor along which we will place the lighthouse strips. We drill holes in the base and insert dowel plugs. We screw in the screws so that the heads are at the same level. The height is determined taking into account the fact that the lighthouse bar also rests on the screws.
We screw in the screws, lay the guide strips on top
This method seems more labor intensive. But believe me, it’s normal to place a beacon on the solution - that’s quite a task. As a result, more time is spent. Verified. Especially if you are doing the floor screed with your own hands for the first time. In addition, immediately after the beacons are placed, you can begin pouring the screed.
Laying out and leveling the solution
The solution is spread between two beacons, spreading it slightly. Having laid out a certain amount, take a rule, use it to level and level the solution. It is moved slightly to the right and left, and at the same time pulled towards you. Beacons are used as the basis. The bottom edge of the rule rests on them. The plank captures excess solution and pushes it in front of itself. Along the way, possible voids and holes are filled.
How to level a screed mortar using the rule
If after passing the rule, dips have formed, add mortar with a trowel and level it again. Do this until we get a smooth surface. Mix a new batch of mortar and level it again.
The floor screed begins from the wall farthest from the entrance
To make work convenient, start pouring the screed from the wall farthest from the entrance. It is more convenient to completely fill one span between the beacons, leave the next one empty, then fill the next one. Then - the third. With this technology, the screed can be poured in parts. This option is good for those who do repairs after work and have a couple of hours to spare.
Dry screed device
Dry screed is a special gypsum fiber (GVL) sheets of increased strength, laid on a backfill of insulating material (for example, perlite).
In the same way as in the case of a traditional screed, you must first determine the thickness of the dry screed, calculate the required amount of materials and purchase them.
It should be taken into account that after delivery of gypsum fiber boards to the installation site, they must rest for at least 10 hours at room temperature.
Preparatory work
The old screed is removed only if it is severely damaged. In other cases, a thorough cleaning is sufficient. In the same way as in previous cases, the level of the future screed is marked on the walls. A layer of special vapor barrier film is laid, and an edge strip is installed on the walls up to the level of the future screed.
Installation of guide profiles
The profiles begin to be installed parallel to the walls, the first along the wall, and the rest at a distance of about one and a half meters from each other. The supports under the profiles should be placed at a distance of no more than 70 cm from one another.
Filling the filler
The filler is poured starting from the strip farthest from the door and leveled with a special device.
Laying GVL
Then the first layer of GVL is laid on the filler. This is done staggered, with the seams shifting between the sheets in each next row. The second layer of gypsum plasterboard is laid on top of the first one using glue with an offset to cover the seams of the first layer. The layers are fastened together with self-tapping screws. After this, the topcoat can be applied.