Methods for finishing slopes
You can trim slopes in different ways:
- Cement and carefully putty;
- Install slopes from a sandwich panel. This is an inexpensive type of finishing. But sandwich panels are fragile and short-lived.
- Install MDF slopes. This is a more expensive and at the same time reliable method of finishing. MDF slopes are more durable. In addition, they can be matched to the color of the door. Torex produces slopes that fully match the selected door model in color and texture.
You can perform any of these options either independently or with the help of professionals. You can order the installation of MDF slopes from a certified Torex team. In this case, we guarantee high quality of work performed. Since installing MDF slopes is the most complex and time-consuming, you need to know a number of nuances. If you decide to do this yourself, use our instructions.
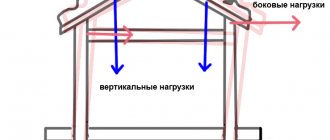
Plastering entrance door slopes
It is not for nothing that this method is considered one of the most budget-friendly. However, its main drawback is the need for a fairly highly qualified craftsman and the duration of the “dirty” work.
In order to clearly maintain the contour of the doorway, before starting work, it is necessary to remove all loose elements of the previous finish and secure a plaster corner along the contour of the opening. It will simultaneously perform two roles - to form impeccably even corners and serve as a “beacon” for the plaster.
Important: if the opening is uneven, has chips or poor-quality masonry, you will need to level the entire surface using beacons. In this case, the corner must be mounted level, additional beacons are placed on surfaces perpendicular and parallel to the door leaf.
Next, plaster mortar is “thrown” into the space between the beacons and leveled using the rule. It is difficult to “stretch” a flat surface; it is necessary that the length is 5...15 cm longer than the width of the slope.
The process of plastering slopes on the front door with your own hands is discussed in more detail in the master class using the example of window slopes.
For thin wallpaper or painting, the plastered surface will need to be opened with finishing putty and carefully smoothed with sandpaper or a grater.
What will be needed to install slopes?
To install MDF slopes you will need the following tools:
Photo 1. Set of tools for installing slopes
- 1 – miter saw;
- 2 – roulette;
- 3 – pencil;
- 4 – angle;
- 5 – knife;
- 6 – hammer;
- 7 – masking tape;
- 8 – fastening elements;
- 9 – screwdriver;
- 10 – polyurethane foam;
- 11 – drill.
Installation of door slopes
The corner slope can be installed using a frame or installing the trim with mortar or glue. It is more difficult to work with the frame, so this process will be described step by step below. For the frame, wooden slats or a metal profile are suitable. You can install the frame on dowels; the slats are fastened along the entire perimeter of the opening, two slats on both sides, as shown in the photo:
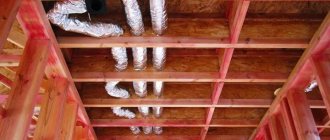
Frame installation
To strengthen the slope, several slats are mounted in parallel; they can be installed at the lower, upper and middle points. If drywall is used, then it is simply attached to the profile with self-tapping screws around the perimeter, recessing the cap, and the space between the wall and the gypsum board can be filled with insulation. A perforated corner is installed on the edges of the material, and the joints must be sealed with sickle tape. Next, everything is puttied and smoothed with sandpaper. At the very end, the dust is removed and finishing is carried out.
If MDF is used, then installation on the frame should be carried out with small nails or self-tapping screws. Corners and fastening elements are covered with platbands. Laminate flooring is very easy to install, the first lamella is carefully fastened with nails directly into the groove, and the rest are installed in the lock. The last plank must also be attached.
Stage 1. Control measurement of the opening after door installation
We make accurate measurements of the actual dimensions after installing the door - even if we know the exact factory dimensions. It is necessary to measure the width, height of the vertical and length of the horizontal extension.
Door trims are decorative strips that cover the walls of a doorway. They are installed if the opening is wider than the door frame. Most often, MDF panels are used for this.
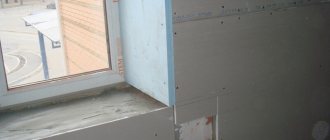
Photo 2. Measuring the width of the extension
It is necessary to measure at three points vertically on each side and at two points horizontally (from above).
Photo 3. Measuring the length of the horizontal extension
The additional element must necessarily be adjacent to the door frame, so we measure the length along the width of the door.
Accessories for the door
These decorative elements are usually sold complete with the door leaf and frame or ordered according to the size and depth of the opening. You can find out exactly how to make front door slopes with your own hands from ready-made additions only from the manufacturer’s instructions - despite the similarity of the installation technology, each specific case may have its own nuances.
Stage 2. Setting aside and marking the required dimensions of the extensions
Photo 4. Preliminary markings
After we have measured the required dimensions of the additions, we set them aside on the blanks of the additional elements. We make preliminary markings directly on the panel.
Photo 5. Gluing future cutting areas with masking tape
Using masking tape, mark future cutting lines.
On one blank for additional elements, you can put two parts - the threshold and the upper part of the additional elements.
In the same way, we set aside the dimensions of the second part, make preliminary markings on the workpiece and glue it with masking tape.
Photo 6. Re-mark
We re-mark the length of the extension directly on the masking tape.
If you do not glue the edge of the additional element with masking tape, chips may appear on it during sawing.
Photo 7. Checking dimensions
Once again we check the correctness of the markings.
Photo 8. Postponing the cutting angle
Use a miter angle to mark a cutting line perpendicular to the edge of the panel.
Stage 3. Trimming the extensions to the required sizes
Photo 9. Sawing blanks
Using a miter saw, we cut blanks for additional elements exactly along the marks.
Photo 10. Sawing the second workpiece
We saw off the first and then the second horizontal parts of the extension.
We repeat the procedure for the vertical parts.
Stage 4. Assembling the accessory box
Before installation, we assemble the extensions into a solid, rigid box.
Photo 11. Drilling holes for self-tapping screws
Using a drill, we drill holes for self-tapping screws - for fastening from the inside. This is a mandatory step so that when screwing in the screw does not split the MDF panel.
Photo 12. Drilling holes for self-tapping screws
We make several holes at a distance of 10–15 cm from each other.
Stage 5. Installation of the extension box
Photo 13. Installation of extensions
We install the extension box in the opening. We set it relative to the door so that the gaps between the door and the frame are the same on all sides.
Photo 14. Preparation of spacer elements
Spacer elements are needed to fix the extension box in the opening. We cut them out of a wooden block. The thickness of the spacer element is selected according to the size of the gap.
Photo 15. Preparation of spacer elements
A total of 10–12 spacer elements are required. 3-4 pieces for each vertical extension. Top and bottom – 2 pieces each.
Photo 16. Hammering spacers
Since in the future we will need to install platbands and close the gap, it is important that the spacer element does not protrude beyond the trim and the wall.
Photo 17. Installation of spacers
In the same way we hammer in all the spacer elements.
How to make slopes on the front door as attractive as possible
If the frame of the front door was made of plasterboard or plaster, it needs finishing. For this purpose, paint, decorative plaster, various types of tiles and - occasionally - wallpaper are used.
The issue with painting and wallpaper is quite simple - they are selected in accordance with the overall design of the corridor. If we are talking about the outside of the door, wallpaper, of course, is not suitable; paint for external use with increased durability is required. For interior decoration, it is better to choose not paper wallpaper, but more durable non-woven or vinyl. An even more suitable option is fiberglass for painting. You can read more about different types of wallpaper and their suitability for certain rooms here.
There is a feature article on painting walls with water-based paints on our website.
As for decorative plaster, there are several nuances:
- a doorway is always a place with an increased risk of mechanical damage. Therefore, you should not choose relatively fragile plaster with high relief; sooner or later it will be damaged;
- protruding elements easily cling to the outer clothing of those entering, so the relief of the plaster should be smoothed;
- compositions with stone chips can be considered the best option.
Since the area of the slopes is small, it is advisable to perform smooth plaster or decorate the elements in the same way as the walls of the corridor.
An interesting option could be a relief border along the outer edge of the opening or a relief platband.
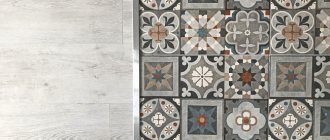
Finishing the slopes of the front door with your own hands using tiles or artificial/natural stone is carried out according to the same principle as cladding a regular flat surface with these materials. Preliminary preparation is required; installation is carried out using tile adhesive or cement mortar.
Typically, such cladding “extends” onto the walls of the corridor.
The cladding process is shown in more detail in the video.
Stage 6. Installation of platbands
Photo 18. Measuring the length of the casing
We attach the casing and mark the required length. The size is set according to the angle of the internal intersection of the horizontal and vertical extensions.
Photo 19. Measuring the length of the casing
Similarly, we set aside the length of the second casher.
Photo 20. Measuring the length of the casing
We mark the length along the inner corner of the extensions.
Photo 21. Trimming the platband
We cut the trim using a miter saw at an angle of 45 degrees.
Photo 22. Filling the gap with foam
Polyurethane foam is used to fix the extension box. Gives the structure rigidity and additional sound and heat insulation.
Photo 23. Filling the gap with foam
It is important not to overdo it with the volume of foam, so as not to deform the extension.
At the same time, if there is too little foam, the opening will be leaky and not rigid enough.
To remove excess foam, you need to wait for it to cool and cut it off with a knife.
Try to avoid getting polyurethane foam on the boards, walls and flooring.
Photo 24. Installation of vertical trims
First we install vertical extensions, then horizontal ones.
We attach the casing to the trim using decorative nails.
Photo 25. Installation of vertical trims
To install the trim you will need about 20 decorative nails. They are clogged at a distance of 20–30 cm from each other.
On average, each vertical trim will require 7 decorative nails, and each horizontal trim will require 3–4.
Photo 26. Installation of horizontal trim
We measure the size of the horizontal platband.
Starting from the larger size, we cut at 45 degrees to reduce it.
The horizontal casing is fixed to the extension box and the vertical casing.
Photo 27. The final stage of installing slopes
We press the structure against the door frame and fix it with masking tape until the mounting foam hardens - for 1–2 hours. The exact time depends on the drying time of the foam, which can be found on the packaging.
After this, you can remove the masking tape. Your front door is ready!
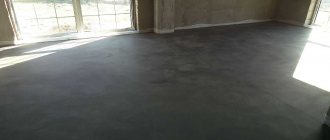
Formation of a slope using finishing material for mortar
In this case, materials such as drywall, MDF, plastic slopes, etc. strengthened with cement-sand mortar or adhesive. The surface has already been prepared: leveled and primed.
It is best to indicate the level of the future slope and provide normal support for the sheathing material. To do this, screw the screws into the wall so that their heads form one plane. In this case, the thickness of the sheathing material is taken into account, because it will rest on the heads of the screws. After this, you can fill the entire space of the slope around the perimeter with a solution.
For reliability and for the sake of economy, the first layer is a cement-sand mortar, which forms a layer slightly smaller than the height of the supporting screws. Next, select an adhesive composition suitable for your sheathing material. The adhesive solution is applied in an even layer over the surface of the slope and onto the strips of material on the reverse side.
Carefully placing the sheets of material on the slope, they must be pressed down until they rest on the caps of the screws. The correct installation is checked using a level; if necessary, you can correct the position while the solution has not yet set.
If there is a gap between the sheathing sheets and the wall, it must be sealed with mortar. After this, you can attach the platbands, if any.