Why electric and not water?
Before finding the answer to the question of how to lay a heated floor under porcelain tiles, you need to figure out what type of heating system is preferable under these conditions.
Installing heated floors under tiles involves using two approaches:
- Installation of water heated floor.
- Using electric heated floors.
Both options allow you to increase the level of heat in the room, and can simply increase comfort while staying inside a room framed with porcelain tiles. At first glance, it may seem that the water version is more economical than the electric one. Moreover, most people believe that the pipes can simply be connected to a central heating system, or inserted into an autonomous device. But in order to obtain the legal right to such an insert, you need to obtain a lot of permissions from government authorities. The latter give these permissions extremely reluctantly.
Important! The option of water heating will be convenient only in a private house.
The electrical version of the system has a large number of undeniable advantages:
- the water circuit always has a risk of leaking, which can become a real problem both for the owners of the apartment and for its neighbors below;
- equipping a modern heating system does not require the creation of a substantial thickness of concrete screed (its minimum size will be sufficient), which will clearly overload the existing floors. Some devices do not require the creation of a screed at all;
- It is much more difficult to install pipe circuits than to lay out cables, mats, and mount rods;
- Electric heating operates without collector-mixing equipment. All control is concentrated in one unit, which allows you to most accurately support the operation of the device;
- the system, powered by mains power, is distinguished by its simplicity of installation work, dimensions, and ease of operational processes;
- To install equipment, you do not need to ask permission from other residents or fill out the appropriate documentation with the housing and communal services authorities. Here you only need not to go beyond 15 kW of consumption;
- A reasonable approach to spending allows you to use energy wisely.
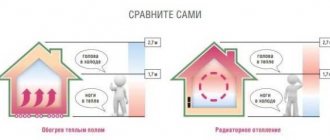
The resulting floor, after all installation work, meets the highest requirements for heating the room: the maximum temperature will be observed at its base, with the distance from the floor it will decrease to comfortable levels.
Important! A special feature of ceramics is the ability to accumulate a charge of heat and then gradually release it to the surrounding space, which allows minimizing the number of times the system is connected to the network.
Main or additional heating?
Thermal systems may include underfloor heating as an additional heating source or rely entirely on it. In a private house, instead of traditional heating radiators, only heated floors are allowed. The area of the heated surface in this case must be at least 70% of the total area of the room.
The apartments use a combined type option, when the warm floor complements the main heating. Installation is carried out in the kitchen, in the hall, in the bathroom in open areas: there is no point in heating the floor if there is stationary furniture or plumbing on it. It is very convenient to regulate the heating depending on the time of year and the operation of the main heating.
Pros of heated tiled floors:
- Maintaining constant humidity in the room. Heating floor tiles does not dry out the air, which is the “sin” of centralized heating in high-rise buildings.
- Even heat distribution. The tiles retain and transmit thermal energy well throughout the entire room.
Which warm electric floor under tiles is better to choose?
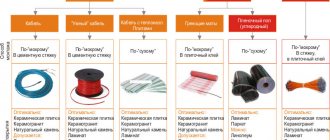
The technology for installing underfloor heating cables is different; it depends on which type of cable was chosen.
- Film with infrared exposure: the thinnest type, created for dry installation. It is often placed under laminate or linoleum.
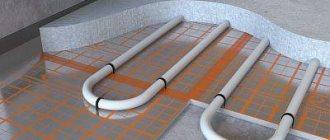
- Cable is a wire that is laid with a certain step, allowing you to achieve the desired degree of heating. It is important that the power of the system is from 15 W per linear meter, and the laying step is 10 cm. This technology requires the presence of a screed with a thickness of about 5 cm. Each square requires up to 200 W for heating.
- Mats: this is a cable that is already fixed by the manufacturer on a special mesh. It can have different powers from 100 to 180 W per square.
- Rod: a separate variety of infrared type, suitable for installation directly into the adhesive backing for tiles.
Pros and cons of electric floors
How to lay, how to lay a warm floor under a tiled base? Before considering options for installing cable heated floors under tiles, you need to evaluate the advantages and disadvantages of this type of heating system.
Advantages:
- no risk of water leakage;
- silent operation;
- there is no need to provide a large amount of free space, install a boiler, or connect to the water supply system;
- uniform heating of the surface;
- ease of system control via remote control and thermostat;
- ability to operate for 50 years.
Flaws:
- high cost of operation for heating large areas;
- the presence of small electromagnetic radiation that can harm a person;
- the presence of a serious load on the network, which can cause its failure (this is especially true for old housing stock).
Comparative characteristics
When installing heated floors of a certain type, you must comply with the requirements for the floor covering, installation methods and temperature conditions. In accordance with these requirements, before purchasing a specific model, a comparative analysis of the main underfloor heating systems is carried out.
Coating
When choosing electric heated floors, you should focus on the finishing coating. Laminate and ceramic tiles are more suitable for cable systems and thermomats. Carbon rods, as well as infrared film, are placed under linoleum, carpet and laminate - such materials serve as good heat conductors.
Advantages of infrared films:
- Easy to install - they can be used immediately after installation.
- Ease of replacement - if several elements fail, they can be easily replaced with new ones.
The disadvantages of infrared films include the unreliability of the connecting sections.
The main advantage of cable-type floors is that they are a solid conductor with a single weak point - the coupling. Its location is entered in the passport so that if it breaks, it can be quickly replaced.
In addition, the screed serves as a protective layer that protects the floor from mechanical damage. If you use films with a 12V power supply, a power supply is added to the system - not a very reliable element.
Advice! To protect yourself from electric shock, you should use residual current switches (RCDs) that meet the requirements of GOST R 51326.1-99.
Installation methods
Warm floors are installed in different ways:
- into the screed;
- between the screed and the tile;
- directly under the finishing coating (film floors).
The first option is more often used when heating living spaces, kitchens and bathrooms. Cable heated floors are installed in such rooms. Waterproofing and insulation are laid under the system.
If there is a heated room below, thermal insulation is not needed, and the heating elements are installed under the tiles in a layer of adhesive. Before purchasing a model, you should check about the possibility of such installation.
When installing a heated floor system under a laminate, you should choose infrared films. A layer of polyethylene is placed on the screed, followed by electrical elements. Then waterproofing and laminate are laid.
Which electric floor is better to choose for tiles?
Installation of heated floors under tiles can be done in one of the most common ways:
- cable;
- infrared film.
In addition, installation of electric floors carried out under tiles may differ in the appearance of the equipment. It could be:
- Heating cable, with one or two cores. It can be adjusted independently.
- Mats on which the cable is attached to the mesh.
- Film where infrared heating elements are located.
- Rods with infrared operating principle.
Each of the systems has its own advantages and disadvantages, so it is difficult to say unequivocally which of them is ideal for installation under ceramics.
Cable
Among all the varieties of electric heated floors under porcelain tiles, cable ones stand separately. In them, the heating element, as the name suggests, is the cable itself; it converts the current passing through it into heat.
Heating cables can be:
- single-core: they have only one heating filament, its ends are brought together at the stage of setting up the system, one is connected to the phase of the wire carrying the current, the second to zero;
- two-core: there are two threads, the installation is a loop with a dead-end installation method;
- self-regulating: a variation of the previous type. It independently controls the degree of heat generation in each of its areas. This option is often used to equip snow melting systems to protect pipes from freezing in winter.
Electric cable heating elements are convenient because the owner can independently configure the required heating zones. The structure heats up in a quarter of an hour, after which it releases the resulting heat in about 4 hours. Cable laying is possible under any type of ceramic granite.
Mats
Electric heated floors under tiles can be installed using laying mats. They are more expensive than a simple cable. But, this type is best suited for tiles.
The thermal mat is a reinforcing network with a cable laid on it in the form of a snake. The perfect pacing is followed here.
Separately, it should be noted that such a system is easy to install; the mat is simply rolled out onto the desired surface and connected to the network. You can lay tiles on top without creating a screed.
Film heated floor
Installation of electric heated floors under tiles can be done using the film version. Such a system already contains materials containing carbon compounds, which, when supplied with current from the network, create infrared radiation. These elements are connected to each other using a copper busbar, covered on the sides with a special shell consisting of polyethylene terephthalate.
Thermal film has a thickness of up to 4 mm; it consumes less energy by a quarter than other standard systems.
Important! Thermal film is not always an ideal option for equipping a surface under tiles. Not every adhesive composition is suitable for it; some of them can dissolve the film shell.
Some manufacturers offer to lay special fire-resistant material in the existing gap, which creates the need for additional expenses. And the equipment itself costs a lot.
Rod
The electric rod floor under the tiles is heated by creating infrared radiation. Here, the heating elements are carbon fiber rods that are connected by busbars that conduct current. Such a system must be installed under ceramics, creating a thin screed of about 3 cm; it can be replaced with a centimeter layer of special glue.
The main advantage of the rod system is the minimal consumption of electrical energy when we compare these indicators with those provided by the cable.
Installation technology
Under tiles
A convenient place is selected and a special crown for the socket is cut out. A socket box is installed in it, into which the thermostat is mounted. In this case, you can choose any height from the floor, but not less than 300 mm. In the future, this place should not be covered by stationary furniture or household appliances. A good installation option is next to the light switch.
It is important to make a square groove of 20×20 mm. It is needed for further installation of installation wires into it.
Working technology:
- They clean the floor well from dust and construction debris.
- The dry surface is primed. If necessary, coat several times in a row after the previous layer has dried.
- Foil-based insulation is laid over the entire area for additional thermal insulation. The insulation is placed outside.
- Adjacent strips and sheets of insulation are laid end-to-end to ensure good density. To do this, the top is glued with metallized tape.
- The mounting tape is laid out on the floor and fixed. They fasten it with self-tapping screws or dowels at a distance of approximately 500–1000 mm from each other.
- Following the diagram, lay out the cable.
- The hinges are attached according to the drawing. At the same time, the necessary step is observed.
- Secure the cable in the area of the end coupling.
Under laminate
Electric heated floors under laminate are installed using the following technology:
- The surface is being prepared. The old floor covering is removed, all debris is removed from the base, and the concrete screed is checked for integrity. If there are uneven spots or chips, the subfloor should be filled.
- Thermal insulation is carried out. The base is well insulated with penofol. The joints between the sheets are glued together with foil tape.
- The film is laid. According to the chosen pattern, you need to spread the material over the surface. Laying sheets overlapping is prohibited. Their contacts should be directed towards the wall on which the thermostat is mounted. The copper side is placed at the bottom, i.e. attached to the base.
- The thermostat is installed. This is done in a groove on the wall near the sockets. The strip is connected to the thermostat with wires and clamped with clothespins. All clamping points are insulated with bitumen insulation.
- The temperature sensor is displayed. It is connected to the underside of the covering by creating a groove at the base 30 cm long, but no more. The sensor itself is placed in a protective corrugation and placed under a heating sheet.
Important A layer of thermal insulation is placed under the temperature sensor to avoid large errors. This can worsen the operation of the entire electric floor heating system. It is possible to connect a heated film floor under a laminate without a thermostat
But there remains a risk of increased electricity consumption. In this case, there will be no temperature control at all. In this option, you can lay a protective foam film on top of the heated floor and cover the surface with laminate
It is possible to connect a heated film floor under a laminate without a thermostat. But there remains a risk of increased electricity consumption. In this case, there will be no temperature control at all. In this option, you can lay a protective foam film on top of the heated floor and cover the surface with laminate.
Video about installing heated floors under laminate:
Into the screed
Work technology:
Select a location to install the thermostat. To install it, leave about 40 cm from the level of the floor covering. A hidden installation option is preferable, in which all the wires are recessed into the wall. Remove the sensor from view.
A mounting tape is attached to the reinforcing layer in increments of 50 to 90–100 cm. 10 cm are indented from the wall, and 40–50 cm in the areas of fittings. If there are pipes and heating radiators, a 15 cm indent from them is made, but no less. The heating cable is attached to the power element, and the connection is hidden in a special coupling. Then connect the power cable to the thermostat.
Heating fragments are distributed over the surface. Use the drawn up diagram
It is important to ensure that the bends are correct (they should be even, smoothly transitioning, and not have any creases). The cable is attached to the mounting tape
For a more successful strong fixation, it is installed on the reinforcement and tightened tightly.
The distance between the turns of the elements is more than 80 mm. Temperature sensors are placed in selected locations.
All connections are checked for correct installation and functionality. The operating procedure of temperature sensors and thermostats is assessed using the data sheets supplied by the manufacturer, which reflect the parameters and errors.
Video about installing an electric floor in a screed:
Electricity consumption
Before laying a heated floor under a tile covering, it is necessary to clarify the energy consumption standards based on each square meter.
If we take approximately the same heating as a basis, then the cable will consume the most. It is usually placed in coils, quite close to each other, which requires a lot of material consumption, and therefore a lot of energy is spent heating it.
Infrared rods consume the least energy; by the way, they heat the floor the fastest. Film with infrared radiation can create a floor temperature of 20 degrees in 20 minutes; mats and cables will have to spend several hours to achieve this goal.
Installation
Independent installation of a “warm floor” cable system does not cause difficulties if you follow the following recommendations:
- Removing the old floor covering.
- Electric heated floors are installed using a screed or using an adhesive tile composition. It is important to remember that concrete screed is capable of accumulating thermal energy very well, so even after a power outage, heat transfer is maintained.
- On wooden surfaces with a void for ventilation, a layer of insulation can be laid and a “double floor” can be installed, characterized by excellent thermal conductivity.
- After leveling the surface using a concrete screed, the cables are laid with sufficient density to each other using metallized tape.
- When installing a “warm floor” cable system in rooms with high humidity levels, it is very important to use high-quality waterproofing.
- In areas along the walls, insulation is made using penofol or polystyrene.
- The heating cable is laid on a heat-insulating substrate in the form of a thick foil based on PVC using a mounting fixing tape, and the standard fastening pitch can vary between 50-100 cm.
- The cable must be installed from the place where the thermostat is installed, after connecting the control device, and with a distance between the transverse turns of 40-80 cm.
- Using a two-core heating cable involves connecting the two ends to a temperature control device.
To make the operation of the “warm floor” cable system problem-free, the installed temperature sensor must be placed in a corrugated plastic pipe and fixed in a place accessible for maintenance.
Heating system control
It’s not enough to install a heated floor on the base to put porcelain tiles on top; you need to properly equip the control system. It is a thermostat. It can be mechanical or electronic.
Special sensors read indicators and control the temperature:
- air;
- floor covering.
To obtain the optimal temperature inside the room, you need to set it on the thermostat at the rate of: comfortable values plus 5 degrees. A modern system is capable of automatically turning off after reaching specified parameters, turning on periodically to maintain them at the desired level.
Recommendations
Before installing a heated floor under the tiles, you need to familiarize yourself with video materials on this topic in order to have an idea of the technology for laying heated floors.
Important Recommendations:
- When choosing the type of device, you need to take into account what kind of heating source, main or additional, it will function as. In the first case, infrared models will be optimal, in the second – cable ones.
- The thicker the poured screed, the longer it will take to warm up. Heating a concrete base will require a lot of energy.
- Cable or carbon rods are an ideal choice for a ceramic base. The systems can be easily installed in thin screeds and are absolutely no different in their demands on loads coming from outside.
- Films are incomparably easier to install, but it is forbidden to place heavy interior items on top of them.
Choosing the best option
Let's summarize. The main criteria for choosing a floor heating method are reliability and durability. After all, repairing a heated floor under tiles is an almost impossible undertaking. It is necessary to remove the tiles and break the screed or adhesive layer. You can't get by with a little bloodshed. The only way. Based on these considerations, there are only three types of more reliable heated floors for tiles:
Installation requires special glue and grout
- water;
- resistive cable;
- cable mat made of resistive cable.
Not such a wide choice. But there are more design options, so it actually ends up being a little more.
Water and cable in a screed
The installation of a water floor and cable floor is possible only at the stage of major repairs. They are placed in a screed, and it must mature for 28 days. But the screed works as a heat accumulator and equalizes the temperature. What is the difference between these two types of heaters? That:
- water requires more money (more equipment and it is more expensive);
- the screed with a water floor should be thicker (5.5-6.0 cm versus 3 cm);
- the load on the water heating ceiling is greater (due to the thickness of the screed and due to the fact that the coolant also has considerable weight).
The cable must be laid out and secured, then covered with a layer of concrete.
But a water floor is more economical in operation. But it is almost impossible to do it legally in an apartment. No one will give permission to connect to the heating system. Installing a separate boiler means increasing already considerable costs. And not every ceiling can withstand such an increase in load. The exception is new houses, which have special risers with a lower temperature, and ceilings are designed taking into account the possible installation of a water-heated floor.
Water and cable without screed
There is also a “dry” method of laying water or cable heated floors. It's good if you don't mind making the floor with joists. The boards are laid on the joists not close to each other, but spaced out. If the board is too expensive, chipboard cut into strips, thick plywood or other similar material will do. Metal heat distribution plates are laid on the boards. A groove is formed in the center of the plate into which a pipe or cable is laid. Sheet material (plywood) is placed on top; tiles can already be laid on it with glue.
Dry method of laying water and cable floors
As you can see, the design is multi-layered. The heating of the floor is not direct (directly from the heating element), but through the heat distributed by the plate. And first the plate is heated, the plywood from it, and only then the layer of glue with the tile. So it will take a long time to heat such a floor. And take the power of the heating element with a large margin. In general, this option is only suitable if you need a warm floor to keep your feet warm. For main heating, this is an unlikely option.
The fastest in laying under tiles
If repairs need to be done as soon as possible, only one type of heated floor is suitable for laying under tiles - cable mat. It installs really quickly and is reliable in operation.
The easiest and fastest cable mat to install under tiles
What difficulties might there be? You need a good tile adhesive for underfloor heating. It can't be cheap. The cost will be higher than when laying tiles on a screed. It is necessary to take into account the thickness of the heating cable and mesh. So the cost of tile adhesive will be significantly higher than without underfloor heating.
Main stages of installation
All of the above is true for any electric heated floor. First, install the thermostat on the wall. This is a small device. It usually fits into a standard socket box. So we install a socket box in the wall and a thermostat in it. It will be necessary to attract food to this place. It is better to have a separate line from the distribution cabinet. The power of an electric heated floor is calculated in kilowatts. So a dedicated line with a circuit breaker is desirable. Down from the thermostat - to the floor level - we wall up the pipe in the groove. We will use mats in it and connect it to the thermostat.
General arrangement of electric heated floors
A heated floor sensor is also required. It is better not to wall it up tightly. This is the part of the system that most often fails. To make it easy to change the sensor, a piece of plastic pipe is embedded in the floor. The far end is placed between the heating elements to make the readings more realistic. Leave the edge of the pipe open. To do this, before laying the tiles in this place, we plug the cut with a rolled up rag. We tie a wire to the rag and pull it through the pipe. We laid the tiles on the heated floor, the glue dried, and the cork was pulled out. The sensor was lowered into the free pipe. Replacing it will be done in the same way: pull out the old wire, insert the new one.
You can choose any type of heater for the tile. But a heating cable attached to a mesh requires less time.
And further. Do not forget to check the functionality of the heated floor before laying the tiles. When you have laid the mats and connected them to the thermostat, you can check the system. First, we supply power to the thermostat, set the temperature on it and wait for a while. After a few minutes the cable should be warm. We check all areas. Heating should be uniform over the entire area. If everything is fine, you can lay the tiles. If not, we look for errors in the connection.
Project preparation
Heating the floor under tiles requires mandatory preliminary preparation of the project. Floors under tiles cannot be installed at random, without thinking through the placement of individual interior items.
Laying a cable heated floor under the tiles does not imply a strong load on top, otherwise the warm air will not be able to rise to the top and will be forced to return to the heat source.
The project involves choosing a location for installing the thermostat. The optimal height for its location will be a meter from the floor. This location will be ideal because you won’t have to cut out a large section of the wall to lay the electrical cable.
Preparatory activities
Before you begin installing a warm water floor under the tiles, you need to prepare the material, tools and design of the future structure.
Watch the video
3 How to make a layout diagram for a heated floor contour
Tools and materials
To install the heating structure, you need to prepare the following tools: a screwdriver, a tape measure, an open-end wrench, a hammer drill and a rule for leveling the screed.
In addition, you should purchase the following materials:
- pipes and elements for their fixation;
- pump and valves;
- reinforcing mesh;
- hydro and heat insulating material;
- construction livestock;
- fasteners.
Pipes for water heated floors are made from various materials; they differ in price, technical characteristics and operating conditions. Common types of pipes include:
- Polypropylene - this material bends and expands poorly when heated, so it is recommended to lay the product with reinforced fiber additives.
- Polyethylene ones are slightly more expensive than polypropylene ones, but they bend better, are stronger, can withstand high temperatures and do not expand when heated. The main disadvantage is that they tend to straighten out, so reliable fixation is required.
- Metal-plastic is a durable contour that has long been used in the installation of heated floors.
- Copper ones are a great option, they are flexible and durable. Their main disadvantage is that they are more expensive than others.
- Steel is a high-quality and durable product. But over the years, it can corrode.
Each type of pipe has its pros and cons. Therefore, when choosing, you should take into account not only the characteristics of the product and the room in which they will be installed, but also your requirements and financial capabilities.
Calculation of required material
To calculate the length of the pipeline, the characteristics of the pipe product and the features of the heating system should be taken into account. To make calculations easier, you can use an online calculator.
The program produces averaged data, so a correction factor is used for adjustment, which is influenced by a number of parameters. You will need to enter the size (diameter) of the pipes, laying step, information about the material of the circuit, finishing coating and screed.
To calculate the size of the pipeline, you can use the following formula:
L=S/n*1,1+k,
wherein:
- L is the length of the heating circuit;
- S is the area of the room;
- n—laying step;
- 1.1 - average safety factor for bending;
- k is the distance of the collector from the floor.
There is a simpler formula - each of the two adjacent sides of the room is multiplied by the laying step and the results are summed up. This is the length of the circuit, you just need to add the distance to the collector.
Project preparation
To make a project, you can use a piece of paper from a regular notebook in a square. You should strictly adhere to the scale of the room in which installation is planned.
You need to start the drawing by drawing the general outlines of the room, marking the areas where the doors, windows and outer wall are located. If the room area is large, it is necessary to install decompression joints, which are also reflected in the plan. Heated floor pipes should not be placed at these seams. But if the contour crosses them, then it is protected by a corrugated pipe.
Then, the diagram marks the areas where it is planned to install furniture that will fit tightly to the floor. There is no point in installing heating elements here. The installation location of the manifold cabinet is determined. After that, the laying diagram of the pipes is reflected on the plan.
Two main schemes that are used for installation:
- “snake” - the pipeline is laid along the wall with a certain pitch, that is, in one half of the room the pipes will be hotter than in the other, this method is recommended for small rooms;
- “snail” - pipes with hot coolant are placed parallel to those through which cooled water circulates, so the heating of the surface is more uniform.
When drawing up a diagram, you must adhere to a number of rules:
- the length of one circuit is no more than 120 meters;
- all highways should be approximately the same - the difference is no more than 15 meters;
- standard pitch is 150 mm, in harsh climates it can be slightly reduced;
- the heating element must be laid at a distance of 150 - 300 mm from the walls;
- the outline must be solid.
If you are not sure that you can do the design and material calculations correctly, then it is better to use the services of professionals.
Thermal insulation
The features of installing a heating system under porcelain tiles require not the simple placement of mats under the tiles, but the preliminary placement of heat-insulating materials.
First, you need to assess the condition of the ceiling slabs and the installation location of the system in order to select a suitable thermal insulation material.
- Thick thermal insulation is necessary when there is a cold room below. Here, using expanded polystyrene or polystyrene would be ideal.
- Thin thermal insulation is ideal for an already prepared base. Here they use foil-type penofol, and place it upward with a surface that reflects light. This backing will help the heat flow into the room.
The insulation should be placed at a certain distance from the walls; the thicker it is, the greater this parameter should be. For example, polystyrene foam is placed at a distance of 10 cm, penofol - 5 cm. The places where the insulation is adjacent to the wall are treated with edge tape. It is necessary to compensate for the thermal expansion of the raw material.
Preparing the base
Before laying a heated floor, it is necessary to properly prepare the base for it. The cable should only be placed on a flat surface, free of dust and dirt.
Therefore, the preparatory stage includes the following activities:
- removal of dust and debris;
- applying a primer;
- in case of strong differences in height, it is recommended to create a screed (but further work will have to be continued only after it has completely dried);
- when there are time constraints, you can choose leveling by creating self-leveling floors;
- It is not recommended to lay the cable on top of wood or plywood, as this will cause wasted heat loss;
- At the same stage, it is necessary to carry out gating of the walls. If the system is installed in an already renovated room, then the wire can be laid externally, placing it in a plastic box.
Installation of thermostat and sensors
Installing a warm floor under tiles must comply with certain rules.
It is important to set the regulator correctly:
- lay the wire that connects the cable to the regulator in the corrugation;
- the corrugation is placed in the pipe;
- the pipe is brought to the place where the sensor is located;
- the device is placed maintaining a distance of 400 mm from the wall (it must be between the cable turns);
- the corrugation is placed without creating kinks; its edge, which will rest against the system, must be filled with sealant so that the screed does not get there;
- The temperature sensor is also mounted in the corrugation.
What power heated floor to choose
Let's start with the fact that the floor temperature is regulated by sanitary standards (SNiP 2.04.05*91*, clause 3.16). According to this document, the floor cannot be heated above:
- 26°C - in rooms where people are constantly present (residential);
- 31°C - floor in rooms where people are temporarily (bathroom, toilet, etc.).
At the same time, the maximum heating temperature above the heating element is also limited. It should not be higher than 35°C. In fact, you feel comfortable if it’s about 26-29 degrees under your feet. It is, of course, a personal matter, but a warmer floor feels hotter.
After you decide on the power of the heated floor, you can choose the power of the cable or heating mat
Why do we need floor temperature? But because the required power per square meter depends on it. If you do everything according to the rules, you need to calculate the heat loss of the room, take into account the heat capacity of the materials, the presence and quality of insulation. Calculating the power of a heated floor is a whole process. But it can be made simpler. There is an “average temperature in the hospital.” The data collected on the basis of actually working structures is shown in the table.
What power should I use for heated floors under tiles?
But this does not take into account the layer of glue and the thickness of the tile. These are really “average” indicators. How can I correct them? If the adhesive layer, tiles or porcelain tiles are thick, add about 20%. This will give the required temperature. In general, it is better to take power with a reserve. There are two reasons. Firstly, operating at the limit damages the equipment. It breaks down faster. This also applies to heating elements.
Secondly, in case of extreme cold or the main heating is turned off, you will have some reserve. True, an increase in the maximum power of the heating elements leads to an increase in the diameter of the wires in the power line and the power of the machines. But in electrics, a power reserve is always better than a lack. More safely.
Calculation example
In the table we have standards, but they are for one square meter. To calculate the required power for the entire room, you need to calculate the heated area. We multiply the resulting figure by the selected norm.
Let us show with an example how to calculate the power of a heated floor. We will lay the electric warm mat only in the free area. In the bathroom this is 3.5 square meters.
First you need to determine the heating area
Based on the table, a bathroom requires 150 W of heated floor power per square meter. But we will be laying thick tiles, so we will take the power with a reserve. We will count 180 W/m².
A total of 180 W/m² * 3.5 m² = 630 W is required. That is, you will need to find a cable mat that will produce at least 600 W of heat over 3.5 square meters.
Laying heated floors
Installation of heated floors under tiles cannot be carried out without first carefully studying the instructions supplied with them. The cable is more difficult to install than mats. If there is the slightest doubt that you can handle it, it is better to seek the help of professionals.
Important! Before installing the cable components, it is necessary to place the thermal sensor in the corrugation and connect it. This will help the sensor shut down the system if there is overheating. The corrugation, in this case, must be firmly fixed with tile adhesive.
Cabling
When assembling a heated floor under tiles, the installation technology of which will be indicated below, you must strictly follow the instructions without deviating a single step from them. This will allow you to assemble a system that will function correctly, without annoying breakdowns.
Before starting installation you will need:
- make notes on the existing surface, indicating a diagram of the future arrangement of elements;
- lay out the cable according to the created diagram (most often they use a “snake” type arrangement), maintaining a minimum distance of 7.5 cm between each turn. This parameter can be changed; in order to calculate it correctly, the area of the room is multiplied by 100, then the resulting figure is divided by the entire length of the existing cable;
- The elements need to be secured with a special installation tape; as a rule, it is included in the kit. If it does not provide the required degree of fixation, you should resort to using tile adhesive;
- after the installation of the cable is completed, one of its ends is inserted into the socket box, moving along a pre-made groove, it is connected to the thermostat.
Important! The elements must be laid strictly according to the scheme, carefully avoiding any kinks, excessive tension, damage to the system or the thermal insulation substrate.
When installation is completed, connect the temperature controller according to the diagram given by the manufacturer in the instructions.
Laying mats
Warm floors under electric tiles can be installed in the form of mats. You should begin installing them by determining the required amount of consumables. The easiest way to carry out calculations is to mark the existing plane with chalk.
First, determine those points where there will be no mats (locations of household appliances, pieces of furniture), this is important to prevent excessive consumption of material.
The mat installation technology contains the following steps:
- Start working strictly according to the chosen scheme.
- When creating a turn, the reinforcing mesh must be cut at the desired point. This must be done carefully to prevent damage to the network. Turns must be made in such a way as to avoid cable kinks.
- When the installation is completed, install all the elements of the control unit, strictly observing the color coding given by the manufacturer.
Cable floor
Electric cable flooring is usually installed in city apartments and country houses as part of a combined heating system. It is good where minimal screed or tiles with glue are planned (that’s why it is so often installed in the kitchen or bathrooms).
This heated floor in the house is not suitable for main heating, but it is good, for example, for heating in the off-season.
SubnusFORUMHOUSE Member
A cable to the floor is not heating, but additional heating with all that it implies.
An electric floor may use resistive or self-regulating cable. Resistive can be single-core or two-core (the method of laying a heated floor depends on this; two-core is much more convenient), self-regulating - only two-core.
| Variety | Advantages | Flaws |
| Single-core resistive cable. The unheated end is connected to the temperature regulator, the main cable is placed in a “snake” under the floor, the second unheated end is pulled into the initial connection and also connected to the thermostat. | The maximum heating temperature is several times higher than that of a two-wire one. Consumes little electricity. It's inexpensive. | A resistive cable has uniform heat transfer in all areas; overheating of the floor covering under the furniture is possible and the system may fail. It is better that there is no heating cable under large furniture - this will have to be taken into account during the design. |
| Two-core resistive cable. It is enough to connect it to the thermostat at one end. This is convenient for large areas and complex house layouts. | Easy to install, you can lay a highly complex heating channel. The voltage that passes through the wire does not affect the electromagnetic pulses. | |
| Self-regulating cable (two conductive cores are in contact with a matrix made of a special polymer material). | Depending on the temperature in the room, it independently changes the heating power. Well protected from mechanical impact. It cannot overheat due to the design features. It lasts a long time and almost never needs repairs. Compatible with any surface and under any furniture. You can make contours of different sizes (and less than 1 sq.m). Easy installation of heated floors. | Expensive. Special ballasts are required. Provides a comfortable temperature only on the floor surface and is not able to quickly warm up the room. |
When installing a resistive cable floor, it is important:
- calculate cable length
- pay attention to the material (brass, nichrome or copper). They have different properties and electrical resistance indicators
- strictly observe the permissible distance between heating elements specified by the manufacturer (usually no more than 12 cm)
- perform the calculations correctly - it is impossible to remove or add part of the wire at the installation stage
When making calculations, they usually rely on the following data (per square meter of room):
- Bedroom – 100-150 W/sq.m;
- Kitchen, hallway, corridor - 150 W/sq.m;
- Bathroom - 150 W/sq.m
- Balcony -200 W/sq.m
Filling the screed
After completing work with the underfloor heating system, you need to check how the system works. If no problems are observed, you can proceed to the stage of pouring the screed.
Important! When creating a system with mats, there is no need to lay a screed; you can immediately begin installing the tile layer.
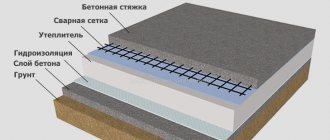
Lay the screed based on the following rules:
- first make a mark on the wall, which will tell you at what level the solution should be placed. Maximum – 5 cm, minimum 3 cm;
- the consistency of the solution should not be too thick; it includes sand, cement, water, plasticizer, crushed stone;
- the solution should be distributed evenly over the floor surface;
- after distribution, it is leveled with a roller;
- When the coating is ready, wait several days until it dries completely, only then begin laying the tiles.
Water heating systems
This system uses metal or polypropylene pipes. They are mounted into the floor, and heated water circulates through them. The connection is made either to a centralized heating system or to an individual gas boiler. To close the system, a circulation pump is connected.
Advantages of water heated floors:
- Cheap installation.
- Economical use due to the low cost of energy carriers - water and gas.
The main disadvantages of the water system:
- For the arrangement, a fairly thick screed is used, which will seriously increase the load on the interfloor ceiling.
- After all stages of installation, the floor will rise by 70–100 mm, which is quite significant for rooms with standard ceiling heights.
- Such warm floors are practically unusable in apartments, since many permits are required for insertion into a common riser, and not every management company will allow this.
- If the pipes are damaged, the neighbors' apartment below will suffer.
- There is no way to physically turn off individual areas, for example, if large-sized furniture is placed in a room, then the area under it will also heat up; you can only turn off the entire room.
USEFUL INFORMATION: Features of cleaning apartments after renovation