Passive methods of insulating a water pipe
It is necessary to take measures to prevent water in a pipe underground from freezing in a private house at the stage of building construction (laying communications). For this purpose, passive, that is, without the use of energy sources, methods of pipeline protection are used. These include:
- construction of a trench for the external main below the freezing depth by 15...20%;
- backfilling the trench and backfilling the pipe with crushed stone, expanded clay or other material that ensures rapid drainage of water leaking from the surface;
- the use of thick-walled large-diameter pipelines, creating a slope towards the well or well;
- organization of a heat-insulating layer around the pipeline and its connection points with intra-house communications;
- connecting the pipeline to the water supply and/or sewer system inside the house with easily removable elements - this will allow you to quickly check the pipeline for the presence of ice plugs and remove them.
Materials for thermal insulation of water and sewer pipes
Basic requirements for heat-insulating materials for passive pipe protection:
- minimum heat transfer coefficient;
- maximum resistance to moisture penetration into the insulator;
- resistance to environmental influences, chemical and physical (pressure, shock);
- durability;
- for hot water pipelines – the ability to operate at high pipe temperatures without loss of operational properties.
These requirements are met by insulating boxes made of polystyrene foam, polyurethane foam, basalt wool with or without an external protective layer. Metal foil and a polymer coating are used as a protective (and additional heat-insulating) layer. Glass wool and mineral wool are also applicable, however, the production of these materials in the form of a roll or mats requires the mandatory use of additional external winding made of roofing felt, polyethylene, and fiberglass. The comparative characteristics of insulating materials for external use are discussed in more detail in a thematic article.
Heat-insulating paint (coating) is considered an innovation in the construction market. It is applied using a sprayer, the thickness of the layer is regulated by operating conditions. This material is especially convenient in hard-to-reach areas and for restoring damaged fragments of thermal insulation.
In the case when thermal insulation is carried out after a long period of operation (pipes at the dacha are frozen, it is decided to insulate them), the material option is used that allows the conditions for laying the pipeline. So, for pipes laid directly in the ground, it is necessary to deepen and widen the trench in the area so that a layer of insulation can be laid. For fragments entering the house, straight and curved boxes made of insulating materials are used.
If there are no corner elements or their diameter does not correspond to the required one, the sectional cutting method is used so that the fragments tightly cover the pipe at the bend.
Features of cable heating protective systems
Application area
Systemic protection against freezing of pipes and maintaining the required temperature of pipes can be carried out both inside and outside the pipe.
Protection systems are used in such areas as:
- pipelines;
- industrial and domestic water supply systems;
- pipes inside buildings (in the basement);
- pipes that are located on the street (aboveground and underground).
What problems can the installed cable heating help solve?
To prevent pipes from freezing, an electrical cable is installed that solves the following problems:
- maintaining the viscosity of the product in the pipe;
- preventing the formation of ice jams, damage to pipes by ice and stopping the operation of the entire pipeline;
- maintaining a constant uniform flow of liquid in the pipes;
- increasing the transport speed of the product;
- preventing the release of solid fractions from the product transported through the pipeline;
- preventing the formation of condensate on the surface of the pipe.
How to choose the right elements of a pipeline protective system
Systemic protection of pipes against freezing consists of two main elements:
- heating cable;
- thermostat.
Advice: additional elements can be included in the protective system, for example, a special seal for inserting the heating cable into the pipe, auxiliary materials.
In order for the pipes not to freeze, and for the pipe freeze protection to work quite effectively, it is necessary to correctly select the heating cable with the required power.
Heating cable
To determine the specific required cable power in W/m for pipelines, several factors must be taken into account:
- pipe location;
- pipe type and diameter;
- the length of the pipe on which the heating needs to be installed;
- quality of thermal insulation (if present).
Tip: the larger the pipe (or the thinner the insulation), the more W/m required.
To prevent plastic pipes from freezing, the installed power should not be higher than 10 W/, and for metal pipes the power can be higher.
Advice: heating cables must not be used at temperatures above +40 C; at high temperatures, silicone cables can be used.
Tip 3 Melt the ice, don't heat the pipe
What if the water in a plastic pipe freezes? Here the above methods will be useless or even dangerous for the integrity of the pipeline. Therefore, it is worth taking a more careful route, which, by the way, is quite applicable to iron products. Before describing it, I will immediately note its main advantages:
- Absolute safety in relation to the pipes and the health of the person performing the defrosting process;
- High efficiency and clear results. The procedure may take quite a long time, but in the end you are still guaranteed success;
- Minimum financial costs. You may have to buy some things, but you definitely won’t need any expensive equipment;
- Ease of execution. You don’t need to have any special skills; it will be enough to accurately follow the instructions I provided below.
Sample of a suitable hydraulic level
Steel wire with a diameter from 2 to 4 mm. Calculate the length depending on how far the frozen place is from the point at which you penetrate the pipeline;
The simplest plastic bucket
- We take one of the ends of the hydraulic level and attach the edge of the wire to it so that the tube protrudes by 10 mm. You can simply wrap steel around the plastic, you can fix it with tape, the main thing is that the connection is strong and there are no sharp fragments sticking out of it that could damage the pipeline from the inside;
- We connect the other end of the measuring device to the outlet of Esmarch's mug;
- Now we begin to carefully push the edge that with the wire into the pipeline;
Scheme of implementation of the described procedure
In 60 minutes, this method can free up to 100 cm of pipeline and, as I noted above, without any significant risks.
There is also a way to destroy ice by inserting a bare wire into a pipe, but if you are an electrician, you yourself will guess how it works, and if not, then it will be too dangerous for you, which means it’s better not to focus on it at all
How to warm frozen water pipes 4 effective ways
When the outside temperature drops below normal and you notice that the water supply is frozen, do not rush to buy new pipes. There are proven ways to help you deal with this problem.
Using hot water
If you find or are 100% sure that a section of your water supply is frozen in an “open” place where you can use boiling water to heat the pipe, then use boiling water. Before doing this, take a rag and wrap the pipe around it. It will take all the water and increase the time the boiling water interacts with the pipe. Pour hot water until the ice completely melts. To speed up the process, you can turn on the tap.
Use a hair dryer
With the help of hot air from a hair dryer, the ice can be easily melted. Owners of such hair dryers recommend hanging plastic film over the heating pipe. This way, heat losses will be reduced significantly, which will allow the hair dryer to work more efficiently. You can also use a hair dryer with a steam generator.
Current
To do this, use a welding machine. To heat a pipe in this way, you need to connect one wire (plus) to one end of the pipe, and the second (minus) to the other end. In just a couple of minutes the ice will melt. The operating principle of this method is similar to a boiler. The advantage of using electric current is that only the water is heated. The transformer wires remain cold. This will prevent the plastic pipe from melting with the water. The downside of this method is that you need a transformer.
Find specialists
You don’t have to suffer on your own, but simply call professionals. They will have special means for warming up the ice. For example, a hydrodynamic installation. It cleans not only water pipes, but also sewer pipes. The installation supplies hot water under powerful pressure, from which the ice gradually melts. At high pressure, the ice in the pipe disappears very quickly.
Which method to choose is up to you. Consider your capabilities and ability to defrost the pipes yourself without incident. And if you doubt that you can do everything correctly, it’s better to call a specialist.
Constantly circulating water
When it is not possible to resort to technical sophistications, it is enough to simply leave a tap open so that the water constantly flows in a thin stream. The method is simple. Yes, it is not always justified because if water flows into the septic tank, it overflows, because... even the thinnest stream can turn into hundreds of liters per day. In this case, already purified drinking water is poured out. In addition, electricity is senselessly wasted on its supply. Another disadvantage of this method is that summer residents often simply forget to open the treasured tap. After all, the habit of keeping the water well closed makes itself felt. And this, as you might guess, leads to freezing of the water supply.
Is it possible to properly circulate water? Can. To do this, you need to duplicate the water pipe. The second one will be used as a return line. During operation, the pump pumps water out of the existing well, drives it through these two pipes and returns it back to the well.
To reduce the load on the pump, you can set a timer. With its help you can set the frequency of operation of the unit. For example, 1-2 minutes of work after 30 minutes of rest. At the same time, the water will not have time to freeze, and electricity will be saved.
When a liter of water freezes, 330 kJ of thermal energy is released. In terms of cotton wool, this amounts to 90 W*hours. Heat loss per linear meter of pipe is approximately 10-15 W.
When we know the diameter of a given pipe and the volume of water that is in it, we can calculate the frequency of pump operation with which it is necessary to replace cooled water with warmer water from the well.
The main question is how not to defrost a container of water
One of the popular old-fashioned methods for not defrosting a container of water is the use of logs. To do this, put the logs into the container. Today, instead of such logs, ordinary plastic bottles are already used. They are covered with sand, closed with a cork and left in a container with water for the whole winter.
There is another method to avoid defrosting a container of water. To do this, you need to dig a hole of 2 cubic meters. Next, cover it in two layers of polyethylene. It should be thick and durable. We lower a container of water into the hole and bury it. It is allowed to leave a couple of centimeters of the container on the surface.
Today, these two methods are the most common among summer residents.
Why does the water in the well freeze in winter? reasons
The only solution to the problem of freezing of the water intake source is thermal insulation of the shaft, cover, underground part of the pipeline and the rooms where the equipment is located. But, before starting work, it is necessary to find out why the water in the well freezes.
In severe frost it is impossible to quickly get rid of the ice shell
Main reasons:
- Shallow depth of the water table. If the water is above the soil freezing level, then there is a high probability that at an air temperature below -5 - -7°C the source will become unusable.
- Lack of insulation of the shaft walls. Concrete and reinforced concrete are heat-conducting materials. In cold weather, such walls quickly cool and the water freezes.
- Open head. A wooden house protects water well from the cold, but if it is not possible to equip a full-fledged house, you can get by with a homemade insulating cover.
Natural wood has excellent thermal protective properties: water does not freeze in such a well.
Incorrect laying of pipes in the ground, shallow trench depth. Even when installing an outlet pipeline below the ground freezing level, insulation must be used.
Water will freeze in a metal pipe without insulation.
Lack of thermal protection in places where the pipe is inserted into a mine or into a house above the ground, the position of the outlet is too high relative to the water surface.
Electricity
There are cases when the thickness of the water supply is only 20 mm, its length is about 50 meters, but the depth is about 80 cm (this is very small), and in places where excavation work is not recommended (on the roadway, for example). In such situations, utility services recommend waiting for a thaw - but this is not an option.
To defrost a plastic pipe in this case, you can use a homemade device. To assemble it, you need a plug for the socket, a two-core copper wire, a compressor and a hose for pumping out water. For our example, let's take a wire with a cross-section of 2.5-3 mm, an 8 mm car fuel hose and a car compressor or pump.
On a small section of the wire, the outer insulation is removed and the cores are separated. First, one of the wires is stripped of insulation, and the remaining insulated piece of wire is carefully bent in the opposite direction along the wire, trying not to damage the sheath. Now, almost at the bend, the wire is screwed with 3-5 tight turns of bare wire. Having retreated 2-3 mm from this place, the same manipulations are performed with the second core. Make sure that the ends of the two wires do not touch each other.
On the other side of the wire, a plug and a “bulbulator” are attached. Such a unit supplies electric current directly to the water, resulting in a reaction that releases a large amount of heat. What is also ideal in this case is that only the water is heated, while the wires remain cold, which does not threaten accidental burns of polyethylene pipes.
So, we push the wire into the water supply, making sure that it does not bend, until it comes into contact with ice. Next, turn on the device for a couple of minutes and wait until the ice begins to melt. After this, you need to turn off the device and try to move the wire further away. In a similar way, first defrost one meter of water supply.
Now it’s time to remove melt water from the pipe using a compressor to reduce the volume of heated water and avoid re-freezing of the pipe. If you have special equipment, you can weld a faucet onto the pipe, which can be closed as soon as water flows through the pipe. This will allow you to avoid flooding the work area with the plug and not pull the wire out of the pipe.
How to drain water from your home's water supply
Please check or ask the person who assembled the system, is there provision for draining water from your system? If you don’t find out from anyone, you can determine this yourself by the presence of taps on the hot water and hot water pipes at the very bottom of the system.
The easiest way to drain in this case (if it was provided during installation) is to simply open these taps.
But if the drain was not provided, you will have to use a compressor to blow air out of the system.
The compressor looks something like this:
In fact, the photo is of an industrial compressor. I just didn’t have a photo of the usual one. The most ordinary household compressor, which is used to paint the walls in the house, will do. Its size is approximately knee-length or slightly higher.
You probably had it in your closet after building your house, or you could ask a neighbor for it. In extreme cases, you will have to buy it. The cost of the unit is approximately 6 thousand rubles.
Now you need to decide whether you will drain the system yourself or call someone to help. For any of these options, the instructions below will be useful.
We use steam
And several more alternative options that use steam. It should be noted that they are used infrequently only because installations that produce steam are not cheap.
Steam generator
- Using a steam generator. Its hose is inserted into the pipeline, where steam is pumped.
- Using an autoclave. This is an installation that works by boiling water. The process itself is exactly the same as in the case of a steam generator. That is, a hose connected to an autoclave is inserted into the water pipe, through which steam from boiling water enters the route.
- Using a hydrodynamic machine. This is professional equipment, which is based on the process of heating water and supplying it under pressure inside the water supply line.
All three options are very effective. If the water entrance to the house or the entire route is frozen, then with their help you can warm up the pipes in a few minutes.
So, the answer to the question was given: the water in the house froze - what to do? The proposed technologies include very simple methods that do not require large expenses; there are quite serious options based on the use of special equipment. If the problem is not very big, then you can get by with small means. If everything is very complicated, then it is better to call specialists. They will not only solve the defrosting problem, but will also help prevent subsequent troubles.
Don't forget to rate the article.
Water in pipes freezes from the inside at temperatures below -7 degrees Celsius. When water freezes, according to the laws of physics it expands. This is the main reason for burst pipes in the winter season. Therefore, it is necessary to identify in advance places in the house where the temperature could potentially drop below -7 degrees and prevent freezing. After all, this temperature can easily freeze the water in the pipes in your home. When making a well or well, you need to think in advance about the water supply system for your home.
If, after all, the pipe is frozen and damaged, then it will have to be replaced. This is extra spending from your wallet. If the tube is simply frozen and there is no damage, then you can try to warm it up. Therefore, it is worth taking care of problem areas on the street underground where your pipes run.
You should check the basement of your home. If it is too cold in winter, then you should think about additional heating of the basement. Next, you should insulate all doors and windows to prevent cold air from spreading throughout your home. These rules will help prevent the temperature in the house from dropping and, accordingly, pipes from freezing.
In many houses, water supply is carried out through plastic pipes. If you find that your pipe is frozen in winter, you should warm it up thoroughly.
In order to do this, you will have to take:
- hardened steel wire with a diameter of 3 mm;
- long hydraulic level;
- enema;
- 100 liters of boiling water;
- metal bucket;
- wire cutters;
- two-core copper wire;
- a regular plug for a socket;
- pump;
- irrigation hose;
- a pipe with a tap at the end;
- 100 liter barrel;
- boiler.
First of all, make the wire straight. Prepare a hydraulic level. Wrap one end of the wire into a loop. Use electrical tape to connect the loop to the hydraulic level tube. The head of the level should extend 1 centimeter. Take electrical tape and connect the wire to the level for the entire length. Attach the remaining end of the hydraulic level to the enema. Now insert the wire with the tube into the plastic pipe where your water is frozen. Move it until you feel that you have hit the ice. Now introduce boiling water using an enema and push the wire inside the pipe. Place a bucket at the end of the pipeline to allow cold water to flow.
Next, remove the insulation from the copper wire. Make a few turns of the bare wire at the end. Make the turns in such a way that they are tight to each other. Use pliers to cut off the excess part. Bare the second part of the wire and wind it in the same way as written above. In the end, you will end up with a device called a “burbulator”.
Now push the wire into the frozen pipe again until you feel ice. Plug the burbulator into a power outlet and stretch the wire along the pipe. Use a compressor to gradually pump out the water. This will help you heat the water in the plastic pipe.
How to easily and simply get water from a well in winter
Many dachas are not supplied with running water. Their owners prefer to work the old fashioned way - walking to the nearest well with two buckets a couple of times a day. But if in summer such a walk gives pleasure to a strong, physically strong person, then in winter the situation is completely different. Even the most resilient person will hardly enjoy turning the ice gate, spilling water and sliding on the ice that always forms around the well in winter.
But this problem is quite easy to solve. All you need is a submersible pump. And, of course, this needs to be done in advance, when the ground is not frozen.
The pump is lowered into the well and connected to a well-insulated hose and, if necessary, a heating cable. For the hose you need to dig a deep and narrow trench - at least a meter and a half deep. You can find out the specific depth by asking experts how deep the ground freezes in a given region. It is advisable to choose a well located closest to the house. Then the excavation work will take a minimum of time, and you will have to buy less materials.
Installation diagram of a submersible pump in a well
The second end of the hose is led into the house and lowered into a large container, for example, a tank, 30-50 liters. Then it will be enough to run the pump a couple of times a day to fill the tank. On the one hand, such a supply of water will be quite enough even for a large family, and on the other hand, the flow of water through the hose combined with high-quality thermal insulation does not allow the water to freeze.
Some people even create their own water supply system by installing a water tank in the attic and connecting it to all the faucets in the house and the water heater. Yes, this system is much more convenient. But the high cost and complexity of the device scares off many people, especially if they live in the country only a few days a month.
And the method described above allows you to supply water not only to the house, but also to the bathhouse. Some people specifically connect two pipes to the main hose - one of them goes into the house, and the other into the bathhouse. Each pipe is equipped with a tap that allows you to open or close the water supply. This way you can fill the tanks in the sauna with water in a matter of seconds. Such a simple water supply to a bathhouse in winter can be a real salvation. There will be no need to walk from the well to the bathhouse with buckets to fill the tanks. You just need to open one tap, close the other and press the pump button.
Spraying with hot water
It’s worth noting right away that you won’t be able to simply pour hot water into the pipe - you’ll have to work hard. To supply hot liquid to the ice plug, you will need a flexible hose or thin tube. For example, if a plug has formed on a straight section of a pipe with a diameter of 25-30 mm, you can use a thin metal-plastic tube with a cross-section of 16 mm.
Having straightened the thin tube, it is gradually pushed into the water supply until it reaches the ice plug. Next, the supply of hot water begins. Melt water will pour out through the gap between the water supply and the working tube. To save money, this water can be reheated and applied to the plug to defrost it.
As the ice thaws, the metal-plastic tube is gradually pushed deeper until the plug is completely pierced. It is worth noting that on winding sections of the water supply you can only use a rigid hose instead of a pipe.
No. 6. How to defrost a sewer pipe?
Let us note right away that sewer pipes freeze much less often than water pipes , and this is a solid reason for joy. The fact is that warm wastewater continuously moves through them, but if it suddenly happens that the sewer system is frozen, try one of the following methods:
- if we are talking about a private house, and the sewer pipe is located shallow, then you can over the supposed frozen area . It will warm up the soil, and then the runoff. The process is lengthy; the fire will have to be maintained until the sewage system fully grows;
- if the ice plug is located near the outlet of the toilet or sink, try pouring a hot concentrated salt solution into the pipe (1 kg of salt per 10 liters of water). Such a solution freezes at a temperature of -220C , so it can melt the ice in the pipe;
- insert a heating cable into the pipe through the inspection hatch or toilet drain hole ;
- if other methods did not help, you will have to supply hot water to the place of ice plug formation through a hose, metal-plastic pipe or hydraulic level.
The method is described above. The most obvious drawback is that melted sewage can flow back . If a section of the pipe near the drain collector is frozen, then it is better to supply water not from the side of the house.
If independent attempts to defrost water supply and sewerage pipes are unsuccessful, then you can only rely on specialists who use special steam generators. These devices resemble car washing machines, only the output is steam, and its temperature and pressure can be adjusted depending on the material of the pipes and the length of the frozen area. This method is very fast and effective.
We use electricity
Another option that answers the question of how to heat water in a private house. Electricity is used for this. It is necessary to immediately make a reservation that the use of electric current is always dangerous. Therefore, it is not recommended to use this option for defrosting the water supply. But, as an alternative, you need to know it.
To do this, use a regular two-core wire, the wires of which must be separated and exposed to a length of 20 cm, that is, freed from insulation. The exposed wire is twisted to a size of 8-10 cm.
Now the prepared two-core wire is pushed into the pipeline until the ice plug. After which it is connected to a 220 volt power supply. The water inside the pipe begins to boil and defrost the ice. Essentially, the forked wire acts as a heating element. As it defrosts, it will need to be moved inside.
Heating cable against ice
The simplest and most affordable method of heating a frozen metal water pipe is to use. They are sold in stores and are inexpensive, so they are available to everyone.
Assembling the heating cable is very easy - there are instructions for this.
But it is worth remembering some nuances in using a heating cable:
- There is no need to constantly turn on this device - it is enough to use it only at night and when severe frosts are predicted;
- be sure to ensure that the heating cable does not completely “go” to the pipes - leave a small fragment for control;
- the heating cable is capable of heating pipes up to 40 degrees;
- This device can be used to defrost water pipes and prevent further freezing for both plastic and metal water pipes.
Please note: it is advisable to use heating drops immediately when installing the pipeline. The main thing is to choose the right type of cable based on your goals (the cable can be simple or with a self-regulating system).
Instructions for installing a heating cable in a pipe
- turn off the water;
- cut a thread into the corner section of the pipe;
- insert the cable into the embedded external thread;
- push along the entire length of the pipe;
- fit sealing rubber to the cable threads;
- place it on top and tighten the union nut, pressing the rubber tightly against the thread and cable;
- connect the heating cable to the electrical network (220) using a heat-shrinkable sleeve.
Installation of heating cable inside the pipe
Advice: when installing a heating cable, it is necessary to carefully calculate the required length of this cable, because it is forbidden to shorten it and it is impossible to lay it in loops inside the pipe.
How to warm plastic pipes
Traditional methods used to remove ice blockages in metal pipelines will not work on plastic pipes. You cannot light a fire near the pipe, use a welding machine, or try to insert a metal rod into the pipe (you will either not achieve any results at all or damage the pipeline). Only 2 methods are considered effective, which we will describe below.
Defrosting plastic pipes using a hair dryer
If the water supply is installed from plastic pipes, then under no circumstances should they be heated with an open fire - it is better to use a hair dryer. In this case, you should not count on a quick result, because... Plastic conducts heat very poorly.
If such a tool is not available, then you will have to resort to the old-fashioned method: the frozen pipe is wrapped in rags and boiling water is poured on them. It is necessary to achieve continuous shedding/warming of the frozen section of the pipe for 20-30 minutes.
Please note: before you start heating plastic pipes, you must open the tap - even slightly thawed water will find a way out under pressure
Pouring hot water into pipes
If a plastic water pipe is frozen, the most effective way to solve the problem is to pour hot water inside. It is necessary to find the junction of two pipe sections closest to the place of freezing, unscrew them and insert a hollow tube into the area of ice accumulation (a gas or oxygen hose will do). You need to supply hot water through it - it will act directly on the ice and quickly defrost it.
The ice has thawed a little, but there is still no water coming out of the tap? This means you need to move further - push the tube or try to direct a stream of boiling water into the middle of the ice plug. After the water comes out of the tap, you can put the system back together. If the freezing area is located at the entrance to a house or garage, then you can insert a tube supplying boiling water into a section of the water supply that is located indoors.
You can also use an Esmarch mug to defrost water pipes. You will need a hydraulic level, steel wire with a diameter of 2-4 mm (we wrap it around the hydraulic level tube) and a medical device used for cleansing enemas (Esmarch's mug). The pipe defrosting diagram is shown below:
It will take a long time for the water supply to completely defrost: in an hour of work, you will free approximately 0.8 - 1.0 m of pipe from ice.
How to avoid freezing pipes
But what if it is impossible to bury the pipe below the freezing depth? For example, the site may have rocky soil that is difficult to develop. Also making it difficult to penetrate are structures buried in the ground - reinforced concrete slabs, foundations, communication routes that cannot be penetrated or bypassed.
The slope should be
The most common reason is high groundwater level. The soil on the site can be so damp that water begins to appear literally at a depth of two shovels. It is not possible to dig a 1.5-2 m trench and lay a pipe there.
Important. For these cases, various methods of installing a pipeline with insulation are provided. They will help prevent water from freezing even when laid at a very shallow depth.
Thermal insulation with “shells”
Manufacturers produce shells for pipe insulation from various materials - polyurethane foam, foamed polystyrene, mineral wool. PPU and PPS shells are used for laying in the ground. They reliably protect structures from freezing, do not rot, and do not corrode in a humid, aggressive environment.
Good pipe insulation
For ease of installation, some products are equipped with a tongue-and-groove lock. An additional outer layer of foil reflects heat rays and reduces the likelihood of channel freezing.
“Shells” are produced in a wide range of sizes and shapes, so choosing suitable thermal insulation for communications, even of complex configurations, is not difficult. During installation, the shell is placed on the water conduit and additionally secured with fastening tape.
"Pipe in pipe"
This method is often used when laying pipes outdoors: at the entrance to the house or between nearby buildings, for example, a cottage and a bathhouse. The method provides not only good thermal insulation, but can also be useful if an ice plug has formed in the water supply. Hot water is poured into the gap between the pipes and patency is restored in a matter of minutes. Everything is convenient and practical - no need to look for a blockage or dig a hole in frozen soil.
So very convenient
For installation using the “pipe in pipe” method, non-pressure plastic sewer pipes with a diameter of 110 mm are used. The water pipe can first be wrapped with thermal insulation, and then inserted into the channel. A good insulating effect is achieved by using polyurethane foam (polyurethane foam), which is pumped into the gap between the pipes, having previously made holes along the length every 30-35 cm.
To minimize heat loss, the design is made even more multi-layered. It may consist not of 2, but of 3 pipes. If in such a “box” you additionally install thermal insulation from some porous material, for example, foam rubber or a substrate for laminate flooring, the pipeline will not freeze even in the most severe frosts.
Foil materials
Effective thermal insulation of water supply and sewerage systems - cylinders laminated with foil or foamed polyethylene films with a metallized layer. The materials reduce heat transfer to the surrounding space by reflecting infrared rays from the metal surface into the pipe.
The insulation is very convenient to use
The products consist of layers of insulation and aluminum foil. The thicker it is, the stronger and more resistant to damage. Mount the films with the foil side facing out. When laying, use a special metallized tape, carefully sealing all joints with it.
Heating cable
Cable pipe heaters are becoming increasingly popular in private buildings. They are installed both outside and inside water supply networks.
Laying can be carried out not only at the stage of laying communications, but also along already buried pipelines. This is often the most acceptable way to get rid of regular freezing without laborious dismantling of pipes.
Example of heating element installation
To heat water supply and sewer networks, a polyolefin-coated cable is used, which is resistant to aggressive environments and mechanical damage. When laying wires inside the pipe, products with insulation made from food-grade fluoroplastic are used, which is safe for health and does not change the taste of drinking water.
Visual diagram
According to the type of regulation, cables can be self-regulating or resistive, the latter can have one or two cores. The temperature regime and power level are selected depending on the pipe diameter and purpose.
Installation is carried out in the following ways:
- spiral winding;
- installation outside along the pipe;
- internal gasket.
Self-regulating cables are able to change the degree of heating with temperature fluctuations. The colder it is, the higher the power consumption of the product. Sold in coils of measured length, you can cut the required amount.
Resistive heaters have constant parameters that do not change depending on environmental conditions. Manufactured in fixed length sections. If you need to cut the conductor, you will have to apply the coupling yourself.
Important. When laying a heating cable, it is advisable to carry out insulation so as not to waste heat on warming the surrounding space.
In order to save energy, you can turn on the power only when the pipe lumen is blocked with ice, and do not use heating the rest of the time.
Video - installation of a self-regulating heating cable inside a pipe
Thermal insulation paint
Liquid insulators are new generation coatings. Thermal paint creates a thin protective layer on the surface of structures, replacing traditional insulation several centimeters thick.
This effect is explained by the very low thermal conductivity of the composition. It contains tiny balls of glass, ceramics or polymers with a vacuum inside, which effectively prevent heat transfer. The content of heat-insulating microspheres reaches 80%, the rest of the volume is occupied by an acrylic or latex binder.
The paint is applied with a brush to the surface of the pipe in several layers. According to manufacturers, the service life of the coating reaches 12-40 years.
Application of insulator
Ready-made thermally insulated pipes
You can significantly simplify your task if you install pipes in a factory-made protective shell. Manufacturers produce products for plumbing, sewerage and heating installations with one or more functioning channels, as well as an additional heating cable. Insulated communications can be installed both outside and inside the house.
Pipeline ready for installation
The corrugated coating provides design flexibility, which greatly simplifies the process of laying even complex pipeline configurations with a small radius of curvature. To avoid shell deformation, the installation technology provides for the installation of a soft sand cushion. A special adapter is used to connect to a regular pipe.
How to measure battery temperature correctly
When the issue with the coolant is clarified, you can think about how to measure the temperature of the battery in the apartment. This is easy to do in the following ways:
- Use a regular household thermometer. You need to apply it to the battery and wait until it warms up. To account for the error, it is better to add 1-2 degrees to the data obtained.
- Use an alcohol thermometer, attaching it to the radiator with tape, and then insulating it with insulating material, such as foam rubber. The information obtained by this method is indicative in dynamics. The device can be left for a long period to continuously monitor the situation.
- Use an infrared thermometer. In practice, they have a small error, and do not require direct contact with the heating device. And the result is given instantly.
- Use an electrical measuring instrument with a thermal ramp and sensor. The sensor is installed on the battery, and when the “measure temperature” function is selected, the device displays its value.
How to find out the temperature of the coolant in the batteries
When doubts arise about the quality of the heating services provided, and the inhabitants of the apartment simply begin to freeze, measures should be taken to determine the cause. To do this, measure the temperature:
- air in the room;
- pipes;
- batteries;
- coolant - water in the heating system.
The data obtained will help you understand whether the room is really unreasonably cold or whether it is just a subjective feeling.
It must be taken into account that independent measurements of heating indicators are not direct evidence of violation of standards. However, they can serve as a basis for filing a complaint and inviting representatives of the service organization for control measurements
Determining the water temperature in the central system
It should be noted that reliably measuring the temperature of the coolant in a central heating system is not so easy. The most accurate indicator remains only the air temperature in the room. However, you can do the following:
- Open the tap if it is installed on the radiator in the apartment.
- Place a container under it, after placing a thermometer there.
- Collect water.
- Wait for the final thermometer reading.
This indicator must comply with the described standards, but upward deviation from them is also allowed. The maximum temperature deviation is up to 4 °C.
In addition, if air is detected in the heating system of the apartment, you should contact the service organization.
Determining hot water indicators
There is another way to establish the truth, related to the fact that the temperature of the heating batteries in the apartment and the hot water supply are directly related. Therefore, it is advisable to measure the water degree like this:
- Open the hot tap.
- Wait 3 minutes for the water to heat up to maximum.
- Take a container and place it under the stream without closing the tap.
- Place the thermometer in the center of the container.
- Wait for the final readings from the device to be received.
If the device shows a number from 60 to 75 °C, everything is normal with the coolant. If the temperature data is lower, it is possible that the water in the heating system is not heated enough.
Temperature standards for the heating system in an apartment building
The heating circuit in apartment buildings is built in cooperation with a centralized system to which the pipes are connected. Through them, the coolant is directed to the apartment building, where its further supply is regulated by inlet valves. After this, the water goes through the risers and eventually ends up in the radiators and radiators of each apartment.
The described processes, as well as everything related to the rules for providing the population with utility resources, are reflected in the Decree of the Government of the Russian Federation dated May 6, 2011 No. 354 “On the provision of utility services to owners and users of premises in apartment buildings and residential buildings” (hereinafter referred to as Decree No. 354). Heating quality requirements are set out in Section VI of Appendix No. 1 to the rules of Decree No. 354.
In addition, detailed rules for the provision of heating services are prescribed in the Order of Rosstandart dated June 11, 2014 No. 544-st “GOST R 51617-2014. National standard of the Russian Federation. Housing and communal services and management of apartment buildings. Public utilities. General requirements" (hereinafter - GOST R 51617-2014) and "GOST 30494-2011. Interstate standard. Residential and public buildings. Indoor microclimate parameters”, approved by order of Rosstandart dated July 12, 2012 No. 191-st (hereinafter referred to as GOST 30494-2011).
These acts establish the parameters of the coolant for the heating system of an apartment building. Thus, the temperature of the coolant (water) when supplied to the system is equal to the temperature of the water when it leaves the heating boiler. As a rule, the coolant should be brought to a temperature of 130-150 °C, but this indicator also depends on the outside temperature in the region.
Typically, the water leaving the boiler should have a temperature of 115 °C.
However, the standard temperature in the heating system can be within 95 ° C or 105 ° C (for different systems).
Next, to create comfortable conditions in the room, the proper condition of the parameters of the riser, which conducts water from the heating unit to the apartment, is ensured. They vary depending on the summer and winter seasons.
Of course, in practice, the temperature of the coolant in the riser depends on the operation of the thermal power plant and on heat loss on the way to the house. However, the riser temperature in winter should be in the range of 70-90 °C.
How to defrost a plastic pipe indoors
When we say that plastic pipes indoors are frozen, this means that there is easy access to them. For example, they can be located in the attic or basement, that is, in places where there is no heating.
In this case, the defrosting process can be performed in several ways:
Using hot water. The frozen area is wrapped in cloth and watered with hot water. The operating time depends on the length of the ice plug. The defrosted pipe must be covered with insulation to prevent it from freezing again.
- Using a construction heat gun. A stream of warm air is directed from the hair dryer to the surface of the pipe. Despite the high efficiency of this method, such work is considered dangerous. If the air is too hot, the PVC may simply melt. Therefore, the temperature of the hair dryer must be set to minimum.
- Using electric heating. The metal-plastic pipe is wrapped with an electric heating wire, which is connected to the electrical network. The wire is wound in turns. If there is a small frozen area, defrosting occurs quite quickly. Warming up a plastic water supply takes up to 3 hours.
Heating cable for water pipes
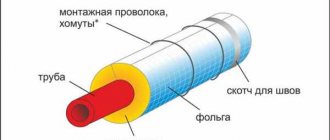
This method of protecting pipes from freezing has been used relatively recently. Here the main element is the heating cable. In this case, it can be located either on the outside of the pipe, enveloping it, or inside the water supply. In both cases, the part of the water supply system element that needs additional thermal insulation is pre-wrapped with a layer of foil. This will minimize possible heat loss.
Cable heating systems are ready-made kits consisting of wires of different lengths, with a certain power, a plug at one end and a thermostat at the other end of the cable. The thermostat ensures that the pipe is heated at a given temperature and can independently turn on or off the heating system within a given temperature range. Many kits also include a thermostat that allows you to control temperature and energy consumption.
The main advantages of a cable heating system is the ability to install it both on pipes running underground and on the surface, while on average the energy consumption of the heating system is small - about 15 W/m, and above all, depends on the expected minimum air temperature and thermal insulation pipes.
Options for installing a heating cable on a pipe
However, it is important to remember that if the power supply is cut off, the heating system also stops functioning. The occurrence of such a situation must be foreseen in advance. To ensure uninterrupted power supply, it is worth purchasing and installing an additional autonomous power generator.
The most famous and popular manufacturers of cable heating systems are companies such as Ebeco, Tyco Thermal Controls, Ensto, Nelson EasyHeat, Raychem, Nexans, Special Systems and Technologies, etc.
Heating cable for water pipes | Heating cable for water pipes |
External location of the heating cable
The heating cable can be located along the pipe in one or more lines.
Another option for placing the heating element is in a spiral along the pipe. When installing the heating cable, it is necessary to ensure that the cable pitch is uniform.
The heating cable is placed in a wavy line along the pipe if the length of the cable is too long for the linear method of placement, and insufficient for the spiral method.
Installation of the cable on the surface of the pipe: 1. Temperature sensor 2. Heating cable 3. Water pipe 4. Adhesive tape 5. Thermal insulation
Internal arrangement of heating cable
When placing the heating element internally, a cable with a special coating is used. The top layer of the cable allows this method of pipe insulation to be used in drinking water pipelines. It should be noted that when using a heating cable there is no need to place the water supply system at great depths.
As a rule, the heating cable is installed inside the pipes if it is not possible to lay it outside. For internal installation, cables use special kits designed for installation in water pipes with a diameter of 1/2″ to 1″.
Tip 2 Use an artificial temperature increase against ice
Heating a pipeline from freezing with your own hands by increasing its temperature is only possible if it is made of metal. You will only damage the plastic structure. And taking into account the fact that frozen liquid tends to expand, it is advisable to react quickly before the pipes burst.
Whichever of the methods listed below you choose, you should follow some general rules to avoid unpleasant consequences of your activities:
- Before starting work
, open the water tap so that the melted water has somewhere to move; - Do not heat the frozen area from the middle
. After all, again, there will be no way out, and no one knows what this will lead to; - Heat the water supply system from the tap to the riser, and the sewage system, on the contrary, from the riser to the tap
. This will also ensure a controlled outflow of melt water; - First of all, examine the place of freezing, evaluate it and select the optimal warming method
.
Boiling water
This elementary and incredibly cheap method is suitable even for plastic products, since polypropylene pipes, which are least resistant to high temperatures, can withstand heating up to 90-100 degrees Celsius. But it has two important disadvantages:
- Can only be applied to open sections of the pipeline. If crystallization occurred, for example, underground, then you simply won’t get there with a kettle;
- Low efficiency. Frankly speaking, there is little benefit from pouring boiling water over pipes. Unless we are talking about a very small ice plug in a thin product.
Blowtorch or industrial hair dryer
The action plan here is simple:
Turn on the device; We methodically move an outgoing stream of hot air or flame over the frozen area, observing all the above precautions.
The efficiency in this case, of course, increases significantly in comparison with the method described above, but access is still limited only to visible gaps in the highway.
Electricity
If you took the trouble to install a heating cable at one time, then to remove ice from the pipeline using electricity you will only need to turn on the appropriate toggle switch. But if you haven’t done this, then you need to get a welding machine somewhere and make the pipe itself a heating element. After all, everyone remembers that metal heats up when an electric current passes through it?
The instructions for defrosting the object in this case will be more complex:
- We connect the terminals to the edges of the proposed ice plug. It is noteworthy that here it is enough to have only some points of the pipeline open, and not the entire freezing zone, which significantly expands the capabilities of the described method;
- We set the power on the regulator to the minimum;
- We click the power switch and let the device work for thirty seconds;
- Then turn it off for a minute to let the equipment “rest.” Burning it down is a simple matter, but very expensive;
- We repeat the procedure several times. If there is no overheating of the pipe during the process, then the power can be increased;
- After thawed water begins to drip from the tap, we warm it up a few more times, and then turn off the device completely. It is not at all necessary to completely melt the ice; it is enough to make a gap in it so that the rest can be completed by the water flow;
- You should not close the tap for a while longer in order to clean the pipeline as best as possible from any remaining icing.
How and how to insulate and cover a well on the street outside for the winter
MBFT-75 Membrane for 75GPD
SF-mix Clack up to 0.8 m3/h
SF-mix Runxin up to 0.8 m3/h
Since the source of water implies constant dampness, for thermal insulation it is necessary to choose moisture-resistant materials that at the same time can withstand exposure to extreme temperatures.
In the southern regions, where there is no strong negative drop in degrees and the winter period is generally short, you can use natural materials for thermal insulation: straw or fallen leaves, as well as sawdust.
If the system goes outside and pumping equipment is installed near it, then the entire assembly is hidden under a wooden box, which, in turn, is covered with a waterproof cloth on top.
If your suburban home is located within a region with a cold climate, then the thermal insulation process needs to be taken more seriously. The pipeline is covered with materials made of polystyrene foam, polyurethane or foamed polyethylene. These products are made into special sleeves or shells. However, Penoplex is recognized as the best option. Inside, the system can be protected from the cold using rolled polyethylene foam with a foil coating. It is not recommended to use mineral wool, as when in contact with water they lose their insulating properties.
Another proven material is polyurethane foam. This is a high-quality product that is placed on the walls of the caisson and pipeline using special equipment by spraying.
Polyurethane foam is also a waterproofing coating. Therefore, the borehole source can be considered additionally protected.
Thermal insulation materials
This option is not the main, but rather an additional method for insulating a well in a private house. They can be used along with a heating cable, and in the southern regions - alone.
The most common materials for thermal insulation:
- Polystyrene foam and similar products. Such synthetic materials contain at least 95% air, due to this they have low thermal conductivity. Rigidity and the ability to poorly absorb moisture are qualities that allow the use of this synthetic material and its varieties for thermal insulation.
- Foamed polyethylene. It consists of sheets or cylindrical shells. The main purpose of application is to insulate the internal parts of underground chambers. In this case, external materials are not used, as they can lead to compression of penofol (another name for polyethylene) and reduce its thermal insulation properties.
- Mineral and glass wool. This option is more suitable for use when preserving a pumping station for the winter, since glass wool absorbs moisture well, and therefore is not suitable for a humid environment. The material is compacted tightly into a special house or box where the protruding part of the outer part of the casing pipe is hidden.
- Other products. There are less common options, for example, penoizol. They are used infrequently, since their commissioning requires special equipment and the use of certain technology. The process looks like this: a special composition is applied to the desired elements, which subsequently hardens, forming a porous structure.
Here we can also mention expanded clay - a granular concrete filler. Lightweight and porous, it has good thermal insulation properties, and due to its low cost it has gained popularity as a reliable building material.
Well protection from freezing: choosing a heating cable
AMETHYST - 02 M Residential building for up to 10 people or up to 2 cubic meters/day.
Aeration unit AS-1054 VO-90
Main table dispenser AquaPro 919H/RO (hot and cold water)
We have already said above that, among other things, heating cables are used to protect against freezing. They are divided into types: resistive and self-regulating. In the first case, everything works like a spiral, and in the second, the equipment adapts to the ambient temperature and changes its mode depending on this.
You can also place the cable in different ways - inside and outside the pipeline. External placement involves the use of additional insulation, such as a shell.
Self-regulating cables are the most reasonable option. Compared to resistive ones, they are not much more expensive, but at the same time they have proven to be more efficient in their work.