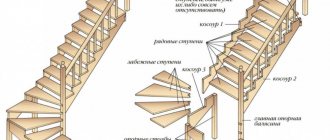
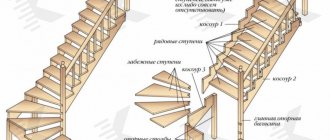
Sliding gates: main types
There are three types of sliding gates. We will consider the design features, their advantages and disadvantages below.
Sliding gates can be either automatic or manually operated
Beautiful sliding gates will highlight the style of your property
Hanging gates
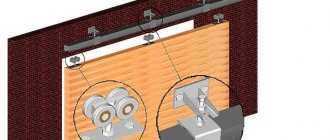
A design that became widespread in the old days in industrial enterprises. This is a fairly massive, but at the same time reliable structure, in which the door leaf (gate) moves on roller carts along a beam located above the passage (Fig. 1).
Rice. 1. Diagram of a hanging gate
The advantages of this design include its high resistance to wind loads, the ability to resist burglary, and the absence of restrictions on the width and height of the door leaf. The disadvantage is the high metal consumption of this design, which determines its high cost. But the main disadvantage is the height limitation of transport through such gates; it is determined by the height of the guide beam.
Hanging gates
Rail gates
The simplest and most reliable design of sliding gates, in which the gate leaf moves along a lower rail installed flush with the road surface (Fig. 2).
Rice. 2. Diagram of sliding gates on a rail
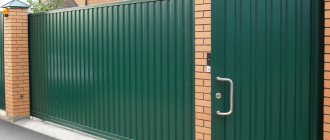
Such gates are attractive due to their simplicity of design, high reliability and resistance to wind, and the ability to close very wide (up to 6 m) openings. The design allows the installation of a powerful frame and heavy cladding that can withstand a ramming strike (which is why such gates can often be found in military units and correctional labor colonies). Their main drawback, which is especially pronounced in our latitudes, is the need to constantly clean the rail, which is especially problematic in winter, when water can freeze in the rail after thawing.
Rail type sliding gates
Beautiful sliding gates with decorative wrought iron elements
Sequence of installation work
Installation of the canvas is carried out only after the concrete has completely hardened. First of all, the roller mechanism is mounted. It is recommended to place the supports as wide as possible. But between the pillar and the support there should not be less than 25 cm.
To ensure against incorrect installation of the blade, you need to install special adjustment stands. They are attached by welding directly to the channel. Then the canvas is rolled up and its final adjustment occurs strictly horizontally.
During this procedure, the blade and roller supports are removed, and the adjustment pads are welded to the grille. Next, the gates are mounted on them, and the structure is closed. The correctness of its location is checked using a level.
When the mechanism is adjusted, it is the turn of the end roller. It is placed in a supporting profile and secured with special bolts. For maximum structural reliability, it is recommended to use a welding machine.
It is advisable to install a plug on the profile that will protect the mechanism from debris getting into it. Then you can work on the bracket, which is attached to the top of the structure. Moreover, the holes for the bolts should be turned towards the support.
The completion of the stage will be fixing the bracket on the pole and checking its adjustment.
The final touch is the gate trim. The most budget option would be lining or corrugated sheeting. Individual finishing elements are attached to the sheathing using self-tapping screws.
And you need to start from the front of the gate. Then the lower and upper catchers are installed.
The first is when the gate is closed, and the second is attached opposite the corners of the door, preventing them from touching. Now all that remains is the queue for automation. At this point, the installation of sliding gates is considered complete.
Console gates
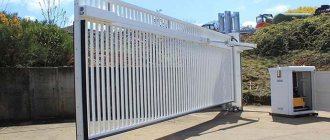
Their design managed to get rid of the disadvantages of both hanging gates (there is no height restriction for vehicles) and rail type gates (no contact with the ground). The door leaf of this design moves with the help of cantilever roller blocks along a guide beam. Most often, the main structural unit - roller blocks and a beam - are located at the bottom of the gate (Fig. 3), this location is caused, first of all, by the ease of its installation.
Sliding gates in a modern style
Cantilever gates, due to the absence of guides at the bottom and top of the opening, allow vehicles of almost any size to pass through
Much less common are cases where roller blocks and a guide beam can be located in the middle of the web (Fig. 4), and even on top (Fig. 5). This arrangement is justified in the case when it is possible to place the cantilever units, the main mechanical part of the sliding gates, on the main wall of the building (structure, structures), which are capable of withstanding the loads created by the gate leaf. This makes it possible to reduce the cost of constructing individual power structures for gates.
Rice. 3. Scheme of cantilever gates
Rice. 4. Diagram of a cantilever sliding gate with a cantilever assembly located in the middle
Rice. 5. Diagram of a cantilever sliding gate with a cantilever assembly located at the top
In addition to the absence of height restrictions, cantilever gates have a number of other advantages. First of all, the design of sliding gates involves the location of roller trolleys inside the welded beam, which completely protects them from snow and dirt, which means that natural factors do not affect the stability of the gate mechanism. The use of sealed plain bearings in roller carriages eliminates the need for periodic lubrication - lubricant is applied at the factory.
Spectacular sliding gates
In addition, cantilever gates fit very tightly to the fence, compared to other types of sliding gates, without leaving even a gap for the overly curious. And one more important point - the easiest way to install automation is on cantilever gates. Among the disadvantages, it should be noted that the design of the gate is very difficult to install, and, in addition, to install this type of gate, the fence must have a free section, 1.5 times longer than the length of the gate.
Gates are an important element of the architectural ensemble of your home.
Stylish modern sliding gates
Kinds
Sliding gates are divided into three types:
- hanging;
- sliding on rails;
- console
The first ones were previously installed in enterprises, but recently even there they have become a rare occurrence. This is due to two reasons: high cost and height restrictions on entry. Among the advantages is the high level of reliability of the design itself.
The second type of gate has the simplest design, but due to the climate in most Russian regions, they are not so popular, since due to temperature changes, ice and other situations, opening and closing them can be, if not impossible, then very complicated.
But the console system of all types is considered the most successful and simple. Their design is the most complex of all, but very reliable. The condition for their installation is that there is space along the fence so that the gate has somewhere to move when opened. If for the first two types of gates a length equal to the door leaf is sufficient, then to calculate cantilever gates this figure should be increased by one and a half to two times.
Installation of sliding gates
To install sliding gates on a site, a number of requirements must be met:
- sliding gates can only move in a straight line, so in the required area the fence must also be straight. Moreover, the length of this straight section of the fence, as mentioned above, should be one and a half times greater than the width of the canvas. This is due to the fact that in addition to the door leaf itself, cantilever gates have a so-called technological part, which acts as a counterweight and makes it possible to reduce and evenly distribute the load created by the gate onto the cantilever block (Fig. 6)
Rice. 6. Placement of cantilever gates
- any uneven terrain (slope or bumps) will create great problems for the free movement of the gate, significantly increasing the load on the automation
- the gates are installed on the side opposite to the direction of the gate rollback, otherwise they will simply be blocked when the gate opens
- if automation for sliding gates is installed, you should immediately provide for where the power cables will be laid
Stunning metal sliding gates
Advice! A ready-made kit for sliding gates (Fig. 7) (roller trolleys, guide rail, pipes) can be purchased in the store, but please note that it is designed for a “European standard” - a gate 4 m long.
Fig.7. Accessories for sliding gates
Sliding gates can be installed both on a finished fence and during its construction. A drawing of the sliding gate is shown in Fig. 8.
Rice. 8. Drawing for the manufacture of cantilever sliding gates
Laying the foundation
The foundation is laid along the fence on the side where the gate will open. Foundation parameters:
- depth – 1 m (to the depth of soil freezing)
- width – 30-40 cm
- length – half the length of the gate leaf (if the gate is 4 m long, then the foundation is 2 m).
Sliding gates with original supports
A harmonious combination of styles of a modular house and its sliding gates
After the trench for the foundation is ready, its metal part is made. To do this, on a metal channel (its length is equal to the length of the foundation, width - 16-20 cm), 8-12 legs made of a metal rod or reinforcement with a diameter of 10 - 16 mm are welded along its entire length (Fig. 9)
Rice. 9. Scheme for manufacturing the metal part of the foundation
The finished channel with legs is placed in a trench (legs down) and filled with concrete (Fig. 10) flush with the channel, time is given (at least 7 days) for the concrete to completely set.
Rice. 10. Concreting scheme for installing sliding gates
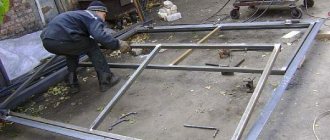
Manufacturing of gate leaves
While the concrete is setting, we make the frame. To do this, the guide rail (6 m long) must be placed on a flat surface with the cut down and a profile pipe (60x30x2 mm) must be welded - 2-3 cm tacks, the distance between them is 20-25 cm. Then we install and weld vertical posts onto this pipe (pipe 60x30x2 mm), be sure to maintain a right angle. Then the top pipe (60x30x2 mm) and the counterweight triangle are welded - the outer frame is ready. All that remains is to weld the inner pipe (40x20x2 mm) - and the frame for the sliding gate is ready. Now you need to sand the corners, prepare (clean and degrease) the metal elements for primer, apply the primer and paint the frame.
Decorative rail gates
For greater savings, you can install sliding gates yourself
Advice! Covering the frame begins after the paint , using corrugated sheeting (metal or plastic), wood, metal sheets, etc., which, depending on the material, can be secured with dowels or screws.
Sliding gates made of stainless steel
DIY sliding gates: photo report with explanations
These gates are made on the basis of a ready-made kit; they made the frame themselves and installed it themselves
The gates were installed in Moscow, and accordingly the prices were in the capital. They were installed in 2010, since then the kits have become much cheaper. For example, the “fresh” price of a drive for a blade weighing no more than 400 kg (there are up to 1.2 tons) is about $100, but this is a budget option. During construction, components from Rolling Center (the best on the market at that time) were purchased with a 6-meter long drive beam. The upper catcher and bracket were also ordered separately. Everything with delivery cost about $600.
The following materials were also purchased:
- profile pipe 80*60 mm - 6 m, 60*40 mm - 18 m, 40*20 mm - 36 m;
- channel - 180 mm - 3 meters, 200 mm - 2.4 meters;
- reinforcement 12 mm - 6 m;
- electrodes - 2 kg;
- paint - 3 cans, brushes, rivets;
- cement M-400 - 5 bags;
- The corrugated sheeting was purchased during the manufacture of the fence.
Sliding gate diagram with dimensions
The first step was to weld the frame for the gate with a counterweight. The frame (black) was made from a 60*40 mm profile pipe, the lintels and internal frame (lilac) were made from a 40*20 mm pipe. A guide beam is welded at the bottom with the cut down.
How the frame was cooked
The inner frame was welded with an indentation from the edge - 20 mm on each side. This makes it more convenient to attach the corrugated sheet later; if desired, you can also sheathe it from the inside.
How to weld a 40*20 mm profile pipe
First the foundation was poured. Reinforcement was installed in it, with a channel on top with the back facing up. Close to the channel there are two racks made of profiled pipe 80*60 mm. One post is adjacent to the post, the second is set vertically at a distance of 120 cm. Rollers are then hung on them, which hold the canvas from above. On the other hand, a 180 mm channel was installed along the return post.
A 180 mm channel was attached to the return post
On-site fitting
On the counter part, catchers are attached to the channel at the top and bottom, which will prevent the gate from dangling in the wind.
Stops installed on the receiving post
Upper and lower catchers
The next step is to install the roller plates. They are attached to mortgages. In this case it is a channel, so the space turned out to be large. When the foundation was made, it was made too high, so the plates were welded directly to the mortgage. This is impractical: if the roller breaks, changing it will be problematic. Usually a platform is welded, to which a platform with rollers is then bolted.
The roller platforms were welded and the rollers “ran over” them
The finished gate frame is simply rolled onto fixed rollers.
Photos of the sash on rollers from different angles
After installation, plugs are placed on both ends of the support beam. On the far side, a thrust wheel is installed, which in the closed position drives into the lower catcher, lifting the gate and removing the load from the rollers.
Installing the plug and thrust roller (the beam is upside down in the photo)
Now, to prevent the gate from “walking” in the upper part (they are currently not secured by anything), sets of upper rollers are attached to the posts (80*60 mm) - one per post. They are practically put on the frame. Now the rollers inside will hold it up.
The upper rollers are attached to the posts, gripping the top edge of the gate
This is what the installed top rollers look like
That's it, the sliding gates are assembled with your own hands and ready for use.
What sliding gates look like from the yard
If you have any questions, watch the video. It assembles a ready-made kit, the whole process will become clearer.
Mechanism installation
The installation of the sliding gate mechanism begins after making sure that the foundation is completely frozen. To accurately install the roller carts (to prevent them from moving), they are secured to the channel with the side part, and then a guide rail is placed on them. After this, the canvas is placed both along the fence line and level, and when finished, it is secured by welding.
Installation of sliding gates in most cases can be done by yourself
After this, the gate catchers (upper (Fig. 11) and lower (Fig. 12) are fixed to the supporting posts, for which the gate must be rolled out until it is completely closed. The lower catcher allows you to partially remove the load from the roller block and thereby increase its service life, and the top one - does not allow the gate to swing under wind load.Supporting rollers are attached at the top (Fig. 13) - they allow you to maintain the verticality of the door, thereby making the movement softer and easier.
Rice. 11. Upper gate catcher
Rice. 12. Lower gate catcher
Rice. 13. Support rollers.
Do-it-yourself sliding gates - see the sequence of operations and recommendations from professionals in the video:
Foundation arrangement
First you need to prepare the hole. Its parameters directly depend on the width of the opening. An embedded part made of a two-meter channel and reinforcement bars is installed into it.
They are immersed in a hole one and a half meters, and then reinforcement is attached to the rods using a welding machine. Moreover, the longitudinal rods are installed first, and then additional crossbars are attached across.
The result is a reliable grid. If you plan to install an automatic system, you will additionally need to provide space for pipes and a hole for the cable.
The finished grate is lowered into the pit, and the channel must be installed horizontally, along the line of movement. Its end should be adjacent to the support post. It is very important to arrange all the elements correctly.
After installing the grille, you need to lay the cables, and for protection they are placed in 30 mm plastic pipes.
Then the hole is filled with concrete mixture. In this case, the upper part of the channel must be left open. The structure remains in this position for at least a week until the concrete dries completely.