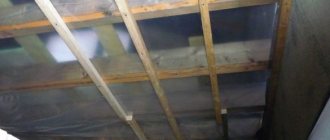
Installation and installation of lamps in suspended ceilings begins with marking the places of their future fastening.
This marking is done even before the fabric is stretched. There are two ways to use it:
- tape measure and pencil
- laser level
Marking
When using a level, you can first make all the marks below, and then use a laser to transfer these points directly to the ceiling.
When marking on the floor, it is convenient to work not with a tape measure, but with a pre-made template. For example, a piece of plinth or plastic cable channel, cut to a certain length corresponding to the distance between the light points.
To avoid damaging the floor covering, use paper tape.
After stretching the canvas, thanks to the marks on the floor surface, it will be very easy to transfer all these fastening points to the finished ceiling.
The main thing is to maintain a minimum distance from the edge of the hole in the PVC film and baguette.
It should be at least 2.5-3cm.
Installing a chandelier on a mounting plate
Installing a chandelier on a beam is done a little differently. First you need to find the location of the timber, and stick a heat-resistant ring in this place.
In this case, its diameter should be such as to ensure ease of access to the beam, but it should not be larger than the size of the protective cap.
Then the mounting strip of the chandelier is secured to the beam using self-tapping screws. When tightening the screws, it is important not to press them in completely so as not to bend the plate.
Next, the wiring is connected, and then the chandelier itself is attached to the mounting plate.
All that remains is to hide the wiring and cover the hole with a protective cap.
Materials and accessories
Tools and material that you will need to install mortgages and connect spotlights:
- pliers, or better yet, narrow “platypus”
- roulette
- cable VVGng-Ls 3*1.5mm2
- electrician knife
- stationery knife
- indicator screwdriver
- punched paper tape 12*0.7mm or rigid adjustable stand
- Wago clamps
- thermal ring
- screwdriver
- hammer drill
- dowel-nails
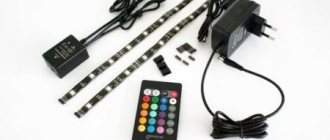
LED strip installation
If PVC film is used for a stretch ceiling, it is not recommended to use halogen lamps and incandescent appliances. The fact is that the material may be damaged due to heating of these products, which will require replacing the film. To prevent this from happening, it is recommended to use devices with a low degree of heat generation. It is best to choose LED strips.
Such devices are installed under the canvas at the same distance. When the device is turned on, only the place where they are fixed or the entire area of the material is illuminated.
Features of LED strips:
- By changing the installation distance, you can achieve different lighting effects - from light lighting to create a romantic mood to bright light to fully illuminate the room;
- various lighting effects can be created by changing the distance from tape to canvas, from tape to tape;
- The final lighting effect is influenced by additional layers and additional elements.
The LED strip is installed not only on the construction material, but also in the box. This method is especially relevant for multi-level ceilings. This allows you to emphasize this type of design. When installing an LED strip in a box, it is necessary to make the canvas in such a way that at any time you can open part of it and gain access to the power supply. The fact is that due to the large accumulation of LEDs, if there is not enough ventilation, overheating of the material may occur. As a result, devices may fail. For this reason, the power supplies must be accessible so that appropriate replacements can be made at any time.
If LED lamps are installed above the ceiling, then the devices are fixed to the ceiling. Manipulation is performed using glue or double-sided tape. Before manipulation, the material is treated with a degreasing compound and coated with a primer. This will ensure good adhesion of the surfaces. Connectors are used to connect the tapes. To fix the device under the canvas, special fasteners made of profiles are used. Such devices can be placed in any angle.
Making an embed for a lamp
First, prepare a mortgage. There are ready-made mounting platforms for installing lamps in suspended ceilings. They are:
- universal
- for a specific diameter
If you have a universal one, then cut a hole in it according to the diameter of the lamp.
After this, be sure to try on the body for it below, so that later, after stretching the ceiling, unexpected problems do not arise.
Next, check the greatest distance from the base (main) ceiling to the lower level of the profile. This is necessary to cut the punched paper tape to the required size.
Then you bend this same tape, giving it a U-shape (the size depends on the diameter of your lamp):
After which, it needs to be secured using so-called “bugs” on the mortgage. “Bedbugs” are mini screws 3.5*11mm
If the design of the lamp does not provide for such fastening with self-tapping screws, then simply pass the tape through special slots under the embed and bend it at the required height.
Instead of tape, you can use an adjustable stand.
It is of course more rigid in design, but not so universal.
Some people cut off a small piece of tape, 3 holes long, and bend it to create an additional fastening for the power wire.
You can't do that. You can easily damage the cable sheath. It is better to use a plastic clamp for this purpose.
After assembly, all that remains is to secure the entire structure of the mortgage to the base ceiling.
Use a hammer drill to drill a hole in pre-marked areas and use dowel nails to screw the mortgage to the ceiling.
Installation of a chandelier on a cross-shaped strip
The most difficult thing to install is on a cross-shaped bar. This bar is quite large.
Finding a heat-resistant ring in large sizes is not always easy. Therefore, you can mark on the film the places where this plank will be attached to the plywood base, stick small rings in these places, and then make holes in them.
Then you need to attach the strip to the base, then install the chandelier, connect the wiring and hide the installation marks with a protective cap.
Connecting the cable
The VVGng-LS 3*1.5mm2 power cable must be laid in advance along the luminaire location route.
You cannot use any kind of wires and cords, such as SHVVP, as home lighting wiring. The approved brand is VVGnG-Ls, or NYM.
In this case, select the minimum permissible cross-section of group cable lines to be
at least 1.5 mm2 .
No 2*0.75mm2! Even if your load is very small. In the place where the light spot will be located, leave a supply of cable in the form of a loop (it will need to be cut later).
This loop should hang at least 10-15cm from the already stretched fabric or the lower edge of the embed.
Features of choosing a chandelier for a stretch ceiling
First you need to decide on the chandelier itself. When choosing, you need to take into account several parameters to avoid problems in the future:
- You should not select chandeliers with a small height (you need to ensure a sufficient distance between the chandelier lamps and the ceiling film to avoid the possibility of sagging of the film due to the heat generated by the light bulbs);
- It is advisable that all lamps be placed in separate shades (they will additionally protect the captivity from overheating);
- It is better to choose a chandelier that uses several lamps, the more of them, the better (with a large number, even low-power lamps will provide good lighting, and they will not affect the film);
- When choosing, you should pay attention to the protective cap that will cover the wiring, as well as the chandelier fasteners (this cap needs to be large enough. This will primarily facilitate the installation of the chandelier);
- The protective cap should not have sharp edges (to avoid the possibility of cutting the film);
- You need to decide in advance on the fastening method.
POPULAR WITH READERS: Energy-saving fluorescent lamps, is it worth using them
Wago terminal blocks and piercing clamps
Cut the loop at the bottom in half, remove the insulation from the wires by 11-12mm and connect them back through the Wago 2273 series terminal block.
In this case, the remaining free terminal will be connected to the power wires from the lamp itself. This connection scheme is called parallel or daisy chain connection.
1 of 2
By the way, you don’t have to cut the cable at all for this purpose, leaving it intact. It is enough to use special piercing clamps instead of Vago.
When using them, remove only the upper protective sheath from the VVGng-Ls cable, the main cores remain untouched. Insert these wires into the top of the piercing clamp and snap it into place.
The built-in knives should automatically pierce the insulation, creating reliable contact. The wires to the lamp are connected to the lower half in the same way.
Having mounted the terminal blocks, connect the entire group of lamps to the supply wire. It is advisable to then check with an indicator screwdriver the presence of voltage at the end contacts, so that later you do not have to disassemble the ceiling and look for where the phase disappeared.
If everything is fine, the main part of the installation of the mortgages is complete. Now it’s time to proceed directly to the installation and connection of the spotlight.
After stretching the canvas, according to previously established marks on the floor surface, mark with a marker and a laser beam of the level the points where it will be necessary to cut the canvas.
If you don’t have a level, then measure the distance from the walls with an ordinary tape measure.
Fixing the chandelier
The chandelier is mounted in different ways.
On the hook
This method of installing a chandelier is used most often. The work algorithm will be as follows:
- fix the hook on the building foundation, test its reliability by hanging a load;
- run the cable;
- after installing the wiring, you should fix the canvas on the frame;
- make markings to understand where the hook is located;
- Using glue on the canvas, fix the thermal ring in the center of the marking;
- cut a hole in the material.
After this, you can install the chandelier by hanging the device on a hook.
Using the bar
Another way to install the device on a structure is using a ceiling strip. To do this, you need to follow the following sequence of actions:
- determine the location of fixation of the chandelier;
- measure the length of the bar and the diameter of the device bowl;
- make a wooden beam of appropriate dimensions, so that the lighting fixture is always fixed in one position and does not swing, make the length of the beam slightly larger than the diameter of the chandelier bowl;
- secure the timber;
- lay electrical wires;
- install the construction material on the frame;
- place a mark on the film or fabric of the place where the chandelier will be installed;
- Using glue on the canvas, fix the thermal ring in the center of the marking;
- cut out the center of the thermal ring to fix the device;
- in the center of the installed beam, fix the mount on which the lighting device is mounted;
- install a chandelier.
Attention! If the chandelier has large dimensions, it is recommended to mount the device on a cross-shaped mount. This method is especially relevant if the device is placed close to the stretch ceiling material.
In this case, you should follow the same rules as when installing a chandelier using a strip, but plywood should be attached to the beam. Its diameter should be slightly larger than the dimensions of the chandelier bowl.
Another option for fixing a large-sized device is to fasten plywood to a suspension system.
Mounting the chandelier on the platform
Installation of thermal ring
Then you need to glue the thermal ring of the required size.
It is made of heat-resistant ABS plastic (standard thickness - 2mm). This material can withstand temperatures of up to 100 degrees for a short time.
The ring performs two functions:
- protects the canvas from the thermal effects of lamps
Sometimes, for powerful and bright light spots, it is necessary to glue two rings at once so that the lamp body does not touch the ceiling and similar troubles do not occur.
This primarily applies to lamps with halogen bulbs.
LED lamps are less susceptible to this. Their heating temperature usually does not exceed 60 degrees. For a stretch ceiling this is not a dangerous temperature.
- acts as mechanical protection
That is, it allows you to cut a hole in the ceiling so that it does not come apart.
Therefore, it is important to evenly apply glue (Cosmofen, Contact, etc.) along the entire contour of the ring. There should not be a single un-glued area left.
At the moment when you press the ring, you do not need to move your finger along it, otherwise it may slide along the glue. It's enough just to press it and that's it.
Next, carefully pierce the canvas with a stationery knife and cut out a hole. In this case, it is better not to leave anything unnecessary, since otherwise the film of the canvas will touch or cover the radiator of the light bulb, impairing its cooling.
If you have a huge lamp, then do not forget that you cannot cut an arbitrarily large hole diameter.
It is always limited by the ratio of the thickness of the web to the force of its tension. For example, for a small area of 4m2 (2*2) and a ceiling film thickness of 2.5mm, the maximum possible hole will be 8cm.
In addition to round rings, there are also square ones. They are used for lamps with a square base.
But most lamps of square or other shapes fit into round fittings without any problems.
Square thermal rings do not come in all sizes, and also have a slightly different installation principle.
The size of the hole in the embed should be a couple of millimeters larger than the outer size of this “thermal square” so that it seems to fall into the embedded and does not deform the ceiling from tension.
Types of lamps and recommended lamp power
According to the installation method, spotlights are divided into two types:
- Embedded . The main part of the device is hidden behind the canvas. The bottom edge is at the same height as the ceiling and does not protrude beyond it. Because of this, the overall level of the structure drops slightly. With this arrangement, the spots are less noticeable, but the flow of light is more narrowly focused. The lamp and the canvas around it heats up more and takes longer to cool down.
- Invoices . The lamp is fixed at ceiling level, and the body is located below. When placed outdoors, the device is more noticeable, but it cools faster and illuminates the space more evenly. This type is safer to use.
The body is made from different materials: glass, crystal, aluminum, plaster, plastic. The shape can be round, square or rectangular. To choose the appearance, take into account the overall style of the room. It is advisable to purchase lamps designed specifically for suspended ceilings. They are designed in such a way that the rays do not shine through the canvas around them. Drywall is a denser material, so suspended ceilings do not have such problems.
There are several types of light bulbs:
- Incandescent lamps. They are almost never used with suspended ceilings, as they get very hot.
- Halogen. A relatively expensive option and they also generate a lot of heat.
- Energy saving. They are convenient where constant lighting is required, and when turned on frequently they consume a lot of electricity.
- LED. Economical and durable, practically do not heat up.
Important! To prevent the PVC film around the body from melting and turning yellow, it is necessary to comply with the maximum power requirements: 60 W for incandescent lamps and 35 for halogen lamps.
The most common types of base:
- G5.3 (for halogen and LED lamps);
- GX53 (led and energy saving);
- G9 (halogen and LED for surface-mounted luminaires).
Previously, only light bulbs operating on 12V voltage were produced. A transformer was required to connect to the power supply. Now there are lamps on sale that operate directly from 220V.
Installation of a lamp in the ceiling
Next you need to level the mortgage. Grab it with your fingers and pull it down on the punched tape so that it comes close to the stretch ceiling, but does not put pressure on it.
Initially, mortgages are set at the profile level. After tensioning the canvas, gluing the rings and cutting out the holes, they are brought level with the canvas (stretched or pressed).
If you make a mortgage even 1-2mm higher than the level of the baguette, then this is not correct. The canvas, depending on the area, always sags by 1-3 cm and, accordingly, if the mortgage is higher than the profile, or at its level, the lamp will appear as if pressed in.
There may even be a swelling effect on the ceiling due to water leakage from neighbors above.
It doesn't look very nice. Especially on glossy ceilings.
For each type of light bulb, a different height of lowering the blade from the base is recommended:
- for GX-53 – 35-50mm
- for E-27 – 100mm
- for MR-16 - 60-70mm
- for luminaires with G9 base - 40mm
Recommended light bulb power is no more than 40W. Otherwise, the PVC film can be easily damaged. This primarily applies to halogen models. These are the consequences.
Next, release the power wires outside and connect phase and neutral to the wires of your lamp through Wago terminal blocks.
If the wiring is made with flexible wires with stranded cores, then to ensure reliable contact they must either be tinned or crimped with NShVI lugs.
However, you can do without this; just use Vago terminal blocks of the special series No. 221, 222 (with flags), which are designed for both flexible and stranded wires.
With a three-core power cable, the 3rd grounding conductor must be connected to the lamp body. If yours is plastic and not metal, then simply leave it unused.
How to assemble a recessed ceiling light
Some models of spotlights, for example, Feron DL 11, are sold disassembled, that is, the clamps are not fixed to the body. Therefore, before proceeding with installation, you must first install the springs. Assembly occurs in this order:
- Without straightening, place the tail of the spring between the fastening antennae located on the lamp body.
- Place the spring on one of them, then wrap it and squeeze it into place.
- Repeat on the other side.
Remote lighting control
You need to connect a remote lighting control system. What a great solution for dividing lighting into multiple zones without putting extra wires on the base switch. Such a controller does not require the console to be in line of sight. The radio signal encryption program reliably protects against interference from other consoles. Several controllers can be installed in one room. Each controller responds only to its own console. The maximum console coverage is 8 meters.
Switching modes are also carried out by a switch without using a remote control. Instantaneously turning off and on the circuit breaker leads to sequential switching of modes. Continuous shutdown resets the controller to its original state. Maximum load: 3×1 thousand watts. When connecting fluorescent or energy-saving lamps, the load power must be calculated based on the output power. The initial power of fluorescent lamps exceeds the nominal capacity by 2-3 times.
Let's say you need to install a new lamp somewhere, in a place where there are no special connections for it, and this happens quite often. In such cases, it is enough to connect this lamp to the nearest outlet and install a compact remote control included with the control panel. After this, you will be able to use the lamp, controlling its operation using this control panel.
In addition, with the help of an LED system, you can divide existing lighting groups into several, change the operating modes of lighting fixtures, and much more.
The difficulty in creating a remote control system for connecting a chandelier lies in where the controller should be installed. The controller is one of the most important elements of the remote control system. It receives signals sent from the remote control or fixed switch and executes the switching signal that is presented for the set lighting mode.
The parameters can be very different:
- turning on separate groups of lamps on a chandelier;
- adjusting the brightness of the lighting.
The stationary remote control has search functions on the remote control - the corresponding button is pressed and a signal is sent, including a melody or tone on the remote control, which greatly facilitates its search. As a rule, the controller is small in size and can be easily placed under the decorative cover of the chandelier, which covers the wiring on the ceiling.
You can install the controller in the wall using a fixed switch or in another place, for this you must run wires to it from the chandelier and the fixed control panel. Different controller models have differences in connection diagrams.
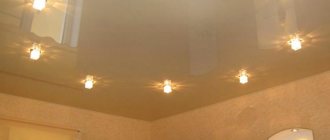
What kind of lamps are called spotlights
A spotlight is a small-sized device for lighting a space, which requires a hidden type installation. It is capable of providing light to only a small part of the room, therefore, to fully and uniformly illuminate the room, the required number of spotlights is selected and placed in a certain way on the ceiling. The device is designed to create a narrowly directed stream of light.
Spotlights can be mounted both on the ceiling and in furniture, for example, in cabinets.
The name “spotlight” fully conveys the appearance of the device and the area of the illuminated space.
Spotlights can be divided into two large groups according to their intended purpose: for installation in a suspended ceiling and installation in plasterboard structures.
How to install spots yourself
Installing lighting fixtures in a suspended ceiling is very simple.
Step 1. You need to run electrical wires to the places where the lamps will be placed. And this must be done before installing the ceiling.
Step 2. After completing this stage, work on the holes for the spots. Cut them into the ceiling. It is best to use a circular saw for this. Then connect the wires and insert the lighting fixtures, to do this, squeeze the clamps and bring them to the top. When you place them in the holes, the latches should be released. This way the lamp will be securely fixed in place.
Installation of spotlights in a suspended ceiling
Step 3. Screw in the incandescent bulbs. Halogen bulbs need to be handled differently than standard incandescent bulbs. First install the plug-in connectors, and then insert the lamps into the luminaires. For fixation, use locking rings; manufacturers supplement each set of lighting fixtures with them.
Step 4. Don't forget about protection; work with fabric gloves. It is not recommended to touch the glass of halogen lamps with bare hands, as the products may prematurely lose their functionality.
Prices for LED lamps
LED lights
How to markup
Since you will have all the spot spots inside, it is not surprising that the lighting angle of the room will be limited. Near the lamp it reaches 30 degrees, and then, at a short distance, the light dissipates. To avoid shadows and keep the room flooded with bright light, place the lighting fixtures so that the light streams intersect. This trick will ensure that the room is illuminated evenly. For example, the room has standard-height ceilings, then you should retreat 60 centimeters from the edge of the wall. Place the spots at a distance of 1 m from each other.
Popular placement options for spotlights
Apply marks before starting work. They are easy to make using pieces of electrical tape. Cut two small strips and stick them crosswise in the place where you plan to install the lamp. Repeat the action, the number of stickers should correspond to the number of lamps.
Once you've made your markings, look at the placement of the marks. This must be done after the crosses are evenly distributed across the ceiling. Take a tape measure and measure the distance between adjacent marks. Make adjustments if necessary.
Do not place lights where two panels meet. When the marking is completed, you can move on to the next stage.
Marking the ceiling for lamps
How to make holes for spots
To make holes, prepare the following tools.
- Buy an electric drill . If it is not there, use a regular screwdriver.
- Prepare a crown , it should be made for wood. Focus on the diameter of the spots, usually it is 6.8 centimeters.
Insert the crown into the electrical appliance and use it to cut holes. If there is no crown, then the circles will be harder to make. In this case, buy a wood or metal drill. You will also need a utility knife.
Drywall crown
Draw a circle of the required diameter. It should be slightly smaller than the diameter of the outer part of the lighting fixture, then the lamp will not fall inside. Drill a hole using a thin drill bit. Use a utility knife to remove burrs on the surface of the material. When all the holes are ready, you can move on to the next stage.
Conclusions and useful video on the topic
Visual instructions for attaching a lamp to a mounting plate with a plywood mounting platform:
How to “drown” a chandelier in an already installed stretch ceiling:
Installation of lighting fixtures without a mounting platform:
You can completely handle the installation work when installing a chandelier on a tension structure yourself. This does not require special skills or complex equipment. All you need is knowledge of the basics of electrical installation and a set of available tools. The correct and easiest way to do the work is before stretching the ceiling fabric.
The main thing is to follow safety precautions when working with electrical wiring, choose the most suitable type of fastening and carefully check the stability of the mounted structure at the end.
Do you have experience installing a chandelier or lamps on a suspended ceiling and want to share it with other users? Tell us about it, dwell on the difficulties you encountered - the feedback form is located below. Also here you can show the result of your work by adding original photos of the installed chandelier.
Video
Conclusion
Before hanging a chandelier on a suspended ceiling, craftsmen advise carefully considering all options related to the possible dismantling of the lamp. You should not install the lighting device in such a way that it will be impossible to remove it or even get to the contacts. During the service life of the chandelier on the suspended ceiling, it may not be necessary to repair it, but in any case, you should not turn the possible process of repair and maintenance into another puzzle.
Sources
- https://pod-potol.com/osveshchenie/lyustry-i-lampy/ustanovka-i-montazh-svetilnikov-v-natyazhnye-potolki-poshagovoe-rukovodstvo.html
- https://VannayaSovety.ru/delaem-sami/montazh-svetilnikov-v-natyazhnye-potolki.html
- https://svetosmotr.ru/kak-ustanovit-tochechnyj-svetilnik-v-natyazhnoj-potolok/
- https://ElektrikExpert.ru/kak-ustanovit-lyustru-na-natyazhnoj-potolok.html
- https://2proraba.com/elektrika/ustanovka-lyustry-na-natyazhnoj-potolok.html
- https://balashiha.d-mastera.ru/ustanovka-lyustry-i-montazh-svetilnikov/
- https://elektrika.expert/svetilniki/svetilniki-v-natjazhnoj-potolok.html
- https://elektrikaetoprosto.ru/ggg.html
- https://simplelight.info/montazh-i-nastroyka/lyustra-na-natyazhnoy-potolok.html
- https://sovet-ingenera.com/elektrika/svetylnik/montazh-lyustry-na-natyazhnoy-potolok.html
1 647