Those who farm their own plots know that crops and homemade products must not only be grown and preserved, but also properly preserved so that what is grown will last until the next season.
A cellar is a recessed or semi-recessed structure, built like a dugout and used for storing and storing food and drinks. Below we will tell you how to build a cellar with your own hands step by step.
Choosing a place
Residential premises are not suitable for this purpose for several reasons:
- Insufficient space.
- A separate room will be required.
- The need to comply with temperature and humidity conditions, the standards of which are different for housing and food storage.
- Excessive illumination of residential premises.
If you knew about this in advance and took care of the arrangement of the basement, which serves as a vegetable storage or wine warehouse , this is good. But situations often arise when there is no basement (or it is not suitable for these purposes), but there is a storage problem. And here a solution such as constructing a separate cellar on the site will help us.
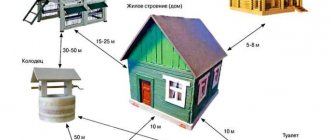
The cellar location must have the following characteristics:
- as little illumination as possible, so a place on the shady side of the house is suitable;
- as low a groundwater level as possible.
And if we solve the first question in inexpensive ways, then the second one determines what kind of cellar design we will choose.
Today we will consider the most difficult case - the construction of a cellar on heaving soils with high groundwater level , since such soils are common in the European part of our country, especially in the north-west. There are two difficulties that await you when building an underground structure with such soils: the threat of flooding and destruction under the influence of frost heaving forces. That’s why we’ll tell you how to build a cellar at your dacha with your own hands, step by step.
Cellar design options for high groundwater levels
In order to decide how to build a cellar if groundwater is close, you need to choose an option for its construction. According to the type of main structures, the storage room is divided into:
- ground;
- semi-recessed;
- completely buried.
Types of cellars in areas with high groundwater levels, according to their location relative to the main building, are divided into:
- free-standing;
- wall-mounted, i.e. adjacent;
- underground, i.e. under the house.
All these types of basements have their own characteristics during construction.
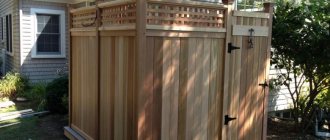
Wall-mounted ground cellar
An above-ground cellar with high groundwater levels is a simple and economical solution. It is very simple to build it with your own hands. Such a cellar does not require deep digging or large material costs. One of the walls is the existing outer wall of the house or barn. The extension is made of brick, concrete blocks or frame type with additional insulation of the space between the internal and external cladding. The pit is buried no more than 50 cm.
Preparation for the floors is made of sand with a layer of 10 cm and broken brick, gravel or crushed stone 15 cm thick. Reinforcement is placed on top and poured with concrete 8 cm thick. The floors are covered with roll waterproofing, and a screed with cement-sand mortar is placed on top. Sometimes liquid clay is used instead of concrete, as in the village. The outside is covered with earth 70-120 cm thick. Such a cellar is built even in low-lying and swampy areas, where the water is very close to the surface.
Semi-buried cellar
The difference between a semi-buried cellar and an above-ground one is that part of it is located in the ground. If the groundwater level is high, you can deepen a semi-buried cellar by half or a third of its height. The floor level should be 0.5 m above the water level.
Often one of the sides of the structure rests on the slope of a hill. The walls are made of bricks, blocks, wood or monolithic concrete. The roof is usually made of boards coated with clay. The entire structure is covered with roofing felt or roofing felt.
Important: the walls and roof should be well insulated with earth from the outside in order to avoid freezing of the room.
Bulk cellar
It is not so difficult to build a bulk cellar with your own hands if the groundwater level is high. It is better to choose an elevated location, as far as possible from the nearest body of water. The entrance is best oriented to the north.
How to build a bulk cellar with your own hands if the groundwater is close to the surface:
- Construction should begin by clearing the site and removing the top layer of soil. It is advisable to deepen the base of the cellar to a depth not exceeding 50 cm.
- Level the bottom of the basement, lay a mixture of sand and crushed stone, compact it and fill it with bitumen. This will give the necessary waterproofness to the floor. You can use other waterproofing materials.
- Build walls from bricks, blocks or wood. The inside and outside of the walls are also covered with bitumen or other material to protect against moisture. Arrange an entrance opening.
- Mount the basement roof from boards or timber 40-50 mm thick, treated with special compounds to prevent rotting. Additionally cover with a layer of bitumen.
- The outside of the entire structure is treated with bitumen and covered with roofing felt in 2 layers.
- Install thermal insulation from clay or mineral wool.
- Cover the entire building with a layer of earth - 70-120 cm, with a sufficient clay content, and give the structure the shape of a hill.
- Carry out final work on installing doors and interior decoration.
Metal cellar-caisson
A caisson is a chamber or box made of metal or plastic with sides. Sometimes it is made of reinforced concrete, but in the conditions of country house construction this is very expensive. In case of high groundwater, a caisson cellar reliably protects the reserves stored in it.
The caisson, due to the high tightness of the joints, is used even at very high groundwater levels. Before installation, the metal bunker is treated from corrosion on the outside, and the inside is painted with metal paint.
The plastic caisson does not require additional processing. A pipe with a shut-off valve is welded in one of the corners at the bottom of the box. When the caisson is lowered into the pit, the tap opens and water flows into the chamber. After installation, the cellar is secured in the ground by concreting the sides, the water is pumped out and the tap is closed. Install the ladder and manhole cover. To prevent the caisson from floating when the groundwater level rises, it is additionally secured with anchors and equipped with devices for pumping water from under the bottom.
A metal caisson cellar has a lot of advantages that are fully justified by its price.
Concrete monolithic cellar
A cellar made of monolithic concrete is a reliable and affordable structure for storing supplies during the cold season. It can be done buried or partially buried when the groundwater level is high. The construction of a concrete cellar is carried out when the groundwater does not rise high.
Excavation
The depth of the cellar depends on what type of structure you choose. There are two of them: deep and shallow.
But in both cases, in addition to depth, the area of the future storage is also important, the minimum size of which should not be less than 2 by 3 meters .
Therefore, adequately assess how much and what products you will store. The choice of your project largely depends on your finances.
Deep cellar . The base of the foundation of such a cellar is 20 centimeters below the freezing depth mark in your region. This means that before pouring the base cushion, you will need to dig a pit based on the following calculation: freezing depth + 20 cm + 10 cm + 15 cm; 10 and 15 cm is the thickness of the sand and crushed stone cushions that will be located under the concrete base.
Thus, if you have a freezing depth of 1 m 20 cm, then it turns out that you need to dig a pit 1.65 m deep .
The area of the pit must be larger than the area of the future structure. Firstly, you need space for further work, and secondly, you need to avoid the collapse of the pit walls. Well, thirdly, you will need to carry out drainage work, which we will talk about later.
Shallow cellar
It is located above the ground level, usually a meter from the ground or so. Often, determining the depth of foundation is complicated by the fact that in addition to groundwater, clayey aquifer layers are located high on the site, above which sediment accumulates.
Such areas can be seen with the naked eye in the summer during rains - there is water in the spaces between the beds. And here we also need drainage . And, before half-deepening our cellar, we’ll make a calculation.
It will be like this:
GWL+10 cm+15 cm
It is best to determine the groundwater level by looking at the nearest wells, or by drilling a hole 2 meters deep. This procedure is carried out in the spring.
Internal drainage
Internal drainage is a worse option, which does not allow moisture to rise above a certain level and is carried out along with the installation of the base.
Drainage channels are laid in the floor of the base, increasing its thickness, while they are arranged in exactly the same way as in the first case, observing the drainage layers and arranging the storage tank.
If flood waters rise too high in an area, then a combination of two methods would be the best choice.
External drainage will drain water under normal conditions, and internal drainage will save you if the situation gets out of control during a flood.
In order for water to flow better from the groundwater storage tank, you can install a pump with an automatic float sensor that discharges water to the sewer or outside the site.
Filling the base
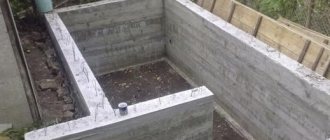
The base cushion is a structure of several layers. The first layer is geotextile. It will protect the overlying sand preparation from spreading and erosion. Place 10 cm of sand on top and compact it. Then comes crushed stone, which also needs compacting.
Now you need to set up the formwork . When laying a deep foundation, it is necessary to avoid pushing the future cellar out of the ground by tangential heaving forces. It is important that the concrete base looks out beyond the walls of the cellar by 15-20 centimeters: this way the cellar will be anchored.
The thickness of the formwork is from 8 to 20 cm . We lay reinforcement mesh inside or knit a frame. It is better to make a knitted frame around the perimeter in increments of 10 cm, this will strengthen the structure. We release some of the reinforcement to the top, especially if the walls of the cellar are also concrete.
After pouring, we remove the formwork on the fifth day. The pillow must be immediately treated with bitumen mastic and covered with two layers of rolled waterproofing (Technonikol) on all sides.
If you plan to enter the cellar not through the roof, but via stairs, be sure to take into account the area of the stairs when calculating the size of the pillow.
Water disposal
Despite the fact that in dacha areas and the private sector of settlements with storm drainage everything is bad, it is still worth trying to drain water from the walls of the cellar. If you have a ditch along the site, then the problem is partly solved. If there is no ditch, you will have to dig drainage wells.
The well must be dug at a distance of about one and a half meters from the walls , but it can be closer. The depth of the well should not be less than the depth of the pit. The best option for such a device is concrete rings with a hatch, especially in cases where there is nowhere to drain the water.
If you have a ditch of sufficient depth, then you can install a rotary drainage well , where there is an outlet pipe, from which you will need to lay a pipe to the ditch with a slope of 2 cm per linear meter of pipe.
Drainage
We lay a layer of sand about 10 cm around the perimeter of the concrete pad, and lay geotextiles on top of it. We lay a layer of crushed stone on the geotextile and place a drainage pipe (with holes) on top. The slope of the pipes should be towards the well.
The inlet pipes of the rotary drainage well must be exactly at the height at which the drains end. If you have concrete rings, you need to make holes in them.
the pipes with crushed stone and cover them with geotextiles , after which they can be sprinkled with sand. We fill the sinuses of the well in the same way.
Internal drainage
It is performed when the area of the site does not allow for a large volume of excavation work. In this case, instead of a cushion, a concrete perimeter with a T-shaped section is installed.
Inside, sand and gravel preparation is made on geotextiles , into which drains are laid and inspection wells are connected to them inside the cellar and one drainage well outside.
After this, the floor can be concreted. The disadvantage of this method is that the water from the well will need to be pumped out with a submersible pump from time to time.
Construction of a caisson cellar
This method is justified when groundwater is close to the groundwater level. The only drawback is the high cost of the caisson. This can be a box made of stainless steel or plastic. The metal box looks like a trough with sides. There are fasteners on the sides by which the caisson can be removed or lowered.
- In the corner of the caisson, a pipe, at least half a meter long, with a shut-off valve is welded vertically.
- The inside of the box is coated with special iron paints, and the outside is additionally waterproofed with bitumen.
Cellar-caisson - The caisson is lowered into the pit by opening the tap in advance. Water will flow through the pipe into the box. When the caisson reaches the bottom, the outer wings are concreted, the water is pumped out, and the tap is closed.
- After this, the stairs, ventilation and cellar lid are installed.
Advice. When building walls and floors, decide in advance where the ventilation pipes and electrical wiring will be placed so that you don’t have to drill additional holes in the walls later.
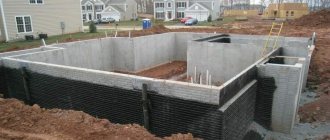
Building walls
They can be a monolithic concrete or masonry structure. With monolithic concrete, everything is clear: the formwork is set up, the frame is knitted and the concrete is poured.
But with masonry materials there are some restrictions. The following will be acceptable:
- Dense single ceramic brick.
- Cement-sand blocks.
- Rubble stone.
Under no circumstances should you build the walls of an underground structure from:
- Expanded clay concrete blocks.
- Multi-slit brick.
- Sand-lime brick.
This is due to the fact that the last three materials have reduced frost resistance , and at low temperatures and high humidity they quickly lose strength and collapse.
The thickness of a concrete wall must be at least 25 cm, and a brick wall - 38 (one and a half bricks). Shallow cellars can be made with a smaller thickness of masonry, but deep ones are not worth it: lateral loads in winter can destroy the walls.
The thickness of the walls is also determined by considerations of thermal inertia. This is a very important property for a cellar, because the temperature in it should be as constant as possible.
The masonry is made using cement-sand mortar of grade 100 and above . Simultaneously with the construction of the walls, the staircase with the entrance is also being erected.
Ceiling and ventilation
After you have built the walls, you can begin to overlap. Cellars can be covered with reinforced concrete slabs, a monolith and a brick vault can be made. In the first case, installation is carried out using a crane, in the second it will be necessary to make formwork on racks.
It is made of plywood, which is laid on beams, which, in turn, are supported by other beams perpendicular to the top ones on telescopic racks. If you don’t have them, it doesn’t matter: their role is perfectly fulfilled by accessories in the form of logs. The main thing is that the racks are located at least every 1.2 m .
After installing the formwork a reinforcement frame is knitted , and the cross-section of the reinforcement (corrugation) must be at least 8 mm, and if the spans are large, then the cross-section must be large. The ceiling height is usually 20-22 cm, but you can save on both reinforcement and concrete if you put a profiled sheet down instead of formwork. It should extend onto the walls by at least 10 cm. The profile of such a sheet will provide the rigidity we need.
When installing the ceiling, one should not forget about two ventilation holes. One of them will serve for the supply of fresh air, and the other for removal. Pipes are laid in the holes , one of which should start under the ceiling, and the other at the floor. The difference in pressure at different heights will provide us with proper natural ventilation.
About the importance of ventilation
To properly store food, you will need to set the optimal humidity in the cellar. It ranges from 70 to 95%, and it is important to prevent condensation.
The second reason for the need for ventilation is to ensure the release of gases that may be released if some products have deteriorated.
Brick vault
This version of the ceiling is made using semicircular formwork, which should be securely fastened before erecting the vault itself.
The vault is built from the edges to the middle , the number of rows should be odd (in the middle there is a castle row). Spoon and tie rows are laid alternately. The thickness of the seam at the bottom of the arch should be about half a centimeter; all seams are carefully filled with mortar.
You can read more about the construction of vaults online; this work is quite painstaking and requires qualifications. If you don’t have time to acquire this qualification, then follow the instructions that can be found on the Internet.
Waterproofing and wall insulation
Walls made of stone materials must be plastered with cement mortar before insulation. After the plaster has set, you can begin waterproofing the walls.
They are thoroughly coated with bitumen mastic, after which they are covered with waterproofing using a propane torch. It is best to do two layers of waterproofing. Concrete walls are waterproofed in the same way.
Along with the walls, the top of the floor is also insulated . The thickness of the insulation depends on the weather conditions in your region and the required temperature in the storage. And we’ll tell you more about this.
Construction of a semi-buried brick cellar
A brick cellar is the most practical and common type of semi-buried cellar. Its pit usually does not exceed 1 m in depth. Thanks to this and the construction material, such cellars can be built even in damp places. Construction technology provides the following algorithm:
- Creation of a pit of the required depth;
Digging a hole
- After this we make a hole for the foundation. Its depth should be at least 50 cm;
Attention: When making the foundation, the type of soil should also be taken into account. If it is loose, then you can make a hole for the foundation of about one meter. In this case, the foundation is best reinforced. To do this, you need to weld a grid of reinforcement bars.
- We fill the hole with crushed stone, for this you can use all the unnecessary stone from the site;
- We make a solution from cement, just make it liquid at the level of liquid sour cream and pour crushed stone;
- After this the walls are made. In this case, pay special attention to the dressing. The seams of the bricks should not match;
We make a trench and then build walls
- If necessary, the construction of block (cinder block) walls is allowed. Using a cinder block in a cellar is impossible; the place for future storage has too high a humidity level. To make block walls waterproof, they can be plastered with cement mortar.
Attention: After installing the walls, they must be waterproofed. Otherwise, they will simply collapse quickly (see Waterproofing basement walls and floors). There are many materials for this in the retail trade. Some people simply attach roofing felt. This is also effective.
- An obligatory step in creating a cellar is the construction of a brick or concrete floor, which is made from slabs or uncut boards. Their thickness is usually 40-50 mm. Clay grease and a layer of roofing material are placed on top of the boards.
- After installing the ceiling, a layer of waterproofing must be applied. This will extend the life of the structure and will not allow excess moisture to penetrate into the room.
- We want a mound of earth on top.
Cellar temperature
Different foods require different temperatures to be stored, and you will need to decide what you will be storing in order to calculate the optimal average temperature.
So, potatoes and carrots are best stored at +4.+5 degrees , cabbage can withstand zero, and for pickles it’s not so much the temperature itself that is important (it can be from +1 to + 6), but rather its consistency, otherwise your pickles will soften and will lose crunch.
In some villages, pickled cucumbers were rolled into barrels and stored in the river under ice - there the temperature is the most constant. But, unfortunately, not everyone has such an opportunity.
If you only have vegetables and preparations in your storage, then the best temperature setting for you is within 8 degrees . At the same time, you can safely store vegetables there, dividing them by height. So, root vegetables and cabbage tolerate the cold best, and it is better to sprinkle the former with sand to prevent drying out. Boxes with potatoes and onions are placed on the shelves, and canned goods occupy the highest places.
When the base of the cellar is below the frost depth, the cellar, with proper thermal insulation, will maintain the temperature of the ground. It rarely differs from +5 Celsius. But if the cellar is higher, it will be necessary to insulate the floor .
For wine cellars, the recommended temperature range is higher - from 11 to 14 degrees . At lower temperatures, the wine does not ripen well (and if you are making sparkling wines, the process of secondary fermentation in the bottle may stop altogether), and at temperatures above 18 degrees it deteriorates. Temperature fluctuations should be avoided if your wine is sealed with a natural cork: it can change its size depending on temperature and humidity. Therefore, if you are setting up a wine cellar, you better think about means of controlling the temperature of the room.
The thickness of the insulation is calculated based on the minimum temperature outside in winter, the thermal conductivity coefficients of the insulation, the material of the wall and backfill. The essence of the calculations is that the dew point must be placed in the insulation: the wall should not freeze.
12 cm of polystyrene foam will be enough for insulation , or even better - 2 layers of five-centimeter extruded polystyrene (for example, penoplex™).
Temperature retention looks something like this: The floor has the temperature of the earth, the walls perceive and retain it, the thicker the wall, the higher its thermal inertia. The outer layer of insulation and insulation prevents heat transfer between walls and the ground, as well as between walls and street air.
Backfill
After all these activities, we begin filling the sinuses and the outer part of the cellar. It is better to fill the sinuses with sand and gravel, which will not retain water by capillary action. The water should go into the drain.
The outside of the cellar needs to be covered with earth , and to prevent it from spreading, it is better to intersperse it with geotextiles. The final step is to cover the cellar with turf and install the door.
I would like to note that the construction of a slide from soil allows one to shift the level of soil freezing upward, and this compensates for such a disadvantage of shallow storage facilities as freezing of the floor.
Floor finishing and wall construction
After completing the excavation work, they begin finishing the basement foundation.
Although there is absolutely no risk of groundwater penetrating into a semi-buried cellar, it is preferable to make the flooring from concrete or brick; sometimes in dry areas it is possible to use cinder concrete where there is no overhead water.
Next is the transition to the construction of wall structures 2–2.5 m high to be able to stand there at full height, thus ensuring the convenience and safety of being inside the basement.
Wall surfaces are erected using the earthen walls of a dug pit as a basis.
At the same time, to ensure complete protection and reliability of the structure being built, additional building materials are used for wall structures.
There are many options for this. But it is desirable to use monoliths.