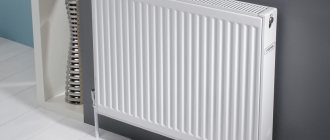
To install an automatic washing machine, it is not at all necessary to call a specialist. After all, his services will not be cheap. Detailed instructions explaining how to connect a washing machine yourself will help you correctly carry out all the necessary manipulations with minimal financial costs.
We will tell you how to install and connect household washing equipment with your own hands. The article we presented describes in detail the process of unpacking, leveling and connecting the unit to communications. Taking into account our advice, you can carry out all the work flawlessly.
The procedure for connecting an automatic machine
To start the operation of the washing device, you need to choose the optimal location for its placement. Then prepare the washing machine for connection work.
After this, all that remains is to correctly perform the following steps:
- align the device, giving it the optimal position;
- connect to the water supply to collect water needed for washing;
- connect to the sewer to drain water when implementing a given program (washing, soaking, rinsing, spinning);
- connect to the electrical network to ensure the supply of electric current that drives the unit’s motor.
Next, we will consider in detail all the above stages.
Connecting an automatic washing machine to the water supply with your own hands
This stage is the most important and difficult. Therefore, you need to look at a few important points.
- Assess the place where the machine will stand. The connection method and the selection of the necessary parts will depend on this.
- It must be remembered that water hoses should be located behind furniture or interior parts. Their length will depend on this.
- It is necessary to estimate in advance the approximate length of the water hose. Very often the kit comes with very short ones.
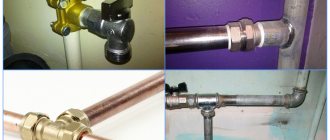
- To connect to the water supply system you will need: pipes, a valve or a regular tap.
Faucet for connecting an automatic washing machine
The most common connection method is to connect it to a flat section of the water supply. To do this you will need a tee. Or this can be done on a special branch of the pipe. The connection to the tee or branch is made through the toilet cistern.
Stages of direct connection to the water supply.
You may need some special tools during the connection process. When working with metal piping, you will need a variety of wrenches. You will also need some kind of seals. Fumlenta or flax. It is better to choose linen, as it swells during use and prevents leaks.
When working with a water supply system made of polymers, especially if you have to make a new insert into it, you will need special equipment. tools for soldering polypropylene pipes. You will also need a calibrator and special fittings.
Hose attachment.
First, you need to connect the pipeline hose to the machine. At the same time, insert the special filters that come with the kit into the ends of the hose. After this, tighten the nut located on the hose. It is better to tighten the nut by hand, without using wrenches.
Stage #2 - preparation for installation
The purchased machine is delivered to the apartment in packaged form. All rotating parts are fixed with fasteners (bolts, bars, brackets), which protect the device from accidental damage during transportation.
Before starting installation, it is important to remove all fasteners (bolts, brackets, clamps) that protect the machine parts during transportation
The delivered washing machine should be freed from the box, and then begin removing the fixing parts:
- From the rear wall of the unit you need to remove the brackets , which are installed for the rigidity necessary for transporting household appliances. Such elements also hold flexible parts of the structure, namely the hose and electrical cord.
- Following this, it is necessary to remove the bars placed between the tank and the body of the device. To do this, just tilt the washer slightly forward.
- You should also remove the bolts that are installed on the front of the machine to secure the drum. It is better to immediately insert plastic plugs into the holes from the removed elements (they are usually included with the model).
Released fasteners must be carefully packed and stored: they may be needed when calling for service.
Image gallery
Photo from
Installation points for fastening blots
Loosening the bolts with the supplied wrench
Removing the bolt along with the plastic insert
Collecting shipping bolts for storage
Stages of installing a washing machine.
- Remove all staples. They are located on the back wall of the machine. They serve for rigid fastening of all elements of the washing machine.
- Remove all special bars located between the body and the tank of the machine.
- Remove all bolts installed at the front of the washing machine. They serve to completely immobilize the drum of the machine. In the resulting holes you need to insert special plugs, which should be included in the kit.
All removed parts should be removed and not thrown away. If you call for service, these details may come in handy.
Stage #3 – leveling the washing machine
In order for the automatic machine to serve with maximum efficiency, the installation and connection of the washing machine should be approached with the utmost care.
The floor base requires special attention, which must meet a number of criteria:
- strictly horizontal surface;
- durable structure;
- sustainability;
- protection from vibration and other influences inevitable during operation of the unit.
If the foundation does not meet these criteria, it is better to take measures to meet them.
In addition to levelness and reliability, the base for installing the washing machine must also have anti-vibration properties. If you are going to install it on a tiled or wooden floor, then it is better to carry out the whole process using devices that dampen vibration:
Image gallery
Photo from
Felt pieces against vibration
Anti-vibration stand for washing machine
Round anti-vibration device
Invisible anti-vibration pads
On fragile surfaces, it is advisable to make a cement-sand screed or strengthen the existing floors in the place where the washing device is supposed to be installed.
Adjustment of the position of the washing unit is achieved by changing the height of the support legs: to increase the distance from the floor they can be unscrewed, and to decrease they can be screwed in
After making sure that the base meets all the previously mentioned requirements, you can begin installation. The fully unpacked machine with the fasteners removed is placed in the selected location.
The horizontal installation is determined by the top panel, while the angle of deviation, which is checked by the top cover, should not exceed two degrees. Exceeding this indicator leads to a sharp increase in vibration, which has a very negative effect on the condition of the components and significantly reduces the service life of the machine.
Image gallery
Photo from
Step 1: Screwing all legs to minimum height
Step 2: Adjust the rear support to the required level
Step 3: Checking the horizontal alignment of the legs
Step 4: Fine Adjustment of Support Heights
Placing improvised materials under them that could slip out from under the supports during work is strictly prohibited. This may lead to an emergency situation. At the same time, it is allowed (and even recommended) to place a thin rubber mat on the sliding tiled surface.
As soon as the body of the machine is in a perfectly horizontal position, you should tighten the locknuts counterclockwise, fixing the optimal height of the support legs.
When leveling the machine, it is recommended to consider the following factors:
- The greatest degree of stability of the unit is achieved with the adjusting supports screwed in as much as possible, but this option is only permissible on a perfectly flat surface.
- When installing the machine on an inclined floor, it is advisable to use fixing parts to secure the supporting structures.
- To check whether the unit is installed correctly, you need to try to swing it diagonally. If the process is done correctly, there is no free play or its amplitude is the same for different diagonals.
Once you are sure that the unit is in the correct position, you can proceed to the next steps.
We connect the drain hose through a siphon - how to do this?
A siphon is a simple device. It is inexpensive and is sold in any store that offers plumbing products. The siphon is usually installed under the washbasin in the bathroom or under the sink for washing dishes if the washing machine is installed in the kitchen. The siphon must be mounted as high as possible. Setting it too low increases the risk of water backflow.
Connecting a washing machine
Draining through a siphon is arranged independently according to the following scheme:
- Install the siphon. The device is installed strictly vertically. It is prohibited to place it horizontally due to the increased risk of leaks.
- Connect the drain hose to the installed siphon. The hose first needs to be raised by 0.6–0.8 m, secured to the back of the washing unit (almost all machines have a special hook for this purpose) and only then lowered to the sewer drain.
- Connect the hose to the siphon pipe. It is optimal to perform this operation through a special cuff. It ensures complete tightness of the connection. If there is no cuff, you will first have to connect the adapter, tighten it with a metal clamp, and then connect the hose to this intermediate device.
Check all connections for leaks. Job done, drain done! Recently, special siphons have become widespread. They can be mounted on a wall surface. Such new devices have one side brought outside, and the other connected to the sewer. A water outlet (cold) is installed next to the siphon. This is done to ensure that the process of connecting the washing machine is carried out as quickly and conveniently as possible. If such a plumbing “infrastructure” is available, a new washing unit is connected to the sewerage system and water supply pipes in literally 5 minutes.
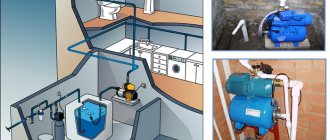
Stage #5 - connection to the sewer
Connecting the washing machine to the sewerage system allows you to solve the problem of draining dirty water that remains after washing.
This can be done using different schemes:
- Temporary , by using a special hose directed into the toilet or bathtub.
- Permanent , providing for a stationary drainage device.
The first method is very simple: the water is drained through a hose attached to the edge of the bathtub, toilet or sink, which can be done using special fixing elements.
In the second case, two options are possible. Drainage is carried out using a siphon of a special design, which has a separate outlet for connecting automatic washing machines, located under the siphon elbow.
You should not replace such a device with a conventional analogue, since waste water will linger in it, spreading an unpleasant odor.
This diagram shows an option for connecting the “machine” to the sewer system using a siphon of a special design, which provides a special outlet for the hose
The washing machine can be connected without a siphon. With a sewer pipe diameter of 4-5 cm, the outlet for the machine can be connected directly to this element.
The S-curved drain hose is inserted into the pipe so that it does not touch the waste water, and then carefully surrounded by a sealant and sealed. The distance from the inflection point to the floor must exceed 0.5 m.
The maximum hose length is usually indicated in the instructions supplied with the model. If you select a large part, the load on the pump will increase sharply, which can lead to unexpected failure.
Image gallery
Photo from
Washing machine drain hose
Exit to the bath using a retainer
Discharge into sewer pipe
Siphon with a pipe for connecting equipment
If the design of the washing unit does not provide for a check valve, then when installing the model, there is a restriction on the height at which the drain hose is located. The manufacturer usually provides specific information in the instruction manual.
Connection to the sewer system using a siphon
To connect the drainage system this way, you need to install a siphon high under the sink. This will prevent water from returning to the machine. It is not easy to connect the drain under the sink; if the drain hose is short, it needs to be extended. The maximum size is indicated in the instructions for the machine. The only drawback of extension is the increased load on the pump. An additional section of the hose increases water pumping and the pump wears out faster.
Connection to the sewerage system via a siphon
The plastic siphon is equipped with a pipe to which the hose is connected. This connection must be secured with a coupling in order to prevent the penetration of unpleasant sewer odors into the machine and to seal the connection. The drain pipe allows water to enter the drain pump.
With this connection, dirty water is drained into the sewer without hindrance. There are no water leaks under the siphon above the floor. This is due to the sealing of the siphon using a rubber cuff.
In the bathroom, you can easily do what you need to do, since the sink or toilet is not occupied by a hose. Water flows directly into the sewer through a siphon. The only thing that may bother you is the liquid coming through the drain pump and slightly gurgling in the neck of the sink.
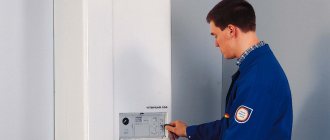
Stage #6 - connecting to the electrical network
Specific information on how to properly connect a newly purchased washing machine to the power supply can be found in the instructions. Particular attention must be paid to safety rules, since the device has a high level of power consumption (1.5 - 2.5 kW) and also comes into contact with water.
To connect the unit to the electrical network, it is important to carefully select the outlet. The device must be grounded; in addition, it is advisable to choose a model with a cover
As a rule, to connect a washing machine yourself, you need a three-wire socket, which has a phase, a neutral, and a carefully insulated ground wire. The distribution board is grounded by using a special bus with a cross-section of at least 0.3 cm.
When connecting, it is advisable to follow several recommendations:
- The best option is an individual power supply . In this case, the washing machine is powered from the distribution panel via a separate input, and electricity is supplied through additionally laid power cables. To prevent wires from spoiling the interior, they can be placed in neat plastic boxes.
- Use of specialized electrical protection devices . In addition to the mandatory circuit breakers, it is recommended to additionally install a residual current device (RCD) into the power supply line of the automatic machine.
- Strict compliance of all components of electrical circuits with requirements /technical/operational characteristics. For wiring, it is important to use three-core cables, and the cross-sectional area must exceed 1.5 sq.cm.
- Connect the socket according to the diagram specified in the instructions. It is important to comply with a mandatory condition - the presence of protective grounding. The wire must be connected to the grounding bus of the distribution panel.
- Connecting a conductor to heating or water supply lines is strictly prohibited , since this can lead not only to failure of the machine, but also to the creation of emergency situations.
- It is better to give preference to sockets with IP44-IP65 when choosing models that have a high degree of safety; It is desirable that they have a lid that protects from moisture and a ceramic base.
- Extensions, tees and adapters should be avoided when connecting a washing machine: the additional connections inevitable in this case can provoke an increase in temperature in the contacts, which leads to breakdown of the unit.
It is undesirable for the socket for an automatic machine to be located in rooms with constant high humidity. If the electrical cord is long enough, it is better to place the power supply in an adjacent space, for example, a corridor.
Image gallery
Photo from
Minimum distance between the socket and the washing machine
Grounding power cord plug
Socket with grounding for washing machine
Violation of the washing machine operating rules
How to connect a washing machine to the sewer
How to properly connect a washing machine to the sewer
You can entrust the connection of an automatic washing machine to a specialist, or do it yourself. By choosing the latter option, we will save money and have the opportunity to spend it on something else, more useful. Previously, we looked at connecting a washing machine to a water supply. Now, let's look at how to connect a washing machine to the sewer, ensuring reliable and safe drainage of dirty water.
Many users believe that there is nothing complicated about this - just throw the drain hose over the edge of the bathtub or sink. But this approach cannot be called optimal, since it is unsafe. Therefore, it is best to connect the washing machine directly to the sewer using special equipment . This is what we will talk about in this review.
When making any connection of the washing machine to the sewer, do not forget to pay attention to the position of the drain hose. It must be laid in such a way that it cannot be accidentally twisted. You also need to monitor the position of the drain hose - nothing should squeeze it, interfering with the normal passage of water.
Main features of connecting the machine to the sewer
There are two main ways to connect a washing machine to the sewer:
- Through a special siphon;
- Directly by securing the drain hose with a plastic hook.
Draining into the bathtub and sink - disadvantages
The latter method is practiced quite often, since plastic hooks are always included with the washing machine. By throwing a hook with a hose over the edge of the bathtub or sink, we will ensure unhindered drainage of dirty water into the sewer. In this case, we do not need to install siphons, mess with pipes and connections. But not everything here is as simple as we would like.
The thing is that direct drainage of dirty water into the sewer contaminates bathtubs and sinks . Having scrubbed our bathtub to a shine, we immediately pour dirty water with washing powder and residual pollutants into it. And it’s good if this dirty water immediately goes into the drain - in many cases, the drain hose only reaches the other end of the bathtub. Therefore, dirty water will gently flow along the bottom, contaminating the snow-white enamel or acrylic (depending on what kind of bathtub it is).
Another drawback
Let's consider the second disadvantage of this connection - the drain hose easily gets knocked off the edges of bathtubs and sinks. Therefore, the threat of flooding will constantly hang over our neighbors. Your floors will also suffer if at this time the machine starts draining dirty water. Hoses fall off not only due to the carelessness of users, but also on their own, for example, during a spin cycle - vibrations have an effect. There are also frequent cases of hoses falling as a result of turning on the drain pump - water running under high pressure through the ribbed hose causes it to twitch.
If the water drains into the bathtub, then it’s not so bad. And if it goes into the sink, it’s a real nightmare - after all, it’s customary to wash your face over a sink. Seeing streams of dirty water, sometimes with a strong aroma of mud, is not so pleasant. Therefore, it is best to connect the washing machine drain to the sewer system through a siphon. Connecting via a siphon is devoid of the above disadvantages - the connection is sealed, there are no unpleasant odors, and the likelihood of water leakage is extremely low. Another thing is that with such a connection you will have to tinker a little. Let's look at both connection methods in more detail.
Connecting the washing machine to the sewer through a siphon
In order to connect the washing machine drain to the sewer, we need a special siphon, which can be purchased at any plumbing store. The siphon is installed under the sink, as high as possible, to prevent water from backflowing. During the connection process, we may find that the length of the drain hose is too short. Therefore, in many cases it has to be lengthened. You can find out the maximum hose length in the instructions for the selected washing machine.
Plastic siphons for washing machines are equipped with pipes to which the drain hoses themselves are connected. We fix the connection between the pipe and the hose using a special coupling. This will help seal the connection and prevent unpleasant odors from entering the sewer.
Advantages of the connection method
This connection scheme is quite common, as it provides an excellent connection between the drain hose and the sewer system. In this case, we don’t have to worry about leaks - the siphon is equipped with a rubber cuff, which makes the connection more airtight. As for dirty water, it will be able to flow freely into the sewer .
This scheme is also good because we can use the sink or bathtub with complete peace of mind. Agree, when the machine is washing, you won’t take a bath - it will fill you with dirty water. It’s also unpleasant to wash your face, seeing in front of you seething streams of foam and the same dirty water with an unpleasant odor. The maximum that can disturb us in the presence of a siphon is a quiet gurgling sound coming from the neck of the sink.
Siphon installation
A siphon for a washing machine is always installed in a vertical position, but not in a horizontal position - such a scheme is erroneous, as leaks are possible. You also need to remember about the correct position of the drain hose. It must first rise to a height of at least 60 cm, and then descend to the drain. Usually it is hooked to the upper part of the case, where appropriate fasteners are provided.
In order to connect the washing machine to the siphon under the sink, the old siphon must be removed and a new siphon installed in its place, with a pipe for connecting the drain hose. We carefully tighten all connections to ensure proper drain tightness . After this, open the water tap and check our assembly. The next step is to connect the drain hose. If there is a special cuff, then that's good. If it is not there, we use a special adapter to connect the hose, tightening it with a metal clamp to ensure tightness.
Some installers advise not to get carried away with tightness - according to them, the presence of a small gap will avoid the effect when dirty water from the sewer is partially sucked back into the tank (due to excessive tightness).
Special siphons for hidden installation in the wall are of considerable interest. On one side they are connected to the sewer pipes, and the other side looks outwards - this is where we connect the drain hoses, tightening the connection with a clamp. Usually a cold water outlet is installed nearby so that connecting the washing machine is convenient and quick - even if you buy a new machine, it will only take 5-10 minutes to install it.
We connect the machine to the sewer without a siphon
You can connect the washing machine to the sewer without a siphon. In this case, the drain hose is connected directly to the sewer pipe. To do this, a tee is placed in it, to which the hose itself is connected. In some cases, a separate plastic pipe is laid to the machine, connected to the sewer drain.
Let's connect
The process of such connection is quite simple - just lower the drain hose into the sewer pipe, fix it and seal the connection. If you don't seal it, you'll have to enjoy all the odors coming from the sewer . By the way, during the connection process, you need to arrange an S-shaped bend in the drain hose - thereby we isolate the machine from the sewer system at those moments when the drain pump is turned off.
By the way, if the drain hose is made straight, without rises, all the sewer stench can get into the tank where the clean and washed laundry is located. Therefore, special attention must be paid to the bending of the hose. It’s best to try to install a siphon that will cut off all unpleasant odors. To prevent sewage water from entering through the drain hose back into the drum during washing, an anti-siphon is used - a non-return valve for the washing machine.
Special adapters are used to connect drain hoses and sewer pipes to help seal the connection and prevent unpleasant odors from entering the bathroom atmosphere.
Drain the water into the sink and bathtub
Another way to dispose of dirty water is to attach a drain hose to the edge of the bathtub, toilet or sink. But in this case, we may face the danger of flooding our own bathroom. In order to protect your bathroom from flooding, you need to secure the drain hose well in such a position to prevent it from accidentally being thrown off.
Do not rest the drain hose on unstable surfaces as it may accidentally fall . It is also not recommended to secure it tightly - then it will be susceptible to falling from vibrations. Remember, if it is not possible to secure the drain hose in a free and safe position, then it is best to connect the washing machine to the sewer through a siphon - it is not very expensive, but it will help protect the bathroom from accidental flooding.
In addition, a siphon with a pipe is a reliable protection against unpleasant odors. But if you do decide to connect directly to the sewer, be sure to give the drain hose an S-shape to isolate the washing machine from sewer odors.
In conclusion, we can conclude that the safest way to connect a washing machine to the sewer is to connect through a siphon.
Connecting the washing machine to the sewer and water supply - 2 main methods
SlavagodM July 14, 2021 Specialization: master of interior and exterior finishing (plaster, putty, tiles, drywall, lining, laminate, etc.). In addition, plumbing, heating, electrical, conventional cladding and balcony extensions. That is, the renovation of an apartment or house was done on a turnkey basis with all the necessary types of work.
Connecting a washing machine to the sewer with a pipe with a diameter of 32 mm
If you need to know how to connect a washing machine to the sewer, then you have come to the right place for advice. I want to talk about two main methods that can generally be applied in this case. In addition, I will explain the features of the sidebar, and also invite you to watch the video in this article.
Two methods
The sewer hose for the washing machine can be fixed to the bathroom
There is another, third way, which you see in the photo above. But this is no longer a connection, but simply fixing the hose with a U-shaped adapter over the side of the bathroom. This U-shaped fitting is included in the kit for every automatic washing machine.
Method one
The blue arrow indicates the location of the connection of the drain hose from the washing machine.
It is not for nothing that I focus your attention on the automatic machine, since there the water is drained forcibly. Therefore, all the instructions below apply specifically to this type of washing machine:
- on the plumbing market there are currently on sale siphons for sinks, sinks and bathtubs with an additional outlet for connecting a hose 22 mm in diameter;
- we can say that there are much more such siphons (with an additional outlet) offered than conventional ones;
- If you install such a siphon, but for some reason you will not connect the washing machine, then the output can be closed with the plug included in the kit.
Method two
Connection via reduction to a 50 mm tee
But the correct connection of the washing machine to the sewer directly into the pipeline may differ slightly:
- the hose, which is designed to drain water in an automatic washing machine, has a diameter of 22 mm . but there is no special socket for bends for 50 mm or 32 mm pipelines;
- therefore, for connection, a rubber reduction is used here with a transition to 22 mm - its price is rather symbolic, but the device is quite suitable for its purpose - it is convenient and airtight;
- if your washing unit is located in close proximity to a 50mm sewer pipe, then of course you will be cutting into it through a tee ;
- but if the machine is located at the other end of the room, then you should use a 32 mm PVC pipe, connecting it to a 50 mm outlet ;
- in such cases, the scheme for connecting the washing machine to the sewer does not require installing the 32nd pipe at a slope . since the drainage here is forced;
- The 32nd pipe is also connected to the outlet socket of the 50th pipe using a rubber reduction .
Installation of rubber reduction
The drain hose on some units has a diameter of 19 mm on the machine side and 22 mm on the pipeline side.
Features of connecting a washing machine
Correct bend of the drain hose
First of all, you should know if your washing machine has a check valve on the drain that only allows water to flow in one direction. Only in this case will you be able to figure out how to properly connect the washing machine to the sewer.
If such a device does not exist, then the manufacturer must indicate the height level at which the hose loop should be located - a water seal is created in this area. This seal mainly serves to prevent the leakage of unpleasant odors that may come from the drain pipe through the machine.
Drain hose for washing machine
In the latest models of automatic washing machines, for the most part, a non-return valve is provided, so in this regard there should be no questions about how to connect the hose. Your task is only to correctly connect the end pipe (it is smooth, without corrugation) with a rubber reduction or with an additional siphon outlet.
In order not to damage the rubber reduction, I usually lubricate it with liquid dishwashing detergent - this makes it easier to pack it into the socket and insert a smooth pipe into it.
The hose pipe is tightened with a coupling number 8
If the connection is made through an additional siphon outlet, then you just need to remove the tube that is inserted there from the factory and install a hose pipe instead. To seal the connection, there is a coupling - it is indicated by the number 8 in the image - it presses against the conical gasket, which, in fact, provides a seal in this place.
That is, the tube that is in this siphon from the factory is installed there more to keep these parts in working condition.
You can use fittings for extension
If a standard drain hose does not reach the place where it inserts into the sewer, then it can be increased by adding a piece of the required length and connecting these fragments with a fitting and safety with 16x27 mm steel clamps. As I already said, the end pipes can have different diameters, which is why there are connecting fittings for two options - you see them in the top photo.
There are also modular hoses on sale, where each fragment is 0.5 m long, so you can implement any requests. But do not forget that the longer the outlet, the more difficult it is for the pump to cope with the water supply.
Connection to water supply
Water supply hose
In this case, oddly enough, connecting the unit to the water supply is much easier than to the sewer, since here, in fact, there is no choice. In any case, the water supply pipeline must be located near the automatic machine and there must be shut-off valves in the form of a straight or corner valve. There are two clamping nuts on the hose itself, therefore, there must be a fitting with an external thread on the machine itself and on the shut-off valve.
Connection to water supply shut-off valves
It is noteworthy that the nuts are designed for a 3/4-inch diameter, therefore, the shut-off valves must have the exact same thread. But if a special tap that is designed for this purpose is made at 3/4, then the water supply wiring most often has 1/2 inch. Therefore, in some cases a reducing fitting will be required for connection.
Conclusion
In fact, connecting the unit to the sewer with your own hands is quite simple, if all connections are made carefully, that is, hermetically. But if you still have a misunderstanding on this issue, ask about it in the comments.
Self-connection of an automatic washing machine
When purchasing a washing machine, you can seek help from specialists to connect it. However, this procedure is quite easy, and many craftsmen are able to cope with it on their own. We will find out how to connect a washing machine without calling specialists, and where in the apartment it is best to do this.
We carry out preparations
First of all, we carry out the preparatory work: we select the ideal location for installation. The most common places are the bathroom and kitchen. When choosing a point where you can install an automatic washing machine, you should adhere to the following factors:
- close location of water supply, sewerage and electrical networks to connect a household appliance;
- harmony with the surrounding interior;
- flat floor surface;
- Convenient installation and operation.
Disputes sometimes flare up among users about the location of the unit. Some argue that connecting a washing machine in the kitchen is the best option for installing it, while others prefer the bathroom.
In order not to create unnecessary problems and financial costs for yourself, it is better to install a washing unit in the bathroom.
Even if in some city apartments this room is quite small in size: in this case, you can place your assistant under the sink. Just make the necessary measurements before purchasing to choose the correct height.
Experts have their own point of view on the installation issue:
- Standard placement is in the bathroom, where there is easy access to communications, the floor is tiled.
- A kitchen is considered a viable option to save space in a small bathroom, but that's where the benefits end.
- Installation in the hallway as a last resort. Pros - there is no need to look for a place in the kitchen or bathroom, cons - additional communications are needed, and connecting to the water supply network will be problematic.
- Temporary connection when the drain hose is lowered into the bathtub or toilet (with a combined option).
- Stationary - a connection is made into the sewer, and here users often encounter certain difficulties.
- the length of the drain hose should not be too long, as this will increase the load on the drain pump, and it may fail prematurely;
- When you connect the drain to the siphon, you prevent unpleasant odors from entering the machine from the sewer, which is an undeniable advantage.
When all the options have been thought through and the installation location has been chosen, we proceed to the next stage of preparation - dismantling the parts of the washing machine that act as stoppers and dampers during transportation.
Any technician from the service center will confirm that this is a very important stage of preparation. If this is not done, then when starting up, important components of the washing machine will fail.
First of all, we remove the transportation bolts, then the spacer bars made of wood, and the safety brackets. In the operating instructions you will find the item “how to unlock a household appliance yourself,” where everything is described in detail.
Connecting the machine
Connecting a washing machine with your own hands is not difficult for those who understand technology, deftly handle various tools and have minimal knowledge of how to handle pipes, adapters and plumbing. If all this is unfamiliar to you, then it is better to contact specialists, having previously found out how much it costs to call a specialist to your home.
The diagram for connecting the washing machine to communications is shown in the photo; we will look at each action in more detail.
To the sewer
At first glance, organizing the draining of water from a car into a sewer riser is not a difficult matter, but in practice everything depends on the specifics of the connection, which is carried out using two main methods:
Important! For proper drainage, the connection point of the hose to the siphon must be at least 50 cm from the floor level; the same rule must be followed when temporarily draining into a bathtub or washbasin.
The drain hose is connected to the sink siphon for washing or drainage, as shown in the photo. As a result, the connection will be quite tight.
To the water supply
A home handyman needs to know how to connect a washing machine to the water supply lines without adding an inlet hose with fittings from the manufacturer. If the machine is located at a distance of more than three meters from the water pipe, then the best option is to make a separate connection using a metal-plastic pipe to ensure that there are no leaks in the most inconvenient place.
At the connection point, it is necessary to install a tee, a separate valve to turn off the water in emergency cases.
If everything you need is within the length of the inlet hose, then connecting the washing machine yourself will not be difficult using one of the methods (see photo).
When connecting, you must fulfill the basic and quite important requirements:
If you comply with these requirements, the floor in the room will be constantly dry while pouring water into the household appliance. That's all the tricks on how to independently organize the connection of the washing machine to the water supply and sewerage system.
Power connection nuances
Household appliances of this class, such as a washing unit, have a very high level of electrical energy consumption in the range of 1.5-2.5 kW. In addition, they are constantly in contact with water, so connecting the washing machine to electricity yourself must be done in compliance with all electrical safety requirements.
When the apartment has wiring based on aluminum wires, it is necessary to conduct a separate one - with copper wire. consisting of three cores with a cross section of 1.5 square meters. mm, separate AZO (residual current circuit breaker) and RCD (residual current device). In particular, this applies to old houses. The cable should be chosen as NYM type with a triple insulation system, good rigidity, and convenient for installation in walls.
When connecting the washing machine to the power supply yourself, you need to know that the household appliance is plugged into a separate waterproof outlet. When purchasing, remember; the higher the index of degrees of protection (there are only 8), the better. The socket is connected to the electrical panel via a separate switch. with a rating of at least 25 A.
When the household appliance is in the bathroom, the machine must be unplugged when taking a shower to avoid electric shock.
If there is no grounding, then if the machine malfunctions during operation, there is a real danger of electric shock. Do not touch the body under any circumstances; prohibit children from entering the room when washing is in progress.
Connect to the electrical panel as follows:
- the blue wire is connected to zero;
- the green-yellow wire is the grounding wire, it is attached to a separate screw on the shield body;
- phase - to a separate switch or RCD.
Modern washing units must be connected to a residual current device. which will protect you from unwanted exposure to electric current. The device must have the following parameters: current strength 16-32 A, and leakage value - 10-30 mA.
When the apartment is without grounding. like the majority in the Russian Federation, the connection must be made according to the following scheme, as shown in the figure. If you independently connect to the electrical panel on the floor in the entrance of an apartment building, consult an electrician from the housing office or ask him to perform these operations for a fee.
Important! If connected incorrectly, the neutral wire burns out and there is a real danger of electric shock to people.
To properly connect a washing machine to the home electrical network, you must strictly follow these recommendations:
Separately, I would like to pay attention to the location of the socket for connection: it should not be located below 60 cm from the floor level and no further than 130 cm from the body of the machine.
We must remember that the electrical connection of a washing machine is the most difficult. If you know an electrician, then use his help: he will probably know how to properly connect the washing machine.
Machine leveling
The washing machine must be positioned strictly horizontally. which is done using a building level, deviations are allowed no more than 2 degrees. The level is installed on the top of the housing. Leveling is carried out using height-adjustable legs; after finishing, they are secured with special nuts - tighten them counterclockwise with a wrench, but without fanaticism.
Place a rubber mat under the washing machine to prevent the feet from slipping. It is strictly forbidden to level your unit by placing foreign objects under the legs: if they vibrate, they may slip, and all your efforts will be in vain.
It is necessary to technologically correctly align the machine body; to do this, simply follow the recommendations of specialists:
- How to properly connect a washing machine to a sewer Connecting a washing machine to a sewer No housewife today can do without a washing machine...
- Connecting the washing machine to the water supply and sewerage system with your own hands Installation location Preparatory stage How to connect to the water supply system How to connect to the sewerage system Other installation stages...
- How to turn off the washing machine during washing? Ways to force the wash to end What should I do? What to do if there is a power outage? There are situations when...
- Anti-vibration mat for a washing machine Causes of vibration and methods of elimination Purpose When should it be installed? Prices and where to buy? Reviews…
Stage #7 - test activation
Having completed all the work described above, you need to check the correct installation by starting the washing machine one by one to operate in all modes.
The final stage of work is to check all systems of the washing machine. It must be carried out strictly according to the instructions and affect all sides of the connection.
To do this, you need to inspect all the assembled components, and then conduct a test run of the machine without laundry, during which you need to pay attention to the following options:
- the period of time (it should be short) during which the tank is filled;
- no leaks;
- correct functioning of the drain;
- uniform rotation of the drum;
- good spin;
- full heating of water, which occurs 5-7 minutes after the completion of water collection.
At all stages of operation of the unit there should be no extraneous sounds.
You can install and connect to communications yourself not only a washing machine. We suggest that you read the installation instructions for the dishwasher. The step-by-step guide we offer will provide effective assistance in carrying out the work yourself.
How to connect a drain in a private house without a sewer system
At a dacha or in a private house there may be no sewerage system, in which case the drainage is carried out “overboard”. If there is no sewerage system in the house, you should not place a drain hose up to 500 cm long on the floor. A long hose collects an amount of water commensurate with the volume of liquid in the drum. Therefore, water can constantly be filled and drained.
It is not difficult to install a drainage system at your dacha; just install a large water tank and lower a hose into it. For pressure, install 2 tanks of water on the 2nd floor of the house.
Connecting the drain of a washing machine in a private house
If there are no large tanks at your dacha, and the water pressure is excessively low, you should think about purchasing a pumping station. This is necessary, because low water pressure leads to breakdowns of the washing machine.