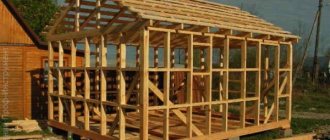
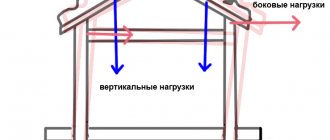
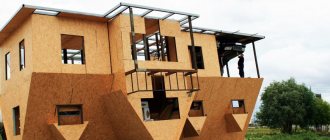
The framing of a frame house is the most important connecting element for the high-quality construction of frame houses on pile and columnar foundations. The lower piping ensures the unification of the foundation structures with each other, as well as strong adhesion between the foundation and walls. The top trim makes all the walls and partitions of the house one whole and serves to evenly distribute the load created by the floors or roof.
Bottom frame of a frame house
Design and purpose of the harness
Houses built using frame technology are lighter in weight compared to their counterparts made of wood, concrete blocks or brick. Most often, they do not require the construction of complex monolithic foundations. It will be enough to equip a strip or pile-screw base.
Pillars and piles are designed to support the building, protecting it from contact with the ground, preventing moisture from entering from the outside and providing ventilation for wood structures. Since these elements are located separately, their common connection is required. For this purpose, a grillage is used, which acts as a framework for the foundation. For frame houses, the function of tying the structure itself and the foundation is combined only by the lower tying, and the grillage is not used.
Using timber, logs, boards or a metal channel, a strapping is installed, guaranteeing the strength of the entire structure of the house. In addition, it also serves as the foundation for all the building’s load-bearing elements: frame posts, jibs, panels, walls.
The lower frame of a frame house built on screw piles is designed to distribute the load from the total mass of the building, preventing it from warping or collapsing. In the case where the piles are located at a distance of at least half a meter from the ground level, the mandatory arrangement of the lower trim is required.
For some types of buildings, piping is not mandatory. For example, if the house has a small area and the height of the piles from the ground surface is less than half a meter. In addition, tying is not necessary if a monolithic strip foundation is used. However, if the building has several levels and a complex structure, then the piping of the second floor and subsequent ones for a frame house is mandatory.
Node design
Technology for arranging a warm corner
The frame house design includes vertical posts that are mounted on top of the lower frame. Nails act as connecting elements. Metal corners are used to fasten beams without cutting into a T-shape. Fixation with nails is used at the joint with partial cutting of the lower beam - this is the most difficult stage in the independent construction of a wooden building.
Start laying the strapping by marking the corners, according to the sketches.
A joint without cutting is relevant for corner connections of supports. Butt-type fasteners with plate fixation are used on the main elements of a house in construction. Craftsmen use fasteners with partial insertion. This method prevents the lumber from moving when drying out.
The volume of cutting for the vertical support of the structure should not be more than 30-45% of the thickness of the bottom trim beam.
In places where corner joints are not cut, fixation occurs with metal plates using wood screws. Perforated steel corners are used for reinforcement. It is recommended to choose self-tapping screws with a golden head. To strengthen the corners, it is necessary to carry out technological treatment - hardening - or use metal with a cross-section of 2 mm.
Fastening with cutting is used to connect racks in the center of the wall. Recesses are prepared, supports are installed in them and secured with nails. The structure is strengthened by installing vertical jibs, which are rested on one side against the rack and on the other side against the frame. For convenience, the ends of the boards are cut down, making them beveled.
List of strapping requirements
Materials and structures for tying a frame house must meet all the requirements of the technology for constructing this type of building.
The most durable binding can be achieved by using double or triple boards connected to each other. The board must have the same geometry and dimensions and be fastened together using anchors or staples.
The dimensions of the strapping parts (board thickness, beam cross-section or log diameter) are selected based on the thickness of the building walls.
Coniferous wood is the most optimal for lining houses built using frame technology. This is due to its strength characteristics, service life, resistance to temperature changes and exposure to adverse atmospheric phenomena. Coniferous wood resin prevents putrefactive processes and increases moisture resistance. In addition, coniferous wood materials have an attractive price.
Wood material for strapping must be treated with antiseptic substances to protect it from rotting, and a fire retardant must be used to protect it from burning. All this must be done before starting work on the installation of the harness.
The timber or board used should be made from wood with the most straight trunk possible. The wood material does not have to be smooth, but it must have an even geometry.
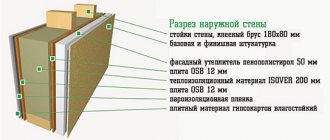
External wall cladding
Taking on a large load, the outer cladding of the wall frame ensures the rigidity of the structure and its stability during operation. Properly selected building materials for cladding will allow the walls to maintain their shape for many years and withstand negative external factors.
Application of OSB-3 boards in frame construction
OSB-3 boards (OSP-3) are moisture-resistant oriented strand boards of increased rigidity. They are made by pressing and gluing three to four layers of wood chips. In each layer it has a different direction, which gives the material increased rigidity.
Advantages of OSB-3 boards:
- The optimum ratio of price and quality.
- Easy to process - cutting, drilling, grinding.
- Suitable for using various fastening elements - nails, screws, dowels, etc.
- Resistant to splitting even when fasteners are used close to the edge of the slab.
- Do not deform due to temperature changes and various atmospheric conditions.
The main disadvantage is the low vapor permeability. Walls made of OSB boards do not “breathe”.
Of no small importance is the fact that synthetic resins are used for gluing chips. This means that the cladding material can release formaldehyde and phenol into the air. However, stoves made according to European standards are safe for humans.
Note! The most environmentally friendly material is the one marked E0 and E1 .
Cement particle boards (CSP)
DSP is a material based on a mixture of wood chips and high-grade cement. To improve its performance properties, special additives are included in the composition.
Cement particle boards have the following advantages:
- Resistant to moisture and, accordingly, to mold formation.
- They are not afraid of rodents.
- Environmentally friendly. They do not release harmful substances into the air.
- Fireproof, belong to the category of low-flammable materials.
- Retains heat well.
- They have good vapor permeability and are breathable.
- When covering the frame, a flat surface is formed.
In contrast to the advantages of DSPs, they also have disadvantages:
- Heavy weight.
- Difficulty in processing the material. Drilling and cutting require a lot of physical effort. At the same time, a lot of dust is generated during the work.
- High price.
The recommended thickness of cement particle boards for frame construction is 12-18 mm.
Fiberboard for external cladding
Fiberboard is wood fibers pressed into a board. As in the production of OSB, they are laid in several layers, in each of which the fibers have their own direction. No adhesives are used. Enough pressure, exposure to high temperatures and resins contained in coniferous wood.
What characterizes this material on the positive side?
- It provides good heat and sound insulation of rooms.
- Environmentally friendly.
- The slabs are light in weight.
- Good vapor permeability.
The main disadvantage of fiberboard is its low stiffness index. When using this material, it is necessary to install jibs and select rigid internal lining.
Note! The recommended thickness of fibreboards for cladding the walls of a frame house is at least 25 mm.
Covering the frame with plywood
Plywood is a sheet material made from several layers of veneer that are glued together. In frame houses, regular walls made of moisture-resistant plywood have a thickness of at least 12 mm.
Useful: Methods for forming and covering warm corners in a frame house
Advantages of plywood:
- not afraid of low temperatures;
- easy to process;
- high compressive strength;
- affordable price.
The disadvantages of plywood include its flammability, the presence of synthetic resins, and its tendency to chip.
Attaching the outer skin to the frame
Attaching the outer skin to the frame is done according to general rules.
- The presence of a temperature gap of 3-5 mm between the plates (sheets) is mandatory.
- Their joints should be in the middle of the frame beam.
- To fasten the sheathing, self-tapping screws 55-70 cm long are used. At the same time, they must go into the frame stud to a depth of at least 40 mm.
- Self-tapping screws are screwed in at a distance of at least 10 mm from the edge of the slab.
- Fixation of sheets or slabs is carried out in increments of 15 cm - along the edge, in 30 cm - in the center.
Since you will be using a huge number of fasteners, stock up on high-quality power tools in advance.
Bottom harness
After the foundation is erected, the lower frame of the frame house is arranged.
Material selection criteria
If the construction is carried out on your own, then it is logical to choose materials that do not require the use of special equipment to work with.
What to look for when choosing:
- The material must withstand the maximum load on the building structure;
- Be resistant to temperature changes and mechanical stress.
timber
A reliable material for tying a frame house is considered to be timber with a cross-section of 15 by 15 cm or 20 by 20. A correctly selected size will make installation easy and create a strong and even base. The downside is the possibility of cracks appearing if the load on the wood is uneven. In addition, if the timber has not been sufficiently dried, deformation is possible when it dries.
Board
Strapping with boards is considered quite strong, because deformation processes are minimal, since shrinkage is evenly divided by the number of boards.
Log
Inexpensive and reliable building material for framing a frame house. Since the log does not undergo special treatment, during which the wood fibers are destroyed and its strength is reduced, it can withstand heavy loads, negative environmental influences and temperature changes. The disadvantage is the difficulty of installation due to the irregularly shaped cross-section, which requires careful fastening to the foundation.
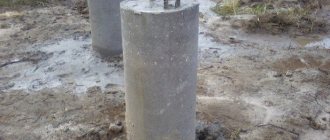
Installation of piping on the foundation
Based on the type of foundation, the method of attaching the strapping changes. Most often, strip, pile or column foundations are installed for frame houses.
Strapping on pile and columnar foundations
It is first necessary to install a layer of waterproofing on the surface of the foundation. You can use bitumen or roofing felt on mastic, as well as other materials.
The board or timber (depending on what is chosen) is laid out for subsequent installation.
The framing of a frame house made of timber is carried out using the “half-tree” method or in a joint at a corner.
The strapping elements are mounted to the grillage or piles using anchors or pre-installed threaded rods.
The harness should always be checked for evenness using a level. The corners are fastened with galvanized corners, bolts, screws or nails. The logs are fixed along the strapping with the necessary spacing.
Strapping on a tape base
The work order is as follows:
- First of all, lay out and secure the waterproofing layer;
- Next, make the connection sockets in the corners;
- The harness is fixed with anchor bolts or brackets;
- Using fasteners, corners are reinforced;
- The horizontal level is checked; if there are inaccuracies, they are eliminated using shims or wedges.
Strapping beam connections
The timber is fastened along its length and angles in accordance with technology. Compliance with this guarantees the reliability and long service life of the harness.
Methods for attaching timber strapping:
- The "root tenon" is used for joining at corners;
- “In the paw” the beam is fastened along its length;
- “In half a tree” the corners are fixed;
- “Butt” - similar to the previous one.
Cuts for attaching timber are made in various ways. You can use a wood hacksaw, a carpenter's axe, or a chainsaw.
The work is performed as follows:
- Markings are applied horizontally and vertically in accordance with the required dimensions of the cutting. The width of the horizontal cut should be equal to its side. The depth is half the vertical part of the beam. For example, if the side of the beam is one hundred millimeters, then you need to cut 100 millimeters horizontally and 50 millimeters vertically;
- Sawing begins along the vertical markings on both sides. In the end, you will get a cut that has smooth planes and allows you to qualitatively connect the timber.
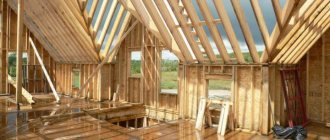
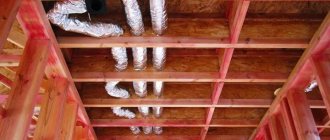
Installation of floor joists
The basis of the ceiling will be logs, similar to how the subfloor is constructed. However, it should be noted that the lower logs can be further reinforced with columns, while the ceiling beams rest on the walls only at their ends. You can, of course, install additional supports under them - but this depends on the interior decoration of the rooms and the usable area of the house.
However, the denser the logs are installed, the more weight they can withstand. Calculation of the installation step for floor joists is usually made at the house design stage. Most often, a distance of 1 meter is sufficient for ceilings in standard houses.
If the vertical posts bear the weight of the roof and roof, then the ceiling joists only bear the weight of the second floor floor itself (if a second floor is provided), as well as the load from the weight of insulation, furniture and people. It is necessary to take into account the maximum bending of the floor beam for fracture. The bending of the beam is determined by special tools.
In this case, we are talking only about single-span roofs - when the rafters do not rest on the load-bearing wall.
Usually, when calculating, it is assumed that the bending of the ceiling beam should be no more than 1/300 of the length of the log for interfloor floors and 1/250 for attic floors. That is, with a ceiling 9 meters long, the maximum deviation should be no more than 3 cm (for an attic - 2.5 cm).
After laying the boards, there is always a slight deflection, but if you treat them with a special compound, under load, this deflection decreases - the boards seem to tighten. Square beams used for flooring can be replaced with boards of smaller thickness installed on the edge. But in this case they will require either insertion or additional fastening with corners. Yes, and such a ceiling will have to be insulated with a thicker layer of insulation
In general, the size of floor beams depends on
- Number of floors
- Expected loads
The connection of the floor beams to the top trim is carried out as follows. Typically, the beams are laid parallel to the side of the shortest wall, according to the floor plan.
Frame house floor
The piping of the first floor of a frame house is the basis for attaching the subfloor joists. For work, use an edged board with a cross-section of 50 millimeters, mounted on an “edge” with the elements at the same distance from each other. Using the bottom trim makes it easy to install joists and strengthen the floors in the building.
Options for installing floor joists on the frame:
Support on an additional bar attached to the framing of the frame house. This option requires additional fastening of the logs to the frame, since the block that supports the logs does not create a connection between them and the frame. The logs are installed on metal corners or plates on the harness, so the logs hang on the mount without a support point from below.
Fastening the log to the harness with support on it. This method allows you to securely connect the strapping and floor joists, creating a reliable structure. This option requires the creation of additional connecting elements for the installation of racks and frame wall elements. This technology is suitable for assembling a structure on a construction site, then lifting it and attaching it to subfloors.
Preparing vertical racks - choosing a board
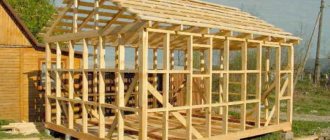
There are several basic techniques for constructing a frame using frame technology. The first method is to assemble the frame frame on the floor, lift it and install it vertically around the entire perimeter.
The second method is to install each rack vertically separately.
Fundamentally, both methods differ in that the racks are fastened in the first case to the upper and lower beams of the frame, and in the second - directly to the foundation frame. However, the fastening methods themselves are the same, so let’s take a closer look at the second case, as the most indicative.
Installing racks individually and in an assembled frame
The racks perform an important function - ensuring the structural strength of the frame, taking on significant (up to 3-5 tons) loads from the roof and roofing. The material for them is accordingly chosen to be durable and of high quality.
The heaviest loads fall on the corner posts, so a massive beam is taken for them - usually 100x100 mm. Side racks located along the wall line carry less load individually, and for them, as a rule, a beam with a cross-section of 40x100 mm is sufficient. You can also use beams of larger sections, but this will generally cost more. If necessary, you can sew racks from two boards of a smaller section, 25-30 mm thick.
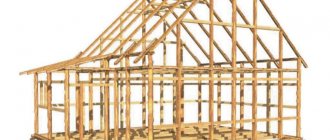
Upper harness
The top trim of a frame house is analogous to the reinforced belt of houses made of blocks or bricks. It is designed to fasten the building elements along the upper part, distributing the weight of the roof, ceilings and joists, without allowing the walls to deform from their weight. Most often, the lower and upper trim of a frame house are made from the same materials, having the same characteristics and methods of fastening.
Attaching floor beams to the top frame
The top trim is attached to the frame posts using the strapping method or using galvanized steel corners.
Installation using corners. The corners, which have massive dimensions and a stainless surface, are fixed with wood screws and fasten the racks of the house frame and the frame.
Fastening with grooves. This option is considered more labor-intensive. Cutting is carried out strictly vertically under each rack. If there are inaccuracies, this will lead to distortion of the racks and the entire structure. Fixation is carried out using two nails 15 cm long. The nails must go into the posts at least 10 centimeters.
Attaching rafters to the top frame
The top frame of a frame house is designed to take on the load from the rafters of the building and distribute it evenly across the walls.
Fastening methods:
- Cutting is a popular method, thanks to which the top trim of a frame house built with one’s own hands is most often performed. It is also necessary to additionally secure the structure with nails on both sides;
- Fastening to steel or galvanized corners.
Cutting or cutting should be done in the rafters, and not in the support beam. This allows not to disrupt the load-bearing function of the strapping and strengthens the structure.
Only complete and strict adherence to the technology of constructing frame houses guarantees the correct functioning of individual parts of the structure, ensuring its reliability and durability.
Options for bandaging the corners of the timber box
Corner strapping diagram.
- Half a tree. This is a frequently used method of installing frame frame house frames and walls. It is performed more simply than others: two beams are laid one next to the other so that each of them is one of the sides of a right angle. In other words, the first one is placed in a perpendicular position relative to the other.
- One-sided groove “in the head”. In this option, you will need to make cuts in each of the beams and lay each of them at right angles to the other. The ends of both beams should protrude 10-15 cm beyond the corner point, forming a “cross”.
- In a dressing with a root thorn “in the fringe”. Here the installation process is in many ways similar to the first one, “half a tree”. The difference is that the end of one beam is cut out in such a way that a “spike” 4-5 cm high is formed in the middle. A slightly smaller groove is cut out in the second beam. Next, the lumber is at right angles and the beams are tapped together so that the “tenon” fits tightly into the groove.
- With hidden dovetail spike. This version of the corner connection is in many ways similar to the previous one. But the shape of the “tenon” and groove is different. It resembles a dovetail. The method of connecting the bars is the same, but in this case you need to tap from above, since the “tenon” will be placed on the groove and not inserted into it.
Return to contents
How and with what to fix angles
Scheme for covering the corners of a frame house.
- Anchors. This method is good because the fastening is very strong. Not only are the beams connected to each other, they are also attracted to the foundation, which provides the frame with the necessary rigidity.
- Using 150 mm nails. To fix each corner you will need 4 nails. It is necessary to maintain the required distance from the nail to the edge of the beam. It should not be less than 2 cm.
- Using a wooden pin (dowel). To make this fastener, it is recommended to use dry oak wood. Before installing the dowel, create a hole with a diameter of 2 cm, but slightly smaller than the size of the pin. The optimal shape for such fasteners is square. When hammering in the dowel, you need to leave at least 10 cm above the surface of the beam, as it will be needed for further laying out the corners of the frame house.
Return to contents