Attaching heating radiators to the wall surface is not a labor-intensive process, but it has its own characteristics and subtleties. Installation of heating radiators to the walls is one of the important stages of work on organizing a heating system. The rules for fixing radiators primarily depend on the material from which they are made. To do this reliably, you should know about the types of these elements of the heating system, fastening options and take into account other subtleties of the work process. Then attaching radiators to the wall will not cause you any difficulties.
Types and features of batteries
- Cast iron radiators are characterized by thick walls and resistance to corrosion. They retain heat for a long time and have a long service life. However, it is the large weight of these products that makes it necessary to make the most durable fastenings and supporting stands for them.
- Steel batteries are light in weight, which makes their installation not difficult at all. But they are short-lived and quickly lose heat.
- Aluminum products for the heating system are attractive in appearance, the installation of which is also simple due to their light weight.
- Bimetallic radiators are considered the most universal, combining the properties of steel and aluminum structures. Their installation is also not labor-intensive.
Mounts for different types of batteries
To attach heavy heating appliances to the wall, you should choose massive holders that can easily hold a lot of weight for many years. For such products, thicker, more solid metal is used, most often marked as “reinforced”. For this purpose, brackets and hooks are available for sale, supplied with dowels. After drilling a hole in the wall, just insert the dowel and screw the hook into it.
Often, cast iron batteries are equipped with legs that can be adjusted in height. In order to hang them on a wall made of concrete or brick, you can use standard dowels, but in the case of plasterboard or wooden walls, it will be necessary to provide an additional floor base. In this case, the legs will come in handy.
To attach bimetallic, aluminum and steel radiators to the wall, similar brackets are used, only made of thinner metal. Convenient in this case are corner fasteners, which are considered universal and equipped with recesses for the collector. Such parts can be fixed on both the right and left. However, for heating radiators of these types, there are also special racks that allow them to be installed on the floor.
Basic subtleties of work
The type of heating system plays an important role in the entire operation. With single-pipe heating, a bypass will be necessary, allowing, if necessary, to turn off individual sections of the heating system. To work on mounting radiators, you will need to prepare all the necessary tools and materials:
- plugs and stoppers;
- dowels;
- taps and brackets;
- construction level and hammer drill.
When attaching radiators to the wall, you should follow some rules to do the job as efficiently as possible. First of all, the following dimensions must be observed:
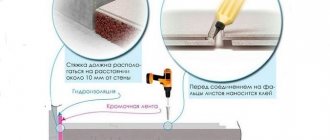
- Be sure to take into account the distance of the structure from adjacent surfaces. So, the space from the floor to the radiator should remain at least ten centimeters. Approximately the same distance should be maintained from the batteries to the windowsill for uniform air distribution.
- The distance from radiators to walls must be maintained within three centimeters.
In addition, you should take into account other nuances that allow you to correctly fasten the elements of the heating system:
- Square footage of the room. The number of sections of the heating device depends on this parameter, which plays an important role when mounting.
- The number of brackets must be chosen with reserve. It is advisable to use at least three brackets: two on top and one on the bottom. But it is best to use four, two at the bottom and two at the top. If the battery size exceeds 10 sections, it is recommended to increase the number of brackets to six.
Calculation of the number of sections
In order for radiators to provide the required heating power, it is necessary to determine the optimal number of sections (for sectional devices). SP 60.13330.2010 is used as a regulatory guide, containing recommendations for the calculation of heating, ventilation and air conditioning systems.
The technique is not simple, it involves the use of various coefficients and the following data:
- room volume;
- orientation relative to cardinal directions;
- climatic parameters;
- presence of thermal insulation of external surfaces;
- number, type and sizes of windows;
- characteristics of the heating system;
- power of one radiator section.
In practice, when installing heating batteries in an apartment or private house, simpler calculation methods are used that give results with acceptable accuracy.
Method No. 1. Determining the number of sections based on the required standard heat transfer of 100 W per square meter of room.
For example, you need to calculate sections for a room of 18 sq.m. Heat transfer according to the standard is 18x100=1800 W. We divide this value by the power according to the passport of 1 radiator section. For aluminum it is about 200 W, bimetallic 150 W, cast iron 100 W.
We get the required number of sections:
1800/200=9 aluminum or 1800/150=12 bimetal or 1800/100=18 cast iron.
Method No. 2. Using an online calculator. In each field of the program you need to enter your data, the radiator model and click “Calculate”. You will receive an answer in 1-2 seconds, and specific parameters and coefficients will already be taken into account.
The required power calculated using method No. 2 may differ from the value obtained by method No. 1 by 10-50%, both up and down. In order for the heating system to operate efficiently and be economical, it is recommended to carry out calculations using a more accurate scheme.
Procedure for attaching batteries to the wall
- After carrying out all the necessary calculations and purchasing materials, you can begin fixing the heating devices. Before mounting, the wall surface should be prepared by plastering or wallpapering.
- The space for hooks or brackets is marked. Using a building level and a ruler, all measurements are carefully taken, and only then drilling is carried out.
- Dowels are inserted into the holes made and fasteners are screwed in.
- After hanging the battery, you need to check that it is fixed correctly and make sure that there is no play. After trying on the batteries, it will be clear whether the work was done correctly. If the radiator is seated tightly, immobilized and its weight is distributed among the fasteners, then we can conclude that everything was done technologically correctly. A horizontal level and gaskets of the required thickness, which are installed where they come into contact with the brackets, will help eliminate the possibility of radiator distortions.
- Only after this should you begin connecting radiators to other elements of the heating system.
Required Supplies
Polypropylene pipes for heating
In hardware stores, heating radiators are sold without accompanying elements, so for installation you will need to buy the following parts:
- Polypropylene pipes.
- Two pass-through plugs plus one blind plug for the required diameter. To bleed air when starting the heating system, purchase a plug for the Mayevsky tap.
Mayevsky crane
- A PPR end cap with a diameter of 20 mm, as well as a thread for it, which will allow you to connect to neighboring batteries.
- Gaskets for each plug.
- To turn off the radiator and carry out maintenance work, you will need American taps.
Ball valve (American)
- To turn on the heating system when the “American” ones are closed, you will need a polypropylene tap. The coolant will continue to circulate even when the battery is removed.
Problems of insufficient fastening of batteries to the wall
Correct and reliable fastening of heating devices to the wall is a guarantee of peace and well-being of apartment residents. Insufficient fixation of batteries, especially in combination with the following factors, can lead to deformation of the product or depressurization of seams, which will cause leaks. That is why it is very important to install them correctly and reliably.
So, the factors that aggravate the improper fastening of batteries:
- mechanical damage to devices during their operational life;
- distortions of heating radiators when filling them with water.
How to connect two heating radiators to each other
There are two connection schemes:
- Single-pipe. With this method, there is no need for a second pipe, which saves costs, however, using this scheme, each subsequent radiator will heat less and less, its temperature will be five degrees less.
- Two-pipe. In this case, water flows through the supply pipe into each individual radiator, and a separate pipe comes out of it, leading the water back to be heated.
There are three types of connection between a heating radiator and pipes: one-sided, diagonal and bottom. Each of these schemes has its own advantages and disadvantages.
- One-way (side) is a scheme in which the path along which the water enters and the outlet pipe is connected to the same section of the radiator. Those. Water is supplied to the top of the battery, and water is discharged from the bottom, on the same side.
- The lower circuit is used in cases where the supply and discharge pipes are close to the floor. The connection is made from opposite sides from below.
- Diagonal, or as it is also called “cross”, is the most energy-efficient, since heat loss is minimized. With this method, hot water is supplied to the top of the radiator, and the outlet pipe is supplied to the bottom on the opposite side.
In conclusion, I would like to say that furnishing your home is an important matter and should be taken with the utmost seriousness, do not use cheap materials and do not skimp on really important things.