A barn is a necessary additional building that sooner or later the owners of suburban plots begin to build. The benefits of such structures are obvious. Here you can store work equipment.
You can take things you don't need in the house here. Gardeners and gardeners keep a wide variety of tools in their sheds: shovels, rakes, hoes, and so on.
In other words, the shed helps free the house from unnecessary junk and also serves as a storage room for the necessary things needed when working on the site.
This building is often called the utility block.
Simple construction available for self-construction
How to build a shed interests many summer residents. The simplicity of construction inspires many with the idea that they can carry out such construction on their own, without inviting anyone from the outside.
At the same time, it is necessary to take into account many points related to the location of the object and design data. Decide on the order of work, find out process technologies.
How to insulate a barn - working from the inside
Shingling, although a budget option, will take you a lot of time. If you value time, then instead of budget options you can use more expensive ones, but also more effective in terms of speed of work. These include the option of insulation with mineral wool and polystyrene foam. There is no point in talking about the advantages of materials - we have already talked about this more than once in articles devoted to these heat insulators. Let us remind you of the disadvantages - mineral wool is easily saturated with moisture, as a result of which it loses its thermal insulation qualities and also cakes over time.
When insulating with mineral wool, nails are hammered onto the walls in a checkerboard pattern to create a reinforcing mesh. Rolls of mineral insulation are unwound and laid on the walls, while a reinforcing mesh is created using rope to hold the wool in the desired position. There is no need for mesh if you use rigid or semi-rigid slabs instead of soft rolls. But in this case, you will need to make a sheathing of boards with your own hands.
The distance between the boards should correspond to the width of the slabs, and even be a couple of millimeters smaller so that the slabs fit tightly into the space. How to insulate a shed with mineral wool for the winter? The secret is to prevent the material from getting wet due to condensation. Therefore, a layer of vapor barrier is placed on top of the insulation - glassine or more modern versions of membranes.
Insulating foam inside a shed is even easier. If the base is strong, you can glue the insulation boards with your own hands using any available glue, even regular PVA. Both polyurethane foam and liquid nails are suitable. For greater strength, you can fasten the slabs together with the adhesive base using special dowels. In any case, after this, be sure to protect the material from mechanical damage. Any sheet materials will do. In a chicken coop this could be flat slate, and in a small horned shed it could be sheets of plywood.
How to Design a Shed
Even such a simple-looking building should be pre-designed on paper. To build a shed with your own hands, you need to figure out a number of important design points.
Calculate the area, length, width of the floor and height of the walls. Determine what materials will be used for the construction of the structure. Decide what type of roof it will be, gable or flat.
It is important to decide on the location of the shed.
We recommend reading:
How to make a utility block for a dacha - a step-by-step description of how to build it yourself and instructions for arranging a utility block (115 photos)How to build a bathhouse from timber - 125 photos of the best projects and ideas on how to build a bathhouse correctly
Do-it-yourself canopy: step-by-step description of how to build a canopy correctly. The best ideas and beautiful design options (95 photos)
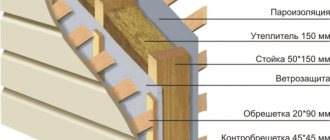
How to insulate a shed from the outside with your own hands, step-by-step diagram
Step 1: Create a frame for the walls
The back wall of the frame will be the existing wall surface, and we will put together the front wall from boards. Even those that are not quite even will come in handy. What about the cracks? There is one proven technique - the boards are nailed with an overlap! First, two boards are nailed to the bars, leaving space between them for the third. The middle one is inserted so that the upper part fits under the first board, and the lower part covers the second board on top. You will get a “Christmas tree” through which no wind will break through. The advantage of this design is that it is protected from drying out, because if we simply nailed the boards together, sooner or later large gaps would form between them.
Step 2: Fill the frame with insulation
The space between parallel walls can be insulated with your own hands in different ways. If funds allow, buy mineral wool or fill the voids with polyurethane foam. However, initially we agreed to save money, which means it’s time to remember the methods of insulation for the winter that our grandparents used. What could be simpler than sawdust! The material is almost free - at the nearest sawmill there is at least heaps of this stuff, you can bargain with the watchman for a bottle of something stronger.
It is advisable to take sawdust that is dry and small. To prevent rodents from infesting them, it is enough to mix the wood with fluff lime - 1 part of lime is enough for 25 parts of sawdust. When insulating with sawdust, the space between parallel walls should be at least 25 cm. The prepared material is covered in layers, constantly tamping. Over the next two weeks, the insulation will still shrink - do not forget to add more sawdust after some time.
Step 3: Insulate the ceiling
In the case of the ceiling, the same frame is created. But unlike walls, a layer of high-quality waterproofing is also laid on top of the thermal insulation. Simply covering with slate or tiles is not enough; between them there must be a layer of roofing felt or plastic film. The most important thing at all stages is to prevent moisture from penetrating into the sawdust. To prevent this from happening, many people pack sawdust in plastic bags and then carefully place it in the space between the walls.
Step 4: Insulate the floor
To insulate the floor with your own hands, it is important to make a mound of soil at least 10 cm high on top of the main level. Then clay is poured and compacted
The disadvantage of this method is the dirt that will always be inside the barn. If you want to make a clean and durable heated floor, it is recommended that instead of an embankment of soil, make an embankment of expanded clay and pour a cement-sand screed on top of it. Just do this in advance, in the warm season.
Obtaining various types of information on the topic of building sheds on the site
People who are far from the construction industry cannot independently design a building and determine the best place to put it.
It is better to learn what rules to follow in this case from the recommendations of specialists. Here again it is convenient to mention construction sites.
If printed information or video material is too tedious, you can turn to searching for images of site plans with the layout of main and additional facilities.
There are many such plans made in color on the Internet. You can easily find a layout similar to yours and see how to arrange the barn.
You can also find a photo of the barn online to get an idea of what the building might look like.
We recommend reading:
Beautiful canopy over the porch - installation options, design options and installation tips (95 photos)How to attach a terrace to a house - step-by-step description of the construction, design options, projects and installation instructions (115 photos)
Building a gazebo with your own hands - the best design ideas and main stages of construction (115 photos + video)
Types of frames
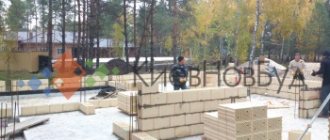
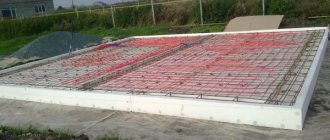
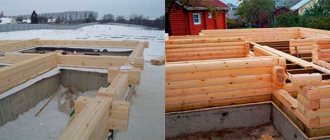
The barn is a lightweight structure. But under it, as with the construction of more massive structures, a foundation is required. It can be ribbon or columnar.
The second option is chosen when there is an intention to erect a frame shed. A strong frame makes the structure more durable. You can position the frame in such a way as to mark openings for windows and doors.
More often the frame is wooden. Most summer residents work with this material. The technology for assembling and fastening frame elements can be found on construction sites or in builders' directories.
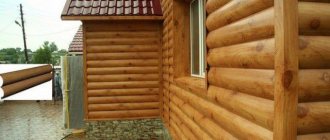
A barn built of wood is the most common building in suburban areas. It uses second-class material. There are no special finishings in barns. Sometimes there is a clean board left inside without covering.
100 x 100 mm timber is used for the frame and joists. For cladding the walls of the barn - boards 25 mm thick. The floors are laid from boards 40 mm thick.
Plywood, chipboard, OSB are used for cladding. As a finishing, façade anti-frost paints are used.
We recommend reading:
Construction of a chicken coop for a summer residence - how to make simple and high-quality chicken coops (105 photos + video)DIY porch - 135 photos of the best projects and video description of the main stages of construction
How to make a chicken coop with your own hands - step-by-step description, construction ideas and projects for the best chicken coops (120 photos)
To protect the structure from fire, fungus and insects, wooden surfaces are coated with special protective compounds.
The structure can be even stronger if it is a metal shed. It is reliable and creates safety for the things stored inside.
In case of fires, the metal will not allow fire to penetrate inside. On the other hand, the metal surface quickly heats up in the sun and becomes corroded.
Therefore, the metal surface is treated with anti-corrosion agents and sheathed with protective non-flammable materials on the outside.
Brick barn.
Brick sheds are quite rare on a plot of land. There is no point in arguing that a brick barn is a solid, reliable and durable structure. But, its construction will require a lot of time, money and before the construction of the barn; lay a solid foundation. The building materials for such a barn are very expensive, like brick. A brick barn will in fact turn out to be an unreasonably expensive building. Any other types of sheds will help you.
In custody:
We briefly described the types of sheds for a summer cottage. Which barn to choose for yourself, decide for yourself. In any case, the choice will be yours!
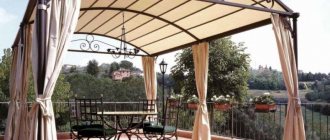
How else can you use the building?
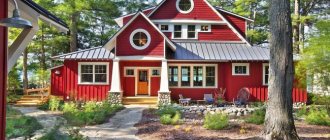
A shed does not have to be built just to store equipment. Sometimes this building is great for creating a relaxation corner in it.
In many sheds, people have furniture installed: armchairs, sofas. Especially in large buildings. Interior and exterior decoration can be a lining or a House block. Many people resort to siding.
Door designs in barns
Depending on the dimensions of the items that are supposed to be stored in the barn, the entrance is planned. Doors for a barn can be double-panel, hinged, the entire height of the building and the entire width.
This option is used more often than others because it is more convenient. Door leaves are installed either wooden or metal. It all depends on the material from which the building itself is made.
Construction and insulation are carried out outside the barn
Rural residents hardly need to be explained what pets are and how to care for them. But for yesterday’s “city dwellers” who decided to move closer to nature, everything is new! As a rule, chickens are the first on the list of pets, not counting dogs and cats. In spring and summer, caring for them is not at all difficult, the main thing is to provide high-quality food and a shelter where they can hide from the sun. But in winter, the question is different - you can’t invite a chicken “gang” led by a pugnacious rooster into your house for the whole winter, and in the tool shed the animals will simply freeze.
The issue should be resolved quickly and effectively. And, as everyone thought at that moment, preferably inexpensive. Even a leaky tool shed can be turned into a warm room for the winter with your own hands. The simplest option is to knock down a wooden frame from boards, hollow inside.
Photo of a barn for a summer residence
Read here Construction of a chicken coop for a summer residence - how to make simple and high-quality chicken coops (105 photos + video)
Did you like the article?
0