Monolithic flooring is one of the options for creating a structural element of a building, which is used along with prefabricated and precast-monolithic ones. If prefabricated floors are formed from ready-made reinforced concrete slabs, which are produced in a factory and delivered to the installation site by special transport, then monolithic structures are poured directly on site.
A monolithic floor slab can be created by craftsmen independently; it does not require the use of lifting equipment: panel formwork is installed, a reinforcement frame is mounted in it, then the whole thing is filled with a concrete mixture of the selected brand.
With correct calculations of the formwork and the floor itself, the result is a strong and durable structure that can withstand the loads placed on it.
Monolithic reinforced concrete floors demonstrate increased strength characteristics, resistance to load-bearing loads and the effects of external negative factors. Pouring a floor slab yourself makes it possible to save significantly, because the final cost of an individual slab is significantly lower than the total cost of purchasing a reinforced concrete product, the cost of delivery and installation of floor slabs using special transport.
Advantages of monolithic slabs over hollow core slabs
Concrete floors are used everywhere in construction today. Different types and design options have their own characteristics, pros and cons. Therefore, before you start designing a building and implementing the project, you need to carefully study and calculate everything.
The main advantages of monolithic slabs:
- Increased strength of the product - the design has no joint zones, seams, or voids, so the element is a solid monolith with the building, withstanding maximum load-bearing loads, acting simultaneously as both the ceiling and the floor in buildings of two or more floors
- The ability to equalize the forces created by the mass of building elements when acting on the foundation and the box itself. The entire load is transmitted evenly along the perimeter of the entire supporting surface
- You can make a monolithic ceiling with your own hands in any way - any shape, non-standard size and configuration. It is possible to design remote-type balconies built on a reinforced concrete floor console; not only load-bearing walls, but also columns can be used as supporting elements
- The maximum rigidity of the monolith slab, which is formed between the floors of the building - the structure is solid, the ceiling or floor cannot move, become covered with cracks at the joints, and remains unchanged in the longitudinal and transverse plane
- Significant savings - on paying for the work of craftsmen (you can do everything yourself) and renting lifting equipment (as is the case with prefabricated slabs)
- Long service life - the correct design of a monolithic floor slab guarantees a service life of at least a century
Among the disadvantages, the only ones worth mentioning are: a serious amount of concrete work and an extension of the construction period due to the need to allow the concrete to gain strength within 28 days.
Let's build our own house
One of the main structural elements of a private house is the ceiling. The ceiling is the basis for the future floor and ceiling. And like any structural element of a private house, it must be durable throughout its entire service life. The most reliable and durable floor is reinforced concrete. A do-it-yourself floor slab is a feasible task for most private developers. For the first time, in practice, your administrator of the Let's Build Your Home community encountered the production of reinforced concrete slabs not in a factory, but on an open construction site while working in a Danish-Canadian construction company. Where, in the field, a site was prepared for the production of reinforced concrete products. Everything looked quite simple: a layer of sand and gravel was poured and leveled onto the leveled surface of the soil; the filling was necessary, since the production was in the field, in the literal sense of the word. Next, wooden blocks were laid on which the wooden flooring was attached. At the site, formwork was installed according to the required size of future reinforced concrete slabs, polyethylene was laid on the bottom and side walls, then a reinforced frame was knitted, with mounting loops removed, and concrete from a local plant was placed into the formwork. During laying, the concrete was vibrated, then the surface was leveled using a wooden board placed on its edge. After laying the concrete, the surface of the slab was covered with the same polyethylene. After 1-1.5 weeks, such slabs were calmly lifted by crane and installed... although they were used as wall panels with subsequent external insulation. But with proper calculation of reinforcement, precise placement of reinforcement in the slab and high-quality concrete, I see no problems with using such slabs as flooring. By analogy with the installation of a monolithic ceiling with your own hands - //vk.com/wall-72891995_273, only with pouring on a separate site and subsequent installation by a crane.
So, I briefly described the technology for producing reinforced concrete floor slabs with my own hands; all that remains is to decide on the thickness of the concrete, as well as the quantity and location of the reinforcement in the slab.
Calculation of the thickness of the floor slab.
The thickness of the slab depends on the size of the span. It is usually calculated from a ratio of 1:30. For example, with a span length of 6 m, the thickness of the slab will be 20 cm and made of concrete of at least B20 class. On each meter of the floor slab, at a distance of 4 cm from the bottom of the floor (no more than 4 cm!!!), there should be 5 Alll reinforcement rods d14mm (20 cm increments), this is the main working reinforcement. Upper reinforcement will be needed only at the beginning and end of the slab at a distance of a quarter of the span (but actually laid along the entire length, like the bottom), since in the case of supporting the masonry of the second floor on reinforced concrete slabs, we have negative moments at the beginning and end of the span. Negative moments have smaller values than the maximum moment in the center of the span, so the upper working reinforcement Alll d12mm (step 20 cm) ... you can read more about the method of calculating reinforced concrete structures in the pinned post on the community wall - //vk.com/wall-72891995_273. From my calculation for a span of 6 meters, we have the following results: The thickness of the slab is 20 cm. Reinforcement in the lower part of the slab - All not less than d14mm, pitch no more than 20 cm, center of reinforcement no more than 4 cm from the bottom edge. Reinforcement in the upper part of the slab - All not less than d12mm, pitch no more than 20 cm, center of reinforcement no more than 4 cm from the top edge.
Recently, in our “Let's Build Your Own Home” community, a question was published from a participant who wanted to make floor slabs themselves. The maximum span in the house he is building is 4.2 m. Let's consider this special case.
An example of calculating a reinforced concrete floor slab.
It is required to calculate the floor slab for a span of L=4.2 m. The thickness of the floor slab h=L/30=420/30= 14 cm. Calculation. Since, in fact, a reinforced concrete floor slab can have either free support on the walls or rigid pinching, for the safety of members of the Let’s Build Your Own House community, I will calculate the maximum bending moments using two schemes for supporting floor slabs (rigid embedding and free support ), and select the maximum bending moments of each section. Those. I will choose the maximum moment at the center of the span according to the scheme of free support of the slab - M = qL²/8, and the moments at the edges of the slab according to the scheme of rigid pinching - M = qL²/12, .
We obtain: Мн = qL²/8, values of the bending moment, to determine the area of the working reinforcement of the lower chord. Мв = qL²/12, bending moment values, to determine the area of the working reinforcement of the upper chord. where q is the distributed load per meter of monolithic floor. q = own weight of the monolithic floor + operational load q = 400 kg/m²×1m + 2500kg/m³×1m×0.14m = 400kg/m + 350 kg/m = 750 kg/m h0=10cm - distance from the center of the reinforcement section to the edge of the compressed zone of reinforced concrete floors Calculated compressive strength for concrete class B20 - Rpr (Rb) = 117 kgf/cm2 (11.5 MPa).
b = 1 m, the same value as in my previous calculations in the group let’s build our own house //vk.com/wall-72891995_213 The calculated tensile strength for class A-III reinforcement is Ra = 3600 kgf/cm2 (355 MPa).
Mn = 750×4.2²/8= 1654 kg•m Mv = 750×4.2²/12= 1103 kg•m A0(n) = M/b×h0²×Rpr = 1654/(1×0.1²× 1150000) = 0.1438 А0(в) = M/b×h0²×Rpr = 1103/(1×0.1²×1150000) = 0.0959 Using the auxiliary table for the entry we find η(n) = 0.921 and ξ(n ) = 0.156 ; η(в) = 0.95 and ξ(в) = 0.1 (vk.com/postroim_svoi_dom).
For the design of cost-optimal reinforced concrete products, it is recommended to take: μ% = 1÷2%, ξ = 0.3÷0.4 - for beams μ% = 0.3÷0.6%, ξ = 0.1÷0.15 - for floor slabs Required cross-sectional area of reinforcement: Fa( n) = M/η×h0×Ra = 1654/(0.921×0.1×36000000) = 0.0005 m2 = 5 cm2. Fa(in) = M/η×h0×Ra = 1103/(0.95×0.1×36000000) = 0.00032 m2 = 3.2 cm2 Using the table for the entry in the “Let’s build our own house” community, select the diameter of the reinforcement
upper and lower belts in increments of 20 cm. Upper reinforcement Alll d10mm, pitch 20cm (5 rods per meter of width). Bottom reinforcement Alll d12mm, pitch 20cm (5 rods per meter of width). The center of the cross-section of the reinforcement of the lower chord is located at a distance of 4 cm (no more!) from the bottom of the floor. The center of the cross-section of the reinforcement of the upper chord is located at a distance of 4 cm (no more!) from the top of the ceiling. Fa(actual)= 5.65 cm² Fa ≤ Fa(fact) 5 cm² < 5.65 cm² Fa(fact)= 3.93 cm² Fa ≤ Fa(fact) 3.2 cm² < 3.93 cm² The condition is met .
Reinforcement coefficient - μ = Fa/b×h, Reinforcement percentage - μ% = 100×μ μ% = 100×5.65/100×14= 0.404% 0.385% is within the recommended limits for slabs (0.3-0. 6). Checking compliance with the boundary conditions: ξ ≤ ξR ξR = ξ0/{1+σа/400(1+ξ0/1,1)} ξ0 = a — 0.008Rpr, where Rpr is taken in MPa; coefficient a = 0.85 for heavy concrete and a = 0.8 for concrete with porous aggregates. ξ0 = 0.85 - 0.008·11.5 = 0.758 ξR = ξ0/{1+σа/400(1+ξ0/1.1)} ξR = 0.758/(1 + 365/400(1 + 0.758/1.1)) = 0.2984 0.156 < 0.2984 The boundary condition is met.
Testing strength by shear stress.
Since we did not provide transverse reinforcement in the floor slab (clamps or vertical rods), we should check the strength of the monolithic floor using shear stresses:
Qmax ≤ 2.5×Rbt×b×ho, where Qmax is the maximum value of the transverse force (determined from the transverse force diagram). With our calculation scheme, Qmax = ql/2 = 750·4.2/2 = 1575 kg; Rbt - calculated tensile strength of concrete //vk.com/wall-72891995_272, for concrete class B20 Rbt = 9.18 kgf/cm2; 1575 kg < 2.5×9.18×100×10= 22950 kg Q ≤ 1.5Rbt×b×h0²/s or Qmax ≤ 0.5Rbt×b×ho + 3ho×q, where Q is the shear force at the end of the inclined section , starting from the support; the value of c is taken to be no more than cmax = 3ho. With our calculation scheme, the value of Q at a distance of 3 × 10 = 30 cm or 0.3 m from the support will be Q = ql/2 - 0.48q = 1575 - 750 0.3 = 1350 kg; 1350 kg < 1.5 9.18 100 10²/30 = 4590 kg
The strength conditions for tangential stresses are met and in this case, the calculation of transverse reinforcement along sections inclined to the longitudinal axis is not required.
Conclusion: Based on a span of 4.2 meters, we have the following results: The thickness of the slab is 14 cm. Reinforcement in the lower part of the slab - All not less than d12mm, pitch no more than 20 cm, center of reinforcement no more than 4 cm from the bottom edge. Reinforcement in the upper part of the slab - All not less than d10mm, pitch no more than 20 cm, center of reinforcement no more than 4 cm from the top edge.
Making a floor slab with your own hands
It’s quite possible to make monolithic floors yourself. If you calculate and think through everything correctly, prepare materials and tools, and break down the task into its components, the process will not seem so difficult.
What you will need to install a monolithic floor:
- Tools – hammer, axe, wood saw, level, construction level, device for bending reinforcement
- Materials and consumables – nails, wooden boards, wooden beams for formwork supports, plywood sheets, steel reinforcement, special clamps for installing reinforcement, M350 concrete mortar (order or mix it yourself from sand, cement, crushed stone, water and additives if necessary)
First of all, it is necessary to complete or order from a specialized company a design for a floor slab in a monolithic house. It is quite difficult to calculate all the impacts on the slab and the maximum loads, so it is easier to entrust the preparation of the project to professionals.
If you want to do everything yourself, you need to carefully study all the parameters, take into account important factors, features of materials, design, etc.
Components of the concept of floor production:
- Steel frame - guarantees load-bearing capacity, is laid in one direction (parallel to the short side of the floor) or in two (crosswise, increases the overall thickness of the slab)
- Support reinforcement – mounted in the wall part of the structure, needed to protect the ceiling from cracking
- Filling with concrete - creates a functional surface of the entire floor (is the basis for installing the floor, ceiling), protects the reinforcement, is done in a layer at least 6 centimeters thick
- The crown is an essential component of the floor, passes through the load-bearing walls of the structure and is connected to the reinforcing bars of the slab
The main stages of work that need to be completed to make a concrete floor between floors with your own hands: performing calculations, preparing tools and materials, installing formwork, laying reinforcement, pouring concrete, proper care of the screed.
Pouring concrete
For concreting the slab, it is best to use concrete ordered at the factory. This will help save time and effort, and will also ensure the uniformity of the partition and increase its strength. If the ceiling is poured quickly and evenly enough, and this is achieved with the help of a concrete pump, the solution does not begin to harden early and thanks to this the ceiling can rightfully be called monolithic.
You also need to use a deep vibrator to compact concrete. It must be applied until the concrete stops settling and the release of air bubbles stops.
In order to completely fill all the cracks, before filling the floor with concrete, first fill in the pouring material. It is done in a thin and slightly liquid layer. When this layer is compacted and evenly distributed, you can begin pouring the main layer.
Features during operation
Some advise not to fill to the 2 centimeter edge, and then after a few days, when the concrete has set, use beacons to fill the remaining space with liquid mortar. This will allow you to achieve evenness and smoothness of the interfloor overlap. Self-leveling floors can also be used for these purposes.
If the floor slab is made by hand in winter, then the concrete must contain anti-frost additives. However, it is worth remembering that they influence the time it takes for concrete to gain strength. Therefore, the best time to pour a floor slab yourself is definitely the warm season.
Concrete hardening process
After the floor is filled with concrete, it cannot be said that all the work is finished and you can just wait for the slab to gain its strength. The process of solidification of the solution is inextricably linked with the evaporation of moisture, and this leads to the appearance of cracks in the concrete. In view of this, during the first time after pouring, you need to regularly water it with water. In this case, it is best to use a hose with water, because lifting bucket after bucket to the height of the second floor is a thankless task.
If the concrete dries in hot weather, watering it with water will not be enough; you need to cover the slab with polyethylene.
After the concrete has hardened, all formwork must be removed. Care should be taken to ensure that this process is not so difficult at the stage of installation of the structure. If all the boards have been covered with polyethylene, they can be used in the future.
As you can see, if desired, floor slabs can be made with your own hands. And although this process is labor-intensive and time-consuming, the resulting strength of the slab is worth the effort.
Load calculation
The minimum thickness of the monolithic floor, the number and cross-section of reinforcement, as well as other parameters are determined based on the calculation of the loads acting on the structural element.
Types of loads acting on the floor:
- Permanent - those that create the weight of the building box, all partitions in the structure, roof
- Variables - can change: this is the mass of finishing elements, the weight of utility networks, furniture, people
The ability of a floor slab to withstand certain loads directly depends on the thickness of the reinforced concrete monolith, as well as the cross-section and amount of reinforcement, and the grade of concrete. In order for a monolithic reinforced concrete floor to withstand a load of 500 kilograms per square meter, the thickness must be 20 centimeters.
Factors affecting the accuracy of calculations:
- Concrete grade
- The size of the design forces that act on a unit area of the slab
- Concrete slab thickness
- Slab width and length
In accordance with the calculated loads, the cross-section of the reinforcement is determined that can withstand tensile forces and bending moments. It is very difficult to independently calculate a monolithic reinforced concrete floor, but you can try using special formulas or find an online calculator on the Internet.
When calculating a monolithic floor, the thickness of the slab is very important. And not always the thicker the better. Much depends on the span - the distance between columns or walls. Typically, for a private house, the floors are poured with a thickness of 15 to 20 centimeters.
If you plan to take more than 18 centimeters, the decision must be justified by accurate calculations, because the load on it increases in proportion to the increase in the thickness of the slab. Thus, before you start designing and installing a monolithic floor, drawings must be drawn up.
Types and advantages of floor slabs
So, let's look at what the designs are:
- Depending on the material from which they are made: wood, concrete, metal, reinforced concrete. You can also find combined slabs.
- Depending on the installation method: monolithic or prefabricated.
It is worth immediately noting that one or another type may vary depending on the design features of the building, the load on the slab, as well as the method of its installation.
It is impossible not to note the advantages that floor slabs have:
- durable - if made from properly selected materials;
- durable;
- it is possible to make a slab that has non-standard dimensions;
- Both columns and walls can serve as support for floor slabs.
How to fill a slab: technology
The technology itself involves several stages of the process: calculations, preparation of equipment/materials/tools, assembly of sealed formwork, creation of a reinforcement cage and placing it inside the formwork structure, mixing of concrete mixture, pouring, proper maintenance.
Installation of formwork
Before pouring the floor slab with your own hands, you need to install the formwork. You can rent a ready-made structure or assemble it yourself from boards, plywood, or timber. Factory-made formworks are supplied with telescopic supports, saving time on installing supports. But the second option will be cheaper, although labor-intensive.
To make your own formwork, take an edged board with a thickness of at least 2.5-3.5 centimeters or moisture-resistant plywood sheets with a thickness of 2 centimeters or more. The boards are knocked down as tightly as possible and covered with waterproofing film.
To complete the work you will need: plywood, boards, timber, hacksaw, hammer, level, axe, nails.
The formwork installation process - step-by-step instructions:
- Installation of vertical support posts - it is best to make telescopic vertical ones from metal. If there are none, you can take wooden logs with a cross-section of 8 centimeters or more. Install the racks in meter increments, at a distance of at least 20 centimeters from the perimeter walls.
- Next comes the laying of crossbars on the surface of the racks - a longitudinal beam that will hold the formwork structure.
- Formwork is mounted on top of the crossbars - first, wooden transverse beams are installed on the longitudinal beams, and plywood or boards are mounted on top of them. The extreme edges of the formwork structure must rest exactly on the walls, without creating gaps.
- Adjusting the height of the support posts so that the upper edge of the formwork is strictly at the same level with the upper border of the laid wall.
- Installation of vertical structural elements - the edges of the floor slab extend onto the wall, so the vertical fence must be mounted at a certain distance from the inner edge of the wall.
- Checking the level of evenness of the formwork installation, correcting possible deviations.
The formwork elements are connected with nails or dowels, and the inside is covered with waterproofing material. Compared to their wooden counterpart, metal telescopic stands are considered more preferable due to their reliability and durability.
One such rack can support up to 2 tons without cracks or deformations, unlike wooden beams, which sometimes cannot withstand the thickness of concrete.
Reinforcement of the floor, reinforcement of reinforced concrete floors
Before making a concrete floor with your own hands, you need to lay a reinforcement cage into the formwork, which will give strength to the structure and make it resistant to bending loads.
To create a frame you will need: metal rods with a diameter of up to 16 millimeters, tying wire, a hook for tying, special clamps for the rods (ensure that the reinforcement is poured with concrete from all sides). It is also advisable to prepare a grinder with a metal disc and a device for bending rods in advance.
Rules for assembling the reinforcement frame:
- Cutting rods into pieces of the required size
- Knitting rods with wire to form a mesh with a cell size of 15 by 15 or 20 by 20 centimeters
- Layout of clamps, laying the bottom mesh on them
- Installation of vertical (transverse) rods in increments of at least 100 centimeters
- Assembly and installation to the vertical bars of the upper frame mesh
The overlap when assembling elements should exceed on average the diameter of the reinforcement by 35-40 times.
Important nuances of reinforcement:
- Typically, for the reinforcement frame, rods of class A400 C, periodic hot-rolled profile are chosen; the steel must correspond to grade 35GS or 25G2S
- Working diameter – from 8 to 16 millimeters
- The main reinforcement is considered to be the lower one, since it takes on bending loads. Here you need to make a particularly strong frame. The diameter of the upper reinforcement may be smaller (except for the floor areas in the support zones, where, according to calculations, it is necessary to strengthen the upper zone of the slab)
- If the spans are large or there is support on columns, install transverse reinforcement (frames or clamps), choosing class A240C
Concrete preparation
Before pouring a monolithic floor slab, it is necessary to determine the composition of the concrete. Usually, durable brands of solutions are chosen to ensure the required parameters and resistance to loads. Concrete in Moscow and the regions can be ordered ready-made from the factory, or you can mix it yourself.
Preparation of concrete for pouring a monolithic floor:
- Preparation of building materials - purified water, sand sifted and cleared of impurities, crushed stone of a fraction of 20-30 millimeters, M400 cement
- Mixing concrete mortar: mix 2 parts sand, part cement and crushed stone thoroughly, then add the optimal amount of water to achieve the desired consistency
- It is best to mix in a concrete mixer - first all the dry ingredients, then gradually adding water
Concreting a monolith
To make a strong, durable and homogeneous monolithic slab, it is recommended to pour concrete in one go. This is why many craftsmen prefer to order ready-made solution from the factory, since it is almost impossible to quickly prepare the required volume on your own.
Rules for pouring mortar onto slabs:
- Supplying the mixture to the formwork structure, uniformly distributing the mixture over the area
- Compaction of the layer with a surface or deep vibrator
- Checking the evenness and accuracy of the fill
Hardening of the slab, care of concrete
Poured concrete must be moistened periodically. After all, during the hardening process, water leaves and heat is released. If hydration occurs too quickly, the concrete monolith may become cracked and deformed.
To maintain optimal humidity of the monolith, it is covered with polyethylene and periodically (in the first 7-10 days) water is sprayed over the surface. Next, they wait until the concrete gains most of its brand strength without carrying out any work.
How long does concrete dry at +20C:
- 3 days – 30% strength according to brand
- 14 days – up to 80% strength
- 28 days – 100% brand strength
When humidity levels and air temperatures change, concrete can behave differently. So, at +5C the hydration process stops altogether. Therefore, it is best to carry out work in the warm season. You can see the features of drying and hardening of concrete mortar depending on conditions in the reference literature.
Checking the concrete for dryness: leave a piece of roofing felt on the surface in the evening, lift it up in the morning and look. If a dark spot appears under the roofing felt, the concrete has not yet dried.
Monolithic flooring is an excellent choice for a high-quality and durable building made of any material. If you perform all the calculations correctly and implement the project yourself, you will be able to save significantly without compromising the strength and ability of the structure to withstand mechanical loads.
We apply reinforcement
If factory products are used for the ceiling, then the installation of an armored belt is mandatory for buildings made of blocks. The reason for this is the fact that under the weight of the slabs, due to the uneven shrinkage of the building, serious cracks in the walls may occur in the future. In this case, the reinforced belt will ensure that the entire mass of the slabs will be evenly distributed on the walls of the building. The structure of the armored belt is similar to a strip foundation, supported by the walls of the building.
However, if you fill the floor slab, the resulting monolith will evenly distribute the load on the walls and protect against the formation of cracks. Therefore, there is no need to construct an armored belt when doing work with your own hands.
How to reinforce monolithic floors? To do this, it is necessary to use steel reinforcement with a diameter of 10-14 mm. For reliability, the concrete is reinforced with two meshes: one is located at the bottom of the platform being poured, the other at the top. The reinforcement frame should have a cell width of either 15 or 20 cm. For small buildings, a mesh with a cell of 20*20 cm will be quite sufficient.
Advice from an expert builder
If the length of the reinforcement bars is not enough to completely cover the entire distance of the floor, then the rods should be overlapped by 40 cm. It is also desirable that each subsequent row have a reinforcement joint at the other end of the floor. After laying all the reinforcement, it must be tied using tying wire.
The mesh should extend onto the walls of the building by at least 15 cm (if the walls are brick) or 25 cm (for walls made of aerated concrete). Since when pouring the slab on your own, no reinforced belt is provided, it is very important that the reinforcement extends onto the walls. The lower mesh must be raised 2-2.5 cm above the lower level of the ceiling. The upper mesh is located at the same distance from the top of the platform to be poured.
When preparing the site for pouring concrete, it is important not to forget about cavities for laying wiring and communications.
Upon completion of work with slab reinforcement, concreting of the floor follows.
Important Tips
Let's consider important nuances that will be relevant for people who decide to equip the floor slab with their own hands. Thanks to the advice, it will be possible to save both material resources and time, which is an important factor.
- For slabs, it is best to order a concrete solution that is sold in specialized stores and has passed quality control. This substance contains important fillers that are necessary to improve the quality of concrete, while they do not allow it to delaminate.
- If you are making a slab for the second or third floor, you won’t be able to do it without a concrete pump. Of course, you can throw concrete along the gutters - but this task is quite labor-intensive, and in addition, it can also affect the quality of the ceiling.
- When pouring concrete into a slab, it is important to remember that the formwork must be reliable and strong. Wet concrete weighs a lot, and both the appearance and quality of the floor directly depend on the strength of the entire structure.
- It is imperative to use laminated plywood in order for the ceiling to be of high quality.
- The formwork must be created from wooden boards arranged horizontally. The material must be lubricated with a special solution, which will allow you to remove the protective film from the boards.
- Before pouring the floor slab, you need to make sure that the formwork can support the weight of the entire structure without being deformed.
- When creating a slab, you should also take into account the fact that it must support more than just its own weight. Walls, furniture, all necessary equipment, people - all these factors need to be taken into account.
- During installation, care should be taken to ensure sound insulation. It must be installed taking into account all rules and regulations.
- If the ceiling will be present as a separator between two rooms that have a difference in temperature, then you need to take care of high-quality thermal protection.
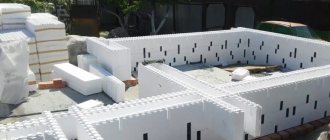
Insulation of the structure
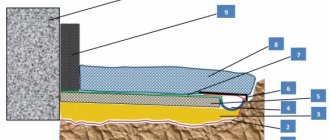
Scheme of a concrete reinforced slab.
As mentioned above, the Swedish stove is often built with insulation. This technology helps maintain an optimal air-heat balance of the future building. Expanded polystyrene can be used as insulation, which is laid in 2 layers with an intermediate layer of waterproofing. The latter is necessary to ensure that the materials do not absorb or allow moisture to pass through. A polymer film is suitable for waterproofing. Expanded polystyrene is placed directly on the ground. The thickness of this layer is about 20 cm, but in places of stiffening ribs it can be reduced to 10 cm. In parallel with this, formwork from wooden panels is being erected. They must be very well fixed, since the mass of concrete can simply destroy them.
The next stage is pouring concrete into the slab. To make a high-quality foundation, before pouring concrete, it is necessary to make reinforcement with laying pipes for a warm floor. The reinforcement must be laid as follows: it is placed on pads 20 mm high in one direction. Metal rods are installed on top at an angle of 90 degrees, which must have a wire bandage. Such a structure must be very durable. Heating pipes are placed on the grate, all of their outlets lead into the collector. There can be many pipe contours. Pipes are pressure checked for leaks and plugged. Then the second reinforced lattice is laid.