Bituminous shingles are a modern, practical roofing material that is made from fiberglass impregnated with modified bitumen. It is lightweight, aesthetically pleasing, resistant to environmental factors and the effects of fungi or other microorganisms. The peculiarity of this roof covering is that it does not have a rigid shape, so a solid base is required for its installation. Lathing for a soft roof is an important element of the roof structure, on which the durability and reliability of the material depends. In this article we will tell you how to properly prepare the base for laying asphalt shingles.
Features of flexible roofing
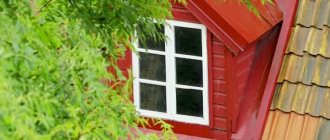
Soft roofing is also known as asphalt shingles. It was first introduced to the building materials market about 30 years ago. This elastic material is made from fiberglass or polyester, which are impregnated with bitumen compounds. The result is a water-resistant, durable yet flexible material that is ideal for roof finishing.
Flexible tiles
Flexible tiles Ruflex MINT
The surface of flexible tiles is always covered with a special coating - fine crumbs obtained during the processing of various minerals. And the bottom layer has an adhesive base that allows you to glue the tiles to the roof. This type of tile is used when arranging roofs with slope angles of at least 11-12 degrees.
Flexible tiles
On a note! Flexible tiles are distinguished by a wide selection of shades, colors, and sizes. This is why you should not purchase materials made by different manufacturers, even if they are very similar to each other.
Due to their softness, such tiles require a special base. It can only be laid on a crate made in a certain way.
Installation of flexible tiles
Prices for various types and manufacturers of flexible tiles
Flexible tiles
Construction of houses
78 votes
+
Vote for!
—
Vote against!
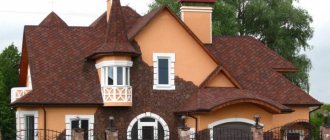
There are countless roofing materials available today. For every taste and budget. Among them, a special place is given to soft tiles. If you prefer this coating and decide to install a soft roof on your roof, then be sure to familiarize yourself with the basic rules for its installation. But before that, think about installing a roof under a soft roof. After all, this process is very important and requires a special attitude towards yourself.
- Material and requirements for it
Features of a soft roof
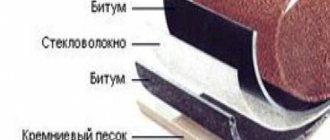
Bituminous (soft) shingles appeared about 30 years ago. Subsequently, this roofing material gained wide popularity. Soft tiles for roofing and lining for it are produced from raw materials such as non-woven polyester or fiberglass. The latter is impregnated using a bitumen-based composition. Polyester, unlike fiberglass, has greater tensile strength. It should be used in areas where there is a large load on the roof. These are ridges, valleys and various junction points.
On top of the flexible tiles there is a topping, which consists of basalt granules or mineral chips. At the bottom of the material there is a self-adhesive layer made on the basis of bitumen. It also contains a plastic film, which must be removed during operation. To prevent individual sheets from sticking together while the tiles are stored in your home, manufacturers refuse to attach a protective film and sprinkle its lower surface with sand.
Soft tiles are produced in plates. They have a length of up to 1 meter, a width of 0.3-0.45 meters, and a thickness of 3-5 millimeters. Different manufacturers have different colors and shades of material. The price of the material, which is produced on the basis of fiberglass, will be much lower than that of tiles reinforced with polyester. Thus, it is more advisable to buy the latter option to form the main coating if the level of strength does not matter.
It will be possible to install a soft roof if the slope of the roof under the soft roof is at least 11-12 degrees. If the slope is greater, rainwater will stagnate on the surface. And this will cause the destruction of the structure. When laying bitumen shingles, the roof shape can be any, even the most complex design. The finished roof takes the shape of a rectangle or oval. The form of a hexagon or any other geometric figure is possible.
Conditions for working with soft tiles
When working with soft tiles, adhere to certain working conditions:
- You can install a soft roof if the ambient temperature reaches at least 10 degrees above zero. The bottom layer of material, which is capable of adhesiveness, will spontaneously adhere to the base when heated by the warmth of the sun. After gluing, a completely monolithic carpet will be created that is not able to get wet.
- If the temperature outside is lower, the layer of glue will not melt. In this case, the lower part of the material will have to be heated forcibly. For this purpose, buy yourself a hot air gun.
- For industrial facilities, it is possible to install a special shelter called a greenhouse. This is a wooden or metal structure that is placed on top of the roof in case of roof installation in frosty conditions and is heated until the temperature reaches the desired value. However, in special cases this option will not be profitable, as it is expensive.
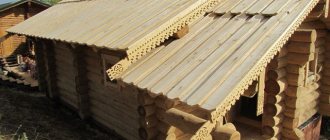
- Remember: if the weather is damp, it is better to avoid laying soft tiles. Of course, it will be possible to lay the material on a wet base. But it will quickly rot under the covering. Thus, the best time for work of this type is summer. And in winter you can do preparatory work. For example, make a rafter system, as shown in the photo of a roof under a soft roof.
- All this time you will store soft tiles. Create suitable conditions for the material. The selected location should not have direct access to the sun, since the adhesive layer should not melt under any circumstances. Under no circumstances should the temperature drop below zero.
Preparing the roof for soft roofing
Laying bitumen shingles, like installing other roofing materials, begins with preparatory work.
Arrangement of the base for a soft roof
The base for soft tiles must be solid and even, since the material is not only glued to it, but also nailed:
- It’s good if you take an OSB board or edged board for the base. Plywood will also work. Use moisture-resistant or tongue-and-groove.
- Remember not to use wet material. Its moisture level should be minimal - no more than 20% of the total mass.
- When creating a base for a soft roof, the joints of the boards are located at the support sites. In this case, take boards with a length of at least 2 spans between such supports.
- When doing this kind of work, it is worth considering the expansion capabilities of the boards. This is a common phenomenon for wood and is caused by changes in temperature and humidity levels. Leave enough space between the boards.
Creating ventilation gaps
When preparing a roof for soft roofing, always leave an air gap. Remember that it should be made large enough. Its dimensions must be at least 50 millimeters. Position the exhaust vent higher. And at the bottom of the roof make a hole for air flow.
Ventilation gaps will ensure a long service life of soft tiles. They are required because they perform many functions:
- They remove moisture from the insulating material. The sheathing structure and roofing pie are also eliminated from it.
- By arranging ventilation, the number of icicles and ice that form on the roof in winter is reduced.
- In summer, optimal temperature conditions will be maintained in the middle of the roof.
Installation of underlay carpet
Be sure to arrange a lining layer under the flexible tiles:
- To do this, prepare insulating material in rolls. It is better to give preference to materials recommended by soft tile manufacturers. They contribute to better “sintering” of the roofing cake into one whole.
- Ruberoid should not be used, as it has a short service life. Its use with such durable material as soft tiles is impractical.
- Lay lining material parallel to the cornice. In this case, choose the direction from bottom to top.
- Make an overlap that should reach at least 10 centimeters.
- Secure the edges with nails, maintaining an interval of 20 centimeters. Seal the seams with glue.
- Sometimes, when attaching a drainage system, it is necessary to install special brackets that are needed for installing the lining layer.
- If the roof slope is more than 18 degrees, the underlayment layer can only be installed in places where leaks are most likely to occur. This includes skates and cornices.
- Also waterproof the roof valleys and ends.
- Be sure to install underlayment in areas where the roofing material meets the walls through the roof.
- Don't forget about chimneys and roof windows.
Creating lathing for a soft roof
After preparing the base for the soft roof and installing the underlayment, start making a special sheathing. It consists of beams and boards, which should be located perpendicular to the rafter joists. The sheathing will act as a base on which workers attach flexible tiles.
Material and requirements for it
When laying the sheathing, adhere to the following requirements:
- The material used for the sheathing must be strong enough to withstand the weight of the roofing, people and snow in winter.
- Make durable sheathing that is highly reliable.
- Arrange a structure that is not able to respond to environmental factors and mechanical influences.
- There should be no bumps or sags on the sheathing. Cracks are allowed no wider than 6 millimeters. And there should be no protruding nails at all.
To make a lathing for laying a soft roof, prepare a material that necessarily meets the established quality standards:
- Edged board. Its width should be 140 millimeters. Choose only durable, high quality material.
- Wooden bars. It’s good if their humidity is no more than 20% of the total weight. The overall dimensions of the bars will change as the sheathing step progresses.
- Diffuse film. You can also use roofing film. It is needed to improve thermal insulation and increase the waterproofing properties of soft roofing.
- Roof purlins. They will strengthen your roof, make it more stable, and give it reliability.
- Plywood. You will place the board according to this material. This way you will achieve a perfectly even sheathing.
Recommendations for creating sheathing
Not only the roofing material is responsible for the quality of the roof. This function lies entirely on the sheathing. Therefore, when making sheathing for soft tiles, follow these recommendations:
- Before arranging the sheathing, lay the bars parallel to the ridge on the rafters. Maintain an interval of 5-10 centimeters. On top of the bars, place the plank from the ridge along the slope to the overhang.
- Despite the fact that there are several types of lathing, use only solid lathing for a soft roof. Make the sheathing in 2 layers.
- Be sure to ensure the evenness of the structure. Remember to exclude corners and kinks. Excessive bending of soft tiles is fraught with consequences. Therefore, adjust the material very well so that there are only smooth, even lines.
- When making sheathing for soft roofing, one important point must be taken into account. Always take into account the condition of the boards used. Wood can warp during storage. As a result, depressions and bulges appear on its surface. If you want to properly lay a roof that will last a long time, place the boards in this position - with the tray facing outward. So the moisture that has leaked onto the roof through the roofing will flow down. If you do not take this into account, then after a while you will find consequences on your roof. Water will flow through the roof joints into the under-roof space. After this, the materials used will completely deteriorate.
- There is one more nuance that should not be forgotten when creating sheathing for a soft roof. This is the correct production of the finishing layer. It should be solid. To form it, prepare frontal boards. Round them at the ends. This way, the bitumen shingles will only have smooth bends, and you can forget about kinks.
Instructions for creating a sheathing
Carry out the work in the following sequence:
- Attach the sheathing bars to the roof support structure. The direction of work is from bottom to top.
- Nail the bottom sheathing. It is attached directly behind the cornice board. It is required to fix the first row of soft tiles.
- Lay down the roofing tape. It is positioned horizontally in relation to the roof ridge. Place the first strip at the eaves. The following are placed with an overlap. This is how the work is done up to the ridge of the roof.
- The roofing tape is fixed between the rafters and counter battens. This must be done to form normal ventilation gaps.
- Fix the first block to the edge of the rafters. First of all - in the area of the cornice.
- Place the second block behind the bottom edge of the first. Maintain a distance of 300-350 millimeters between them.
- Attach the following bars. The pitch in this case is 370 millimeters.
- The last block is attached to the ridge board. For this, ordinary nails are used. The distance should be about 200 millimeters.
- Remember that all bars must be positioned strictly horizontally. To create a reliable sheathing, achieve strong fastenings of soft roofing sheets and not worry about the accuracy of the connections, strictly observe the distances between the bars.
Thus, soft roofing has many fans today. The quality of its flooring and use will directly depend on the quality of roof preparation, the correct creation of ventilation gaps and the laying of the underlayment. But the most important thing is the arrangement of the sheathing. Pay due attention to its design, selection of high-quality material and study of all the nuances of the work.
What is lathing, its types
Sheathing is an element necessary for every roof, which is a system of boards and beams onto which the roofing material is attached. It comes in different types, the choice among which is made depending on what roofing material is used. For example, if the roof is covered with slate or corrugated sheets, then the sheathing may be sparse, that is, there will be gaps between its elements (a certain pitch). If soft coverings are to be installed on the roof, then the sheathing should be continuous, without gaps. To lay bitumen shingles, you will have to use a continuous type of sheathing.
Installation of continuous sheathing
On a note! The lathing can have two layers at once - sparse and continuous. Due to this, it will be possible to achieve good ventilation of the roof, install thermal insulation and improve the quality and reliability of the roof as a whole.
Continuous sheathing device
The sparse lathing is always laid perpendicular to the roof rafters (parallel to the ridge), the solid one is fixed on top of the mounted sparse one. At the same time, do not forget about laying heat and waterproofing materials.
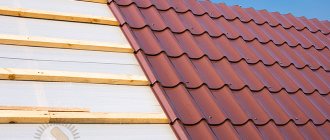
Roofing a house made of flexible tiles
High-quality and correctly installed sheathing for a soft roof must meet the following criteria:
- be durable;
- do not bend under the weight of the roofing material;
- remain resilient even under the influence of environmental factors;
- be level - do not have any bumps, protrusions, or irregularities, all sharp elements are removed from it, the heads of nails and screws should not protrude above the level of the horizontal surface of the boards;
- should not have large gaps between individual elements (maximum step - 1 cm).
Roofing pie for flexible tiles
On a note! Sometimes solid lathing is laid directly on the rafters, without using sparse lathing - the so-called single-layer flooring. This is done to speed up the construction process; usually the option is used only for houses that do not need enhanced insulation and waterproofing.
Installation of sheathing
DIY installation features
During installation, you must strictly follow the technology. It depends on the type of sheathing.
Single layer
It is better to make a single-layer sheathing continuous
Single-layer sheathing is mounted directly on the rafters. It is used if there is no need to form an insulation cake. OSB and plywood boards and panels are used to make the structure. Unedged elements are not suitable for the first option. The boards are laid across the rafters. Their width is 10-14 cm, thickness - 2-3 cm. The sheathing elements are attached along the ridge with the trays facing up. Laying is carried out from the bottom up using nails or self-tapping screws. The joints of the boards should touch the rafters.
When using plywood, the sheets are mounted with the long side parallel to the ridge. Vertical joints of adjacent rows must be made so that they do not coincide. Self-tapping screws or rough nails are used for fastening. The pitch between them is 30 cm. At the edges, the distance between the fasteners is 10 cm.
Materials for making lathing
Sheathing for soft tiles can be made from several types of materials. The main requirements for them are strength, reliability, durability and evenness.
Materials for continuous sheathing
Plywood is most often used to create sheathing for soft tiles. This is an environmentally friendly material, multi-layered, quite wear-resistant, inexpensive, easy to use and durable. The main thing is to purchase a moisture-resistant option for the roof - ordinary plywood cannot be used here. The most suitable brand is FSF plywood. It has the qualities necessary for creating sheathing - fracture strength, ductility, low density, light weight, and is not afraid of fungus. This plywood is resistant to moisture, which means it will not rot. In the process of its production, residues from the processing of coniferous wood are used.
FSF coniferous plywood
Another good and suitable material for creating sheathing is OSB board , a slightly improved version of the chipboard familiar to many. It has a high level of moisture resistance, is dense and durable, is not afraid of snow loads, is very smooth and does not deform under the influence of moisture. It will ensure that there are no differences in height and will make the sheathing perfectly level. The material is quite simple to install and does not require the use of any special tools.
Oriented Strand Board (OSB)
The sheathing for a soft roof can be made from edged or tongue-and-groove pine boards . The material should have low humidity - no more than 20%. The width of the boards used should be 140 mm. The main disadvantage is the tendency of the boards to deform; due to moisture, they often warp and bulges and cracks form on the surface of the sheathing.
Lathing made of boards for a soft roof
Important! Before using wood in construction, it must be treated with antiseptic compounds, as well as drugs that increase the fire resistance of the material.
Prices for various types of construction boards
Construction boards
Rules for making lathing
The creation of lathing can only be done in compliance with certain rules. Otherwise, the structure will not last long and will quickly deteriorate. And the manufacturer of soft tiles does not provide a guarantee for its material in case of violation of the installation technology.
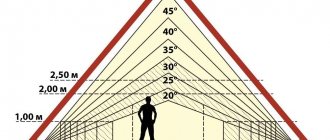
So, determining the angle of inclination of the roof slope requires special attention . If it is very small and is only 5-10 degrees, then soft tiles need to be laid only on a solid sheathing made of plywood and boards. And in general, in this case, this material is not recommended. If the slope angle is within 10-15 degrees, then the sheathing is made of timber with a cross-section of 45x50 mm and covered with plywood or OSB. The bars are installed in increments of 45 cm. If the angle exceeds 15 degrees, then a beam of the same cross-section is used to create the sheathing, but mounted in increments of 60 cm.
How to calculate the roof slope angle
Attention! When calculating the requirements for sheathing, it is important to take into account the climatic characteristics of the region - the load that the roof will experience due to snow cover. The load that will be created by the roofing material itself is also taken into account.
Table. The dependence of the pitch of the rafters on the thickness of the material used.
| Step, cm | Plywood thickness, mm | OSB thickness, mm | Board thickness, mm |
| 30 | 9 | 9 | Not used |
| 60 | 12 | 12 | 20 |
| 90 | 18 | 18 | 23 |
| 120 | 21 | 21 | 30 |
| 150 | 27 | 27 | 37 |
When installing the sheathing, it is worth remembering about the compensation gaps that are left between the elements of the material from which the solid base is created. The gap between sheets of plywood or OSB should be 5-10 mm. If the material swells, it will save the roof from curvature, and the roofing material from damage.
Installation of plywood
Plywood prices
Plywood
Lathing technology. Design Features
The basis of any roof is the rafter system. They are fixed on the Mauerlat - a support that is mounted around the perimeter of the house and will experience maximum load. Therefore, the Mauerlat must be durable and securely fixed. Fixation is carried out using anchor bolts. If the walls of the house are not built of wood, but of aerated concrete or brick, then it is recommended to additionally fix the anchors with cement.
Mauerlat for a gable roof
After installing the Mauerlat, a rafter system is created. Rafters can be made of wood, metal and other materials. Wood is the easiest to work with; it can be easily adjusted to certain dimensions on site, and you don’t have to order special equipment to lift it up. The rafters are installed in increments, which are determined based on the thickness and width of the materials used for the continuous sheathing (if it will be laid immediately on them). For example, with a board thickness of 2 cm, the step can be 50 cm. The same step can be used when laying plywood or OSB with a thickness of 10 cm. If the step is too large, the base of the roof will bend over time under the weight of the roofing material itself.
Rafter system
On a note! If the sheathing is mounted from a board, then it is important to round its edges in order to avoid the occurrence of unevenness on the surface in the future.
Do not forget that the roof must have ventilation. The gap that is formed between the solid and sparse sheathing is quite suitable as it. If the boards are laid on joists, then it is important to think about how to make vents. Otherwise, condensation will accumulate under the roofing material, which will have a negative impact on all elements included in the roof structure.
Roof ventilation
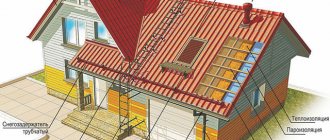
Waterproofing is also an important aspect that should not be neglected . Material capable of retaining moisture is laid on the rafters and fixed with bars - a counter-lattice (sparse lathing) is formed.
Thermal insulation is useful if the house is planned to be used as a residence throughout the year. In the case of a temporary country house, where people will live only in the summer, thermal insulation may not be useful.
Insulating the attic roof with foam plastic
The sheathing materials are fastened using self-tapping screws. Nails are used less frequently. However, regardless of which fastening option is used, the caps must in any case be recessed into the base. Otherwise, the coating on top may be damaged. Fastening is done in increments of at least 15 cm.
Sheets of plywood are laid staggered - their joints in parallel rows should not be in the same place. OSB boards are installed in a checkerboard pattern, that is, seam spacing is also necessary. The joints of longitudinal seams should be located on the battens of the sheathing (counter-lattice).
Placing plywood or OSB sheets on roof rafters
Important! After the work on creating the sheathing is completed, the lining carpet is laid on a flat base. Only after this the most flexible tiles are installed.
"Breathing" roof - ventilation device
Many people have heard about the ventilation of interior spaces, but they often forget about the ventilation of the “roofing cake” itself. In the absence of a normal air flow convection system, warm air rises to the roof and accumulates there, which can lead to unpleasant consequences. In winter, this contributes to the melting of snow on the roof, which leads to the formation of ice dams. In spring and autumn, warm and humid air from the house comes into contact with cold air from the street, as a result of which condensation forms on the insulation and supporting structures, which contributes to the growth of fungi and mold.
To organize a ventilation system, special holes are made in the soft roof, which promote the convection of warm and cold air.
- The ridge aerator is installed on the roof ridge on a special ribbed profile. The element must be covered with the same material as the rest of the roofing so as not to stand out from the general background. The aerator is protected from the penetration of debris, dust, insects, leaves and other unwanted objects.
Air convection using a ridge aerator
- Point ventilation outlets (PVEs) are cut into the roof covering at the rate of one ventilation outlet per 50 - 60 sq. m. The locations of point exits are isolated and masked with roofing materials.
Don't forget about the drip
The protection of eaves and rafters from moisture is provided by a drip tray. Its purpose is to remove moisture from the roof into the drainage system. Thus, this element will protect the wooden parts of the structure from exposure to moisture, the onset of rotting processes, and the development of mold or mildew.
The drip line is fixed on the edge of the roof in a vertical position. Due to this, water from the roof will flow directly into the drain. As a rule, this element is made of galvanized steel, painted in a color to harmonize with the roofing material. It is installed along the entire perimeter of the roof. Fastening is done to the sheathing.
Installation of drip
Creating sheathing for soft tiles
Step 1. Taking into account the load-bearing capacity of the foundation and the shape of the roof, a rafter system is created from boards with a section of 150x50 mm. The elements are installed in increments of 60 cm.
Creating a rafter system
Step 2. A vapor barrier membrane is attached to the rafters from the inside, which will prevent moisture coming from inside the house from affecting the roofing materials. The vapor barrier roll is rolled out parallel to the eaves, the material is fixed by using a construction stapler to the rafters. Individual strips of material are laid overlapping each other. The overlap is 10-15 cm. The membrane is also overlapped onto the walls.
Vapor barrier membrane
Attaching the vapor barrier
Step 3. The insulation is laid. The mineral wool that will be used in this case has a thickness of 20 cm. This is the best option for the regions of Russia. In general, the thickness of the insulation will vary depending on the climate of the area. The material is laid on top of the vapor barrier membrane. The width of the insulation should be equal to the installation pitch of the rafters. If the material is laid in several layers, then the vertical seams should be spaced apart.
Next, the insulation is installed
Laying mineral wool
Attention! From the inside, several support boards are nailed to the rafters through the membrane, which will help hold the insulation in place.
Step 4. A counter beam with a cross section of 5x5 cm is installed in increments of 60 cm. Another layer of thermal insulation 5 cm thick is laid between the individual beams.
The step between the bars is 60 cm
Step 5. A vapor diffusion membrane is laid, which will protect the roofing materials from dust and moisture. It is laid on the insulation, the roll of material is rolled out parallel to the cornice. The individual strips are laid with an overlap of at least 10 cm. It is also ensured that the membrane extends 20 cm beyond the contour of the insulated layer of the building. The material is fixed using a stapler. The overlaps are additionally taped with adhesive tape.
Laying a vapor diffusion membrane
The roll is rolled out parallel to the cornice
Overlaps are taped with adhesive tape
Step 6. To ensure under-roof ventilation, a ventilation chamber is created. To do this, counter beams with a section of 5x5 cm and a pitch of 30 cm are installed parallel to the rafters. The beams are attached in a checkerboard pattern so that there is a free gap of about 5-10 cm between them every 1.5-2 m.
Scheme of fastening counter-bars
The bars are nailed
Result of work
Step 7. A continuous base for flexible shingles is created from oriented strand board or plywood. The thickness of the material is at least 9 mm. The slabs are laid staggered relative to each other, leaving small gaps between them - 4-10 mm. The sheets are laid parallel to the cornice.
Next, a continuous sheathing is installed
Installation of oriented strand board base
There are small gaps between the sheets
Step 8. The cornice strips are attached. They are installed on the edge of a solid base. Fixation is carried out with self-tapping screws in increments of 25-30 cm. Individual elements are installed with an overlap on each other. The overlap must be coated with sealant.
Fixing cornice strips
After this, the drainage system is installed, the underlay carpet is laid, and the soft roof is laid directly.
Prices for OSB (oriented strand boards)
OSB (oriented strand board)
How to calculate the amount of material for lathing under a soft roof
Taking into account the above-mentioned relationships between the spacing of the sheathing elements and their thickness, it is possible to make a fairly accurate calculation of this structure. To do this, you will have to first take the dimensions of the roof itself, which are indicated in the building drawing. And if the roof is a complex multi-level and multi-slope structure, then it needs to be broken down into simple geometric shapes. It is on their basis that the total roof area is calculated.
In this case, you will have to take into account the angle of inclination of each slope, because the smaller the angle, the greater the loads the sheathing system is subjected to. This means that you will either have to reduce the spacing of the boards or bars, or increase the thickness of the slab and sheet flooring. Therefore, to simplify calculations when determining the total roof area, correction factors are used. For example, when the slope is inclined at 35°, a multiplying factor of 1.221 is used.
Calculation of a solid structure
With the calculation of a continuous sheathing, the situation is simpler, because it covers the entire area of the slopes. That is, its area will be equal to the area of the roof. Let's look at an example of calculating the number of plywood sheets for a slope with an area of 50 m².
- The total area that needs to be covered with plywood is 50 m².
- If square plywood sheets with a side of 1525 mm are used for the sheathing, then the area of one sheet is 1.525∙1.525 = 2.3 m².
- The number of sheets is determined by dividing the first value by the second - 50:2.3 = 21.74.
- Rounding up, we get 22 sheets.
The area of the continuous sheathing is equal to the area of the roof, so slab or sheet materials are purchased taking into account the size of the roof slopes
In the construction business, when calculating the amount of building materials, a small reserve is made in the range of 5–10%. Here we need to do the same, so the final result is 23–24 sheets.
The number of OSB boards is calculated in exactly the same way. But with boards it’s a little more complicated. First of all, you need to calculate the area of one selected board. The length of the edged boards varies from 1 to 6.5 m in increments of 0.25 m. Width ranges from 75–275 mm in increments of 25 mm.
Let’s say a board 3 m long and 0.1 m wide is used for the sheathing:
- We calculate the area of one board: 3∙0.1=0.3 m².
- A slope with an area of 50 m² will require 50:0.3 = 166.66 boards.
- Round to the nearest whole number and add a margin of 10%: 167∙1.1 = 184 boards.
Calculation of sparse sheathing
For this calculation, the area of the slope itself is not required. The length of the roof and its height are required, that is, the distance from the overhang to the ridge.
- Using the first indicator, we determine the length of one row of laid boards. For example, if the length of the cornice is 10 m, and the same three-meter boards were chosen for the sheathing, then 10:3 = 3.33 pieces will fit in one row. In this case, there is no need to round the resulting value.
The number of boards for sheathing is calculated taking into account their sizes and the distance between the rows
- Next, we calculate the number of rows that are mounted parallel to the overhang or ridge. To do this, you need to select the sheathing pitch. Let it be equal to 50 cm. If the height of the slope is 5 m, then you will need to lay 5:0.5+1= 11 rows. One extra row is formed by laying the sheathing at the overhang and at the ridge, that is, at the edges of the roof slope.
- We determine the number of boards: 3.33∙11= 36.63.
- We round and add a margin of 10%: 37∙1.1=41 boards.