Choosing a location for a shed
Before you begin construction, you need to determine where the barn will be located. The choice of location, size and shape depend on its purpose, and any outbuilding must be combined with the overall design of the site. You also need to pay attention to the soil where the shed will be placed. The type of foundation depends on the type of soil or whether it will be possible to do without it altogether.
- The barn can be windowless, like a small storage room, or it can be beautiful - with decorative elements as an addition to the design of the site. Near it you can plant trees, flower beds, paint the walls or use siding for decoration, and tiles for the roof.
- If the building will be used as a warehouse for solid fuel, then it will be built closer to the house. At the same time, it is better that the material intended for the shed is combined with that from which the house is built.
- If the building will store gardening tools, then it is better to place it next to the garden or vegetable garden, on the most shaded side, where plants grow worst.
- When a barn is used for subsidiary farming, it is built behind the house, at the distance required by sanitary standards.
Construction and ligation of half-brick walls
The main advantage that brick laying reveals is that there is no need to strengthen the base of the floor, even a wooden one. The masonry process itself is based on raising the walls so that the face of the wall consists of the tray surfaces of the brick. The spoon is the long side of the brick, the poke is the short side, the bed is the wide upper and lower surface of the product.
Half-brick masonry is carried out in one row, in a checkerboard pattern, on a cement-sand mortar. Vertical mortar joints between bricks should not line up so as not to reduce the strength of the masonry and wall. Without the plaster layer, the wall thickness will be 120 mm. The load-bearing capacity of such a wall is small, but if there is a need to use a half-brick wall as a load-bearing one (for example, to support a rafter system or an interfloor ceiling), a preliminary examination and permission from regional or city architectural services is required. The standard weight limit for such walls is up to 130 kg.
To connect half-brick masonry to a load-bearing wall, the junction is laid out in such a way that the end surface of the load-bearing wall is a butted wall, and the inner surface is a tongue-and-groove. The number of three-quarter bricks is calculated based on the thickness of the load-bearing wall. Adjacent rows are laid out one after another. If the thickness of the load-bearing wall is one and a half or two bricks, with the first row laid according to the “spoon-poke” pattern, then the next row is laid according to the “poke-spoon” pattern, etc.
Where else can you use half-brick masonry:
- As fencing.
- As interior non-load-bearing partitions with good noise reduction parameters and the possibility of decorative finishing with any materials.
- In the construction of household facilities - sheds, verandas, pavilions, garages.
- In the construction of limiting structures: prevention of landslides on the site, demarcation of land, etc. During the construction of external fences, it must be taken into account that the wind load of brick walls, the thickness of which is 12 cm, a height of 1.5 m and a length of ≥ 2 m, is no more than 350 kg.
Set for work
To build a shed with your own hands, you will need the following tools: a shovel, an ax, a saw, a hammer, a plane and a trowel. To construct a building, you can use various building materials:
- brick;
- wooden boards and beams;
- foam blocks.
Cement and sand will also be needed to mix the mortar when pouring the foundation and laying bricks or blocks. You will also need nails or bolts when attaching walls, floors, roofs and roofing felt for waterproofing. Roofing material will also be necessary; it is selected depending on the location and appearance of the building.
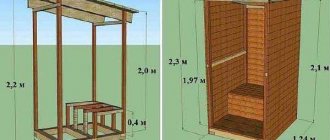
We build a barn with a pitched roof with our own hands
You can calculate the amount of material needed for the frame and pitched roof. To build a 3x6 shed, six-meter boards are used:
- For the frame, material with a cross section of 50x150mm - 14 pcs., 25x100 - 23 pcs., 50x100 - 19 pcs.;
- For the floor, boards measuring 25x100 mm - 27 pcs.;
- For the sheathing and roof supports, 43 boards with a section of 25x100 mm are required.
All joints and connections are made with black carpentry screws 50 mm, 70 mm and 110 mm. To reduce the cost of construction, you can use ordinary nails and construction angles, but such savings are not always justified.
Making a foundation for a 3x6 shed
After choosing a site for building a shed, you will need to plan and remove soil on an area of at least 3x6 m in size. It makes no sense to make a larger building area. To prevent vegetation from pestering you, the cleared space can be covered with salt and sand.
After marking the location of the supports, at the installation points of the pillars we dig 12 holes, 15 cm deep and the size of a standard cinder block. At the bottom of the mini-pits we pour a 5 cm layer of a mixture of crushed stone and sand, after which we lay out columnar supports from cinder blocks using masonry mortar with the addition of PVA.
Before laying out, you will need to pull horizontal cords, along which you can control the height of each support, so that the entire supporting surface of the pillars is in the same horizontal plane.
After a day, you can install the strapping beam. All corner joints and T-shaped mortises are made with the ends “half-timbered”, each connection is reinforced with self-tapping screws screwed into the beam at different angles.
Assembling the frame and pitched roof
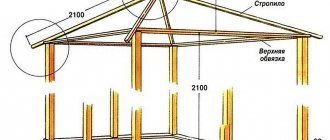
At the next stage, you will need to install load-bearing vertical posts; they are highlighted in orange in the drawing. Next, we sew up the floor and lay the rafters of the pitched roof.
We make the central load-bearing racks from 50x100 boards, for the rear wall you will need to cut three 220 mm racks, for the front wall - four 250 mm racks. We first fix each support on the lower frame with one self-tapping screw, then set the exact horizontal position according to the building level and additionally fasten it with small half-meter struts, as in the photo.
After all the racks are installed, we strengthen them with additional temporary struts and tie the upper tier of the frame under the future pitched roof. To give the entire structure of the barn additional rigidity, before assembling the elements of the pitched roof, it is necessary to cover the floor with a tongue-and-groove board.
Next, all installed elements, floor boards, rafters, sheathing material, side posts, lower and upper trim must be treated with an antiseptic and preservative. During the time it takes to assemble the rafters and roof of the pitched roof, the procedure must be repeated twice.
For the upper overhang of a pitched roof, installation of rafters and sheathing, you will need to secure an additional horizontal beam of the mauerlat, as in the diagram.
The cutting of the seat on the rafter beam is carried out according to the markings or according to a prepared template. After installing and leveling the position of each beam, it is recommended to fill the space between the beams with short boards; they will fix the rafter from horizontal displacement and at the same time strengthen the base of the pitched roof.
Roofing and finishing works
At the final stage, we sew up the rafters of the pitched roof with a sheathing board. If bituminous materials - flexible tiles and roofing felt - are used for the roof of the barn, additional OSB sheets will need to be laid on the boards or the sheathing will need to be completely hammered in with wooden clapboard.
The easiest way to cover a pitched roof is with corrugated sheeting. The metal surface will withstand any disasters that may occur in a summer cottage, and laying and fastening roofing material is much easier and faster than euro-slate or roofing felt. A polyethylene film is laid as waterproofing, the edges of which will be released from under the awnings and nailed to the top edge of the wooden walls of the barn.
Laying the roof on a pitched roof begins with the bottom left sheet, as in the diagram. Each element is joined to the previous one in a row in an overlap of two waves, an overlap of 15-20 cm is made on the bottom sheet. The overlap areas, the lower and upper edges must be pierced with roofing nails with a silicone washer.
Wind strips are nailed to the sides of the roofing pie, protecting the pitched roof from water flow and gusts of wind. We nail a similar strip for installing a drainage gutter under the lower overhang. We protect the upper overhang of a pitched roof with a screen made of two wooden planks.
Foundation
The construction of a shed begins with the most important stage - the construction of the foundation. The durability of the entire structure depends on how high-quality and reliable the supporting structure is. Usually a strip foundation is made for an outbuilding. Its depth depends on the building material from which the barn will be built.
Work order:
- the construction site is cleared of bushes and trees;
- using twine and pegs, mark the site for the building, marking the strip for the foundation;
- remove the vegetation layer and dig a trench according to the size of the shed;
- a 15 cm layer of sand is poured onto the bottom of the ditch and compacted, then crushed stone is 10 cm thick and compacted;
- the base of the foundation is lined with a layer of waterproofing;
- the formwork frame is installed;
- A concrete mixture of cement, sand and crushed stone is prepared, and the foundation is poured.
If a barn is being built from brick or block material, then a reinforced frame is made. A reinforcement cage is installed in the trench, on the base of the foundation, and concrete is poured. Hardening time depends on the quality of the cement and the air temperature. When using accelerators for hardening, the waiting time is reduced.
Brick barn
Anyone can build a brick shed with their own hands, the main thing is to understand the basic rules and remember the procedure.
And by building a brick shed with your own hands, you will gain experience, new skills and knowledge. Who knows, maybe you will like this business, and you will master a new specialty, which is always in demand on the labor market.
Preparing to build a brick shed
No matter how significant the construction project is, certain rules must be followed.
Namely, to carry out in a certain sequence all the steps associated with the construction of new structures.
Design
Before constructing any object, even the smallest one, it is required, first of all, to design it.
You must think through and calculate everything down to the smallest detail:
- Width and length of the building;
- Foundation depth;
- Wall thickness;
- Building height:
- The shape of the roof (single slope, double slope, etc.);
- Foundation material;
- Material for roofing and ceilings and so on.
Once your project is on paper, you can proceed to the next, no less important step - choosing a location for construction.
Choosing a suitable location on the site
So, in addition to your desire to build a brick shed in one place or another, some conditions must be met:
- Carry out zoning of the site;
- Determine the suitability of the soil for the construction of buildings.
Since the construction of a brick shed assumes that it will last for more than one year, you should think in advance in which zone to place it.
The structure must fit into the overall landscape and not interfere. But, at the same time, “to be at hand.”
If possible, cover the area from prying eyes. That is, partially taking over the function of the fence. However, in this case, you must not cause inconvenience to your neighbors; follow the rules of good neighborliness.
It is not recommended to place a shed next to drainage holes or wells. Near cliffs, where the soil can crumble, slide, and so on. Consider the terrain and soil structure.
It is advisable to choose a place for the shed that is flat and not sunny. Most unsuitable for garden crops.
Brick foundation for a barn
When you have decided on the location, you can proceed directly to the construction of a brick shed.
As you know, any object begins with a foundation. If you want the structure to be strong and last a long time, then a foundation is necessary.
The foundation can be built from various materials. Since this is not a capital construction of residential premises, we will consider budget options.
Since brick is supposed to be used to build a shed, the options for sheds on stilts are immediately eliminated.
For a brick shed, either a monolithic ground belt or a monolithic slab is suitable. By the way, the monolithic slab serves as a foundation and floor.
Soil preparation includes the following steps:
- Alignment;
- Removing fertile soil to the required depth.
When you want to pour a monolithic slab, you should remove the soil from the entire marked area.
If you decided on a strip foundation, then you need to dig trenches of the required depth, along the perimeter or established markings.
If there is a broken brick, it can be used in the construction of the foundation.
A brick foundation for a barn will last for many years. Although, the service life largely depends on the quality of the brickwork. Read more about how to pour a broken brick foundation on the blog.
Rules for pouring the foundation
In order for a brick foundation to last longer, it is necessary to carry out high-quality waterproofing of the area at the first stage.
Since the brick is capillary active, it quickly absorbs moisture from the soil. And over-moistened brick at sub-zero temperatures quickly collapses.
As a result, the foundation made of broken bricks and cement begins to crumble and disintegrate into small pieces.
Concrete based on capillary active filler will not last long without appropriate waterproofing.
Such a foundation must be protected from moisture both above and below. The base must be protected from groundwater, moisture, etc., and the top must be protected from precipitation in the form of snow and rain.
Such a foundation, protected from moisture on all sides, will last a very long time.
Of course, it is best to create a sand cushion of about twenty centimeters under the foundation. But, in principle, you can do without it.
Pieces of brick and stone are placed in a trench pre-insulated from moisture and lined with formwork. Next, the brick battle is filled with liquid concrete. Try not to allow air bubbles to form.
Construction made of wooden beams
You can build a small wooden shed from boards and timber, and you do not need to make a reinforced foundation; a columnar base is sufficient.
Sequence of actions:
- the perimeter of the structure is marked, pegs are driven into the corners, and a rope is stretched between them;
- in the corners of the future building, they dig holes 50-70 cm deep, the width required for installing the pillars;
- 10 cm of sand is poured onto the bottom and a beam is inserted vertically, covered with earth and compacted tightly at the base of the pillars; if the building is tall or large, then the holes are filled with concrete mixture;
- Cross beams are attached to the posts from below and above, creating the frame of the future barn;
- in places for door and window openings, vertical bars are nailed to the required width;
- sheath the barn with wooden boards, nail them vertically - as close to each other as possible or overlapping;
- the floor in the building is made of wood, poured concrete or earthen.
The roof can be single-pitch or gable. In the first option, when installing the pillars for the frame, the front two are made 30 cm higher than the rear ones. This will allow you to slope the roof so that rainwater can drain away. Rafter beams are laid along the length of the barn; their length should be half a meter longer than the building. Afterwards the sheathing is done and the roof is laid.
From timber
Barn made of timber
First of all, you need to make a project, because a barn is a small house. You can do it yourself. In the project you indicate the overall size, the material used and its quantity, the presence of a roof and its shape, the presence of partitions, etc.
Next you need to decide on the type of foundation. For such a shed, the foundation can be of different types, since the walls made of logs do not crack. To a greater extent, the choice of foundation type will depend on the availability of groundwater, the depth of freezing, as well as on the basic characteristics of a particular soil.
Columnar foundation
The most popular type of foundation that most builders choose is a columnar foundation. Why? The reason is very simple. To make it you will need a minimum amount of building materials. Moreover, it is quite possible to make a columnar foundation yourself. To make it, you need sand, crushed stone, cement and reinforcement. The formwork for the base can be made from roofing felt, twisting it into the shape of a pipe. This option will be the cheapest and simplest.
Laying timber
So, now let’s look at the sequence of work on making a columnar foundation for a barn made of timber:
- The first step is to determine the location of the pillars, and first it is important to remove the plant layer of soil; up to 25-30 cm will be enough.
- It is extremely important to have a post at each corner of the shed, with a gap of 1500-3000 mm between them.
- Based on the level of soil freezing, a well is made using a garden drill.
- Afterwards, a sand cushion must be made at the bottom of the pit, with a layer of 200 mm.
- When the well is prepared, previously prepared roofing material is placed into it, which will act as formwork.
- A manufactured frame made of reinforcement is inserted into it. The length of the fittings can be placed 3-4 pieces. All that remains is to make concrete and pour it into the well.
- After complete drying, the columnar foundation is ready.
Laying the foundation
Before you start building walls, you need to lay the strapping crown. First lay roofing material on the finished columns. Preferably in several layers, this way you will make waterproofing. Afterwards, antiseptic-impregnated beams are laid on them around the entire perimeter. At each corner, the beams are connected using a dowel. Before laying the next row of beams, it is necessary to put insulation, for example, tow or jute.
Note! So that the future barn can be easily sheathed with siding, as well as additionally insulated, the beams must be connected “in a paw” in the corners.
Using dowels, connect the crowns. To do this, several holes are made in each crown every three beams. A 3-4Ø mm “stick” is inserted into the holes made. To prevent cracks from appearing during the shrinkage process, their length may be less than the depth of the drilled hole.
Structure frame
When the height of the walls matches your project, all that remains is to lay the beams and lay the ceiling on them. The roof shape can be pitched. To do this, immediately raise one side of the barn higher than the other. If you want to make an attic or hayloft, then you can make this rise from the base of the roof slab higher.
Brick barn
Brick construction differs from wooden construction in strength and durability. Brick material has enough advantages over others: it is not subject to rotting, is not afraid of dampness and is a fireproof material. However, it also has disadvantages - heavy weight with a small size, the cost of pouring a solid foundation, and it does not hold heat well.
For the construction of a brick shed, a strip-reinforced foundation is required. After the concrete mixture has dried, construction of the walls begins. They are made from material laid in one row. The masonry is carried out with the obligatory dressing of half a brick and starts from the corner of the building. The evenness of the walls being erected is monitored using a plumb line and level.
To firmly hold the roof, after laying the last row, fill the armored belt. The roofing system is installed and the covering is installed.
barn frame
The frame is most often made with screws or nails. The work is, in principle, not difficult. After the main frame (walls and roof of the barn) has been assembled, additional supports and racks are installed.
The frame can be made of boards, logs, bricks. The use of a combined method is also possible. When erecting a structure of a combined type (from logs and bricks), first lay out the brick base, and only then continue working with the logs.
The bricks are laid in four rows directly on the concrete slab. The log or beam is attached to the brick using anchor pins.
It should be remembered that a waterproofing layer is required between the brick and wooden parts.
When building a shed from planed boards, it is best to place them vertically. It is permissible to fasten the boards with an overlap (one board “floats” onto another). You can build a barn this way in thirty hours.
A simple method for building a shed from unedged boards
- A simple shed can be built without building a foundation . As a last resort, the building can be moved. The only thing that needs to be done is to raise the floor and walls above the ground using wooden blocks.
- The lower trim and floorboards should be thoroughly coated with an antiseptic. It would be nice if you also use waterproofing compounds.
- Before continuing work, you need to wait until the antiseptic dries.
- The main material for building a simple shed is unedged board. The boards are overlapped vertically or horizontally. When covering the last wall, you need to take care of the doorway. It is better to make all measurements in advance.
- The roof is covered with roofing felt and nailed down with planks.
- To make your shed stronger, you can line the inside of it with a solid, continuous strip of metal.
- The last stage is the construction and installation of the door.
Shed made of foam blocks
A barn made of lightweight concrete blocks can be built quickly. If the material is compared to brick, it is larger in size and weighs less. At the same time, it has good thermal insulation properties, which is important for the construction of a building for a subsidiary farm.
Stages of work: the foundation is made, the walls are erected and the roof is built. Before you start building a building, you need to draw up a detailed project to avoid mistakes.
Step-by-step instructions for making a strip foundation for a barn:
- The place is marked - using pegs and rope, the perimeter of the barn is outlined;
- A trench is dug for the foundation;
- For the foundation base, a layer of sand and crushed stone is poured, then compacted;
- Lay a layer of rolled waterproofing;
- Install formwork from boards;
- A knitted reinforcement frame is installed in the space between the formwork walls;
- The concrete composition is poured;
- As soon as the concrete hardens, the formwork is removed and the top of the foundation is covered with roofing felt.
For the construction of walls, foam blocks, gas blocks or cinder blocks are used. To ensure that the rows are even and the structure is not skewed, check the evenness of the masonry using a level and a plumb line.
Walling:
- The laying of foam blocks begins from the corner of the building, with dressing in half a block;
- The first row is laid with cement mortar to level the surface of the foundation;
- The second and further rows can be laid with special glue, so the thickness of the seam between the blocks will be thinner;
- During the construction of walls, door and window openings are laid out.
The roof on a barn is usually made of two types: single-pitch or gable. The second roofing option is more complicated, but it has a more attractive appearance and attic space.
Gable roof installation:
- to fasten the truss structure, the floor beams are laid in the grooves between the blocks of the last row, they must be 20-30 cm longer than the walls on each side, or an armored belt is poured;
- the last row and the space between the beams and foam blocks are fastened with cement mortar;
- timber (mauerlat) is placed along the perimeter of the walls, connecting it together at the corners with staples and attaching it to the floor beams;
- cross beams are laid, boards are nailed onto them - they will be the floor in the attic and the ceiling in the barn;
- a rafter structure is attached to the Mauerlat and connected from above using a ridge board;
- a transverse beam is nailed to the rafters, a sheathing is made;
- roofing material is laid.
Windows are inserted into the finished openings and the door is hung. If the threshold of the barn is too high, then a porch or just steps are made in front of the entrance.
Execution of work
Of course, there is a difference: you are doing cladding, erecting a partition, or building a fence. Each case will have its own subtleties, so it is impossible to talk in detail about everything at once. We will talk about those nuances that are common to all cases.
- The first rule states that under any brick wall there must be a strong, rigid foundation. If this is an exterior finish, it means that the brick wall must rest either on a foundation or on a concrete blind area constructed according to all the rules.
- In private houses resting on pile foundations, basement walls are built from brick. Since in this case there is no support for the masonry, a shallow trench is dug between the piles, formwork and frame are installed, and a concrete strip is poured.
- When it hardens well, a strip of waterproofing material is spread on it, and only then do they begin to lay the brick. The height of such a wall is usually 5-6 rows, and no reinforcement is required.
- The same shallow tape has to be made in the case of building a fence or gazebo. Here, as a rule, columns (pillars) are installed at a short distance from each other. The masonry spans are small, so reinforcement is also not required.
- Internal brick partitions can rest on a concrete floor. But if the house has beam-type floors, then the only way to plan the house is with the help of plasterboard structures.
- As for the reinforcement of the masonry, if the height of the partitions is up to 3 m, and the length of the spans is up to 5 m, it is not required - it is enough that you tie the structure around the perimeter.
- However, if you are building a partition and plan, for example, to hang a heavy water heater on it, then the longitudinal reinforcement can be done according to the usual pattern - mesh or strip steel in every fourth row.
- The partition is tied to adjacent walls and ceilings using masonry anchors. On one side, they are mounted in concrete, and the other end of the anchor is simply monolid in the horizontal joints of the masonry. As an anchor, you can even use ordinary straight hangers, on which a frame for a suspended ceiling is usually attached.
Mix from the manufacturer for brickwork.
Everything else is a matter of technique - watch the video once and you will understand how and what needs to be done. Just remember that the reliability of any masonry is ensured by a properly prepared solution.
The materials for making brickwork are as follows: if you use Portland cement M300, then 5 parts of sifted clean sand are placed on 1 part of it. Water is added at the rate of 500 ml per 1 kg of dry mixture. If a masonry mixture is used, the manufacturer indicates the amount of water for mixing on the packaging.
iz-kirpicha.su
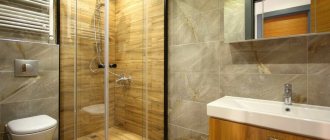
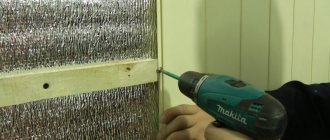
Roofing and wall cladding
Various roofing building materials are used to cover the roof. Using metal tiles or ondulin, you can give the building an attractive look, since these materials are produced in various color shades. The roof will also look beautiful if you cover it with bitumen shingles, which are also available in many colors.
The appearance of the shed can be improved by sheathing or painting the walls. Siding is used to decorate brick and block walls. The cladding of a building made of boards and beams is treated with drying oil or painted.
For convenient placement of equipment in the shed, hanging shelves are made on the walls and hooks of different sizes are attached. Acrylic lamps are well suited for lighting inside buildings, as they are resistant to mechanical stress.
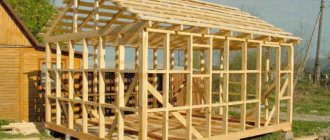
Construction of a frame shed
The optimal distance between vertical posts is 60-80 cm
The frame is erected on a completely hardened foundation or on a lower beam laid on the ground. In both cases, work begins with waterproofing. Well, the foundation is laid with roofing felt or roofing felt in 2 layers. The material must extend beyond the bottom support beam.
For the lower beam, choose a beam with transverse dimensions of at least 100x100 mm.
The lower trim is attached to the foundation with threaded rods, which are poured simultaneously with the foundation or screwed into threaded anchors. The fastening step is 1–1.5 meters.
It is more convenient to assemble the frame of each wall on the ground, and then lift and secure it in a vertical position.
For a pitched roof, the walls must be of different heights, providing a slope of 10°.
When working alone, each rack can be installed separately, secured in the desired position with slopes. After installing the vertical supports, they are connected by horizontal crossbars. Fastening is carried out with nails or using a galvanized corner and self-tapping screws.
The distance between vertical posts should not exceed 1.5 meters, and 60–80 cm is considered optimal, which will correspond to the distance between the roof rafters - in this case, maximum structural strength is achieved.
Before sheathing the walls, the racks are strengthened with inclined jibs to ensure vertical installation.
The upper edge of the frame is made of longitudinal beams. Horizontal crossbars are installed taking into account window and door openings.
Estimate for the construction of a barn
The cost of building a shed directly depends on its size and the types of building materials from which it will be built. So, for example, for a wooden building measuring 5x3 m, installed on a larch columnar foundation, you will have to spend about 70 thousand rubles:
- metal tiles - 13-15 thousand;
- impregnation - 5-6 thousand;
- boards and beams - 40-50 thousand;
- consumables - about 5 thousand.
A 3x6 brick shed can be built for approximately 50-55 thousand rubles (strip foundation, pitched roof). The cost can be reduced by using previously used building materials.
3x6 shed with pitched roof.
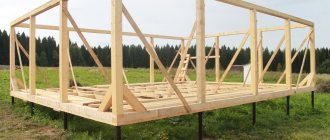
The 3x6 shed is one of the most popular formats. I have already published one report on the construction of a 3 by 6 meter shed, now I decided to add another one. This time a barn with a pitched roof.
Let's start with the foundation. Since the site is located on the banks of the Mother Volga (the upper layer of earth, and below it is river sand), I decided to pour a concrete foundation. I dug eight holes 600x600x600 mm. He mixed the concrete and poured it into the finished holes. I installed reinforcement in the concrete (vertically upward) so that I could then attach the platform for the shed to it.
I made the platform out of brick - I laid out the brickwork, the next day I measured it level and added cement mortar where needed to make it level.
Once dry, I began to assemble the lower frame of the shed.
For this, a board 50x200x6000 mm was used. The vertical posts of the frame are made of 50×100 mm boards. Here is a photo of the finished shed frame:
As for the roof: a 6 by 3 barn required 8 rafters. I took rafters 50x150x5000 mm. Cuts are made on the rafters and fastened to the frame with nails. You can also attach it with metal corners, but it seemed more convenient this way. Here is the diagram for fastening the rafters:
Here's a closer photo of the rafters:
I did not do any lathing, since the roof is galvanized 2500 mm. The roof took 2 sheets of galvanized steel with a slight overlap.
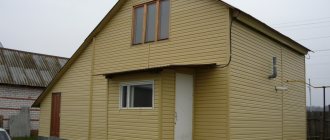
Shed cladding from edged boards 25x150 mm. The overlap is about 2.5cm. Fastened with galvanized nails 90mm. I decided to paint the board right away, before covering it. It seemed easier this way. And when the board dries, the unpainted areas will not be visible.
At the front of the barn, I first tried on the door, then began to plank it.
If anyone is interested, I painted it with Azure paint, impregnation V33. Bought in Leroy, it took about fifteen liters for the shed. I applied 2 layers. The paint seems to be good.
And here are the final photos of the 6 by 3 meter shed:
The construction of the shed took about a week of leisurely work. The barn stood fine over the winter, no problems were found.
Floor installation
If the structure does not claim to have a long service life, you can use soil as a floor. You can also cover the ground with simple boards. If you prefer a strip foundation, before laying the floor you need to work on the waterproofing layer.
Only after this, lay the logs, and then the wooden shield that acts as the floor. A columnar foundation may involve the use of boards 10 cm wide, which are nailed to the joists.
The barn is an important building, as it is where building materials and tools for working on the site are kept. Building a shed yourself requires certain construction skills, but this task will not be too difficult for you if you use the tips described in this article.