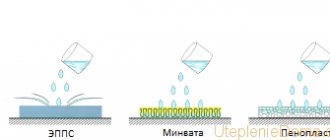
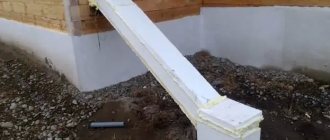
A specialist looked at this pipe (the one from Petrovich), it cannot be used. It's just a protective casing, not a pipe. You just need a 110 diameter sewer pipe. You will need to insulate it, of course. Thermal insulation of such a pipe can be made with materials such as EPS or polyurethane foam. They can be in “shells”, shaped like a pipe. You can simply “cover” the pipe with sand and along the contour, for example, EPS (sheet). But shells are, of course, better. I'll send you an example in a private message.
The passage of pipes through a pipe is done like this. Something larger in diameter is laid before pouring. I write “something” because it could be anything that is convenient. A larger diameter pipe, or, for example, a bucket without a bottom. This passage must be located between the reinforcement bars.
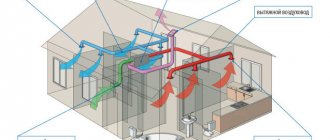
Any owner of a private house or summer cottage dreams of creating the most comfortable living conditions for himself. But comfort cannot be imagined without such amenities as a shower, toilet, bath - just as the building itself cannot be imagined without a window.
A sewer pipe pulled out of the ground
For this purpose, it is necessary to install a sewerage system in a monolithic house. It’s good if you managed to install a sewer system in the slab when pouring the foundation, and accordingly build a monolithic house at the same time, but if this was not possible, then you will have to lay pipes and cables under the foundation.
This is a mandatory process, because otherwise you will not be able to lay the sewer and all the necessary communications under the foundation or in the slab. This is exactly what will be discussed in this article.
What is a slab foundation
A slab foundation is a monolithic reinforced shallow slab, which is most often used in places where the soil is heaving or prone to shrinkage. Quite often, slab foundations are found in particularly wet areas, where the groundwater level is almost at the surface.
Such a foundation creates a kind of raft, protecting the room from negative atmospheric phenomena and preventing the penetration of moisture into the room. The foundation itself is very similar to USP, with the exception of floor insulation, which is not used in a slab foundation.
This type is used:
- in areas where the soil has a low ability to hold the structure and the weight of the planned building is quite large;
- in places where uneven shrinkage of the structure is possible;
- in areas where pressure groundwater is present.
Pros and cons of a slab foundation, comparison with USP
The slab foundation and USHP are approximately similar in structural design, but there are also significant differences, to a greater extent this concerns the insulation that is laid under the foundation, which is not used in a conventional slab foundation.
To determine the most suitable type of foundation for your home, you need to consider the pros and cons of a slab foundation, and then the differences from USP.
Advantages of a slab foundation:
- reduced construction cost compared to a Swedish stove;
- ease of installation;
- high strength indicators, since contact with the ground occurs over the entire area;
- the platform of the slab is common throughout the house, so deformation is not dangerous for it, since part of the load will simply be transferred to a larger area;
- the ability to use the slab as a rough covering for the basement;
- there is no need to go very deep into the ground, which reduces the cost of equipment and labor;
There are significantly fewer disadvantages, but they also exist:
- the need for additional floor insulation after construction for a comfortable indoor microclimate;
- increased costs for concrete and reinforcement compared to traditional types of foundations;
- the need to use equipment to pour large volumes of concrete;
- financial disadvantage of using a slab foundation on sloped areas due to the significant consumption of concrete.
As you can see, the difference between a slab foundation and a USHP is only in the absence of a layer of insulation under the base, as well as the need for additional insulation of the floor of such a foundation. This type of foundation is well suited for seasonal buildings, as well as bathhouses, but for houses with permanent residence such a foundation has become quite outdated.
Stages of foundation construction
First you need to mark the site on which the future structure will be located. Please note that the formwork will take up some space; to make it more convenient to work with it, add about a meter to the sides of the pit.
In order for the pressure on the slab to be uniform in the future, the platform is leveled. There should be no bumps or drops at the bottom of the pit. the drainage system must be done immediately. To do this, you can dig transverse trenches to drain water. Geotextiles are placed on their bottom. Then you need to lay plastic pipes with pre-drilled holes. All this is covered with fine crushed stone and again covered with geotextile.
Substrate for the foundation
Depth of slab foundation
As a rule, the thickness of a monolithic foundation slab is 35-50 cm, it depends on the type of soil and the weight of the building. This parameter can be determined more accurately based on calculations. To find out the optimal depth of the foundation slab, you need to perform the following calculation:
- Determine the type of soil;
- Using the reference book, we find the optimal specific pressure on a given soil;
- Next, the weight of the house is calculated. Here you need to take into account everything: the walls, the weight of the slab itself, the attic floor, the roof and possible pressure on it from snow, the balcony, the attic and everything that creates a load on the ground;
- Determine the load on the surface. For example, let's assume that we have a two-story house with a weight of 100 tons and an area of 54 m2. 100,000/54 = 0.19 kg/cm2. For example, sand has an indicator of 0.25 kg/cm2. Thus the difference is 0.06 kg/cm2. Now you need to multiply by an area of 54 m2, so you get 32 tons - this is the required mass of the foundation;
- Next, taking into account the density, we calculate the volume of concrete 32,000 / 2500 = 12.8 m3;
- It remains to obtain a foundation thickness of 12.8/54 = 0.24 m.
Thus, a slab thickness within 30 centimeters will be optimal for a given house. At the same time, the depth of such a foundation should be such that there are no fertile layers of soil under the slab - all of them are removed at the surface preparation stage, and after pouring the concrete, the foundation is backfilled.
Preparing for sewer installation
Before the actual installation of sewer pipes, a number of preparatory measures are carried out:
- Select pipe products and fittings. Sewage pipes can be made of plastic, metal-plastic, steel and galvanized. The cost of each type of product has significant differences, and pipe installation is also carried out differently. Polymer products are very popular because they are lightweight, durable and practical. They are practically not deformed or destroyed. When choosing sewer pipes, you should pay attention to the color of the material from which they are made. Pipes for indoor sewage systems are gray in color. External sewerage, from the house to the septic tank or storage tank, is made of brown or red pipe products.
- Calculate the optimal value of the diametrical cross-section of the pipe. In this case, the maximum volume of fluid passed is taken into account. In most cases it is sufficient to use a pipe with a diameter of 32 mm. However, in large private houses, it is better to lay proper sewerage under the foundation using pipes with a diameter of 100 mm.
- Determine the optimal slope of the pipes being installed.
Experienced craftsmen claim that in order for sewage to move under the influence of gravitational forces, each meter of pipes being laid must be lowered by 2 cm.
Step-by-step instructions for installing a slab foundation
Surface preparation
The first step is to mark the perimeter of the area and remove the fertile layer of soil. After excavation work, a geotextile flooring is laid. Next, you should fill the area with crushed stone and sand to form a cushion. The sand is compacted in layers of 10 cm. Then communications are laid. Laying communications in a slab foundation is similar to the same operation in an insulated Swedish slab. It is better to lay pipes in special sleeves, which allow repairs and replacement of communications. Some builders duplicate sewer pipes in the slab so that if one pipe fails, they can use another.
Formation of the base
Next, a screed is made from M100 mortar with a thickness of about 10 cm. Waterproofing is laid on top of it, the seams of which are soldered with a torch. The waterproofing should be slightly larger than the area of the future foundation in order to then turn the flooring up.
Slab foundation reinforcement
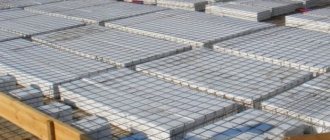
After the foundation is formed, the reinforcement is installed. As a rule, for the slab frame you need to knit two-row reinforcement from a rod with a thickness of 12-16 mm and a cell size of about 20-30 cm. The entire frame must be at least 5 cm above the base level; for this, special spacers are placed under the reinforcement. This is done so that after pouring the slab with concrete, the reinforcement is recessed inside.
Pouring a slab foundation
After reinforcement, the formwork of the slab foundation is formed. The formwork of such a foundation is the simplest structure, consisting of wooden panels installed along the perimeter of the foundation. Such formwork will not require large financial investments compared, for example, with strip foundation formwork.
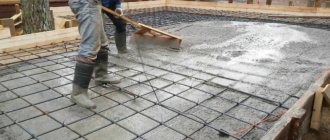
After all preparatory steps are completed, concrete is poured and compacted. The easiest way to do this is to use mixers, since such a foundation requires a significant amount of concrete, which must be poured at once to avoid uneven drying and the formation of cracks.
DIY option
If you need to build a pit with your own hands, you can resort to one of two construction options. The main difference between them is the choice of the main building material. Talking about pits:
- made of monolithic concrete;
- made of bricks or blocks.
The pit will protect against debris and animals entering the house through the windows in the basement.
When choosing between one option or another, the main role is played by the availability of materials and the budget for construction work.
What both cases have in common is the preferred form of their construction - a rectangle. Everything is calculated so that the top of the structure rises slightly above the ground (up to 30 cm), and the thickness of the walls at the same time is about 15 cm. The bottom is located in a standard recess from the lower end of the frame.
Monolithic well
For the construction of a pit, the design of a monolithic well is one of the most successful. It is strong and durable if you choose the right brand of concrete.
To build a structure in this way, you will need a number of tools and materials:
- shovel;
- concrete mixer;
- roofing felt (can be replaced with geotextiles);
- rack for tamping;
- cement;
- water;
- gravel;
- iron fittings;
- wooden boards for formwork.
They dig a pit and arrange formwork inside it, for which they use prepared boards. If a pit of an atypical shape is being built, the formwork made from them may not be suitable; in this case, fiberboard or PVC panels are taken.
After the formwork is made, reinforcing material is placed. Metal rods or mesh are used as it. The main work on pouring concrete begins with the walls. It is important to use only high-quality material from good brands, otherwise you will have to redo everything pretty soon.
When pouring the solution into concrete, it is constantly compacted. A rail is used for this. Once the walls are finished pouring, they are left to dry, which can take up to several weeks depending on conditions. Dried concrete is treated with bitumen mastic for waterproofing purposes.
The bottom is arranged immediately after the walls have dried. It is important not to overdo it with the thickness of the concrete layer - it should not be more than 15 centimeters.
There is often an empty joint space between the walls of the house and the pit. Fill it with geotextile or roofing felt. This serves for waterproofing.
Brick or block construction
The list of tools and materials required for constructing this type of pit largely coincides with what is used for a monolithic well. The main difference is in quantity - less gravel, sand, and cement are needed. New materials also appear - bricks or blocks. The first is often more expensive than the second. Eliminates the need for formwork.
As in the previous case, they start with the construction of a pit. It is necessary to take into account the thickness of the blocks used in construction. The walls of the pit are laid out with material from bottom to top so that a protrusion is formed on the ground. The bricks or blocks are fastened with cement mortar.
The bottom of the pit is equipped with concrete, which can be poured immediately after completing the construction of the walls.
The main disadvantage of this method is the relative high cost of materials and the need to have the skills of a mason. At the same time, it is particularly attractive to homeowners who prefer a cozy, classic style.
Features of the slab foundation “pie”
A slab-type foundation does not require deepening - its ability to “float” and resist the forces of frost heaving is fully manifested precisely when laid on the surface.
The basic version of the foundation pie is shown in the illustration:
Foundation layers from bottom to top:
- Compacted soil is the bottom of the prepared pit.
- Pillow - made of sand or a mixture of sand and gravel, crushed stone. It is filled in layers, leveled and compacted. The cushion dampens ground vibrations and reduces the intensity of the impact of loads from below on the foundation.
- Geotextiles. Dornit fabric protects the pillow from silting and reinforces it. Geotextiles can additionally be laid at the bottom of the pit, between layers of sand and crushed stone to increase the strength of the pie.
- Footing. A thin leveling layer of concrete on top of the cushion helps to properly waterproof the foundation and correctly install the reinforcing frame.
- Waterproofing. Waterproof material protects the reinforced concrete foundation slab from the penetration of moisture from the soil. Waterproofing of a monolithic foundation slab is traditionally performed from two or more layers of rolled bitumen material.
- Concrete slab. Actually, the foundation itself, the thickness of which depends on the magnitude of the loads on the foundation.
- Reinforcement frame. Reinforcement increases the strength of a monolithic structure, takes on tensile-compressive loads, preventing cracking of concrete.
Technology
There are two ways to create a foundation slab - monolithic and prefabricated. If the slab is monolithic, the formwork is first installed, then the reinforcement frame is assembled, and after that concrete is poured once for the entire structure. In the case of a prefabricated foundation, it is mounted from ready-made reinforced concrete slabs, the seams between them are filled with concrete. This design does not require formwork or installation of reinforcement cage, but it has its drawbacks. It is impossible to achieve the required thickness of the foundation since the slabs manufactured at the factory have a certain thickness. In fact, the foundation will not be monolithic, which makes it less durable. A crane is required to lay the slabs. Due to the unevenness of the soil, the slabs cannot be laid flat; they will have to be leveled, which is almost impossible to do manually.
Types of slab foundation
There are several options for making a foundation slab.
Most often it is a monolithic slab, the thickness of which is the same over the entire area. The advantages of such a base include ease of installation; the disadvantage is that the upper edge is close to the ground surface - in this case, the base of the walls may be exposed to moisture, which is harmful to building structures. To ensure that the edge of the slab is located higher above the ground surface, you should not increase its thickness - this will significantly affect the cost of the foundation. A more practical option would be to install a slab with stiffeners.
The foundation is a monolithic slab with ribs up
The monolithic structure is a flat base with reinforcing ribs protruding above the surface - it looks like a strip foundation on top of a slab.
The ribs are located around the perimeter and under future load-bearing walls inside, if this is provided for by the project. A foundation slab with upward stiffening ribs allows the construction of a building with a basement or ground floor. In this case, the monolithic structure must be buried in the ground and grillage ribs of a suitable height must be designed. Subsequently, a layer of waterproofing is laid over the ribs and wall structures are mounted.
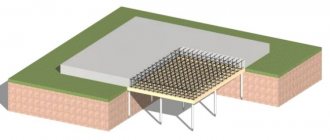
Slab foundation with ribs down
To increase the load-bearing capacity of the slab foundation without deepening it, a monolithic structure is made with stiffeners directed downwards.
There are two options for making a monolithic slab with downward stiffening ribs:
- Stiffening ribs are formed by trenches dug in the ground below the level of pouring the reinforced concrete slab. A reinforcing frame is installed in the pits for the ribs, made as a single unit with the frame of the slab itself, after which the concrete mixture is poured.
- A pit with a flat bottom is being prepared for the slab. Polymer slab insulation is laid on the waterproofed base - stiffening ribs will form in the spaces between the “islands” of the heat insulator and the walls of the pit. Before pouring the concrete mixture, a reinforcement cage is installed.
Stiffening ribs should be located under load-bearing walls and capital internal partitions. If the project does not include partitions, but it is necessary to increase the rigidity of the slab, the downward-facing ribs should be located parallel to the short side of the building in increments of up to 3 meters.
Laying a heat insulator, including extruded polystyrene foam, under the foundation slab not only allows you to install stiffeners of the required size, but also helps to insulate the foundation base and reduce the cost of heating the house. This type of foundation is called a “Swedish slab”. It is often supplemented with a water heating circuit.
Prefabricated slab base
Instead of a monolithic slab foundation, in some cases a precast concrete foundation is used.
Finished structures are laid close to each other. But this option can only be used on rocky soils that are not prone to heaving. In other cases, the base may deform over time under uneven heaving loads due to the lack of a rigid connection between the slabs. A foundation made of ready-made reinforced concrete slabs is used only in the case of the construction of outbuildings, bathhouses, and small light houses. A screed is made on top of the laid slabs. The technology for installing a prefabricated foundation requires the use of special equipment for transporting and laying slabs.
Technological features of pit construction
Pits, like any other building structures, are arranged in accordance with certain technological rules. The installation of a standard pit in the basement is carried out in two ways:
- using a ready-made design;
- with your own hands.
Each method has its own advantages. The first of them is distinguished by the speed and simplicity of construction work, the second is cheaper, but longer and harder. If the owner of the house prefers ready-made structures, then he needs to take care of constructing a pit and drainage in it.
Manufacturers offer two types of pits:
- from composite;
- made of galvanized steel.
Composite structures are extremely durable and can even support the weight of a truck. Therefore, they are placed primarily in areas where there is constant road traffic. Steel structures with lattice are the most popular choice of summer residents.
Important! Drainage is the most important part of the pit construction process. Therefore, the structure requires drainage recesses.
Calculation of the thickness of the slab and reinforcing frame
When installing a slab foundation with your own hands, it is important to correctly calculate the thickness of the slab. A base that is too thin will not withstand the load. Pouring an excessively thick slab will lead to unnecessary financial expenses.
Please note: each centimeter of slab thickness is 1 cubic meter of concrete mixture per 10 square meters. m area.
The calculation should be entrusted to professionals or a special program should be used. The value is calculated based on the type of soil and loads on the foundation. Therefore, it is necessary to have geological exploration data on the site and a ready-made construction project. The standard thickness of a slab foundation is 200-300 mm.
The reinforcing frame for slabs up to 150 mm thick is made of one layer of mesh, located along the central horizontal axis. For slabs of 200-300 mm, two parallel layers of mesh are required, installed with a distance of 30-50 mm from the bottom and top of the future slab. The diameter of the reinforcement is 12-16 mm, the installation pitch of the rods is 200-300 mm.
Under load-bearing walls, the installation spacing of the rods is reduced due to the sparser arrangement of the elements in the central part of the slab.
It is most convenient to calculate the number of reinforcing bars and clamps for their fastening using a specialized calculator.
FORUMHOUSE users share their personal experiences.
Many successfully constructed and operated foundations of these types, with “tightly” sealed communications,
confirm the reliability of the construct.
But novice developers are thinking about how, if necessary, to repair buried communications underground.
In addition, force majeure circumstances cannot be excluded, which may lead to the need for access to sewerage and water supply pipes.
Therefore, in this article we will answer the questions:
- Is it necessary to ensure the maintainability of communications under a slab foundation?
- How to correctly lay “non-removable” communications under a slab foundation and USP.
- What engineering solutions allow you to repair or replace sewerage and water supply pipes buried under a monolithic slab.
Repair of communications under a slab foundation: pros and cons
If you study topics on FORUMHOUSE related to laying water supply and sewerage pipes under slab foundations,
then we can conditionally divide the portal users into two camps.
The first are those who believe that engineering communications must be suitable for repair.
The latter believe that all problems with the “engineer” arise due to violations of building codes and regulations,
use of materials of poor quality or used for other purposes.
That is, if you do everything as it should, then you don’t have to worry about communications.
Or, due to mistakes made at the pipe installation stage, over time a leak formed in the route, and water began to soak the soil base.
No one is immune from mistakes. Even experienced homeowners can overlook workers who, for example, while changing tiles in the bathroom, flush leftover glue and debris down the toilet.
Or during repairs, the mixture for self-leveling floor will get into the pipeline.
Each of them can lead to expensive repairs and complex work associated with digging under the foundation slab.
Moreover, this is often impossible to do without destroying the carefully compacted sand cushion,
which then (after liquidation of the accident) cannot be further compacted to its original state.
Of course, you can be guided by the rule that the optimal solution to the problem of utilities under a slab foundation is their complete absence.
But there are other options:
- Competently design engineering communications.
- This will allow water supply and sewerage pipes to be used throughout the entire life of the building, without the need for “engineering” repairs.
- We do not consider emergency situations that arose due to the fault of users who grossly violated the rules of operation of the system.
- Construction of cases in which pipes are pulled, and pits providing direct access to communications.
- In this case, if necessary, the user can clean or repair communications.
- This option entails a complication of the slab design and an increase in construction costs.
How to make a slab
In general, the construction itself is done as follows: a pit of the required size and depth is dug. Then a layer of sand or crushed stone is poured, communications are laid (sewage and water pipes. A concrete screed is made on top. All this is insulated, then the formwork is built, the reinforcement frame and the slab can be filled with concrete.
Monolithic slab foundation diagram