Loading…
Loading…
Private developers, when choosing a foundation for a house or outbuildings, give preference to the strip structure as a reliable, economical and easy-to-implement option. But in some cases, the only possible solution is a monolithic slab foundation. Such a foundation is required when building on sandy soil, hard and plastic loams, and plastic clay. The design may also be in demand when constructing a building on hard and plastic sandy loams and hard clays.
The slab base is “floating” - it does not resist soil movements and does not dampen them. Therefore, contrary to popular belief, this type of construction is not suitable for soils with strong heaving or marshy soils - on category II soils there is a high risk of complete or partial subsidence of the building under its own weight. The reinforced concrete slab foundation is designed for use only on category I subsidence soils. Read also: DIY laminate installation step-by-step instructions
Features of the slab foundation “pie”
A slab-type foundation does not require deepening - its ability to “float” and resist the forces of frost heaving is fully manifested precisely when laid on the surface.
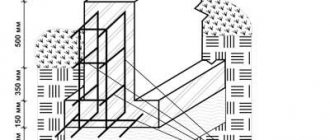
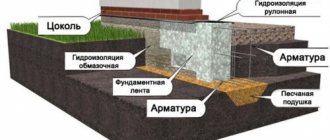
The basic version of the foundation pie is shown in the illustration:
Foundation layers from bottom to top:
- Compacted soil is the bottom of the prepared pit.
- Pillow - made of sand or a mixture of sand and gravel, crushed stone. It is filled in layers, leveled and compacted. The cushion dampens ground vibrations and reduces the intensity of the impact of loads from below on the foundation.
- Geotextiles. Dornit fabric protects the pillow from silting and reinforces it. Geotextiles can additionally be laid at the bottom of the pit, between layers of sand and crushed stone to increase the strength of the pie.
- Footing. A thin leveling layer of concrete on top of the cushion helps to properly waterproof the foundation and correctly install the reinforcing frame.
- Waterproofing. Waterproof material protects the reinforced concrete foundation slab from the penetration of moisture from the soil. Waterproofing of a monolithic foundation slab is traditionally performed from two or more layers of rolled bitumen material.
- Concrete slab. Actually, the foundation itself, the thickness of which depends on the magnitude of the loads on the foundation.
- Reinforcement frame. Reinforcement increases the strength of a monolithic structure, takes on tensile-compressive loads, preventing cracking of concrete.
Types of slab foundation
There are several options for making a foundation slab. Most often it is a monolithic slab, the thickness of which is the same over the entire area. The advantages of such a base include ease of installation; the disadvantage is that the upper edge is close to the ground surface - in this case, the base of the walls may be exposed to moisture, which is harmful to building structures.
To ensure that the edge of the slab is located higher above the ground surface, you should not increase its thickness - this will significantly affect the cost of the foundation. A more practical option would be to install a slab with stiffeners.
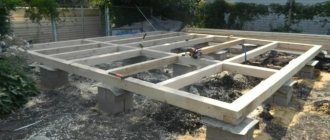
The foundation is a monolithic slab with ribs up
The monolithic structure is a flat base with reinforcing ribs protruding above the surface - it looks like a strip foundation on top of a slab. The ribs are located around the perimeter and under future load-bearing walls inside, if this is provided for by the project.
A foundation slab with upward stiffening ribs allows the construction of a building with a basement or ground floor. In this case, the monolithic structure must be buried in the ground and grillage ribs of a suitable height must be designed. Subsequently, a layer of waterproofing is laid over the ribs and wall structures are mounted.
Slab foundation with ribs down
To increase the load-bearing capacity of the slab foundation without deepening it, a monolithic structure is made with stiffeners directed downwards.
There are two options for making a monolithic slab with downward stiffening ribs:
- Stiffening ribs are formed by trenches dug in the ground below the level of pouring the reinforced concrete slab. A reinforcing frame is installed in the pits for the ribs, made as a single unit with the frame of the slab itself, after which the concrete mixture is poured.
- A pit with a flat bottom is being prepared for the slab. Polymer slab insulation is laid on the waterproofed base - stiffening ribs will form in the spaces between the “islands” of the heat insulator and the walls of the pit. Before pouring the concrete mixture, a reinforcement cage is installed.
Stiffening ribs should be located under load-bearing walls and capital internal partitions. If the project does not include partitions, but it is necessary to increase the rigidity of the slab, the downward-facing ribs should be located parallel to the short side of the building in increments of up to 3 meters.
Laying a heat insulator, including extruded polystyrene foam, under the foundation slab not only allows you to install stiffeners of the required size, but also helps to insulate the foundation base and reduce the cost of heating the house. This type of foundation is called a “Swedish slab”. It is often supplemented with a water heating circuit.
Prefabricated slab base
Instead of a monolithic slab foundation, in some cases a precast concrete foundation is used. Finished structures are laid close to each other. But this option can only be used on rocky soils that are not prone to heaving. In other cases, the base may deform over time under uneven heaving loads due to the lack of a rigid connection between the slabs.
A foundation made of ready-made reinforced concrete slabs is used only in the case of the construction of outbuildings, bathhouses, and small light houses. A screed is made on top of the laid slabs. The technology for installing a prefabricated foundation requires the use of special equipment for transporting and laying slabs.
Characteristic advantages and disadvantages
- Despite the widespread use of the slab type, it has a significant drawback in the form of a number of channels for laying communication cables and heated floors. Communications must be laid in advance and ensure that they are not damaged before pouring. This is not always practical, since there are many objective factors. If there is a basement, the laying is done along the floor of the structure;
- the need to construct two formworks: one in the form of a trapezoid at the bottom, the second at the top in the form of a rectangle;
- non-standard scheme for structural reinforcement. In each specific case it is necessary to draw up a calculation;
- the need to install waterproofing, since the impact will be from moisture;
- single use;
- difficulties in designing load-bearing and secondary walls due to the large area of the foundation pit.
But, despite many minor shortcomings, there are a number of positive aspects, such as:
- an inverted slab allows you to reduce the thickness of the slab to a minimum of 100 mm, reducing the cost of the estimate;
- flat surface of the basement floor;
- reducing costs for surface leveling;
- the possibility of construction on different types of soil foundations, including heaving ones and with a high level of groundwater.
The quality of the pros outweighs the quality of the cons.
Calculation of the thickness of the slab and reinforcing frame
When installing a slab foundation with your own hands, it is important to correctly calculate the thickness of the slab. A base that is too thin will not withstand the load. Pouring an excessively thick slab will lead to unnecessary financial expenses.
Please note: each centimeter of slab thickness is 1 cubic meter of concrete mixture per 10 square meters. m area.
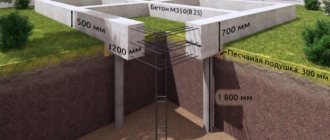
The calculation should be entrusted to professionals or a special program should be used. The value is calculated based on the type of soil and loads on the foundation. Therefore, it is necessary to have geological exploration data on the site and a ready-made construction project. The standard thickness of a slab foundation is 200-300 mm.
The reinforcing frame for slabs up to 150 mm thick is made of one layer of mesh, located along the central horizontal axis. For slabs of 200-300 mm, two parallel layers of mesh are required, installed with a distance of 30-50 mm from the bottom and top of the future slab. The diameter of the reinforcement is 12-16 mm, the installation pitch of the rods is 200-300 mm.
Under load-bearing walls, the installation spacing of the rods is reduced due to the sparser arrangement of the elements in the central part of the slab.
It is most convenient to calculate the number of reinforcing bars and clamps for their fastening using a specialized calculator.
DIY foundation slab: step-by-step instructions
The entire range of work on arranging the slab foundation of a house or outbuilding can be done on your own.
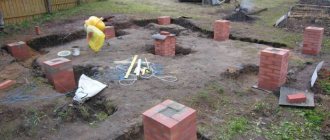
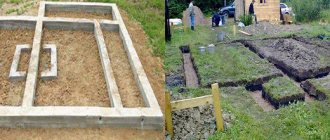
Preparatory stage
The area for the foundation is cleared of debris, trees and shrubs, after which the future pit is marked. It is important to ensure that the stretched cords form right angles. For accuracy of geometry, the coincidence of the lengths of the diagonals of the marked rectangular section is checked.
In the marked area, it is necessary to dig a pit, taking into account the thickness of the sand-crushed stone cushion, concrete base, waterproofing and the design depth of the slab.
It is necessary to remove a layer of fertile soil with vegetation from the building site; the depth of the pit is calculated relative to the prepared surface.
The bottom of the pit should be flat and horizontal, the soil should be thoroughly compacted. The technology for constructing a slab foundation may involve the use of geotextiles to create a barrier between the soil and the sand cushion - in this case, the sand does not silt and is not washed away when flood groundwater rises. Geotextile sheets are laid with an overlap of 30 cm and overlap the walls of the pit.
Arrangement of the pillow
Sand is evenly poured onto the bottom of the pit in a layer of 100-120 mm. Then it is moistened with water and compacted using a vibrating plate. Then, using the same principle, the next layer of sand is poured and compacted. The total thickness of the cushion must be at least 200 mm.
Common critical mistakes: using sand mixed with clay, unloading the entire volume of sand into a pit at once and then leveling it.
The sand cushion is covered with a layer of gravel or crushed stone 120-150 mm thick. You can pre-lay geotextiles so that the layers do not mix. A layer of gravel is necessary to prevent capillary suction of moisture from the soil.
At the stage of arranging the pillow, it is necessary to lay all communications that will be routed vertically through the thickness of the foundation slab.
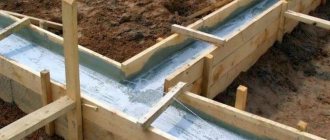
Waterproofing
Formwork is mounted on the finished cushion along the contour of the future slab. To provide rigidity from the outside, the formwork is supported with spacers. The structure must be sealed so that moisture does not escape from the working mixture during concreting.
To ensure reliable waterproofing of the foundation, it is recommended to carry out concrete preparation - a thin layer of concrete is poured on top of compacted crushed stone. Layer thickness 50-70 mm, concrete grade M-100.
After the footing has dried, waterproofing is laid from a special polymer profile membrane or two or three layers of rolled bitumen material. The waterproofing should extend onto the walls of the formwork, the edges of the panels are glued together with bitumen mastic or fused by heating with a burner.
Foundation insulation
In regions with cold winters, thermal insulation of the foundation slab is practiced when it comes to building a residential building, where it will serve as the base of the floor. The insulation under the foundation slab is laid in an even layer if it is designed flat. When arranging a slab with stiffening ribs pointing downwards. Platforms are formed from the same insulation in the designed locations.
Reinforcement
Installation of the reinforcement cage begins with the lower mesh. To maintain the required gap of 30 mm from the base, the reinforcement bars are placed on special plastic stands.
First of all, lay all the longitudinal rods. Then the transverse ones are attached to them using twisted wire or plastic clamps. Welding is not used - overheating of the metal at the attachment points weakens the structure.
To position the second tier of the lattice at the required height above the lower one, use “spider” stands (aka “frogs”) over the entire area (2 pieces per square meter) and U-shaped edge elements.
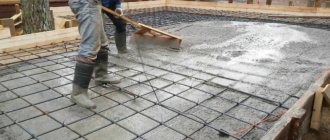
Concrete works
The pouring of a monolithic foundation slab should be completed within one shift, otherwise it is impossible to achieve the required structural strength. Requirements for the working mixture:
- concrete grade M-300 (strength class B22.5);
- mobility P3;
- water resistance coefficient W8 or more;
- frost resistance class F
It is necessary to provide convenient access for an automixer, and take care in advance of a concrete pump or trays for supplying the working mixture to the formwork.
The solution supplied to the formwork must be immediately distributed evenly over the entire plane. To compact concrete and eliminate air bubbles, you cannot do without a deep vibrator. The surface is leveled using a rule or using a vibrating screed.
The monolithic slab foundation should be covered with plastic film to protect it from precipitation, debris and accidental damage. After 24 hours, the concrete surface needs to be moistened with water for 5-7 days. This will prevent the top layer of the slab from drying out and cracking. After 10-15 days, you can remove the formwork - the concrete will have time to gain more than 50% strength. The construction of walls should begin no earlier than a month after pouring - the concrete must be completely mature.
Knowing how to make a foundation slab for a house, you can save a lot of money on the construction of a summer house or country house or garage. In order for the foundation to last for decades, it is important to strictly follow the work technology and use high-quality materials.
Main stages of construction
How to make a monolithic foundation with your own hands? It should consist of the following layers:
- Sand, sand-gravel or crushed stone cushion, homogeneous or layered, with a thickness of 10 cm, serving as a kind of shock absorber that softens the impact of soil movements, and also allows you to evenly distribute the load on the base.
- Geotextiles that prevent siltation or erosion of the soil under the foundation and separate the cushion layer from the soil.
- Concrete preparation with a thickness of 40 - 100 mm: the construction of monolithic foundations without this layer, even for reasons of economy, is not worth doing, because with its help the geometry of the future slab is leveled, it protects the concrete layer from leaks, plus in the absence of concrete preparation, water from the solution will pass into the ground , weakening its strength.
- Waterproofing that protects buildings from the penetration of moisture from the ground.
- If the project provides, a layer of thermal insulation materials, for example, polystyrene foam or polystyrene foam.
- 2 - level layer of reinforcement.
- Concrete.
Reinforced concrete beams (monolithic belt) are used only in cases where it is necessary to additionally connect the walls or level the surface of the slab. They are used on subsiding soils or when using building materials to erect walls that cannot withstand loads well.
Site preparation
The construction of a monolithic foundation begins with marking the soil and preparing it.
The size of the pit should be 1 m larger than the foundation slab.
At its location, the soil is completely removed. The area is carefully leveled and compacted.
The depth of the pit is calculated depending on the heights of the gravel cushion, the slab itself and the thickness of the thermal insulation layer. To prevent the earth from crumbling, the side walls are made with a slight slope of 10 - 20.
When installing reservoir drainage under a slab foundation, transverse trenches are prepared, a layer of geotextile is laid, then pipes are again covered with geotextile. For wall drainage, trenches are prepared at the stage of pit construction. Ring drainage can be done after the building itself has been erected.
Before pouring the slab under the foundation, geotextiles are placed at the bottom of the pit with an overlap and sealed with construction tape. It should cover not only the bottom, but also the walls. 20 - 30 cm of sand is poured onto the geotextile , spilled with water and compacted with a vibrating plate. Crushed stone is added on top.
Since during its compaction there is a risk of damaging water and sewer pipes, they are laid later. To do this, ditches are prepared in the crushed stone, slightly wider than the pipes themselves.
Formwork
To obtain a monolithic slab and a high-quality foundation, the formwork is mounted only around the perimeter of the slab and is positioned strictly vertically. For formwork you can use 40 mm board or plywood. To give strength to the structure, it is supported from the outside with stops.
Concrete preparation (footing)
In a monolithic reinforced concrete foundation, replacing the footing with spilled bitumen and crushed stone is not recommended . For it, inexpensive concrete grades B 7.5-10 are used. When mixing the solution, it is enough to take M 100 cement and mix it with crushed stone or gravel. The resulting concrete is poured into a layer of small thickness - up to 100 mm. To prevent leakage, place a plastic film underneath it. You can protect the concrete base from moisture using a primer with the addition of bitumen.
Waterproofing
In order for a monolithic reinforced concrete foundation to last longer, it is better to use high-quality bituminous materials with high tensile strength Gidroizol, TechnoNIKOL Technoelas as waterproofing. It is also possible to use regular roofing felt. It is laid out overlapping the canvases in such a way that it can later be wrapped onto the foundation slab. All roofing felt seams are fastened with a blowtorch.
Reinforcement
Monolithic foundations are reinforced with a frame of ribbed 12 - 14 mm reinforcement on top of a concrete preparation.
Iron rods are laid in the longitudinal and transverse direction in increments of 15 - 30 cm in two layers and tied.
With a small monolithic slab thickness of up to 20 cm, the presence of one layer of reinforcement is allowed.
To protect against corrosion, the metal must be completely covered with concrete, so the reinforcement is placed on supports (plastic bosses can be used). At the same time, 5 cm is removed from the edge of the slab.
Since welding reduces the strength of the reinforcement, it must not be welded, but tied with baked binding wire. The rods should not be fixed too tightly, as the binding may burst when the soil moves.
Pouring concrete
Making a monolithic slab foundation with your own hands is quite possible. To equip it, you need high-quality concrete with a strength of M 300 and a mobility index of P 3.
A more viscous solution will get stuck between the reinforcement and form voids. Water permeability coefficient - from W8.
In areas with low winter temperatures, its frost resistance should be at least F200.
How to fill a slab? The thickness of the concrete layer is calculated depending on the mass of the building and the type of soil. It can vary from 20 to 50 cm. Since, unlike prefabricated monolithic foundations, a slab foundation does not consist of individual blocks, but a single solid slab, in order to avoid compromising its integrity, pouring is carried out in one day. It is impossible to prepare such a quantity of mortar manually without the use of special equipment, so ready-made concrete is used.
To compact it, it is more convenient to use deep vibrators. Such concrete will be more durable and waterproof. If pouring a monolithic foundation in one step is unrealistic, it is poured layer by layer with only horizontal layers during one shift. After compaction, the solution is leveled. It is prohibited to separate concrete vertically to avoid cracking of the slab.
Care
To protect from the sun and wind and prevent uneven drying, the surface of the slab is covered with a film with overlapping sheets, which is pressed against the edges with boards. All work is carried out at temperatures from +5 C and above. Optimal mode +20 C.
8 hours after concreting, the slab that begins to set is watered with water from a watering can . To avoid damaging the surface with large splashes, it can be pre-covered with sawdust. You can also cover the concrete with burlap. It is necessary to spray the concrete with water for a week. When there is a threat of frost, it is insulated with straw or sawdust. The time for removing formwork depends on temperature conditions. As a rule, this is done after 10 - 15 days.
Since concrete gains strength for at least a month, erecting the walls of a house before this period is unacceptable.
Insulation
It is better to use high-density polystyrene foam with a layer of 10 - 15 cm as insulation for the foundation of a house.
Laying is done in a checkerboard pattern in 2 - 3 layers with overlapping seams. When using polystyrene foam boards with an L-shaped lock, laying in one layer is allowed.
It should be noted that this type of base requires laying a heat insulator not only horizontally, but also on the sides of the structure. Since polystyrene foam can be damaged under the influence of bituminous compounds, a polyethylene film is laid in front of the thermal insulation layer. It will also protect the material from getting wet, because in a wet state its thermal insulation properties are reduced.
Polystyrene foam, which is often used as insulation for the base of a house, has its pros and cons. The main advantage, perhaps, is its low cost. However, it is less durable and sags and deforms very quickly.