When designing a foundation for a shed, the owner of a land plot solves two main problems. This is to reduce the construction budget and not reduce the operational life of the future structure. Therefore, the first task is solved simply - the barn and its foundation are erected with your own hands. The second depends on the correct choice of the type of foundation structure.
Do it yourself
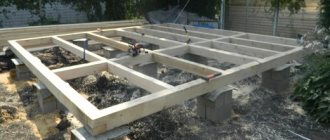
The barn itself is an easy construction, because it is most often erected as a frame structure, which means it does not bear large loads on the foundation. A frame barn consists of four load-bearing beams installed vertically at the corners of the building, tied with timber at the top and bottom. This means that it is better to build a columnar foundation for such a structure, but screw piles can also be used.
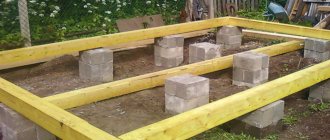
In this case, the pillars are erected precisely at the corners of the building. If you need to build a large house, then, based on the length of the span of the walls, intermediate pillars are poured in increments of 2 - 3 m between the corner support foundations. By the way, the fastest way to build foundation pillars is to use ready-made concrete blocks rather than concrete mortar.
The construction of a foundation for a barn made of blocks is not inferior in load-bearing capacity to either metal piles or a monolith. It is important what sizes the blocks are purchased.
Their main purpose is to create a strong and reliable support, so the main thing in this matter is to accurately determine the dimensions of the foundation pillars, both in height and in cross-sectional size. From which it follows that first of all it is necessary to determine the pressure that will act on the foundation from the side of the building.
Features of building a foundation for a barn
For light change houses for equipment, the absence of a base is allowed. If the building is more massive, then the base must be completed.
The foundation gives the building:
- Strength.
- Durability.
- Thermal conductivity.
- Frost resistance.
First of all, you need to correctly determine the location of the future shed. Place it so as not to damage the landscape design of the site, for comfortable use or on soil unsuitable for planting.
Then you can start choosing the type of base.
Reinforcement mesh for foundation
Type selection
The optimal columnar foundation cannot always be used. Much will depend on the type of soil on the construction site and the size of the construction project. If the soil at the site of the shed is heaving, then it is better to lay a slab or tape. Both options cope well with ground movements.
The only thing that is required from the strip foundation technology is to take into account the level of soil freezing. True, the budget may increase due to an increase in the level of laying the structure. Therefore, it is recommended to lay either a shallow foundation or a surface foundation under the shed.
As for the slab variety, this is the most expensive option, which is used extremely rarely under sheds.
In addition, its costs will largely depend on the depth of the foundation for the shed. The thicker the slab, the more money you will have to invest in it.
Types of sheds and soils
Before considering the types of foundations for a barn, you should decide on the type of structure itself. The following types of country sheds are distinguished:
- With a pitched roof. The roof is entirely flat and slightly inclined in relation to the rear wall. It is for this reason that when building such a shed, the area is somewhat limited. Most of these buildings have one window and doors. For this type of shed, a shallow strip foundation is suitable.
- With a gable roof. One of the popular types of construction among summer residents. The floor is made of tongue and groove boards, and the door hangs on three hinges. There can be one or several windows. Absolutely any type of foundation is suitable for such a building.
- Chest. Very light and squat. As a rule, garden tools are stored in it. The area of such a room is minimal. The foundation for such buildings is built in the most common and simple way.
- Combined greenhouse. It is built exclusively in cases where there may simply not be enough space for a barn. Such premises are perfect for germinating seeds of all kinds of plants and for growing indoor plants in pots. Here you can use a strip or column foundation.
- Temporary. In fact, this is full-fledged housing with practically no amenities. In winter, garden tools and tools or other equipment are often stored here. In summer, the temporary shelter is, in principle, suitable for habitation. For greater comfort, there is a summer shower, electricity and other benefits of civilization. The best type of foundation for a temporary structure is a strip foundation.
The type of foundation being built directly depends not only on the strength of the future building, but also on the type of soil on which it is built.
- In the case of sandy soil, which can float in wet conditions, does not compress and freezes up to half a meter, a screw, monolithic or strip foundation is suitable.
- On sandy and loamy soil, freezing to two meters and below, prone to quicksand, only a strip base is erected. It is also suitable for clay soil, which can exert high pressure on the foundation.
- The gravel soil does not erode or undergo compression; its freezing is no more than half a meter. The simplest and most inexpensive thing in this case will be the installation of a columnar base.
- It is best to have rocky soil for construction. It is devoid of all the above disadvantages, but has its own: hardness. It can work with any type of foundation, excluding screw ones.
Let's look at the types of foundations for a barn that you can build with your own hands.
Tape
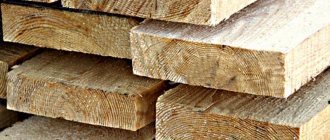
You need to start talking about strip foundations with the choice of materials. Since the structure is light, you can use various technologies that use different building materials.
For example: brick, the same concrete blocks, railway wooden sleepers, a monolith made of concrete mortar.
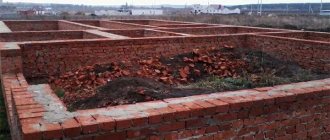
A brick foundation is one of the budget options. The main thing in this process is to correctly carry out the masonry with the banding of elements, which guarantees the strength of the structure and its long service life. It should be taken into account that such a foundation is usually laid on the surface. There is no point in laying bricks in the ground. If this cannot be avoided, then you will have to thoroughly waterproof the foundation walls, for example, with bitumen mastic.
The foundation of a shed made of sleepers is also an inexpensive option. The sleepers themselves are impregnated with oil, which increases their service life in difficult natural conditions. The main thing is to correctly connect them to each other, for which the joint between the two elements is made according to the principle of a half cut. After assembly, the joints are fastened with metal staples and perforated plates with self-tapping screws.
After installation, all sleepers are treated with bitumen mastic on both sides.
And the most famous technology is to pour the foundation under the barn with concrete into the formwork. The method is not the cheapest, but in some situations it is the only possible option. If a shallow or surface foundation is being poured, then there is no need to take into account the level of soil freezing.
Work progress
Let's look at how to properly pour a concrete foundation. First of all, the parameters of the tape are determined. Its length will be equal to the perimeter of the future building. Width and depth within 30 - 40 cm - this is a surface model, width 20 - 30 cm and depth up to 70 cm - this is a shallow version.
- In the first case, the turf is removed along the perimeter of the barn, that is, a trench 20 cm deep is dug.
- A sand cushion is filled with a tamper to the edges of the soil.
- Waterproofing material is laid, preferably in two layers.
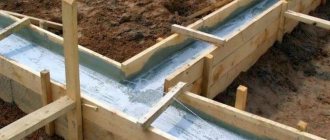
- Formwork is being installed, for which you can use boards, plywood, OSB boards, corrugated sheets, iron sheets and other durable slab or sheet materials.
- A frame made of reinforcement is laid inside. It is knitted in the form of two lattices, which are then connected to each other by transverse pieces. The distance between the gratings is determined by the width of the trench. They should be spaced within 5 cm from the internal planes of the sheathing. If a very light barn is being built, then the reinforced frame can not be laid in the foundation.
- A concrete solution is prepared from cement with the addition of a mixture of sand and gravel. The ratio of components: cement - sand - gravel, as 1: 2: 3. By the way, the mixture can be made of sand and crushed stone.
- Concrete is poured with uniform distribution of the material throughout the entire volume of the formwork. The main task is to complete the process in one day. In this case, it is very important to remove air from the solution that gets there during the process of mixing the ingredients. This is done either with the help of a vibrator, or with improvised means: fittings, pipes, slats and others.
- After 7 days the formwork is removed, after 28 days the foundation for the barn is ready to accept loads.
Here are step-by-step instructions for pouring a strip foundation for a small shed.
The simplest foundation for a shed
The simplest and cheapest foundation for a shed is the so-called bored foundation. The technology for its arrangement is as follows:
- Drill holes for supports along the edges of the boundaries and, if necessary, in the middle of each side.
- Roll up the roofing material and insert it into each of them. This material will provide excellent waterproofing of the base.
- Insert several reinforcements into each support (usually 3–4 are enough), and they should rise above the hole. They need to be connected with horizontal dressings.
3–4 reinforcement bars must be inserted into one recess - Form the first formwork panel along the boundaries. The second one must be placed at a distance of 40 cm from the outer one (the first one). All elements are tightened with transverse inserts and reinforced with external supports.
- Insert horizontal reinforcement into the assembled formwork, which must be tied with the vertical pins of the foundation reinforcing frame.
- Arrange a sand cushion with a layer of 10 cm.
- Fill the formwork with cement mortar with the addition of sand and crushed stone.
By choosing this type of foundation for a barn, the owner will only pay for the cost of materials, although some of them may already be available.
You can save a little more if you use ordinary car tires instead of asbestos pipes and roofing felt, and on non-heaving soils you don’t even need to go very deep into the ground. It is necessary to fill the tire cavity with sand, and then fill the surface with cement mortar.
Video: foundation made of tires
Pile - screw
This is the simplest option for constructing a foundation structure in terms of speed of work. To do this, you need to select the piles themselves by size.
For one-story wooden buildings, which include a barn, it is better to use piles with a diameter of 89 mm and a blade diameter of 250 mm. This steel element can easily withstand loads of up to 3 tons.
Installation of screw piles is often carried out on heaving soils , so their length is chosen based on this indicator. But not less than 1.5 m for light buildings. They are simply screwed into the corners of the building to the required depth, and if necessary, intermediate elements are installed, after which the piles are secured with a metal profile or wooden beams.
Building a barn
Building a shed with your own hands will require good preparation for each stage and care in the work. Therefore, if a barn cannot exist without a foundation with your own hands, then the foundation needs to be created, after which it is necessary to stock up on bricks for laying the walls.
Building a brick shed
It is suitable for creating all types of sheds, both as a place to store tools and as a place to corral livestock. Laying brick is not difficult, it is only important to bandage the masonry, building each new line so that the brick on top is on the seam between the two bottom ones. Also, the walls can be made of logs, boards or wooden panels; such a barn will have a lower cost than a brick one.
After creating the walls, you can make the roof sheathing. This will require strong slats that need to be well secured to the walls. As a roofing material, metal tiles are well suited, which is an expensive, but high-quality and durable material.
Making roof sheathing
It is also important to install a layer of waterproofing on the sheathing, which will prevent moisture from penetrating inside the shed. At the last stage, the window and door openings are fastened in the holes left ahead of time. After preparing the base, you can attach the door leaf and glass windows with frames. Of course, you can also use double-glazed windows, which will provide high-quality protection for the building from blowing, but will be inappropriate in a barn.
The shed frame itself is in most cases made using screws or nails, which is not a difficult job. After assembling the main frame in the form of the walls and roof of the barn, more supports and racks are installed. The materials for the frame can be boards, logs and bricks. Of course, a combined method can also be used, in which a brick plinth is first made, and only after that the work with wood material is carried out. The bricks are laid in four rows directly on a concrete slab, and the log or beams are secured to the bricks with anchor pins. Between brick and wood elements you need to make a layer of waterproofing.
When building a shed from planed boards, it is better to place them strictly vertically. They can also be attached with an overlap, that is, when one board floats over another. You can build a shed in this way in record time, that is, in about 30 hours.
Foundationless building
In construction there is an answer to how to build a barn without a foundation with your own hands. This is not difficult, and the advantage is that if necessary, the building can be moved. The only action that needs to be carried out is to raise the floor and walls above the ground, using wooden elements for this. It is important to treat the bottom trim and floor boards with antiseptic compounds.
Treating the strapping with an antiseptic
Before work continues, you need to wait until the antiseptic dries. The main material for creating a regular shed in most cases is unedged board. The boards should be overlapped, positioned vertically or horizontally. When covering the very last wall, you need to provide a doorway, and it is better to take all measurements ahead of time. The roof is covered with roofing felt and secured with planks. To make the shed more durable, it can be trimmed from the inside using a continuous strip of metal; the last stage will be the construction and installation of the door.
Brick barn
The design of this material is quite complex and perfectly resists fire and moisture. Such a building will be more expensive, but will also last for decades. By insulating the structure, you can achieve above-zero temperatures in the barn. The best material option for creating a shed is sand-lime brick, which perfectly withstands the influence of moisture. You can also use bricks that have already been used for the shed.
Roofing felt and boards are used on the roof; also, such a shed cannot do without a foundation, and it will definitely be required. And the monolithic type should be used as a basis. The standard size of a country shed is a building with dimensions of 2 * 2.5 meters. It is also easy to decorate a stone shed with climbing plants, corrugated sheets, siding and other decorative options. Therefore, there is no need to worry that an unaesthetic brick shed will make the appearance of the site worse.
Shed adjacent to the house
Outbuildings differ not only in materials of manufacture, but also in structure. For example, to store food in a private or country house, a shed is often used, which is directly adjacent to the kitchen and serves as a pantry.
Shed adjacent to the house
It is called a utility block and to create it you will need slate or other material from which the roof is made, as well as frame pillars. It is important to connect the living space and the barn, as well as insulate it and, if possible, equip it with at least some kind of heating system, because the cold from the utility room will penetrate into the kitchen and other rooms.
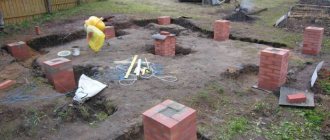
Columnar
As mentioned above, a columnar foundation for a barn is the best option. It is assembled from bricks, sleepers, vertically installed concrete blocks, or a monolith is poured with the installation of a reinforcing frame.
A block foundation made of blocks or bricks requires a special approach to preparing the installation site. To do this, the bottom of the pit or the surface of the soil must be prepared.
Make a bedding of sand with a layer of 20 cm, which is covered with waterproofing material on top. If a block post is sunk into the ground, then the pillars are also lateral waterproofed, for example, by coating with bitumen mastic.
As an option for a columnar foundation, sleepers are cut to the height of the pillars being laid and installed in prepared holes. The main task of the work manufacturer is to level the sleepers to the same level and thoroughly waterproof the areas located in the ground. This is the simplest foundation for wooden construction.
Of course, screw piles and monolith pillars have greater load-bearing capacity. A stone barn can be erected on such a columnar foundation. Although, if you correctly assemble blocks and bricks and accurately calculate their load-bearing capacity, then these materials will cope well with the loads.
The main task of building a columnar foundation for a barn with your own hands is to save money.
Which foundation to choose?
There are several types of foundations, the installation of which depends directly on the climatic conditions of the area, the quality and physical characteristics of the soil, the depth of its freezing and the level of groundwater. The weight of the structure itself is also an important factor. So, the foundation is divided into four types:
- monolithic;
- tape;
- columnar;
- pile
The advantages of a columnar foundation are that:
- it’s extremely easy to do it yourself;
- one of the cheapest options for installing a foundation;
- easy to dismantle if necessary.
Indeed, the mass of the cabin is several times less than the mass of any residential building, so weight distribution and optimal adhesion to the soil can be ensured by this simple type of foundation. And besides, we should not forget that the change house is still a temporary structure, which after the completion of the main construction work should be dismantled and disassembled - and getting rid of the pillars is much easier than somehow digging out a monolithic reinforced concrete foundation.
Plus, although this building will be used for some time and it is desirable to make your stay in it comfortable (this, after all, is not an iron barracks for displaced people), you should not overdo it and spend too much money and effort on it, which should be directed to the main construction process.
The foundation for a change house is not always installed: sometimes it is enough to simply erect a timber frame, which is finished off with boards or tiles in the process, after which this entire structure is also covered with special roofing materials - and that’s where it all ends, such a simplified model
But in this case, it is important not to forget to fill the lower part with sand, slag or gravel, and also install the frame on concrete blocks or bricks - in principle, the same analogue of a full-fledged foundation
But why make do with half measures when you can make a normal columnar foundation for a change house with your own hands? This type of structure is usually left very low, no more than 0.4 m above ground level - this is done so that in winter it would be possible to add snow and thereby insulate the entire structure. If you’re going to stay in the cabin for the winter, you shouldn’t forget about a temporary stove or heater - of course, there’s no need for central heating.
From tires
A foundation for a frame shed made from tires is an original, but quite reliable option. This design is actually the simplest. It is practically cost-free in terms of purchasing building materials.
- To do this, holes are dug in the corners of the barn with a diameter larger than the diameter of the tires by 20 - 30 cm and a depth that determines the depth of the foundation, based on preliminary calculations.
- Tires are stacked one on top of the other.
- They are filled with crushed stone of small or medium fraction (grain sizes from 5 to 40 mm). The backfill is thoroughly compacted.
- After that, backfilling is done on the outer sides of the tires with sand and soil.
- The upper rubber element is filled with concrete mortar to increase the load-bearing capacity.
Although this option is considered original, it has long been used in rural areas.
On dense soils, it is not necessary to dig deep holes for tires. One or two is enough.
They will have to be completely filled with concrete. On soft, fragile soils, holes must be made deeper, and the foundation itself must be assembled from at least three car tires. But the more there are in the pit, the higher the load-bearing capacity of the structure.
Sleeper foundation
The sleeper foundation is a strong and durable structure. Sleepers are usually made from high quality reinforced concrete and can be replaced if faulty.
Disadvantages include:
- Size limitation. The sleepers have a standard size of 2.7 meters, so the foundation will be assembled from similar segments.
- Inaccessibility of used sleepers. It is difficult to find a sufficient number of them on sale.
- The smell of sleepers is specific; it will not disappear for a long time.
- Transportation problems.
- The material is not environmentally friendly.
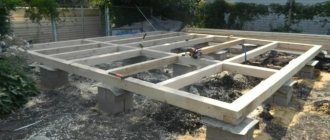
When constructing a foundation from sleepers, they are used as a grillage material. When the supports for the base are ready and completely dry, the ends of the sleepers are laid on them. For the construction of a barn, it is better to use a step of 135 cm, then one sleeper rests on three supports.
Example of a sleeper foundation for a barn
The grillage for the foundation can be assembled using wooden sleepers. If you use sleepers under the foundation of a building that will be erected from bricks or blocks, you can perform work not only using the technology of installing a grillage of sleepers on poured pillars, but also a slightly different construction option, which involves the construction of a full strip foundation.
The stages of this process are as follows:
At the construction site, a ditch is dug for the installation of a strip foundation, the width of which must be made equal to twice the width of the sleepers. After completing the excavation work, a cushion of a 10-centimeter layer of gravel and a 30-centimeter layer of sand is poured onto the bottom of the ditch. After this, the depth of the ditch should be half a meter: this is quite enough for a three- or two-layer laying of sleepers.
The bottom and walls of the ditch are lined with a film for waterproofing, and sleepers are laid on top of it, one on top of the other in a stack
Important! When laying sleepers, you must not forget to tie them. It is performed by placing the sleeper located in the top row on a pair of lower adjacent elements (the sleeper should cover the gap of the vertical joining seam). After laying the sleepers is completed, a cement-sand mixture is poured into the resulting empty space.
In such cases, the part of the foundation intended for the basement (basement) floor is made of brick or concrete blocks. This technology allows the use of exclusively reinforced concrete sleepers for laying. Wooden products in this option are allowed for the construction of walls or the installation of a basement ceiling.
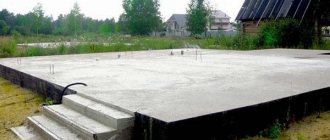
Plate
So, let's look at how to properly pour a slab for building a shed. Usually it is erected on moving soils with minimal immersion in the soil.
Moreover, such a foundation can be laid under a shed made of blocks, bricks, under a frame structure, and so on.
In this regard, there are no restrictions, because the bearing capacity of the structure will mainly depend on the thickness of the slab foundation being poured. Therefore, under non-heavy structures, you can pour concrete mortar with a thickness of 20 cm, and under heavy structures, at least 30 cm.
- Dig a pit up to 30 cm deep exactly according to the linear dimensions of the future barn.
- A cushion of crushed stone 15 cm thick is poured into it. It is leveled and compacted.
- Fill a layer of sand to the level of the soil surface. It is also compacted with water and leveled.
- If the depth of the pit allows it, that is, the cushion was not filled to the brim, and besides, the soil in the area is clayey, then the reinforcing frame is laid in the pit on supports. If the foundation pit was not dug deep, then formwork made of boards no more than 15 cm high is installed around the perimeter of the barn. It is at this level that the frame is installed. It can be assembled from steel reinforcement, or it can be a mesh, for example, a chain-link.
- The concrete solution is poured and air is removed from its mass using a vibrator or available materials.
As for the load-bearing capacity, it all depends on the thickness of the concrete being poured and the number of levels of reinforcing mesh. For example, if a foundation is being poured for a shed made of foam blocks, and this is a small load, then the thickness of the poured layer can be a maximum of 20 cm, and one lattice of the reinforcing frame is laid in it.
If a shed is being built from cinder block, concrete block or brick, then the thickness of the screed should not be less than 30 cm, and a reinforced frame of two or more gratings installed one above the other must be placed in it.
In this case, it is very important to take into account the fact that the frame should extend 10 cm from the edges of the slab. And this is on each side.
The slab is considered the most expensive option for a foundation structure, so it is used very rarely for sheds. The main reason for the construction is mobile, heaving soils, which make, for example, columnar options unsuitable.
Site selection and site planning
The building can be connected to an existing bathhouse or garage, or installed separately. Basic requirements when choosing a site on the site:
- the structure should be conveniently located in relation to the house and other outbuildings;
- do not occupy the area for designated gardening plantings;
- fit harmoniously into the complex of surrounding outbuildings;
- comply with fire and sanitary safety standards.
The owner can resolve the first 3 points independently. But according to the requirements of urban planning and sanitary standards, there are certain restrictions. If you plan to keep poultry or small pets in the barn, you need to retreat:
- from the neighboring property at least 4 m;
- from a residential building at a distance of 15 m;
- from the drinking water well 30-50 m.
The place should be elevated enough so as not to be flooded by melt or rainwater. To protect the area from winds, you can place the shed on the windward side.
The structure should not interfere with neighbors and block access to sunlight to their site. Otherwise, they can file a complaint, and the court will force the building to be demolished or moved to another location.
Shallow strip foundation
Shallow strip foundation
In design, it is practically no different from a monolithic slab, only in such cases bricks and foam blocks are used as building materials. You can also use ready-made concrete blocks, but their installation is expensive and block foundations are not practiced for the construction of sheds.
Therefore, it is worth considering the stages of building a foundation with natural stone, which is always available at construction sites. This technology will be almost identical to brickwork or installation of foam blocks.
- It is necessary to mark the future foundation, taking into account the thickness of the load-bearing walls.
- Dig trenches around the entire perimeter of the building. If the project also provides for intermediate walls, then a trench must be made under them.
- The depth of the trench for heaving soils should be no more than 1 meter; sometimes they do less if a layer of hard rock is found under the loose soil.
- Pour a sand and gravel cushion into the bottom of the trench, compact it and fill it with liquid concrete. Leave the pillow to dry for several days.
- During this time, it is worth making wooden formwork along the outer and inner sides of the trench, connecting the walls together in the upper part, and covering the outer surface with waterproofing, for example, roofing felt.
- Lay broken stones on the finished concrete surface in layers, fill the space between the stones with fine gravel and fill them with concrete evenly in layers. As a rule, reinforcement is not practiced here, although strapping can be done in several horizontal layers.
- Lift the stone layer by layer to the surface, then cover with plastic wrap and leave to dry for a week.
In cases where it is possible to build a strip base from concrete blocks or foam blocks, then the width of the trench should correspond to the thickness of the blocks, and a reinforcing mesh should be provided between the rows.
The construction of strip foundations with concrete blocks is expensive, but also reliable, because you do not need to use several layers of waterproofing.
But it is difficult to build a structure from concrete blocks with your own hands, but tapes from foam blocks are lighter and can be quickly installed on the concrete mortar.
Video of the construction of a frame barn on tires (column foundation)
Organization of the strip base
The relevance of a solid strip foundation for any shed in private housing construction is based on the simplicity and speed of work.
Advantages of strip foundations
The design has a lot of advantageous advantages:
- ability to withstand heavy weight;
- affordability and easy work algorithm;
- increased stability indicators.
“Tape” is also distinguished by its versatility - it can be laid on all types of soil.
Construction progress
To make a strip type base, you need to calculate the amount of materials and refer to the step-by-step work algorithm. The foundation tape is poured with your own hands in a few steps:
- The territory is marked with wooden pegs and stretched twine. The line of marks forms the line of the future base. Large outbuildings are divided into sections.
- A trench channel 45-70 cm wide is dug using a shovel. The depth of the pit is planned below the extreme freezing point of the soil.
- A sand and crushed stone cushion is installed at the bottom of the pit. Crushed stone with medium fractions is covered in a layer of 8-10 cm, and sand is poured on top of it by 4-5 cm.
- The formwork is being constructed. Plywood or wooden boards are used for it.
- Reinforcement is being carried out. Metal pins are laid inside the formwork frame, connecting them with wire. Vents are constructed from plastic pipes of round or square cross-section, which will be located in different parts of the base.
- Concrete solution is prepared. In home construction, it is advisable to calculate proportions using buckets, since not everyone has access to a concrete mixer.
- To fill the strip structure, you will need to make several cubic meters of mixture. For 1 m3 of concrete mixture you will need 300 kg of M500 cement, 1100 kg of crushed stone, 600 kg of sand and 150 liters of water. Optimal material consumption is 2:5:9. The difference in the volumetric weight of the component for sand (bucket - 19.5 kg), cement (bucket - 15.6 kg) and crushed stone (bucket - 17 kg) is taken into account.
- The mixture is poured into the formwork gradually and distributed with a shovel. Experts recommend leaving the first layer to harden, and then pouring the second.
The concrete base-tape completely hardens in 24-27 days.
The influence of the type of structure on the choice of foundation
Before planning the foundation for a utility unit, it is worth choosing its type. In country or private areas, it would be justified to create the following types of sheds:
- lean-to buildings are distinguished by a flat roof, slightly inclined towards the rear wall. The space is limited, only a door or window is equipped. The simplest version of the base is a strip or shallow type;
- a gable roof involves the construction of tongue-and-groove lumber floors and a 3-hinged door. All types of foundations can withstand additional load in the form of 2-3 windows;
- squat chests are designed for storing garden tools. For small buildings, a simple foundation is relevant;
- greenhouses are equipped when the shed space is not enough for cultivating vegetables, berries or herbs. This requires the construction of a strip foundation designed for a massive barn;
- In a temporary shed you can not only store equipment, but also live in the summer. The building in the classic version is being erected without amenities. To make your stay comfortable, basic communications are laid - shower, toilet, heating. The strip base can withstand the load of highways, entrances, window groups and country furniture.
When choosing the type of utility unit, you need to take into account its location. A building at the far end of the property will mask the view from the street. If the shed plays the role of a storage room, it is better to build it next to the house.
Using cinder block
The inexpensive cost of blocks made of crushed stone, slag and sand allows you to build a foundation for a barn on your own. Hygroscopicity and high thermal conductivity will be acceptable for small buildings. The cinder block base is built in stages:
- The soil is cleared of debris, tree stumps and leveled.
- A trench is dug into which the blocks will be laid.
- A cushion is formed using a mixture of crushed stone, sand or limestone and carefully compacted.
- Waterproofing is carried out with roofing felt, on which a reinforcing frame is poured.
- The first row of blocks is laid, and the next one - in a run-up with it. The elements are fixed with a 1 cm layer of concrete mortar. To strengthen the base, concrete mixture is poured into the cavities of the stones.
- Having adjusted the base in height, it is reinforced with a belt of reinforcement.
- The surfaces of the foundation walls are treated with mastic and then thermally insulated with foam polystyrene slabs.
At the end of the work, the pit is filled up and walls are built.
Columnar foundation
A column foundation is an ideal and simple option for constructing lightweight buildings. On such a foundation, you can make a building from foam blocks, but before you start construction, you need to examine the soil composition: if it is homogeneous and compacted, then it is possible to make a foundation from bricks or foam blocks.
It must be remembered that building a foundation with your own hands requires patience. It is best to make a columnar foundation using poured foundations or using brick or concrete blocks, simply installing them in the corners and in places where the corner elements of the walls are located.
To build a columnar foundation, you will need to do the following:
- The work begins with marking the proposed structure. Then remove the layer of turf to a depth of about half a centimeter;
- Dig holes at the locations of the pillars. The depth of each is at least 15 cm from the soil freezing level;
- Fill the bottom of each hole with sand and gravel. The resulting embankment must be compacted;
- In the case of installing poured columns, make wooden formwork with reinforcement. There are two methods of reinforcement. In the first, ready-made meshes of reinforcement are simply laid, and in the second, the rods are laid out at intervals of 200 x 200 mm and fastened with wire at the intersection. To install brick columns, this material is laid out one and a half bricks thick with mandatory suture ligation for structural strength. If you plan to build a powerful barn, then you can use concrete blocks for the pillars. For columns it is also possible to use small foam blocks;
- Prepare a concrete mixture and pour it. A cubic meter of concrete mixture is enough for approximately 10 m2 of pillars. To make a concrete solution, it is important to maintain the correct proportions. For this purpose you will need: crushed stone or gravel - 6 parts;
- sand - 3 parts;
- cement - 1 part;
- water - 1 part.