For the construction of baths, different materials are now used - gas silicate blocks, brick, foam concrete, but the traditional wood from which these buildings have been erected for a long time does not remain aside in most cases: it takes part in the design of their interior. The reason for choosing this eternal “favorite” is beauty, environmental friendliness, the ability to create an ideal microclimate in the premises and retain precious heat. It’s not difficult to do all the work yourself if you study in advance the question of how to attach the lining in the bathhouse. The topic is quite extensive: it includes the correct choice of material and insulation, the characteristics required of them, installation methods and its stages.
A few words about the lining
This finishing material received its name from the place where it first “registered”: it began to be used for lining carriages. It differed from ordinary boards in the grooves along the long walls. They ensured the tightest possible connection of adjacent elements. The wall turned out to be beautiful in appearance, smooth, and had no gaps or cracks.
Now the range of linings has grown significantly: there are several options for profiles that differ greatly from each other - in quality, material, size. A classic for a bathhouse - wooden panels that can regulate humidity, emitting aromas in a hot, humid room that have a beneficial effect on the respiratory system.
A relatively new material is plastic lining. It is not ideal for interior decoration of a bathhouse. It can (but should it?) be used for lining a locker room or dressing room, but a steam room is taboo for it. Plastic cannot withstand such high temperatures.
How to protect the lining and frame from moisture
When choosing products to ensure moisture resistance, you must remember: the high temperature conditions of the steam room do not allow the use of any “chemicals”. During the evaporation process, harmful substances will be released. Therefore, for this room you can only use:
- natural oils, such as flaxseed;
- wax;
- drying oil;
- antiseptics followed by coating with ship varnish.
The following compositions have similar properties: Eurotex Saura, Usadba (U409). As for varnish mixtures, they are chosen to be water-based:
- Acrylic. When heated, they emit an unpleasant odor; they are used only for the dressing room.
- Alkyd. They protect against high humidity and hot steam, but have an unpleasant odor.
- Water-based. They are odorless and do not emit harmful substances when heated; they can be used in a steam room.
- Polyurethane. They protect wood from fading and are used for interior and exterior surfaces.
- Acrylic-polyurethane. They prevent the development of mold and fungi and give the wood a pleasant shine.
The choice of means for impregnation depends on the capabilities of the owner. But in the steam room it is better to avoid all and any chemicals. Natural flax, lavender, and rose oils will require a lot of consumption, but will not lead to dire consequences. And to prevent rotting, you need to inspect the lining once every 6-8 months and treat the affected areas with antiseptics. In this case, a deep impregnation composition intended specifically for steam rooms, baths, and saunas is suitable.
Choosing wooden lining for a bath
The cladding of the internal walls of these buildings is more demanding in terms of materials, therefore, when selecting the type of wood, the following are taken into account:
- budget allocated for construction;
- high temperature, its changes;
- humidity level.
Types of material
The lining can be ordinary or “European”. A simple material has roughness on the surface, eurolining, on the contrary, is ideal - it is smooth, and on the inside it has longitudinal ventilation channels that prevent condensation, which is natural for a bath, from accumulating.
Another requirement for wood is humidity, which is 12±3%. For simple lining this figure can reach 25%. Such a high percentage can provoke deformation of the lining in a regularly used bathhouse, so only European material is optimal. Its advantages:
- higher quality raw materials;
- ideal geometry;
- recessed groove
The European material has only one drawback - the price, but the quality of the material, as well as the impeccable appearance of the bathhouse interior, fully justifies such an investment.
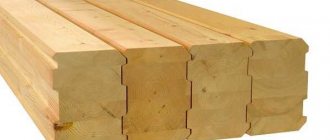
Types of wood
A bathhouse is a building that is very demanding when it comes to wood, so it is advisable to use combinations of different types of material. For those places where contact with the body is excluded, you can choose those breeds that, when heated, emit a pleasant odor and bactericidal substances. For sunbeds, benches, the lower part of walls, shelves, wood with low thermal conductivity is required, since the risk of getting burned on such wood will be minimized.
Evergreens
For the “hot spots” of the steam room, it is advisable to buy coniferous wood. It creates an ideal microclimate for health procedures, as it disinfects the air by releasing phytoncides into it. There are three worthy contenders.
- Cedar. This wood is considered the best option: it is beautiful, soft, and plastic. The downside is the high cost of the material, the high price has led to the fact that you can “run into” a fake.
- Larch. It is durable and moisture resistant, but processing this dense wood is not the easiest.
- Pine. One of its important qualities is its ability to resist rotting. The disadvantage is that it gets quite hot.
Deciduous trees
The best materials for seating and covering surfaces in contact with the body include hardwood with low thermal conductivity.
- Linden. The undisputed leader of this list. It retains color for a long time, does not deform from steam, and does not heat up too much. The lining made from it is pliable, so cracks and chips during installation in a bathhouse are practically excluded.
- Alder. Wood is soft, but it can easily withstand the highest temperatures, resist mold, and rot is also not typical for it. Alder essential oils are very useful for people suffering from rheumatism.
- Aspen. The properties of this wood are very similar to those of linden, but it is cheaper. The wood does not rot, but quickly darkens, and tolerates steam and boiling water well. After drying, aspen becomes very dense.
The main favorite in the last “nomination” is African oak - abashi (other names are abacha, ayous, samba). Its most important difference from other candidates is the complete absence of knots, since the crown of the tree is at the very top, and the “height” of the abashi is 40 m. Other advantages of the “African” include softness, but strength, absence of deformation, even structure, very low thermal conductivity . The downside is the high price, due to the complexity of delivery from Africa.
Classification, profiles
According to quality, lining is divided into 4 groups:
- "Premium" or "EXTRA" class. This product is ideal, having absolutely no defects: both on the surface and in the structure.
- Grade "A". A minimum of imperfections are allowed here. These include slight darkening, resin pockets, two small knots per 1 m2.
- Grade "B". In these products, per square meter there are already 3 knots, through gaps (one, maximum two), resin pockets, and stains over the entire surface.
- Grade "C". Worst quality. As a rule, such material is taken for sheathing or other hidden elements, for cladding utility rooms.
Types of profiles:
- traditional eurolining;
- "Softline";
- "Calm";
- "Landhouse";
- "Block house";
- "American";
- two-sided.
What type of wood to choose for finishing a bath
Regular and eurolining are available for sale. The first one has a rough surface, the second one is completely smooth.
Finishers recommend using eurolining for bath lining, since the raw material has holes for ventilation, which prevents condensation from accumulating inside the material. It is made from premium quality wood and lasts many times longer.
Among the advantages of using eurolining in a bathhouse:
- Large and convenient dimensions of the groove and ridge (length can reach 8 mm).
- The presence of compensation slots ensures good ventilation of the planks and prevents the formation of cracks on the surface.
- The raw materials are already covered with a protective layer of antiseptics, which are used in rooms with high humidity and do not contain toxic substances.
The correct type of wood is also important. The list of recommended species is different for interior and exterior decoration.
Inside (dressing room, steam room)
For a steam room, it is permissible to use only hardwood with increased resistance to moisture. There should be no knots or other defects on the surface. Grade - first or highest.
You can line the steam room with clapboard from:
- aspen;
- linden;
- alders;
- oak;
- Abasha.
Coniferous species in the steam room can be used cedar, larch, hemlock. When heated, they do not release resin.
It is better to use inexpensive pine for lining the dressing room. It is not used in a steam room due to the release of resin, which sticks to clothes, and when heated, it can cause a burn.
Let's look at the properties of wood species that are suitable for finishing baths.
Alder
Hygroscopic. It has low thermal conductivity. Has a pleasant aroma. Has a beneficial effect on health.
Often used to decorate the interiors of country houses and closed gazebos. The downside is the high price. Sold in pieces up to 3 meters long.
Oak
Expensive raw materials, which is why it is not so popular. Difficult to sand or trim. But rot does not form on it. Durable. Oak lining does not require additional processing before installation.
Aspen
Color – white with a silver tint. Tree rings are visible on the surface. Light in weight. Tolerates temperature changes and high humidity well. Thermal conductivity is low. The raw material is soft. Convenient to process.
Over time, aspen lining becomes even stronger.
For periodic maintenance, when the color of the surface becomes dull, it is enough to sand it.
Linden
Many dacha owners prefer to decorate their bathhouses with linden clapboards. This is due to its beneficial properties, beautiful appearance of the material and ease of processing.
Found in light colors with a brownish or reddish tint. It has a matte shine and low thermal conductivity.
When used in a steam room, it releases beneficial microparticles. At the same time, the wood is durable and does not dry out over time.
The only caveat is that contact with iron leads to its oxidation and the formation of rust.
Abashi
This is the name of African oak. Its height in the natural environment is up to 40 m, width – 3 m.
In section, the color of the array is light yellow, cream. Abash has low thermal conductivity. The raw materials are durable. The structure is dense. Does not deform under the influence of external factors. Easy to process.
It will take a lot of money to sheathe the inside of a Russian bathhouse with abash, but such a coating will last for decades without requiring additional processing or maintenance.
Lining is not available for sale in every hardware store.
The same situation applies to ash lining - it is rare and the price is high.
Disadvantages of hardwood upholstery - the color fades over time, you have to periodically coat the surface with an antiseptic.
Coniferous raw materials are rarely used in the steam room. Since most of them, when heated, release resin. But these rocks are great for finishing walls, ceilings in washrooms and dressing rooms.
Conifers are inexpensive, easy to process, and have a pleasant pine aroma.
Let's look at the properties of the most popular of them.
Cedar
It comes in a variety of colors due to its wide range of growing locations. Available in beige to coffee shades. Durable. Resistant to differences in temperature and humidity. Requires mandatory treatment with antiseptics. The price is high.
The disadvantage of cedar lining is that it can begin to release resin after several years of use, without even heating up.
Larch
Demanded coniferous species.
Many builders line the steam room with hardwood clapboard. It can be used to cover the ceiling, walls, and in the shower, locker room, and rest room.
Does not release resin. Durable. Withstands temperature changes. Doesn't rot. Not susceptible to damage by insects.
When exposed to moisture it only becomes stronger. The structure of the wood is homogeneous. The fumes from larch have antiseptic properties.
Pine
Used for finishing work in the dressing room, locker room, and rest room. The surface of the lining is smooth. It comes in beige, brown colors with a slightly reddish tint. The structure of the growth rings is clearly defined. Resin channels are noticeable. Excellent resistance to mechanical stress. Convenient to process.
Pine is not used for lining the steam room. But if the owners do not have another lining at their disposal, then before using the steam room they will have to heat it several times to remove any escaping resin.
You only need to purchase top-class lining.
Hemlock
Coniferous species from the pine family. The tree is also called Canadian hemlock. Unlike pine, it is very durable and is not afraid of high humidity or sudden temperature changes. Therefore, hemlock clapboard is used to cover the shelves, ceiling, and walls in the steam room.
Does not rot or deform. Thermal conductivity is low. When heated, it releases essential oils that are beneficial to health.
Despite the advantages of coniferous trees, most owners prefer deciduous linden or aspen. A pleasant aroma, low thermal conductivity, and ease of processing make them popular in the decoration of baths and other premises.
Outside
For cladding the outer part of the structure, moisture-resistant larch, sometimes oak, abashi, and premium pine are purchased.
The most popular type of profile is the block house, which imitates a rounded log. In this case, the tongue-and-groove connection is preserved. The front side is round, the inner side is flat or with ventilation ducts.
Among the nuances of external fasteners:
- Openings for windows and doors are decorated with a profile (beam).
- Only the highest grade lining is used, without knots or other defects.
- Two posts are fixed at each corner.
- The fastening method is through.
- The parts are mounted with the groove down to prevent precipitation from getting inside.
An alternative to wood lining is plastic. It is resistant to any weather conditions and has a wide selection of colors, including wood imitation. The downside is that the plastic is fragile, so installation is carried out carefully, otherwise the planks may crack.
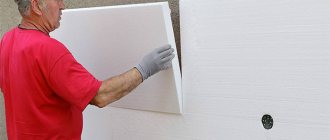
Preparing surfaces for cladding
Before fixing the lining in the bathhouse, there are many operations to be done. Surface preparation is the first stage, during which the walls and ceiling are leveled, cleaned of various contaminants, then treated with antibacterial agents, primed, and communications laid. If the bathhouse has already been in use, then all irregularities are covered with putty.
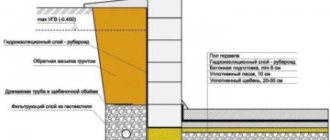
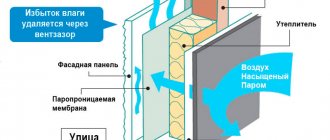
After the preparatory measures, they begin to arrange the waterproofing of wooden foundations. For concrete and brick surfaces, this operation is unnecessary: a vapor barrier layer - polyethylene, roofing felt or foil - is immediately laid on them. Since we are talking about a bathhouse, where it is especially important to prevent heat from escaping, foil will be the optimal insulating material.
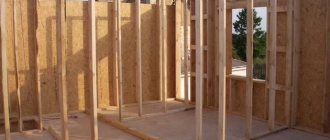
Install the sheathing using wooden slats pre-treated with an antiseptic. The frame is made depending on how the lining will be located, vertically or horizontally. First, the upper and lower guides are nailed, perfectly leveling them using a plumb line and level, then the intermediate beams are mounted.
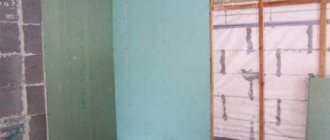
Insulation is the next step. Thin rolled materials are secured with a stapler or nails. Special insulation mats are placed between the rows of sheathing. The timber is filled taking into account their size. All cracks are sealed with mounting foam or self-adhesive tape. A vapor barrier (the same polyethylene or foil) is placed on the sheathing. It is secured with tape (stapler).
Installing fittings
How is the lining attached to the wall from inside the house? Finishing walls and ceilings with clapboard involves installing fittings that will help hide the edges of the material. Most often, fillets or baseboards are used for this, which can be easily secured with nails.
Basic installation steps:
- The connecting strips should be fixed to the floor.
- Ceiling products are attached to the ceiling.
- Corner strips, if the adjacent wall in the room is not covered with clapboard, must be installed to this wall.
When working with plastic lining, the fittings are glued.
Installation options for lining
There are two ways to install lining in a bathhouse - vertical and horizontal. However, there is still no clear answer which one is preferable.
- Vertical installation. This method makes it possible to hide all the joints, which become almost invisible. Another plus is the visual increase in the ceiling. It is believed that only this option is optimal for wet rooms, allowing moisture to flow down freely, which guarantees proper air circulation. The downside is uneven heating of the elements, since hot air accumulates at the top and cold air at the bottom. Differences in temperature and humidity levels are potential culprits for lining deformation. Increased dampness near the floor can cause rotting of all vertical slats.
- Horizontal cladding allows you to “expand” the room. Replacing a damaged element with this arrangement of the lining is greatly simplified. Uniform heating of the lamellas and the same level of humidity of all elements also add to the “treasury of virtues” of the horizontal method. Its most important advantage is that water does not penetrate into the gaps of the boards at all, since the lining is mounted with the tenon facing up. With the vertical method, on the contrary, moisture has a chance to easily “get” inside through the narrow cracks that often remain between the slats.
There is another method - diagonal, but it has a big disadvantage - a huge (compared to simple methods) amount of waste, so it is not so popular. Combinations of several types of finishes are possible.
Finishing a bath: why, how and with what? Covering the bathhouse with clapboard
Finishing is a kind of insulation of the bathhouse and giving the health building an aesthetic appearance and comfort, as well as... a kind of saving... on heating.
Let's just say that the conditions inside the steam room and adjacent rooms of the bathhouse are quite extreme - the humidity is high and the temperature can rise above one hundred degrees Celsius. Therefore, if you value your health and that of your loved ones, and not only health, but also safety, you should immediately discard all thoughts that include options with polystyrene foam and expanded polystyrene.
High temperature conditions subject these materials to deformation and provoke the release of almost the entire periodic table. It’s also better not to remember plastic and linoleum in vain in the context of a bathhouse for the same reasons. And what remains is good and reliable lining.
When decorating a bathhouse, the lining will also play a decorative role - it will give an aesthetic appearance and comfort, help retain heat and maintain the necessary humidity, and can even fill the room with a unique aroma if the lining is made of coniferous wood or linden.
Well, now let's talk about everything in order. How much lining do we need, which lining is better to choose for cladding the walls of the bathhouse, what to take to help with the lining to preserve the microclimate, and what tools to prepare.
How to fix boards correctly?
Depending on the chosen option for cladding the bathhouse with clapboards, work begins in different ways: either from the corner (vertical cladding) or from the ceiling (horizontal method). And in this case, the master has a choice: several installation methods are possible. All of them are not difficult.
- Through - with finishing nails or self-tapping screws. To minimize the risk of the board splitting, first drill holes for the fasteners with a slightly smaller diameter than theirs. The first lining is pierced right through to the sheathing, burying the head into the wood. Then the remaining lamellas are attached using the tongue-and-groove system. The disadvantage of this method is the rapid formation of rust due to high temperature and humidity.
- Through fixation with finishing pin. The material for such fasteners is stainless steel, and the method is used to fasten the lining to the concrete walls of the bathhouse. First, holes are drilled in the base, the panels are secured with a thin pin, its protruding part is cut off flush, and then sanded.
- Concealed fastening through a tenon. This option is suitable for lining that has a fairly wide shelf. In this case, the geometry of the product makes it possible to hide the cap between the groove of the first and the tenon of the second board. This fastening is very reliable, the surface remains perfect, but this operation requires skill from the master.
- Concealed paneling through the groove. Here the hole is drilled at an angle of 45°, and its diameter is larger than that of the hardware head. This work is not so simple, since the slightest inaccuracy will not allow the two lamellas to be properly connected. Such cladding may end up with uneven joints or protruding edges. The best fasteners for this method are self-tapping screws that do not require drilling.
- Use of clamps. This installation option is reliable and fast, so it is used to fix the lining on any bath surface: both on the walls and on the ceiling. The second lamella is inserted into the groove of the first one, a bracket is put on its opposite edge, which is attached to the sheathing with a nail or self-tapping screw, then the remaining clamps are attached to the edges. Then the next element is fixed in the same way. The main thing here is the correct choice of the clasp number. The station wagon is suitable for Euro products and Shtil lining.
The choice of method for a bath depends entirely on the skills of the master: for those who have little experience, it is best to stick to the simplest option, which eliminates irreparable mistakes - fastening with clamps.
Clapboard finishing
Technology of how to decorate the inside of a bathhouse with clapboard step by step with your own hands:
To install the lining, you need to secure the frame to the walls of the room. It can be metal or wood. For bathhouses, craftsmen recommend using wood supporting systems. The marking starts from the lowest point near the ceiling (it is most convenient to measure from the corner and gradually move towards the bottom of the room). You can find the desired angle using a water level or a laser pointer;
According to the markings applied to the wall, you need to install the strips. They can be mounted horizontally, vertically and diagonally. The difference lies in the difference in the direction of the marking. In horizontal lines, lines are drawn parallel to the floor and ceiling, in vertical lines - to walls. In the diagonal version, the diagram is constructed by measuring the diagonals of the walls. To finish the bath, it is recommended to use vertical or diagonal markings;
Wiring branches out along the finished frame. In the bath you need to use wires with good insulation and grounding
Please note that in the steam room they must be additionally protected by tubes; Afterwards, waterproofing and vapor barrier are installed. To do this, the bathhouse is lined with foil along the frame before finishing with clapboard.
This way you will prevent rotting of the frame, which will constantly be in a humid environment and protect the wiring;
The technology for installing lining when finishing a bathhouse is no different from installing a coating in any other room. You can use screws or nails, but home craftsmen most often resort to installation using clamps. The bracket is driven under the board using a small piece of wood (so as not to damage the wood on the panel). Afterwards, a fastening element is installed in the hole. One sheet of lining requires up to 4 clamps, depending on its size and the load-bearing capacity of the fasteners;
To cover the ceiling, special hanging brackets are used, they are also called clamps. The principle is the same as when finishing walls: the panels are inserted under the “tongue” of the bracket, after which the clamp is attached to the frame. This allows for strong and hidden fastening of the material.
After completing the work, you can coat the lining with varnish or antiseptic and a few days after it has dried, the room can be used.
If for some reason you cannot carry out the cladding yourself, you can turn to specialists for help. Prices in the cities of the Russian Federation for finishing a bathhouse with clapboard are approximately the same; the cost may depend only on the specific company and the scope of work. For example, in Samara, a square meter of cladding will cost 10–20 dollars, in Moscow a couple of units higher (up to 25).
Tools, materials
In addition to the lining and ceiling plinth in the bathhouse, you will have to collect a large amount of what you will definitely need for work. This set includes:
- timber for sheathing (50x50 mm);
- waterproofing film;
- vapor barrier membrane;
- insulation: mineral wool and foil;
- finisher;
- drill;
- pencil, ruler, tape measure;
- mallet;
- hammer;
- saw;
- stapler;
- screwdriver
A properly processed wooden frame is the only option for a bathhouse. It will last much longer, the price of the material is also low. It is made from timber. Typically, the gaps between structural elements are 500 mm, but here it is necessary to take into account the size of the purchased insulation.
For vertical installation of the lining, a horizontal sheathing is constructed, and vice versa. Its correctness is checked with a building level and plumb line. A vapor barrier - film or foil - is laid overlapping between the beams. Fix it with a stapler to the beam.
How to correctly determine the required amount of lining for finishing a bathhouse yourself?
So. We decided on the clapboard. Now all that remains is to calculate how much it should be bought. The task is absolutely easy if you understand the calculation algorithm, and that is what we will tell you now.
For a clear example, let’s take the classic size of bathhouses for summer cottages.
Let’s say the bathhouse is three by three meters and the ceiling height is two and a half meters. We will do our own cladding on the walls, ceiling and floor, but - this is important - the floor is not taken into account in the calculations. As a rule, baths of this size have two rooms - the steam room itself - two by three and a changing room - one by three.
Let's calculate.
Ceiling area: 2x3=6 square meters.
Area of one wall: 2x2.5 = 5 square meters.
Area of the other wall: 3x2.5 = 7.5 square meters.
Total area of the bath: 6 (ceiling) + 7.5 (one wall) + 5 (second wall) = 31 square meters.
Using this principle, we calculate the area of the locker room and as a result we get 23 square meters.
We sum up both figures and get a total area to be covered that is 54 square meters. But! This is not the final figure yet. From it we must subtract the area of windows and doors, and then add fifteen percent for the margin when trimming the lining - this will be the amount of material that you need to cover the bathhouse.
As a rule, the price of lining is per square or linear meter, so you can roughly calculate the amount before going to the store.
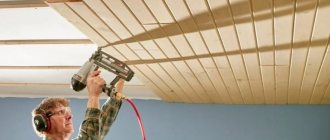
Attaching the lining to the ceiling
Any job has its own characteristics, and they exist here too, since you need to fasten the lining in the bathhouse to the ceiling either with ordinary nails or with clamps. Finishing nails are not able to support the weight of the clapboard cladding. The process always starts from the side where the doorway is located.
- The position of the first element is carefully checked. Be sure to leave a gap of several centimeters between the ceiling and walls.
- If curvature is detected, the lamella is aligned perpendicular to the walls, leaving a gap that will subsequently be covered by the ceiling plinth.
- The first and last element, regardless of the chosen type of fastening, are always nailed down with nails, recessing them into the material.
- The nails are driven in at an angle of 45°, leaving a gap of 1-2 mm between the slats. Otherwise, the structure will warp due to humidity.
- First, the lining is fixed in the middle, then the seam is checked for evenness, then it is fixed on the sides.
- It is impossible to hammer a nail completely with a hammer, so during work they use a hammer.
- When installing - on clamps or nails - the tenon should be directed outward.
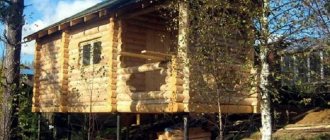
How to make an independent frame in a wooden bath. How to sheathe a steam room with clapboard
General diagram of the walls in the steam room:
Shrinkage in a log bath is approximately 3% over the entire height of the logs, in laminated timber it is 2%, and in a frame bath it is 1.5%. Based on this, a steam room in a wooden bathhouse cannot do without an independent frame. As a rule, planed timber 50x40 or 50x50 (for 50mm insulation) is used as a basis. It is advisable to choose the beam as even as possible. In the steam room, we roll out the B Izospan membrane over the logs and fasten it with a stapler; it is needed to prevent condensation and moisture from the street from getting into the insulation.
Vertically, level the beam 50x40 mm, and secure it to the log using sliding corners.
The height of the beam should be lower than the beams of the second floor (if there is one) by about 100 mm, that is, the 50x40 beam should not rest against anything, it should have free movement when the log shrinks, approximately 100 mm.
With a steam room ceiling height of 2300 mm, 5 corners will be required for each beam. The pitch between the bars is 400-500 mm. We install bars around the entire perimeter of the steam room.
It is also necessary to install an embedded beam under the shelves
It is very important!
Don't forget to check whether it's a rule or a long level: the 50x40 bars on each wall should be in one line, at the bottom, in the middle and at the top. Also check the diagonals of the steam room; the corners should be 90 degrees.
If you miss the point with the diagonals, then when installing the ceiling it will turn out to be a wedge, and if the 50x40 bars are not aligned in one line, then the lining on the wall will go in waves. The ceiling frame is connected to vertical bars (50x40 mm), between which cotton wool is laid.
As a result, you should end up with a free-standing frame that is attached to the logs only along the walls, and the ceiling of the frame is 100 mm lower than the floor/second floor beams. After you have checked everything, we lay 50 mm insulation in the bars.
We tighten the insulation with aluminum foil 100 microns, fasten it to the bars with a stapler, make an overlap of 100 mm at the joints of the foil and glue it with foil tape. Then we screw the counter lath made of 40x20 mm slats to the existing 50x40 mm bars, pressing the foil.
The 40x20 rail provides a ventilation gap between the foil and the lining; if the rail is not installed, the lining will be closely adjacent to the foil, on which water condenses; accordingly, the lining will not be ventilated from the inside and will very quickly begin to rot and rot. The lining in a Russian bath is nailed from above, down, horizontally.
To understand why the lining should be positioned horizontally, watch our short video:
How to cover walls in a bathhouse
There are few differences from installing a ceiling in the case of wall cladding. The operation of finishing the walls is similar.
- When installing vertically, work starts from the corner of the room. The correctness of the installation element of the first element is checked several times - immediately and as it is fixed. Do the test with a regular building level.
- With horizontal cladding, the operation starts from the ceiling. The tenon of the first panel is placed on top. Just like on the ceiling, an indentation must be made: it ranges from 20 to 30 mm from the ceiling and floor.
- Here the through fastening method is often used. The heads are recessed quite deeply into the material and then masked with wood putty. This method speeds up the work, but it does not suit everyone, since making the holes completely invisible is problematic. One possible solution is to make your own putty, made from PVA mixed with very fine shavings, almost dust.
Since it is not difficult to attach the paneling in a bathhouse, due to the apparent ease of work, novice craftsmen sometimes make mistakes. Therefore, they are required to be careful, patient and unhurried. To prevent possible alterations and damage to the material, it is better to first watch several video tutorials. One of the popular videos on sauna cladding is presented here:
Covering the baths with clapboard
Covering a sauna with clapboard is not something long and requires a lot of experience.
It is recommended to break down all work into stages, which allows you to distribute working time as efficiently as possible and control the timely completion of all previously assigned tasks.
- The first stage, of course, will be preparatory work;
- The second is the creation of a wooden frame for subsequent fastening of the lining strips;
- The third stage is the installation of insulating materials and the installation of the lining itself.
- The fourth and final step can be considered finishing the lining itself, applying a protective layer.
Antiseptic coating for wood - a real opportunity to extend the life of wood finishes
Preparatory work
Before immediately starting work on decorating the walls of the bathhouse with your own hands, it is recommended to carry out preparatory work, which most often includes preparing the walls and ceiling of the bathhouse for further work.
If there are sufficiently deep differences on the walls, at the rate of no more than 2 mm per 1 meter, then work should be done to level the surface. In this case, you can use plaster or putty - the most optimal and inexpensive option.
To increase the level of resistance and durability of the building, as well as to eliminate the possibility of fungus and mold appearing on the walls, most experts recommend applying special protective agents to the walls.
Afterwards, work begins on installing communications, which can include:
- Electricity supply;
- Water supply;
- Everything that can be easily and quickly hidden using wooden panels.
As the last work at this stage, we can note the purchase of direct lining strips and other fastening materials, in particular we are talking about wooden blocks, hangers, and various heat-insulating materials.
The photo shows high-quality installed wiring in the bathhouse
Installation of sheathing
The instructions below will help you understand how to choose the right lathing and how to subsequently lay thermal insulation material between the beams.
To create a frame for the subsequent installation of the lining, you should use only a wooden block, the optimal size is 20x50 mm. When cutting, you can use sizes of 1000 mm in length and 500 mm; also, at your discretion, depending on the type of bath structure itself, you can choose a different ratio of sizes.
Installation of metal hangers on the wall
Afterwards, we install metal hangers; they should be placed at a distance of 30-40 centimeters, while the distance between the rows with beams will be about 40-50 centimeters. We attach the hangers to the wall using dowels. We attach bars for the frame to the pendants.
Laying insulation
Before installing the lining strips on the wall, work is carried out to insulate the bathhouse. Most often, in the process of performing these works, mineral wool is used - as an inexpensive material, but at the same time high-quality and effective, fully meeting modern requirements for creating bath complexes and saunas.
Installation of mineral wool, on top of it a vapor barrier film
On top of mineral wool, it is recommended to install a vapor barrier layer in the form of a vapor barrier film; a wide selection on the market is presented by the ISOSPAN company; these materials help to achieve a comprehensive solution to issues related to the implementation of high-quality heat and vapor barrier of a single room or bathhouse as a whole.
Installation of lining
The process of installing and covering the walls of a bathhouse with clapboard inside can be divided into several main components.
In particular, we are talking about:
- Fastening the lining with galvanized tenon screws. It is recommended to drill holes for self-tapping screws to prevent chipping.
- Start the sheathing process from the most inaccessible place, but remember that the very last board will have to be adjusted both in length and width.
Cladding with clapboard should start from the most inaccessible places
The corners of the rooms are finished with a special wooden plinth, which is secured with stainless nails. Some experts recommend the use of glue when attaching such elements, which is considered by most to be a waste of material and money, since glue is simply ineffective in rooms with high temperatures and constant fluctuations.
How to properly line a bathhouse with clapboard using nails as fastening material
Installation of lining in a bathhouse from A to Z
It is recommended to use natural materials for the interior lining of the bathhouse.
The reasons are quite trivial: high temperatures and humidity. Therefore, the cladding must be stress-resistant. The lining invariably remains a recognized classic of the genre. In this article, the reader will learn how to use lining in finishing a bathhouse. And also how to implement the process and choose the best option for finishing material. To get answers to as many specific questions as possible, read to the end!
Lining in the steam room: vertically or horizontally
There are two ways to solve the problem of how to line a bathhouse with clapboard quickly and efficiently:
- With horizontal planks;
- With vertical slats.
With the horizontal method, the lining is installed parallel to the floor surface. In a vertical position - perpendicular to the floor.
The horizontal position more effectively protects the lining from water penetration. This ensures good ventilation of the space between the wall and the panels.
The choice of method affects the technology of work and the final cost of repairs. For lining the inside of a bathhouse, they prefer the horizontal method. In this case, the wooden panels are installed with the tenon facing up.
Wood for steam room
The best option is to equip the steam room with different types of wood : shelves, benches, part of the walls, so as not to get burned, made of less thermally conductive material.
Places not in contact with the body are exposed to more intensely heated wood, which effectively releases bactericidal substances and a pleasant odor.
What are the benefits of hardwoods:
- linden is the most popular material. It does not heat up much and retains its original color for a long time. It does not deform from hot wet steam. Pliable during processing, which determines the absence of cracks and chips during the manufacture and fastening of the lining;
- Aspen is almost an analogue of linden in terms of properties, but cheaper in price. It darkens quickly, but does not rot. After drying, the product becomes so dense that it is difficult to hammer nails into it.
The resinous substances of conifers protect against moisture, the phytoncides emitted disinfect the air and create an excellent microclimate. Before fixing the lining in the steam room, you need to study their properties:
- larch is a durable, moisture-resistant material, not easy to process;
- cedar - softness, plasticity, healing aroma of essential oils, beautiful wood structure have gained recognition as the best option for a paired room. The material is high-quality, expensive, when choosing it you should be wary of fakes;
- pine – not susceptible to rotting, few knots that can burn. The price is comparable to aspen. Use in a steam room is limited by its ability to get very hot.
If the price doesn’t bother you, you can choose Abashi, an African tree suitable for a steam room in all respects.