Waterproofing between the foundation and the first row of brickwork is a necessary measure to protect the walls from moisture penetration.
brick is quite high, so moisture seeping into the walls through the joint with the foundation can spread to a considerable height.
This article will help you understand why waterproofing is needed between the foundation and the masonry, and what negative consequences can be avoided if you install a water barrier.
Formation of efflorescence
Groundwater with salts dissolved in it gradually moves upward through cracks and voids in the foundation, towards the brickwork. Temperature changes provoke increased growth of salt crystals in the thickness of the brick, and the “wetting-drying” process contributes to the precipitation of salt deposits on the surface of the masonry.
An increased content of salts in the form of efflorescence inevitably leads to the degradation of building structures. Efflorescence is not only an aesthetic flaw in a brick house, but also a destructive process.
Waterproofing the foundation with roofing felt - features
To determine what set of measures is needed, the following factors should be taken into account:
- Presence of groundwater and its level.
- Heterogeneity of soil and amount of precipitation in the region.
- Terms of use of the building.
Waterproofing work on the foundation should be carried out when the groundwater level is below 1 m from the bottom of the foundation. Protection is carried out by vertical coating waterproofing, this will be enough. In the event that groundwater is located at a distance of less than 1 m from the bottom of the base, complete protection from moisture is carried out. In this case, they resort to the use of vertical penetrating waterproofing and the horizontal gluing method.
Note! When the groundwater level is at the same level as the basement, horizontal and vertical waterproofing is carried out, as well as the creation of a drainage system around the building.
Now regarding the heterogeneity of soil and precipitation. If the soil is dense, it does not allow moisture to pass through so well, which means it will accumulate on the surface. In this case, there is a risk of flooding the basement. Heterogeneity is directly related to the property of surface water to quickly sink into the ground during heavy rain, snow and other precipitation. Loose soil, which contains gravel, pebbles and sand, has excellent water permeability. With them, water quickly disappears into the soil. But sandy loam, loam and clay are waterproof soils.
But operating conditions also play a big role when it comes to the degree of protection of a building. For damp and damp rooms (saunas, baths, swimming pool complexes, etc.) high-quality waterproofing is needed. Also, the degree of protection, the amount of consumable materials, the order of work and their quantity are affected by the presence of heating in the building, residential premises and the area of the structure.
Materials for waterproofing
To create a water barrier between the foundation and the masonry, various materials are used: bitumen mastic, sprayed and rolled waterproofing, waterproofing membranes.
For horizontal cut-off waterproofing between the foundation and brickwork, Ondutis D (RV) films are suitable. These are durable films that form a reliable water barrier and at the same time are quite convenient for DIY installation.
An innovative type of membrane - film with applied adhesive tape - Ondutis D (RV) Smart, which greatly simplifies the process of installing waterproofing for building structures.
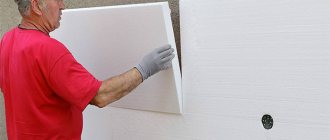
Waterproofing under cladding
The brickwork of the plinth and walls can be insulated by finishing with facing material. Of course, if a technological gap is provided between the wall and the cladding (if siding, ventilated facade, etc. is used). Both waterproofing and thermal insulation material can be laid under the finishing.
A hydro- and vapor barrier film is laid on top of the insulation.
When choosing a waterproofer in this case, you need to proceed from your requirements and capabilities. You can take a special protective membrane or film.
The main thing in this case is not to confuse the sequence: first, the heat-insulating material is laid, and then waterproofing is placed on it, which will protect the insulation and walls.
The nuances of horizontal insulation
Before performing waterproofing work, a number of measures are carried out to remove moisture from the load-bearing structures of the building and drainage is done. Next, material is laid in two stages to prevent the rise of capillary moisture in the outer walls.
First, they install waterproofing between the base and the foundation, creating an insurmountable obstacle to water along the entire perimeter of the object being built. A second layer of protective barrier is placed between the base and the wall. This is especially true if brick and similar materials with a high moisture absorption coefficient are used for its construction.
Coating insulation
To enhance the effect, horizontal waterproofing is combined with vertical protection of the base from excess moisture. It is done using processing methods such as:
Coating.
It is performed using bitumen and its derivatives. Thanks to the thick consistency and high level of water resistance of the material, seams and joints on the foundation, as well as outside and inside the basement, are reliably sealed. Painting. To carry it out, varnishes and paints are used, which are easy to apply but have low efficiency. Impregnation.
It is the most popular and effective way to protect against moisture. For impregnation, liquid polymers and synthetic resins with high penetrating ability are used. Pasting. When using this method, you will need rolled materials that overlap and additionally reinforce the base and foundation.
Waterproofing compounds for impregnation of load-bearing structures are applied at temperatures above 0 °C, after leveling and rubbing the joints. Work is carried out using protective equipment.
Horizontal waterproofing
It is used almost always. The layer is needed to prevent moisture from the foundation from rising up the wall. The work is carried out at the construction stage, when the foundation has already been poured and it is time to lay the walls. In this case, the roofing material is laid on the foundation under timber, brick or other material. Horizontal waterproofing can be:
- pasting;
- painting (coating).
We are interested in glued waterproofing, since this is how you can lay roofing felt on the foundation. Bitumen is applied to the surface of the base, and roll material is glued on top. Instead of roofing felt, other rolled materials, such as hydroisol, brizol or isol, can be glued to the foundation.
Note! As for paint protection from moisture, it is carried out by applying bitumen mastic and synthetic materials.
In addition, built-up roofing felt is available for sale. How to glue roofing felt to the foundation? This requires a burner. With its help, you need to slightly melt the bottom layer of roofing felt and gradually glue it to the base. You will learn how to lay ordinary roofing felt on a foundation from this video.
Here are a few benefits of using roofing felt for this job:
- If the work is done correctly, the material will last up to 50 years.
- The products are cheap.
- The material is durable and elastic.
- Resistant to oxidation.
- It is not afraid of salts contained in the soil and groundwater.
- A universal material that is easy to install.
Ruberoid
Represents a traditional insulation option.
The material is cut into strips of the required thickness and laid on top of the foundation in two layers. Among the advantages of roofing felt are low cost and availability. The level of protection and durability of the coating is not very high, so it can be replaced with more modern roll materials.
How to protect masonry from getting wet through the seams?
Oksana12345FORUMHOUSE participant
Please advise how to solve the problem. The facade of the house is made of 8 cm finishing bricks. The wind rose in our area is such that during rains the wind always blows into one wall almost at a right angle to it. The brick becomes very damp, even the wallpaper becomes damp from the inside. Now we will treat it with a hydrophobe, but this is only part of the problem. There are micro cracks in the masonry seams into which the wind forces water under pressure. How to treat these seams? And will the sealant adhere after the hydrophobe?
Answer from a GLIMS expert.
— Simply treating the wall with a water-repellent primer will not be enough in this case. Since water-repellent soils can seal pores in the base up to 0.2 mm. This problem must be approached comprehensively:
- Seams on brickwork - it is necessary to widen (deepen) by 5-10 mm, since there are already micro-cracks in the seams, plus we will make a reserve in depth for laying new material.
- Treat the prepared surface with waterproof deep penetration primer once and allow to dry for at least 4 hours.
- Seams, filling: if the seams are gray, we recommend using reinforcing hydrophobic putty for filling; if the seams are white, we recommend using leveling high-strength hydrophobic putty for filling, this way we will remove saturation of the wall through the seams of the brickwork. Allow the applied putties to dry for at least 3 days.
- Applying a water repellent over the entire surface of the wall - for this it is best to use a waterproof, deep penetration water repellent based on silicone. We carry out the application in two layers, wet on wet, that is, after applying the first layer, we do not allow it to dry, but immediately begin applying the second layer, from the same place where we began to apply the first layer.
This system of using materials will allow you to protect the wall from getting wet and saturating it with water. In this case, the water repellent will not have to be applied every year; it will be enough to treat the walls once every 3-5 years, depending on the intensity of the rains during the season.
The difference between our silicone-based deep penetration water repellent and analogues:
- Water-based - does not contain solvents, safe for health.
- Does not create a film - vapor permeable, allows walls to breathe.
- Does not change the color of the base and does not create a glossy film - does not disrupt the existing design.
- Easy to apply - can be applied by brush, roller or spray.
- Protects decorative coatings from UV rays.
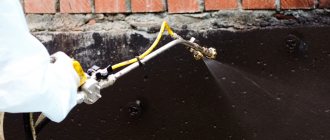
Liquid rubber
It is applied using a spatula and does not require heating. Among the advantages of liquid rubber:
- elasticity, which maintains the integrity of the waterproofing layer even when cracks appear on the foundation or base; good adhesion.
There is no unpleasant odor when using the material. Liquid rubber is resistant to fire, and thanks to its high penetrating ability, it fills the smallest pores and cracks in the base.
How to waterproof a swimming pool with insulation?
Buyan77FORUMHOUSE Member
A question arose about waterproofing the pool: there is a concrete bowl, I will insulate both the walls and the floor with extruded polystyrene foam. Attach to walls using polyurethane glue. Next, I’m thinking of using a plastic mesh for the putty and waterproofing it over it. The question is, which is better? You can use a cement water stop, or you can use mastic. Afterwards I want to glue the mosaic. I don't want to overpay. Or is it still worth it?
Answer from a GLIMS expert.
-If I understand correctly, the insulation is planned to be carried out inside the pool bowl, in which case the pie of materials will be as follows.
In this system there are no questions about what and how to do, there are more questions about EPS (extruded polystyrene foam).
- To glue EPS, you need to use specialized glue and apply it to the EPS board not with cakes, but over the entire surface of the board, with a notched trowel with a tooth height of 12 mm. In this way, we will avoid voids under the EPS slab, which will have a positive effect on the distribution of the load from water pressure on the EPS, and the entire system, including waterproofing and mosaic.
- After 24 hours, the glued EPS boards must be additionally secured to the base with plastic mushrooms with a plastic core.
- To create an adhesive layer on EPS boards, it is necessary to apply a special reinforcing putty with a fiberglass mesh in two layers. When choosing a grid, you must be guided by the following criteria:
- The density of the fiberglass mesh is at least 150 g/m².
- Alkali-resistant.
- Cell – 5×5 mm.
Technology - apply the first layer of putty, 2-3 mm thick, and place a mesh in it, immediately smooth out the putty protruding through the cells, so that the mesh is completely covered with putty (the mesh is not visible). When laying the mesh, ensure that the sheets overlap – at least 100 mm. Leave to dry for 24 hours. After 24 hours, we begin applying the second layer of putty with a thickness of at least 2-3 mm. Thus, we obtain a thickness of putty in two layers of 4-6 mm. Between layers of putty we do not prime, but simply moisten with water. Let it dry for three days.
- Now you can start applying waterproofing - since the base is not the most stable (EPS insulation), then the choice of waterproofing should be directed to elastic waterproofing. The best option would be “rubber” on a water-polymer basis, ready for use, with a consumption of 0.8-1.0 kg/m² in two layers and an elasticity of more than 300%. Drying time for waterproofing is 1 day from the moment the last layer is applied.
- Tile adhesive for laying mosaics is a waterproof white adhesive mixture. This adhesive was developed according to European standards for use in swimming pools and fountains.
- 24 hours after finishing laying the mosaic, you can start grouting the joints. Waterproof grout is recommended for use in swimming pools and fountains.
Now the main question is the choice of EPS insulation! This material must have approval from the manufacturer for use in swimming pools, in systems of this kind as described above. Accordingly, EPS must withstand loads (not change its geometry) from water pressure.
Bitumen and its derivatives
It is represented by mastics from different manufacturers, which are easy to use and provide reliable waterproofing of the base and plinth. Reinforcing bitumen or mastics based on it with roofing felt or glass insulation significantly increases the degree of protection of the foundation from the destructive effects of moisture.
We recommend watching a video demonstrating coating insulation using bitumen.
Why is a water barrier between the foundation and the brickwork of the basement necessary?
The main purpose of waterproofing between the brickwork and the foundation is to prevent the capillary rise of moisture and protect the main structural elements from destruction. There are several reasons why waterproofing is simply necessary.
Freezing and destruction of walls
If you do not isolate the junction line between the brick and the concrete foundation, then moisture from the concrete will get into the pores of the brick. In winter, when freezing, the volume of moisture increases and the brick is destroyed from the inside. Several cycles of freezing and thawing make the brickwork less durable, so over time, cracks appear in the basement walls.
Efflorescence on the surface
Groundwater is characterized by a high content of salts, and the lack of waterproofing allows them to penetrate from the foundation into the brickwork. Periodic increases and decreases in temperature cause the growth of salt crystals inside the brick, and during the process of wetting and drying, salt deposits come out on the surface of the brickwork. Efflorescence not only spoils the appearance of the building, but also has a destructive effect on the material. As a result, the building structure is deformed.
Increased humidity inside the building
The lack of waterproofing between the foundation and the brick plinth causes moisture to enter the main walls of the house. In this case, the humidity in the premises increases, a damp smell appears and living becomes uncomfortable. In addition, the interior decoration deteriorates, which leads to unplanned repairs.
The appearance of fungus and mold
Constant dampness and wet walls are a favorable environment for the proliferation of harmful microorganisms.
Mold and mildew on walls may be perceived as a visual nuisance, but they can also cause serious health problems. Their spores enter the respiratory tract and cause decreased immunity and acute respiratory diseases.
Laying technology
At the construction stage, installation of waterproofing between the base of the building and the plinth or wall does not require significant investments and is not difficult. The algorithm for protecting load-bearing structures from atmospheric moisture includes the following steps:
- cleaning the base; laying waterproofing.
At the same time, the effectiveness of the measures depends on the correct choice of materials and compliance with installation technology. What to do if you need insulation of the load-bearing structures of an already built house? In this case, it is not possible to lay a protective layer around the perimeter of the base without complex reconstruction, and the installation of a moisture barrier is performed using other methods.
Watch a video on how to insulate a base using one of the most popular methods - laying material.
The first method is suitable for buildings with a basement and brick walls and involves the phased partial dismantling of a small fragment of masonry. One of the waterproofing materials is laid on the free space, and the opening is again filled with bricks. You can start working on the next section no earlier than in 2-3 weeks.
The second option for restoring the waterproofing of a constructed building is to fill the pores and voids of the foundation using injections with a special composition. It penetrates between the base and the masonry and creates a waterproof barrier.
To introduce polymer-cement mixtures or sealing gel, you must first make inclined holes in the wall with a depth of at least 2/3 of its width. Filling of the masonry and monolithic base is carried out for at least 2 weeks.
The durability and reliability of a structure depends on how accurately construction technologies are followed.
The most important step is to waterproof the seam between the wall and the foundation. Some builders neglect this work, which subsequently leads to the destruction of buildings.
Technology for arranging a waterproof layer
The least effective method of waterproofing is mechanical fastening of roofing material using nails or slats. However, currently existing materials in the form of mastics make it possible to effectively solve the problem of fixing sheet materials using them.
Preparatory activities
This work consists of leveling the surface of the foundation with a cement-sand mortar. It covers chips, cracks, shrinkage cavities and other surface defects that could subsequently cause mechanical damage to the insulating layer.
Might be interesting
Formation of a protective layer with roofing felt
To fix the roofing material, the surface of the foundation is covered with bitumen heated to a fluid state, while simultaneously placing a rolled sheet of material on it. Hot bitumen is applied with a brush or roller. The rows of roofing felt are laid with an overlap of 7 - 12 centimeters. The edges of the material along the entire perimeter are folded and covered with vertical waterproofing. For complete reliability, you should arrange 2 layers of protection.
Laying roofing felt with heating
Roofing felt laying technology
Work on waterproofing the foundation is carried out in the following order:
- Sealing cracks and defects with cement-sand mortar. After it hardens, treat the surface with a primer.
- Applying mastic in several layers.
- Heat the roofing material sheet with a blowtorch and lay it overlapping, while the joints are heated especially thoroughly and additionally glued with mastic.
- On top of the first layer of waterproofing, the second layer is laid in the same order (except for point 1), and, if necessary, subsequent ones.
Ruberoid-rubber insulation
This method of waterproofing is used quite rarely, but gives excellent results. In this case, special rubber in a liquefied state is used as a binding agent between concrete and roofing felt. In this case, the protective layer turns practically into a monolith endowed with elasticity.
This achieves the following advantages:
- rubber consumption is significantly reduced compared to pure rubber insulation technology;
- there is no need to apply heating to roofing felt, rubber provides high adhesion to roofing felt, acting like glue;
- In terms of durability, such waterproofing is comparable to the lifespan of the structure itself.
Additional protection
A natural moisture-proof material is ordinary clay, which is still widely used today for clay seals of the upper structure of water intake devices:
- To prepare such a material, the clay needs to be soaked for 24 hours with a small amount of water, and then stirred until it becomes a thick sour cream. To improve the quality of the composition, fiber shavings are added to it as a reinforcing element. When dried, it prevents the formation of cracks in the monolithic layer of clay.
- The foundation around the perimeter must be filled with such a solution to the level of the ground surface and left open to dry.
- The normal drying time for clay mortar is about 30 days, but work can continue after 7–10 days. If the weather is dry and hot, the surface of the fill should be covered with film and sprinkled with water daily to ensure that the layer dries evenly. Otherwise, it may suffer from cracking.
Creating a clay seal will protect the roofing material waterproofing layer from mechanical damage, since the seal layer is not compacted during the laying process.
Why is waterproofing needed?
It is not only underground groundwater that has a negative impact.
They contribute:
- Rain and snow; Melt water; Soil movements leading to disruption of vertical waterproofing.
It makes no sense to organize protection against moisture penetration inside the building.
Waterproofing the foundation itself is important, but it will not save the walls from external environmental influences and condensation. Horizontal waterproofing will be required. Its task is to exclude contact of the walls and the area of their joints with the foundation with moisture and to create a barrier to the capillary rise of water along the foundation elements.
Installation technology
If waterproofing is carried out in a house that is already in use, at the first stage the outer wall of the foundation is dug out to its full height, cleaned of soil and dirt, the cracks are sealed and the surface is leveled. The next sequence of actions is as follows:
1. Prime the concrete with bitumen primer.
2. Apply a layer of mastic. You can use cold applied bitumen mastic.
3. Glue a sheet of roofing material onto the mastic. It is recommended to heat the material with a gas burner. The overlap of adjacent strips is up to 15 cm.
4. Place the mastic and the second layer of roofing felt again, observing the spacing of the seams in relation to the first layer.
5. If insulation is not carried out simultaneously with waterproofing, the wall is covered with sheets of plywood. Otherwise, PPS slabs are glued on top of the roofing felt and secured with dowels.
The insulation is protected from external mechanical factors by sheets of plywood, asbestos-cement or reinforced concrete slabs. For external treatment of the base, a durable facing material (for example, porcelain tiles) is suitable as a protective coating.
Horizontal waterproofing with roofing felt is done in the same way, only there can be more than two layers.
Consequences of water ingress
The foundation seam area is particularly vulnerable to moisture due to its properties. A concrete monolith remains strong under the influence of moisture, but according to physical laws, water rises upward and begins to penetrate the structure of the walls.
The porous structure of the brickwork speeds up the process. While the vertical waterproofing of the foundation is intact, it leaks slowly. Due to the fact that the soil moves, it is gradually damaged and then, in the absence of horizontal protection, periodic freezing and thawing of water from changes in ambient temperature lead to the rapid destruction of the walls.
It is important to know! Water, penetrating into the pores of the brick, crystallizes at sub-zero temperatures. When thawing, the substance expands in volume and damages the material. Gradually it begins to crumble, the walls crumble, and a damp smell and mold appear in the room.
Base waterproofing options
Waterproofing is applied to the base area using brushes, rollers, trowels and spatulas. To heat bitumen or mastic, use burners; you will need a reinforced mesh, as well as the insulator itself.
Waterproofing is carried out using the following technology:
- anointing;
- dyeing;
- impregnation;
- pasting.
Rolled materials, paints and mastics must adhere well to the surface of the supporting wall. Impregnations resist negative factors, penetrating deeply into the base. Select waterproofing materials with high strength, low abrasion rates and resistance to ultraviolet radiation.
It is advisable to purchase primers, paints, rolls and bitumen compositions from the same company for the best interaction in a combined version.
Smearing
Applying insulating compound
Simple and affordable processing is used on all types of surfaces. Several layers with a thickness of 4–10 mm are created. The composition is easy to apply and creates a uniform coating without seams. Works effectively on concrete and when waterproofing brick plinths.
The resinous base does not conduct liquid, but allows air to pass through. Coating materials are applied to untreated surfaces, thereby reducing labor costs. Almost all types of coating mastics are inexpensive and belong to the category of environmentally friendly materials.
The disadvantages are manifested in low resistance to wear and temperature changes, the formation is destroyed by impact. Homemade solutions need to be constantly heated to work, so it is better to use ready-made cold mastics.
Coloring
Treating the base with waterproofing paint
They use protective varnishes that are easy to apply and are available for sale at an affordable price. In the city, the plinth is affected by acids, salts, alkalis, and other contaminants, so solvent-based acrylic paints are chosen. Owners of the suburban sector use water-dispersed compositions.
Before use, apply a primer to the leveled surface and use acrylic-based multifunctional products. Such compositions improve the adhesion of the subsequent layer of paint to the base. For porous walls, water-repellent varnishes are used, which reduce water absorption and increase resistance to soil liquids.
Paints and varnishes insulate ground structures, but more often such protection is one of the elements of comprehensive protection of the base from destruction. Works well in sandy, rocky and other stable soils.
Impregnation
Impregnation
Penetrating agents contain polymers based on cement and quartz. The compositions are diluted with water, then applied to the base area with a roller or brush. Most often used for internal processing of the base. The impregnation penetrates into the thickness, the polymers increase in volume and fill the pores. The moisture resistance of the material increases.
Effective impregnation has positive qualities:
- increases frost resistance;
- increases the strength of the material, protects reinforcement from corrosion;
- resists the action of aggressive chemicals.
The surface is not prepared if only the rebuilt base is impregnated. Old supporting walls are pre-degreased. When working, personal protective equipment is used. The compositions are applied to concrete and brick at a certain temperature; they cannot be used in winter.
Pasting
Pasting with euroroofing felt
Roofing felt is glued on hot molten bitumen, and euroroofing felt contains a layer that is heated by a burner. At the same time, the surface of the wall is heated, and sheets of material are pressed over the entire area. Synthetic films are applied in 2 layers, with the first being placed vertically and the second being placed horizontally.
Advantages of the pasting method:
- savings on insulation due to low cost;
- materials are environmentally friendly;
- stick well to the surface thanks to mastic and a special layer.
Rolled insulators have low mechanical strength and can be easily damaged by impact. Roofing felt and roofing felt have poor resistance to the chemical aggressiveness of the surrounding area. The surface of the walls is pre-leveled, and the gluing process can be performed by a person with experience.
How to protect yourself from moisture
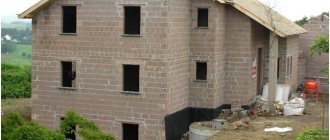
Destruction can be prevented by organizing horizontal waterproofing, which is ideally carried out during the construction phase of the building. It is installed between the brick or gas silicate wall itself and the foundation. This is the best option.
If it was decided to save on building materials or the building was erected in violation of technology, then waterproofing of the finished house is done. The process will be more labor-intensive and require more money. Therefore, it is better to build the house correctly right away.
Objectives of horizontal waterproofing
Installing waterproofing is considered a troublesome undertaking, but not a single house will last long without it, even if it is built on a mountain and the groundwater lies at great depths. There will always be reasons for condensation and moisture penetration into structural elements. Indeed, in addition to groundwater, there is also rain and melt water, which have an equally destructive effect on the foundation and walls of the building.
Horizontal waterproofing is installed between the brickwork and the foundation during the construction stage. Of course, there are ways to do this after the walls have been built, but they are either too labor-intensive or too expensive
A decision to save on materials or simple forgetfulness of the “masters” can lead to significant problems and difficulties in the future, so the importance of a moisture-proof layer should not be ignored
The lower horizontal waterproofing is laid at the level of the base of the foundation, but this article is not about it, but about the upper insulating layer. When constructing it, roll materials are used, such as roofing felt, roofing felt, glass insulation, waterproofing, rubemast, etc. To create a waterproof carpet between the foundation and the brick or block masonry, you must:
- level the upper surface of the foundation with mortar;
- lay the waterproofing material in two layers.
For reliability, roofing felt can be fixed with hot bitumen. In this case, it is recommended to apply the mastic directly onto the prepared canvases, and after laying, press it with a semi-rigid roller. If there are crumbs on the rolls, the surface should be cleaned first, otherwise the joining will be of poor quality.
In the absence of a basement, double horizontal waterproofing of the walls is performed:
- the first layer is between the foundation part and the masonry of the base;
- the second layer is in a brick or block wall, not reaching the lower level of the first floor ceiling or joist about 10-15cm.
Strips of roofing felt or other rolled material are laid flush with the masonry, but they may protrude somewhat beyond the walls. To achieve a neat appearance, it is recommended that the straight edges of the canvases cut lengthwise be oriented outward, and the “torn” side should be oriented toward the inside of the house. In addition, it should be taken into account that the material must be overlapped along its length.
A successful combination of vertical and horizontal waterproofing of a house ensures maximum tightness of structures. And the absence of moisture in them can guarantee a long life of the house and the impossibility of the appearance of dampness and fungus in the interior of the building.
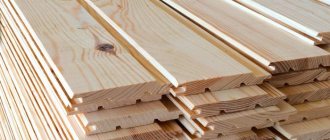
Types of materials and their use
Waterproofing of masonry is made from rolled materials.
The most common of them are:
- Roofing felt; Tol; Rubemast; Glassine; Steklorouberoid; Euroruberoid; Gidroizol; Stekloizol.
Ruberoid is a type of cardboard impregnated with bitumen. By and large, the above materials are its varieties.
- Roofing felt is distinguished by the presence of tar and mineral powder in the impregnation; Roofing felt - by a higher content of bitumen; Euroroofing felt - by the presence of fiberglass and polymer additives.
Fiberglass ruberoid is a modification of rubemast based on fiberglass. All these materials are particularly moisture resistant and low cost.
They can last for decades if installed correctly. The advantages of roofing felt include low cost, durability, and ease of installation. The disadvantages are fragility.
Stekloizol differs in that it does not contain polymers. Thanks to the fiberglass included in its composition, it has a long service life and has excellent waterproofing properties. Today, fiberglass materials are most often used, as they last more than 10-25 years.
Advice! When choosing bitumen varieties of roofing felt, you should pay attention to more expensive materials. Savings in this matter can lead to the fact that waterproofing will not fulfill its assigned tasks.
The rolls are laid on a prepared surface, which should be free of chips, potholes and sharp protruding parts. The materials are pre-rolled and left to rest for 24 hours. Work is carried out in dry weather, preferably in above-zero temperatures.
The process of waterproofing the foundation with roofing felt
Before starting work on waterproofing the foundation, it is necessary to prepare the surface. To do this, perform the following steps:
Stages of foundation waterproofing
- Inspect the surface, identify damage and determine ways to eliminate it.
- A grinder is used to round off sharp corners and protrusions, which can cause damage to the sheets of waterproofing material.
- The surface is cleaned of dust and other contaminants.
High-quality protection involves treating all sides of the foundation, so vertical and horizontal waterproofing is performed.
Protection of vertical foundation surfaces
Waterproofing the side parts of the foundation is carried out according to the following scheme:
Vertical waterproofing
- Using a brush, apply one layer of deep penetration primer to the surface and wait for it to dry.
- Melt the bitumen to a liquid state and apply it with a brush to the side parts of the foundation. In this case, the movements must be vertical, and each subsequent layer must be applied to the previous layer.
- The roll is applied to the surface with the side on which there is no topping, heated with a torch or blowtorch, rolled out and pressed against the wall.
- The edges of each subsequent strip are additionally coated with mastic, applied to the wall, overlapping the adjacent strip, and pressed tightly.
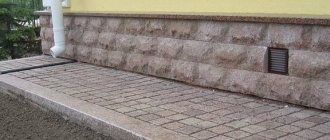
- After pasting all vertical surfaces of the foundation, the roofing material is covered with some dense material and backfilled with soil. Read more in our previous article about the rules for backfilling a foundation.
Carrying out waterproofing work
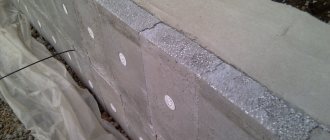
According to modern requirements, it is advisable to perform double horizontal insulation. The first layer is laid between the foundation itself and the plinth at a height of 20 cm from the blind area, and the second layer is laid on top, in front of the walls made of blocks or bricks in a place not reaching 10 cm from the floors of the first floor.
First, the surface of the foundation is leveled using cement mortars and covered with a primer. You should choose a deeply penetrating type of solution. Then the waterproofing material is laid in 2 layers.
The strips are laid flush with the brickwork. Smooth edges are laid along the outer perimeter of the walls. The material is overlapped to prevent the joints from getting wet.
It is better to fix the roofing material with hot bitumen. You can cope with such work yourself. Laying roofing felt will require the efforts of two people.
All joints must be thoroughly coated with bitumen several times, otherwise reliable protection against moisture ingress will not be created.
Experts advise additionally applying liquid rubber in 1-2 layers 2-5 mm thick to create an additional waterproofing layer. Thanks to its special elasticity, even cracks in the foundation and its movements will not lead to moisture penetration. Existing cracks should be slightly widened and given a rectangular shape to ensure penetration of the solution into them.
Polymer coating materials are easy to apply. No additional surface preparation is required. The disadvantage is the high cost of the material.
Other methods of waterproofing using roofing felt
Scheme of waterproofing the foundation of a house.
Laying the material on a base coated with liquid rubber. It is rarely used, but has advantages over the bitumen method:
- Liquid rubber has better water-repellent properties than bitumen.
- There is no need to heat the adhesive component and roofing felt.
- Consumption is 2 times less than bitumen.
- Ruberoid sticks much better with rubber.
- The durability of the coating is higher than that of bitumen.
Ruberoid with a clay lock.
After laying the sheets on bitumen or liquid rubber, the surface of the roofing material is coated with a clay solution. This provides additional inexpensive and reliable protection against moisture. When using any method of installing waterproofing based on this material, safety precautions must be observed. Hot bitumen can severely damage the skin and cause burns. During heat treatment of roofing felt, you also need to be careful not to overheat it. All actions must be performed with gloves.
If everything is done in accordance with the work rules, then such basement waterproofing will last for decades.
Ways to eliminate possible errors
Very often, novice developers neglect waterproofing between the foundation and the brickwork of the basement, but after a while this mistake has to be corrected. There are two ways to solve the problem, one of which is expensive, but simpler. Another method does not require large investments, but its implementation takes quite a long time.
In the first case, the areas between the foundation and the brickwork of the base are injected with a special composition that penetrates deep into pores, microcracks and voids. The result is a reliable waterproof barrier. For such waterproofing, do the following:
- At a slight slope, special channels are drilled to a depth of more than half of the brickwork.
- Cement-polymer mixtures or sealing gel-like masses are introduced under pressure into the resulting holes.
Related article: Foundation for a metal garage
Another method involves partial dismantling of the masonry at the junction of the foundation and the plinth. To implement it, do the following:
- In one of the areas, a small fragment of brickwork is removed.
- A waterproofing fiberglass layer is laid on the surface of the foundation.
- Return the removed bricks to their place.
- Fill the seams with masonry mortar.
- Work on the next section will begin in approximately 20 days.
Building a house requires a lot of effort, patience and attention at every stage. Waterproofing the brickwork of the basement helps preserve the aesthetic appearance of the external surface and protect the basement and main walls of the building from the damaging effects of moisture.
Types of waterproofing for basement foundations, materials used
The base is considered an element connecting the foundation and the rest of the structure of the object. It follows that the operational period of the entire structure will depend on the strength and ability to withstand various negative influences. It is the basement part that protects the interior from water entering, absorbing its impact on its external walls. If this part of the building is destroyed, the entire building will be considered unsafe. It is for this reason that builders make every effort to make the base as strong as possible. One of the measures that contributes to this is waterproofing the foundation base.
Related article: Installation of a foundation for a metal processing machine
Waterproofing materials
To waterproof the basement foundation, several methods are used:
- spreading – is carried out with bitumen of a thick consistency, which, when dried, creates a thick protective layer. The material is not particularly durable and is subject to damage from mechanical influences. Experts recommend using liquid glass when installing waterproofing using the spreading method - the material is more effective;
- painting – performed with protective varnish and coloring compounds. The cost of materials is quite low, the work does not take much time and effort, but the period of operation leaves much to be desired;
- pasting - performed with any roll materials;
- impregnation - a layer of protection is applied with synthetic resins or liquid polymer compounds.
The waterproofing device between the foundation and the plinth has its own peculiarities - when processing the plinth, it is necessary to remember that the horizontal insulating layer must be double: one is located between the foundation and the plinth, the second - between the plinth and the walls.
Rolled
Often, when constructing a waterproofing layer in this way, roofing felt material is used. The work of applying it does not cause any difficulties; all actions are quite doable on your own:
- the foundation surface is cleaned of dirt and dust, cracks and crevices are sealed with a mortar mixture, protruding areas with sharp edges are leveled. This preparatory stage ends with the application of a primer layer;
- As soon as the primer has completely dried, mastic is applied in several layers. To do this, use a brush, performing vertical movements simultaneously over the entire surface;
- roofing felt sheets, cut to size and preheated, are glued onto the mastic layer with an overlap of at least ten centimeters. The edges of the strips are coated with bitumen and glued together;
- The roofing felt material is heated a second time and coated with mastic. If you do not have a gas burner, you can use mastic with a high viscosity;
- in order to create a reliable waterproofing gasket, roofing material is applied in several layers;
- as soon as the coating and roll materials are completely dry, the foundation base is covered with soil.
Coating
Such materials are used as an additional insulating layer and have a short service life. The technological process looks like this:
- All surfaces are cleaned of dust accumulations and dirt. Sharp edges are ground to a three-centimeter radius so that the waterproofing layer does not suffer damage from the pressure created by the soil. If there is a need to cover the inner layer, triangular fillets will have to be made. Seam areas, cavities and cracks are expanded to rigid bases, after which they are sealed with a mortar mixture based on sand and cement;
Related article: Foundation base load
- In order for the film to stick better to the base, it is necessary to use a special primer. Note that there are a sufficient number of them designed for various types of coatings. The primer composition is applied with a roller, corner areas are painted over with a brush. The primer needs several hours to dry completely;
- Having decided to use a bitumen or bitumen-polymer composition, the surface of the foundation base is first coated with a quick-drying varnish applied using a sprayer or brush. As soon as the varnish layer has dried, a mastic material is applied;
- If the mastic you are using is one-component, it remains to be carefully placed, adding a little solvent if necessary. The two-component material is combined in a common container;
- The initial layer is applied solid, the corners are painted over. All movements with a brush or roller are performed vertically. According to this scheme, the mastic is applied in two to three layers. If the outside air temperature is negative, the mastic is heated to give it better elasticity;
- if a new building is being built, the waterproofing layer must be reinforced with fiberglass or fiberglass glued to the first layer. Fillets and sharp corner protrusions must be reinforced.
- if bitumen material is used, which is applied hot, it is preheated to one hundred and sixty to one hundred and eighty degrees in a metal container. This mastic is applied with a spatula and leveled with a hard brush. As a rule, such material is used when constructing a horizontal waterproofing layer;
- as soon as the bitumen layer has completely dried, the base is insulated or the ditch around it is filled with soil. Use clean, dry sand for backfilling. If the groundwater level is high, experts recommend installing drainage.
Painting
The technology for applying such compositions is reminiscent of working with coating materials. It should be noted that in addition to silicate coloring compounds, other materials are also used. One example is mastic, which is based on liquid polyurethane foam. The material is fully prepared for use; a brush or roller is used for application. Note that such waterproofing materials are quite expensive and do not have a long service life. But they protect the base reliably, and the application work is carried out without the involvement of specialists.
Penetrating
Waterproofing the basement part of the foundation in this way involves the use of not only liquid compounds. Today, manufacturers offer developers cement-based mortars containing a variety of additives. This does not change the meaning - protective materials penetrate into the pores of the base and form a protective layer inside it.
Note that the depth of penetration of chemical components reaches twelve centimeters.
Construction experts believe that such a measure is not considered a separate process. This means that penetrating and injection mixtures are not used without additional materials. One example is when a layer of bitumen is applied on top.
Penetrating materials do an excellent job of dealing with defective areas on the base - cracks, chips and gouges. But they are not considered universal compounds.
It should be noted that there are certain difficulties with application. To seal a crack, it is not enough to clean it with a stiff brush - you will need to wash it with water supplied under high pressure. It is mandatory to degrease surfaces and remove stains of oils and fats.