If a country house on the site is constantly flooded, and the dirt in the yard does not dry out, this indicates the presence of a high groundwater level. This inconvenience can be corrected with the help of drainage in the country. The implementation of such a project does not require special skills, so the cost of the work will be low; moreover, the drainage system in a summer cottage can be done independently.
In what cases is it necessary to install drainage?
The need for a drainage system in a suburban area is always visible to the naked eye - waterlogging of the soil after melting snow or precipitation, the presence of dampness in the cellar or puddles that do not dry out indicate the need to create a drainage system. Already when purchasing a plot, you can note the need to transform it: ⊗ The plot is located in a lowland - seasonal flooding due to changes in relief is inevitable. ⊗ Clay or loamy soils are slightly hygroscopic, and therefore water stagnates on the surface for a long time. In this case, the clay may not be visible if it is hidden behind a layer of black soil. ⊗ The close location of groundwater within 2.5 meters from the soil surface during rain is quite capable of turning the area into a swamp. Having dug a hole up to half a meter deep, you need to monitor it for 24 hours - if the hole fills with water, then arranging drainage is a priority. ⊗ The reason for the need to arrange drainage at the dacha may not be the topography or quality of the soil, but the abundance of precipitation. In this case, due to rains, the soil is depleted of oxygen, which negatively affects the growth conditions of plants - without additional drainage it is not advisable to engage in gardening or gardening in such conditions. After making sure that one or more factors from the above list are present, you can begin to create a drainage system.
Materials and tools
After studying SNiPs and studying the geological features of the site, drawing up a diagram and estimate, it is necessary to prepare materials and stock up on tools that will be needed during the work.
Materials
- Pipes for installing drains of estimated length and diameter. Special corrugated products with perforations are suitable for this purpose. As an option, you can use large-diameter sewer pipes by pre-drilling holes in them.
- Rings for constructing inspection and drainage wells.
- Geotextile is a non-woven material with which the filler will be wrapped to protect drains from silting.
- Coarse sand, crushed stone of different fractions, intended to create an aquifer and cushion.
On the topic: you can order all materials for drainage installation from the Vodolov company in Irkutsk
Tools:
⦁ shovels and bayonet shovels;
⦁ wheelbarrow, buckets;
⦁ tape measure, twine;
⦁ hacksaw for metal;
⦁ building level, hydraulic level;
⦁ plumb line, etc.
This is not a complete list of materials and tools. In each specific case it can be supplemented.
Drainage of an area with clay soil
Building functional drainage on a site with clay soil is not an easy task. The fact is that clay itself is heavy not only for growing cultivated plants, but also for drainage. On an estate with clay soil, water stays for a long time and, as a result, causes considerable damage to the farm.
And groundwater located close to the surface can lead to even greater problems. Thus, in cold winters, clay saturated with water freezes to a great depth, which leads to its swelling. As a result, the foundations of buildings on the site quickly collapse, and trees and shrubs die.
On such soils, a deep drainage system should be built, which is designed to drain the territory and preserve the vital activity of the farm. Do-it-yourself drainage on clay soil is possible, but only according to a well-designed project.
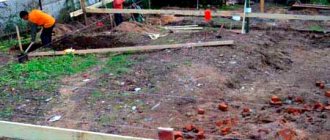
Work must begin from the top point of the dacha plot. First, clear the space of debris and remove trees in the path of drainage branches (roots can damage the drains). After marking, they begin to dig trenches, while maintaining the required slope for laying the central pipe and branches. The bottom of the trench is compacted and a sand cushion is poured in a layer of 10–15 cm.
Then places for drainage wells are arranged. Subsequently, geotextiles are laid at the bottom of the trenches, followed by a layer of crushed stone, drains are laid, wells are installed and drains are placed in them. Storage wells are being installed. The pipes are covered with crushed stone and wrapped in geotextiles. A mixture of crushed stone and sand is loaded on top and sprinkled with soil.
On clay soils, in addition to deep drainage, it may be necessary to install drainage ditches along the perimeter of the site. It all depends on the speed of water outflow through the main system.
Features of the drainage system on a slope
Areas with a slope of up to 8% are considered conditionally flat. To arrange drainage on them, the standard procedures described earlier are suitable.
But the drainage of a site on a slope has features that must be taken into account when creating drainage systems. The main task of such a system is to prevent soil erosion and protect buildings from the destructive effects of water.
The issue of groundwater occurrence remains important. If they come close to the surface, then drainage in an area with a slope is done to reduce the level to the depth of soil freezing.
For this purpose, a combined drainage system is installed, consisting of open ditches with deepening and deep drainage. Be sure to build a good water intake in areas with a slope. A natural body of water can be used as a receiver.
Difficulties in peat area drainage
If you become the owner of a plot of land on peat soil, be prepared for constant work to drain it. On peat bogs there is always a high level of groundwater and the only radical remedy that can save your buildings from destruction is to raise the area through backfilling. Local residents who know all the intricacies of geology will tell you what to sprinkle.
Of course, bedding alone will not save the situation - drainage of the peat area will be needed, the main task of which will be to reduce the groundwater level, and then to drain rain and melt water.
Types of drainage systems
The problem of excessive humidity is solved by two types of drainage systems - they can be surface and deep. The choice of the required option is determined by the reasons that caused the flooding of the territory. It should be noted that each of the above systems complements each other, and if a storm sewer system is used, a logical and technically competent system for the complete drainage of both groundwater and storm water is formed.
Laying depth of drainage pipes
The minimum level of drains is calculated taking into account their resistance to physical and temperature loads.
When laying the drainage ditch as deep as possible, high-strength pipes are used.
In unstable soils, pipes are laid on a specially laid base.
The deeper the drains and wells are laid, the more effort and money required for installation. Drainage systems come in two types:
- Superficial, with a channel depth of 0.3-0.4 meters.
- Deep, sewer trenches are dug up to 3 meters.
To determine at what depth to bury drainage, you need to know the structure of the soil. It all depends on its density.
It is necessary to take into account the amount of soil freezing in your region so that the pipes are laid at a level exceeding its value.
When installing a drainage system near a building, drains are laid below its base. The optimal depth of the drainage ditch is 1.1-1.3 meters. In the garden plot, the pipes are lowered no more than 150 centimeters. Ditches are dug at a distance of 5-10 meters from each other.
Experts advise digging trenches deeper than the calculated value, a couple of tens of centimeters, so that there is room for laying a “cushion” at the bottom of the canal. We should not forget about the slope in the direction of the collector.
Surface drainage system
The rainwater inlet system will allow you to effectively collect and drain unnecessary water outside the site during any rainfall. The efficiency of water drainage allows you to avoid the absorption of moisture into the soil - such a drain is necessary for clay soils and will become a functional addition to storm sewers. The water is discharged into filtration wells; alternatively, it can simply be removed outside the site. The remaining small percentage of precipitation will naturally evaporate. As for the possible types of surface drainage systems, you can choose the following options.
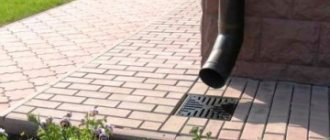
Point drainage
Point drainage involves the use of: ⊗ storm funnels; ⊗ storm water inlets; ⊗ ladders; ⊗ door grilles. Such structures are installed in door pits and other areas where water collection is required - this can be either draining a roof storm drain or a watering tap. Through a point water collector, water enters underground pipes, and then into the storm sewer collector.
Linear drainage
As for linear drainage, depending on the location it differs into wall and remote from the structure. This drainage is covered with lattice overlays and collects that part of the precipitation that does not fall into the point storm inlets. Linear drainage is used in the following cases: 1. Prevention of washout of the top fertile soil layer, which is important for areas with landscape differences. If the horizon tilt exceeds 3 degrees, then this outcome is most likely. 2. If the landscape on the site is fairly flat, but the site itself is located in a lowland, then during precipitation, streams of water flowing from the heights also threaten the fertile layer, as well as plants and houses. 3. Draining of sidewalks and paths - the pedestrian area is located on a slight elevation, while moisture flows down a small slope into the drainage channels. 4. Road drainage - is an ordinary ditch along the road surface.
Type of drainage depending on the depth of its location ↑
Depending on the depth, there are three types of soil drainage:
Open ↑
Open drainage consists of ditches for drainage. Open drainage is cheap, but due to its low profile it is only suitable for draining rain, melt and storm water (from the roof) from the ground surface. The depth of open drainage is 5-20 cm; with a higher profile height, the unstabilized soil will collapse and the trays will be difficult to clean. The walls of open trenches have to be constantly restored or strengthened so that they do not crumble. You can use convenient and aesthetic, but expensive concrete or ceramic trays, and cover them with gratings at intersections with paths and paving. Open drainage is easy to maintain in working order.
U-shaped trays covered with gratings on top are the best option for draining water from paving surfaces and more. Strong, durable, quite expensive
Backfill ↑
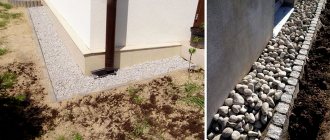
Backfill drainage is an improved version of open drainage. The trenches are filled with material that allows water to pass through well. As a rule, crushed stone, gravel, rubble, and broken brick are used. Backfilling eliminates the need for open trenches that are inconvenient for movement and not always aesthetically pleasing. Also, such a solution makes it possible to increase the height of the trench profile, the depth of the backfill drainage - from 20 to 60 cm. This makes it possible to collect not only rainwater from the surface, but also to remove excess moisture from the top layer of soil that has accumulated after melting snow, heavy rains, - for high groundwater level. To prevent the backfill from becoming clogged with soil particles, the porous material is limited with geotextiles. You can arrange a lawn on top and lay turf. You cannot sprinkle the trench with clay or loam. Despite its relatively low cost, backfill drainage has a significant drawback: the low throughput of the water flow does not allow it to fully cope with heavy rainfalls. Also, drains cannot be serviced without opening them.
The process of installing backfill drainage to reduce soil moisture in a garden. The location of the drains takes into account the terrain of the site
Closed ↑
Closed drainage is a system of perforated pipes laid in the ground, placed in a layer of permeable backfill, limited by geotextiles. The depth of closed drainage is not technically limited; it perfectly collects moisture from the lower layers of soil and soil. Rainwater from the surface enters underground drains through vertical wells, which must be protected from the penetration of dirt and debris. Soil moisture enters the pipes through perforations, first being absorbed from the soil into the backfill. Closed drainage is the most effective and versatile type of water disposal and drainage. It is practically invisible on the surface, does not interfere with landscaping, and is aesthetically pleasing. A properly designed and constructed closed system requires easy maintenance; debris is periodically (recommended in spring and autumn) removed from the wells and, if necessary, the pipes are washed with a stream of water. A closed system has only one drawback - high cost.
Closed drainage during installation
Deep drainage system
This drainage option is relevant for areas where groundwater is located close to the surface, in particular closer than 2.5 meters. It makes sense to create such a drainage system simultaneously with the pits for the foundation of the house and outbuildings, so that they do not flood. The construction of deep drainage is carried out using perforated pipes - the so-called drains - they are laid in the ground at an angle, which allows moisture to collect in the drainage and, under the influence of gravity, move into a storage collector, drainage tunnel or well.
Important!
The slope of the drainage pipes should be within 1 degree; alternatively, we can say that the height difference per 1 meter of pipe should be 1-2 cm.
Features of drainage design to protect the foundation of a building ↑
We found out at what depth to dig drainage around the house: 30-50 cm below the base of the foundation. Let's briefly talk about some of the features of underground drainage. The two main types of drainage around a building are most common:
Ring drainage ↑
The ring system is simpler and, accordingly, cheaper. At a distance of 1.5-3 m from the foundation, a flexible drainage pipe is laid along the perimeter of the building in a layer of permeable backfill. They place it freely, in a ring, without much concern for maintaining equal distances from building structures. Since the ring does not have sharp turns, intermediate wells are not needed. The recommended depth of ring-type drainage is 0.5 m below the base of the foundation. The ring system has limited effectiveness and is recommended for buildings without basements built on clay and loamy soils.
It makes sense to lay a flexible ring drainage pipe even before starting the construction of the foundation
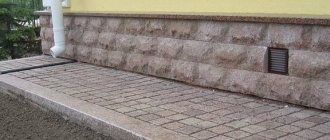
Wall drainage ↑
Wall drainage ensures optimal removal of excess moisture from the foundation area and, if properly installed, will ensure dryness in the basement and a long service life. A wall system will cost more than a ring system due to more complex installation and the need for expensive wells.
Drainage wells prevent clogging of pipes, serve for their maintenance, and play the role of distribution manifolds
Drains are perforated pipes (it is more convenient to use rigid ones, but flexible ones are also possible) in a backfill layer limited by geotextiles. The same (0.5-1 m) distance from the edge of the foundation and the recommended drainage slope towards the drain should be observed (2-3 cm per 1 m.p.). The minimum permissible slope for closed drainage: for a 150 mm pipe - 8 mm per 1 m.p.; for 200 mm - 7 mm per 1 m.p. The recommended drainage depth is at the highest point 30 cm below the base of the foundation, then down the slope. At each turn and every 20 m on straight sections, a well is installed for maintenance. The depth of the drainage well corresponds to the depth of the drain; its bottom is located 10-15 cm below the perforated pipe.
Wall drainage diagram
Alternative options for draining a summer cottage
Drainage at the dacha can be organized in various ways, some of which are quite simple and do not require significant labor costs. But in any case, abandoning the classic solutions using drainage pipes and channels, the effect of non-standard solutions will not appear immediately, but only after a significant period of time. This is due to the fact that a properly designed and installed drainage system based on plastic pipes and trays actually only increases the rate of collection and disposal of groundwater; in other words, it accelerates natural and physical processes. Alternative options, in turn, will only change the conditions for the processes of penetration of groundwater into the soil.
Drying an area without drainage
To drain the area, it is worth understanding the causes of waterlogging. In some cases, the situation can be corrected without installing drainage. An example of such a situation could be a specific topography, which causes increased soil moisture - in this case, you can create a slope along which water will flow outside the site. To do this, it is necessary to make a difference in the relief, providing a slight slope due to the formation of an artificial hill. The soil on one part of the site is removed, and on the other it is poured. Alternatively, you can make a mound of black soil or peat, mixing it with 1/3-1/5 parts of sand. If the cause of high humidity is the presence of a layer of clay near the surface, a real pond can appear in the lower part of the site, which, in addition to its aesthetic properties, will be an excellent way to dispose of drainage water. Such a reservoir can become a natural source of water for watering plants, a place for breeding fish, or simply a decorative element of landscape design.
If the groundwater level is high enough, then waterproofing the pond and reservoir will not be necessary; in extreme cases, you can use PVC film. The presence of aquatic plants along the perimeter of the artificial lake will prevent the water from blooming. Another option for draining the soil is to plant moisture-loving plants. A striking example of such a plant is birch, which consumes a huge amount of moisture for its growth. To drain the area, you can use plants such as willow, spirea, rose hips, hawthorn, and serviceberry. They are planted in problem areas, as well as along areas where moisture is undesirable, for example, along the road, around the perimeter of the house. This is a striking example of the combination of functionality and visual appeal.
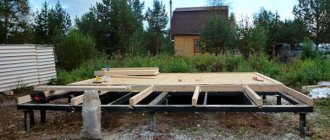
Arrangement of drainage at the dacha
Drainage around a country house or outbuilding will save the basement from flooding with melt water or rainwater, and just a few drainage pipes laid on the lawn will remove puddles and make your vacation as comfortable as possible. It is in the off-season that the groundwater level is closest to the surface, so such a system will be very relevant. The dacha reclamation system should be implemented in parallel with the construction of the foundation for the building. However, drainage in the dacha can be done even after the homeowner notices the appearance of dampness in the basement.
Stages of drainage
1
. It is necessary to dig a trench around the perimeter of the building. The shape of the trench should be inclined, and its lower part should be half a meter deeper than the lowest point of the foundation. Effective drainage is only possible with a slope of at least 2 cm per 1 linear meter. In the pit at the corners of the building, it is necessary to additionally select soil - 400-500 mm, this is necessary for trouble-free placement of the sludge collection part of the drainage well. In most cases, the vertical walls of the trench are made at an angle of 45-60°, this way you can ensure the safety of the work and prevent sudden collapse of the soil. In cramped conditions, it is possible to strengthen slopes using sheets of plywood or boards knocked together from boards.
2
. After cleaning the foundation from soil residues, it is necessary to treat the concrete with a bitumen-kerosene primer, after which a layer of waterproofing rubber-bitumen mastic is applied. It is a soft resin; before the mastic hardens, it is necessary to press a reinforced mesh with a cell width of 2x2 mm into it - this is exactly what is used for plastering work. Next, you need to take a break and wait for the concrete to dry, and then repeat the layer of sealant.
3
. We lay a layer of geotextile and a layer of gravel at the bottom of the ditch, level the slope - before laying out the drainage pipes, we form semicircular grooves in the gravel layer. The geofabric must completely separate the crushed stone from the sand and clay; very often it is not possible to purchase a fabric of the required width; in these cases, the geofabric is laid with an overlap of 15-20 cm, the edges can be fixed with a stapler or pieces of double-sided tape. Geotextiles are not laid along the foundation wall, but in some cases, when it is necessary to ensure maximum protection of the waterproofing layer, a special polymer membrane is installed that separates the crushed stone layer from the bitumen. The membrane, as such, does not provide absolutely any waterproofing; its main purpose is to protect the foundation from the point pressure of crushed stone, and to drain groundwater down to the drainage pipe - which in turn will drain the water from the building. The upper part of the polymer membrane is brought out under the blind area of the building and is protected by a special plastic or metal profile.
4
. We lay out drains, which can be bought with ready-made perforated holes. Alternatively, you can purchase regular PVC sewer pipes and punch the holes yourself. In this case, the hole size should be smaller than the average grain of gravel on the bed. But before you engage in such amateur activities, evaluate the labor costs and the final effect of the work performed; in most cases, it is easier and more reliable to opt for a specialized pipe from reliable manufacturers. How not to make a mistake when choosing when the market offers flexible pipes with the ability to install at incredible depths, and drainage systems without crushed stone, flat pipes, and sometimes just “stockings” filled with foam plastic, which, according to manufacturers, should replace both crushed stone and pipe. Basic advice: for foundation drainage, only rigid double-wall pipelines, supplied in lengths, with a stiffness class of SN4 and SN8 are suitable. For lawns and lawns, with a drainage ditch depth of up to 1-1.2 m, a flexible pipe supplied in coils is ideal. It is advisable to use pipes with running outer diameters: 110 and 160 mm. This way, there will be no problems with purchasing expensive tees and turns of non-standard diameters.
5
. We connect the drains into a single system using crosses and tees - the system should go to the collector located at the lowest point of the drainage system. The slope is controlled using a level; you can also pull a cord along the highway.
6
. If the drainage system has turns, then each of them must be provided with an inspection well. It is a piece of pipe, the upper part of which we cover with a lid. Such elements allow the owner to control the operation of the drainage system and rid it of blockages. Before buying a well, you need to think about how the blind area will be designed, and what appearance of the drainage hatch is best for you. Currently, there are hatches made of plastic, cast iron (round and square) and special products for planting lawns in them - hidden hatches.
7
. We fill the drains with crushed stone and cover them with geotextile. In drainage work, only granite crushed stone and pebbles are used, since these materials do not cake and their throughput does not change over time.
8
. If a storm sewer is laid on top of the drainage system, then its pipes are laid out on top of a layer of crushed stone. This solution will significantly improve the operation of the drainage system, reduce the cost of construction and installation work, and most importantly, will lead to the discharge of water from the roof to a complete and competent solution.
9
. Pour a layer of river sand on top of the crushed stone layer to a height of 15 cm, then cover the drainage system with soil - it is better to pour it with a mound, which will allow you to get a flat surface after all the layers have settled. All bulk materials must be separated from each other by geotextile fabric; when installing the blind area, it is advisable to lay a layer of plastic film in order to protect sand and crushed stone from cement particles.
At what depth should drainage be done ↑
The answer to the question at what depth to drain depends entirely on the purpose of the system.
- To collect rainwater from paths and lawns, there is no point in digging deep; shallow (10-15 cm) surface trenches and trays are sufficient for this purpose.
- If you need to drain the top layer of soil for better growth of herbaceous plants and bushes, you should use a backfill or closed option, the drainage depth will be 40-60 cm.
- When the goal is to ensure normal growth of fruit trees in an initially too wet area, drainage is laid in such a way that excess moisture is removed from the main part of the root system. For dwarf species, it is enough to deepen the drains by 0.6-1.2 m; the specific value depends on the characteristics of the tree variety and the agricultural technology used.
- Protecting the foundation and basement from moisture involves using only a closed drainage system. The depth of drainage is determined by the depth of the foundation. As a rule, for a strip foundation, perforated pipes should be located slightly (30-50 cm) below the base of the foundation.
Wall drainage should be buried 30-50 cm below the base of the foundation
If you lay the pipes higher, moisture will penetrate into the lower part of the concrete structure. Place it noticeably below the sole - under certain conditions it can cause erosion of the foundation. In some cases, taking into account the specifics of the soil and foundation design, other decisions may be made, but this is a topic for another discussion.
The depth of drainage is determined by its purpose
A closed drainage located below the soil freezing depth (SFD) will operate year-round. If melt water is also discharged into a closed system buried below the HGG, it will flow out already in early spring. In the case where the pipes are buried above the GPG, you will have to wait until the soil freezes completely and put up with puddles in March-April.
It is also important to ensure a uniform slope of drainage towards the drain. Recommended values: 2 cm per 1 m.p. for clay soils and 3 cm per 1 m.p. for sandy ones.