An important stage of interior decoration in the house is the laying of facial floors. The base for installation is subfloors. The term floor screed refers to the layer of cementitious composite between the base and the floor covering. The technology for installing subfloors in a wooden, brick and block house, on the ground and upper floors, differs. This article contains useful information on when you can make a concrete floor screed yourself, and when it is better to invite specialists.
Purpose of floor screed with concrete
A screed is a flat substrate for the cladding. The concrete layer performs the following functions:
- Strengthens the base, bears the load from furniture and the inhabitants of the room.
- Levels the surface or creates the planned angle of inclination.
- Provides noise and thermal insulation.
- Serves as a bed for communications, masks them inside the monolith.
The material for the screed is a cement-based mixture prepared in different ways.
In domestic conditions, a cement-sand mortar with the consistency of thick sour cream is often used. It’s easy to prepare it yourself or order M 150 from a concrete plant. The method is labor-intensive, but the technology of concrete floor screed is simple and well studied. Work can be continued a month later, after the concrete solution has been converted into a monolith.
A semi-dry screed is created on a cement-sand base, with the introduction of plasticizers and fiber fiber into the composition. This method of machine-filling a floor screed with concrete requires the use of a compressor pneumatic blower. The mixture is placed tightly and hardens in 12 hours.
Stage II. We measure the curvature and place beacons
If you are laying a concrete screed directly on the ground, it must first be compacted well, and preferably with a special installation. If you skip this stage, the base will simply sag over time, and serious cracks will appear along the screed. Next, we arrange a sand cushion on the compacted soil. We also compact it well, then lay waterproofing. It is necessary so that moisture from freshly laid concrete does not seep into the base, and after hardening, capillary suction from below does not occur.
And only at this stage can we set up beacons, along which we then attach guides. Moreover, all this can be easily done from available materials: long slats, pipes, broken bricks and cement mixture, and most easily from T-shaped and U-shaped guide profiles. But you cannot install them from wood - this material will absorb moisture directly from the screed, and its shrinkage will be uneven.
So, we lay the beacons on piles of cement. It is convenient to install profiles using self-tapping screws, for which we pre-drill holes. To do this, you can use a screwdriver and 10 cm dowels:
- We screw them into the floor through a metal profile, and then tighten them to adjust the height of the profiles above the floor.
- We measure the slope with a level and tighten the required dowel.
- After precise alignment, add more screws so that they are at a distance of 50 cm from each other.
Like this:
In order for the floor to be level, it is necessary to carefully mark the horizontal level of the room. Let's talk about this in more detail in the material: .
It is important to place all beacons strictly parallel to each other, and the outermost ones - 20 cm from the walls. In any case, the distance between the beacons should be 30-40 cm less than the length of the rule. By the way, beacons made of metal pipes are also quite durable. Fix them either with a dense plaster solution or with Rotband. Place them parallel to each other as well. Before laying the mixture, check the horizontality of the guides using a long level, and always in several directions.
In fact, the calculation for installing beacons is quite simple. So, the less experience you have in arranging ties, the closer you place the guides to each other. The larger, the wider the distance can be made, while saving on profiles - but still so that the level does not fall between them.
Some experienced builders manage to make a concrete screed without beacons at all:
Screed installation technology
Structurally, the subfloor is designed to solve various problems. Therefore, the technologies for installing concrete screed are different.
- Bound - concrete solution is poured onto a primed slab. Additional strengthening occurs, the surface is leveled, and the layer increases the thickness of the ceiling of the upper floors.
- With a separating layer, a spacer between the soil and the cladding. The bottom layer of waterproofing is made of roofing felt or other insulating materials on the ground or slab. The reinforced screed must be at least 3 cm thick.
- Floating floor - when the screed is separated by a layer from the base and walls - this eliminates cracking of the monolith due to temperature changes and reduces background noise. It must have a reinforcing frame.
- Floors on the ground are the foundation for the screed. It is suitable if the bottom layer is clean, dry soil and the groundwater is deep. The earth is compacted, a cushion of sand and gravel is placed on it, and a layer of concrete is poured in, imitating a slab. This layer, 3-5 cm thick, serves for further heat and waterproofing of the surface and installation of the screed.
Types of concrete screeds
A concrete base is a durable and flat surface, which differs in type of construction, laying method and operational parameters. Floor screeds are made on a bonded, separating, insulating and reinforced base.
Screed on a bound base
The screed is poured onto a previously prepared base treated with a special primer mixture. Therefore, it has better adhesion to the base and is able to withstand extreme mechanical loads. The performance characteristics of the top layer of the floor will depend on the degree of humidity of the base. This screed is installed on dry floor slabs.
Screed on a dividing base
This pouring technology involves preliminary installation of waterproofing on the base. For this purpose, roll, painting and coating protective materials (roofing felt, film, bitumen mastic) are used, which prevent moisture from penetrating into the top layer of the floor structure. In this case, the thickness of the concrete layer should be 32 mm. The finished base will have high waterproofing characteristics with reduced strength and wear resistance.
This type of screed is used for arranging floors in outbuildings and technical rooms with high humidity.
Screed on an insulating base
Screed is used to create high performance floors. For example, when installing a heated floor, when preliminary thermal and waterproofing of the base is required. In this case, the solution is poured onto a previously laid layer of thermal insulation, and the screed becomes an independent layer. The thickness of the concrete layer ranges from 48 to 55 mm and requires additional reinforcement.
Similar screeds are intended for ground and first floors in residential buildings and outbuildings.
Screed on a reinforced base
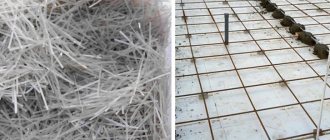
To create a strong and wear-resistant concrete screed, metal mesh and fiber material are used.
- Metal grid. This type of screed is constructed using a fine mesh mesh (mesh size from 4 to 5 cm), which is mounted on special supporting elements along the entire base of the floor. The mesh helps improve the performance characteristics of the floor, but at the same time has significant disadvantages. It does not prevent the possible formation of cracks during shrinkage and is susceptible to oxidation and destruction.
- Fiber fiber. The building material is successfully used to create reliable concrete foundations. Thin microfiber, made from polymer granules by extrusion and modification, has high ductility and resistance to damage and deformation. In addition, it is affordable and easy to install.
Concrete screeds differ in the number of individual layers:
- Single layer. Filling is carried out over the entire area of the base to the required height. Such screeds are used for arranging floors in warehouses, utility and industrial premises.
- Multilayer. The base has a complex structure consisting of several separate layers. Screeds are intended for laying floors in residential, office and commercial premises.
How to make a concrete floor screed with your own hands
Regardless of whether you choose a wet or semi-dry method of installing subfloors, the technology involves preparatory work. They need to be carried out before ordering, or prepare a solution.
Surface preparation
Regardless of whether the screed is installed on previously laid concrete or another surface, leaks should be eliminated by first filling the through cracks with the solution, removing loose pieces of stone. After the solution hardens, the surface is primed.
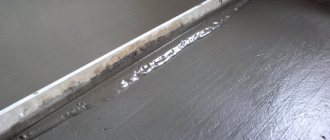
To prevent cracking of the monolithic slab, a damper tape is installed to the walls of the frame. It is the elastic gasket that will absorb the thermal expansion of the slab.
On the ground floor and in damp rooms, a waterproofing layer that protects against the penetration of dampness into the room is required.
If the screed is floating, before installing heated floors, a layer of both hydro and thermal insulation must be laid underneath. When heated, the monolith transfers heat only under the front flooring. Without thermal insulation, heating costs will be significantly higher. Solid porous slabs or expanded clay are used as an insulator.
Reinforcement
If pouring a floor screed with concrete requires reinforcement, the mesh is laid before pouring, on special bosses so that it is inside the stone. Add fiberboard fiber to the concrete mixture. Intertwined randomly, polypropylene fibers create a durable monolithic frame. You can do without a reinforced frame, but not under heated floors. The purpose of the frame is to increase the tensile strength of the screed and prevent it from cracking.
Reinforcement is used:
- when installing heated and floating floors;
- thickness of the rough layer from 5 cm;
- the screed is installed on the base in the form of soil;
- high mechanical load is expected.
The metal frame is installed on special plastic stands for installing one or 2 layers of metal mesh. It must be recessed into the concrete by at least 0.5 cm. The thicker the reinforcing bars, the stiffer they will create the frame, the stronger the screed will be. Most often, the reinforcement is a road mesh with cells 100x100 and 150x150, with a rod diameter of 5 mm. But for loaded surfaces, 8-16 mm reinforcement is used, and the concrete layer above the frame must be at least 3 cm.
Sequence: first the heating circuit is laid, followed by the reinforcement frame.
Marking the subfloor level and installing beacons
Using any method using instrumental measurements, you need to establish the highest and lowest points of the subfloor. This allows you to approximately determine the average thickness of the monolith and material consumption. Concrete never lays evenly, and even an experienced craftsman cannot complete the coating without beacons.
Horizontal reference point - the highest point on the surface is taken as zero. Solid horizontal lines are drawn on the walls and the presence of protrusions relative to them along the entire floor is determined. Leveling lines are drawn taking into account the thickness of the subfloor. It is at their height that the upper heads of the markers should be installed and this will be the zero line.
Homemade slats or professional benchmarks are used as beacons. The main thing is that when distributing the solution over the surface, they should all be at the same level - be flush into the concrete.
It is better to use profiles or pipes as slats along which the rule moves when leveling the concrete mixture. After hardening, they are removed and the gutter is filled with construction mixture. The beacons are secured with self-tapping screws and screws on the concrete substrate to create a horizontal line.
But the concrete base needs to set, it takes time. Therefore, more often the marking line is installed on self-tapping screws that are adjustable in height; they can be left thick, and the narrow seam from the strip can be easily rubbed out.
Benchmark beacons are professional equipment. The device is represented by a rail on tripods with height adjustment. The rule moves along the guides, so they must be secured. The distance between the control lines is 100-150 cm. The contour should be 30-40 cm away from the wall.
Pouring technology
Once the base is prepared, pouring the screed itself will not be difficult. So, how to make a floor screed?
- It is better to carry out work on pouring the solution at a temperature of +150C. The lower the temperature from the specified norm, the longer the setting period of the solution will be.
- At the same time, it is worth remembering that moisture during hardening is very important, so refrain from working in extreme heat. For the same reason, drafts should be avoided.
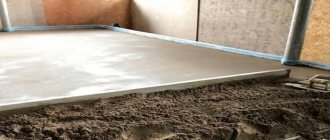
- Filling begins from the far corner of the room, heading towards the exit. The filling layer should be done in one time period.
- If you are unable to cover the entire area, it should be divided into sectors - maps - by jumpers, and work should be carried out separately for each sector.
Over large areas, the surface is filled with sectors
Alignment
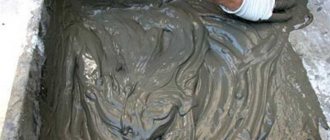
Apply the mixture between the beacons slightly in excess. First, the solution is distributed over the surface using a shovel. It is necessary to carefully fill all corners and areas under the reinforcement, and pierce any possible bubbles.
Then, according to the rule established by the profiles, they begin to create a flat surface. Movements should generally be zigzag. The rule is to go through it several times: the dents are filled with solution, the excess is removed.
Working as a rule
If your financial situation allows, then liquid floors on a screed are suitable for the final leveling of the floors before the finishing coating. In addition, there are composites on sale, which themselves can be used as a decorative finish, although their price is significantly different from concrete pouring.
Liquid floors are a great way to decorate your home
Freezing
After the pouring is completed, the area is fenced off from possible physical activity for a period of about a week: just don’t walk on it and don’t place anything. The screed must be moistened at all times. It is better if it ripens under plastic wrap.
It is better if the concrete dries under the film
How long does it take for a concrete pour to dry?
Complete setting of the solution occurs after 28 days. If a solution based on dry mixtures was used, the instructions on the package will tell you the readiness time. After the mixture has completely matured, work on the finishing coating can begin.
The video in this article shows how to properly fill the screed and what measures to take during the drying process.
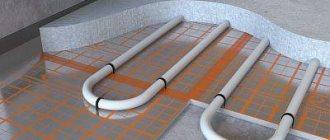
Warm base screed
Why is this type of screed highlighted in a separate chapter? Very often, when installing warm subfloors, owners fall into a stupor, having no idea what, when and how to fill. In fact, there is nothing complicated here. It’s just that, depending on the floor heating system, the filling pattern is slightly different.
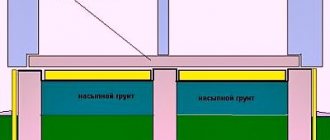
Diagram of a ground screed with a floor heating system
- Water and cable electric heated floors are laid on top of the rough screed under the finishing screed. IR - the floor is laid on a finishing screed under decorative finishing. In any case, a screed under the base of a heated floor is necessary.
- In the first two cases, it fixes the heating systems in the floor; in the third, a perfectly flat surface for the flooring is required.
- You can install a heated floor without a screed if you have, in principle, not a concrete floor, but, for example, a wooden floor.
- The rough preparation for the heated floor is poured based on the need and structure of the building. And the upper thickness of the heated floor screed depends on the heating models and the solution used. Usually this indicator is specified in the system passport.
On a note! If you decide to install a heated floor on a concrete screed, before pouring the finishing layer, be sure to check the serviceability of the horizontal heating system itself. It will be very difficult to repair and change something in the future, especially in a situation with water heating.
Technology for installing subfloors made of liquid concrete
For the installation of subfloors, a cement mixture of grade M150, produced according to GOST at a concrete plant with the addition of plasticizers and modifiers for better plasticity and viscosity, is suitable. You can buy a ready-made composition in packaging.
The classic M150 mixture contains cement, river or quarry sand, fine crushed stone and water.
| Cement brand | Composition in kg c: p: w | Composition for 10 liters of cement p: w | Yield of concrete from 1 liter of cement |
| 400 | 1:3,5:5,7 | 32:50 | 64 |
| 500 | 1:4,5:6,6 | 4-:58 | 73 |
Moreover, the M400 brand requires 9/10 of the amount of water of the binder, and the M500 requires 7/10 of the liquid.
In accordance with SNiP 2.03.13-88, concrete B 15 is suitable for installing subfloors, and this is the M150 grade.
At home, the mixture is prepared using the following composition:
- cement M500 – 1 part;
- sand – 2 parts;
- crushed stone - 3 parts;
- water – 0.5 parts.
A homogeneous mixture of high quality is obtained only in a concrete mixer. When calculating the purchase of ingredients, you should take into account that according to technology, concrete floor screed shrinks with a coefficient of 1.022. Adding lime paste to the mixture in an amount of 1/10 of the total volume increases the plasticity of the composition.
You can buy a ready-made mixture, but it will cost a little more. But there are the necessary chemical additives. Any mixture should have the consistency of thick sour cream. Excess water will affect shrinkage, and its lack will lead to cracks in the monolith.
How to make a concrete floor screed
Experts recommend installing a subfloor with a layer of at least 4 cm. But if shock loads are expected, the thickness of the monolith can reach up to 15 cm. Accordingly, the guide profiles should rise above the surface to the selected height.
Begin pouring from the far strip, taking into account that the surface needs to be leveled in one pass, as a rule, adding mortar to the holes with a trowel. The mixture sets within an hour, so you need to fill in as much as you have time to process. Ideally, the screed will be carried out over the entire area at the same time. When pouring, it is necessary to remove the air lenses by piercing the surface with a thin rod.
If you have outlined a multi-level screed, place additional formwork at the difference in heights - this will prevent the solution from spreading.
It is important that the room is warm and dry, without drafts. The screed should be covered with plastic film to prevent rapid evaporation of moisture. While gaining strength during the first decade, the monolith must be moistened, the surface is covered from evaporation, and the temperature must be maintained at 15-25 degrees.
The next day you can walk on the mass. You need to remove the beacons and wipe away any traces of them with a solution. All other work is carried out after the concrete has gained strength - in a month.
Preparing the surface for laying screed
Before making a concrete floor screed, it is necessary to properly prepare the base for laying the mixture. If there is already any floor covering or screed on it, then it is necessary to determine the degree of its suitability.
If there is a durable concrete covering, and if the level of the old foundation allows, then installing a cement floor screed on the existing surface is allowed, but it is necessary to calculate the load-bearing capacity of the floor slabs for additional load.
Damage and cracks in the old screed must be repaired with repair compounds. In some cases, it is permitted to lay concrete mixture over existing ceramic tiles or marble slabs (provided they are firmly supported by the substrate). Laying concrete floors over soft floor coverings (linoleum, etc.) is not allowed; they must be completely removed from the base. If there is a loose and weak old screed, as well as if there is not enough height to lay a new one on top of it, it is completely removed from the base using a hammer drill.
The surface of the base should be free of grease and oil stains, construction debris and dust. To ensure good adhesion, treatment with special primers is required. With their help, in addition to increasing the adhesion of the concrete mixture to the base, dust removal and strengthening of the top layer are achieved.
Installation technology for semi-dry concrete floor screed
Using the same composites, but in a different percentage, makes it possible to obtain high-quality concrete flooring, but without the long setting time of the monolith. The mortar mix uses enough water to hydrate the cement. The mixture clenched in a fist holds its shape, but does not release droplets of liquid.
Advantages of the building material:
- A monolith of higher strength is formed.
- There are no pores in the hardening mass, which means that shrinkage is minimal.
- Fast maturing You can coat it after 12 hours.
- The humidity in the room does not increase; the next day you can begin general finishing work.
Advantages become disadvantages when it is necessary to draw clear lines between walls and floors and it is difficult to work manually, without tools. Due to design features, it is customary to make only a floating slab from this composite.
Instead of a reinforcing mesh, the composite uses fiber fiber - polypropylene threads with a random arrangement of fibers. They are the ones who keep the monolith from cracking.
Surface Requirements
Preparing the base for laying a semi-dry mixture begins with tapping, removing defects, cementing cracks and surface interface lines. Prepare and clean from dust, degrease and prime the site - do everything so that the mass adheres to the concrete before it hardens.
Composition of the semi-dry mixture
The mixture includes Portland cement M400, washed sand and plasticizers. Take 1 part cement to 3 parts sand, mix thoroughly in a concrete mixer, add minimal water and fiber, creating a mixture that holds its shape, like in a children's sandbox. You need about 80 g of fiberglass per bucket.
The plasticizer is taken specific to this consistency of the subfloor. This may be Saprol or a composition labeled “P”. Concrete with such additives remains plastic even in a monolith for heated floors.
Step-by-step pouring of semi-dry screed
- Cover the surface with insulating material extending onto the walls above 15 cm.
- Attach elastic tape around the perimeter to the walls.
- Install linear beacons.
- Add and quickly compact the bottom layer of the mixture.
- Lay out the second layer of the mixture and level it with the rule along the lines of the beacons.
- Sand the surface.
- Cut expansion joints to one third of the depth of the screed.
- Cover the top with film for 1-7 days, depending on the thickness of the layer and ripening conditions.
After a day you can walk on the floor. Porcelain tiles and tiles are laid after 2 days, linoleum is laid after 7 days.
Parquet and laminate strongly absorb moisture, so there is no need to rush with the front finish.
Selection of materials and preparation of screed mortar
According to established SNiP, the strength of a standard screed should be 150 kg/sq. cm., for this it is enough to use concrete grade from 150 to 200.
To obtain grades of ready-made mortars, cement and sand are used in the following proportions:
- M 300 – part cement M 600 to 3 parts sand;
- M 200 – part cement M 600 to 4 parts sand;
- M 300 – part cement M 500 to 2 parts sand;
- M 200 – part cement M 500 to 3 parts sand;
- M 300 – part of cement M 400 to 1 part of sand;
- M 150 – part cement M 400 to 3 parts sand;
- M 200 – part cement M 300 to 1 part sand;
- M 100 – part cement M 300 to 3 parts sand.
Scope of application of concrete mortar:
- M 100 – for arranging the subfloor and block pillows;
- M 150 – for constructing a block foundation;
- M 200 – for organizing concrete floor screed in premises of various types;
- M 250 – for street roads, paths and concrete fence structures;
- M 300 – for pouring the foundation and supporting walls;
- M 400 – for pouring complex concrete structures and foundations.
To prepare a standard solution, cement (M 400) and construction sand are used.
- Cement and sand are pre-mixed (1:3) until smooth.
- Water is poured into the container at the rate of 5 kg of dry mixture per liter of water. The mixture is poured into the water and mixed thoroughly.
- The finished mixture is stirred with a metal spatula to increase the density of the solution and eliminate existing lumps.
- Mix for 5 minutes with a mixer at high speed.
- The composition is left to stand and mixed again for 2 minutes.
Important! To check the thickness, place part of the mixture in the palm of your hand and squeeze it. If the composition remains a dense and viscous lump, but does not spread, then such a consistency is considered suitable.
No less important is the issue of determining the thickness of the floor screed, which depends on the type of floor covering, strength and thermal insulation characteristics.
The required parameters are often included in the working design, so it is enough to be guided by them when performing the necessary calculations.
The permissible thickness of the screed for the floor base is from 2.5 to 8 cm.
Features of concrete screed in brick, old panel and wooden houses
In the case where the floor cladding in a private brick house is planned from porcelain stoneware or tiles, the base is a concrete screed. Option one is a rough floor on the ground, and it is possible if the groundwater does not rise above 4 meters and the soil is dry. In this case, the quality of the screed depends on the degree of compaction of the base and the backfill of the granite cushion. The thickness of the layer on the ground of 50 mm provides insulation due to effective vapor barrier, insulation of the lower platform with porous slabs.
In wooden, old panel and brick houses, without reinforced concrete floor slabs, a dry screed is used - a layer of expanded clay chips and gypsum plasterboard flooring. Concrete subfloors can be installed in these houses only after a structural calculation of the load on the load-bearing beams.
Dismantling old concrete screed
It should be taken into account that the screed itself will create additional loads on the floor slabs
The old design does not guarantee strength and integrity. The system may crack or peel, which will affect the new layer. You can avoid dismantling by coordinating the loads with the design organizations, but this will delay the work.
Removing the old concrete layer can be done in several ways:
- impact method . The layer is removed using electric jackhammers and hammer drills. This is an effective solution, but causes a lot of noise. Fenders are used in small areas and individual areas, since the dismantling technology is quite labor-intensive;
- diamond cutting . A professional seam cutter is used as the main tool. The method is effective when the screed thickness is no more than 300 mm, provided that there is no reinforcement in the structure;
- diamond drilling . The coating is removed using machines that drill cylindrical holes in the concrete.
The sludge is taken outside the premises, the base is carefully treated with a construction vacuum cleaner.
Concrete selection
Concrete is a universal composition intended for pouring garage floors. When deciding which brand of concrete is best suited for these purposes, focus on the strength indicator, which is decisive regardless of the brand and classification of concrete.
Concrete is considered the most versatile material in construction
The best option for pouring the floor is to use concrete marked M100, M150 or M200, which have the necessary strength.
Let's take a closer look at concrete compositions of various brands:
- The M100 mixture has proven itself to be a good preliminary basis for installing a foundation and performing reinforcement work. It is also used for pouring insulated bases, forming the surface of sidewalks, and laying curbs.
- Concrete M150 is suitable for pouring car parking and is used for the construction of fences. The solution is popular because it has a low price and allows you to make foundations in garages where cars are stored, which do not create significant loads on the floors.
- M200 mortar, which has medium strength, is the best option for pouring a garage floor. This base has a long service life and can withstand the loads of most vehicles.
- The composition of the M250 brand is highly resistant to atmospheric factors and is not affected by precipitation or nearby aquifers. It is used to form platforms for heavy vehicles and is capable of withstanding significant forces.
- The M300 solution has improved performance characteristics, which is not susceptible to temperature changes and high humidity. Abrasion resistance and the ability to withstand significant loads allow it to be used for road surfaces and, if financial opportunities are available, for the construction of heavy equipment parking lots.
Concrete flooring is the type of base that can withstand high loads and is optimal for arranging a garage.
- From an economic point of view, it is advisable to use concrete mixtures M350, M400 when forming a garage floor. They have excessive strength, which by a large margin exceeds the weight of the vehicle.
Deciding what composition is needed to perform concrete work must take into account the weight of the vehicle and the weight of additional equipment that will be placed in the room.
[testimonial_view id=”12"]
Pouring a concrete floor on the ground
In your home, the activities for concreting the surface on the ground consist of several stages. First you need to determine at what depth the groundwater is located.
It is possible to make a concrete floor if the groundwater level is no higher than four meters. Otherwise, the building may flood, as well as water rising through the capillaries.
As a result, there will always be significant humidity in the building, which even waterproofing will not protect. Next, you should analyze the properties of the soil. It should be still and dry.
Shifting soil can break the concrete surface. To avoid freezing of the coating, the house must be heated. When freezing, floors will change shape.
It is also worth paying attention to soil moisture. If all of the above conditions are met, then you can install a concrete coating in the house.
Initially, marking should be done. Then find the height level of the finished floor, that is, determine the zero level. Marks should be placed on the walls up to which the concrete mixture will be poured.
The guideline for filling is the threshold of the doorway. It is ideal when the floors in all rooms of the building are installed on the same level.
When setting the floor level, it is worth taking into account the properties of the floor covering. So, linoleum requires a small thickness, and tiles require a little thicker.
To measure the fill height throughout the room, it is better to use a laser level, as it gives the most accurate measurements. But if it is not there, then you can use an ordinary building level.
For ease of orientation, a nail is driven in at the given marks and the cord is pulled according to the future level of the coating.
Preparing the base
To prepare the base, debris must be removed from the room. Then the top layer of soil is removed and removed outside the house. Pouring a concrete floor is a cake consisting of several layers, the total height of which can be up to 350 millimeters.
The depth of soil removal from mark zero is calculated individually. The soil should be well compacted either with a hand tamper, but even better with a vibrating plate.
Tamping is carried out until no traces of the sole are visible on the soil. When the groundwater level is high, clay is laid as an additional layer for waterproofing.
A clay waterproofing lock will prevent water from penetrating into the ceiling. A solution is mixed from clay and the surface of the soil is covered.
If the depth to the zero mark is more than 350 millimeters, the base should be filled with sand to the required level.
Adding soil
Before pouring, it is necessary to fill with a thickness of 200–300 millimeters. To correctly determine the thickness of each layer, you can use wooden pegs, which indicate the height of sand, crushed stone, and so on.
- The first layer, 50-100 millimeters thick, is poured with gravel. After leveling, it should be watered and compacted.
- The second layer is sand with a layer thickness of up to one hundred millimeters. Before compaction, the layer is moistened with water and thoroughly compacted.
- The last layer is crushed stone up to one hundred millimeters thick. For backfilling, crushed stone of medium fraction 20-40 mm is used.
Before compaction, the surface of the crushed stone for declinging is covered with a thin layer of sand. After which it is thoroughly compacted. It is important to thoroughly compact each poured layer, since the concrete coating has sufficient mass.
Waterproofing and thermal insulation
The waterproofing material is placed on a flat and clean surface. As waterproofing, roofing felt, a special membrane, and ordinary polyethylene film are used, which are laid in more than one layer.
The sheets are overlapped by 150 mm, covering the entire surface of the base. If a polyethylene film is used, then one layer is laid perpendicular to the other, thus forming an additional lock.
The sheets of film are connected with tape. It is mandatory to install waterproofing on a wall up to 200 mm. After installing the coating, all excess residues are cut off.
A layer of thermal insulation is mounted on the waterproofing. Now there is a sufficient amount of materials for thermal insulation, namely, expanded clay, penoplex, extruded polystyrene foam, stone basalt wool, polyurethane foam, perlite.
When constructing a layer of extruded polystyrene foam, the slabs are laid in a checkerboard pattern, as closely as possible to one another. The resulting cracks should be filled with foam.
Reinforcement
When installing a concrete floor, a reinforcing layer is installed, which will help the base withstand heavy loads and give it greater strength.
Most often, a metal mesh with a cell size of 100×100 mm is used for reinforcement . For a foundation that will withstand very heavy loads, for example in a garage, a reinforced reinforced frame is installed.
In a residential building, you can use a regular metal mesh with a rod diameter of 5 mm. When installing a layer of reinforcement, it is important to follow one rule.
If you mount the mesh on a layer of thermal insulation, it will not fulfill its function. Therefore, it must be raised from the floor level by 1/3 of the thickness of the entire screed.
You cannot use wood products or bricks under the layer of reinforcement; over time, they will collapse and dips will appear on the surface.
Granite stones are a good material for this type of work. Thus, the metal reinforced mesh will end up in the middle of the concrete floor.
Installation of beacons
In order for the concrete solution to be poured strictly according to the level, guides should be installed from round pipes, square or rectangular profiles. After installation, the pipes are pulled out of the mixture.
The distance between beacons can be up to 1500 mm if the rule for leveling a concrete mixture of two meters in length is applied. Guides for stability are installed on concrete. The height of all beacons must coincide with the zero level mark.
Preparation of concrete mixture
A concrete floor performs protective functions against groundwater, has a long service life and good strength. To perform the pouring, concrete must be prepared.
If the area to be poured is large and for better mixing of the components, it is recommended to use a concrete mixer.
The recipe for making a concrete mixture for coating is as follows. Two buckets of perlite are poured into a concrete mixer. Then 10 liters of cold water are added.
After mixing, with the mixer running, five liters of dry cement are added. After assessing the consistency, you can add water. Then we put ten liters of sand and two liters of water.
Mixing the components continues until the solution becomes crumbly. Next, the mixture should sit for about 10 minutes and mix well again.
The result is a solution of the required consistency. Taking into account the load and compressive strength, a certain brand of concrete mortar is adopted.
For floors in a garage, apartment, and utility rooms, M100, 150, 200 are used. For flooring in a private house, the optimal concrete is M250, 300. The latter brand is more in demand because it is resistant to abrasion, resistant to low temperatures and impermeable to water.
In order for the floor to serve for a long time and delight you with its impeccable appearance, you need to take care of a strong and reliable base - a concrete floor base (screed). Concrete has long established itself as a relatively inexpensive, convenient and durable building material. A properly installed concrete floor is a smooth, dry and durable surface that can withstand significant loads. This base is suitable for almost any subsequent finishing.
Concrete flooring is the most common type of black flooring. Thanks to a number of the above-described qualities, it has been widely used at facilities for a wide variety of purposes - from industrial warehouses and production facilities to private homes.
However, the technology of the device does not tolerate negligence - poor preparation, incorrect calculations, lack of experience or tools lead to the need for subsequent dismantling, thereby incurring huge costs for the customer. Let's look at the process of installing a concrete floor in stages.
Preparing the foundation
Before the monolithic stage, it is necessary to carry out a number of preparatory work, on which the quality and durability of the future concrete floor will largely depend. If the work is carried out in an apartment building, we dismantle the finished floor; further actions will depend on the quality of the foundation. If there is an old screed, its dismantling is not always necessary; local repairs of potholes and cracks are often carried out.
Preparing the base - dismantling the old coating.
The thickness of the fresh layer can be reduced to a functional minimum (about 4 cm) thanks to the existing “support” in the form of an old screed, read about this further. If the matter happens in a private house or cottage, everything is somewhat more complicated. In such rooms, the floor of the first floor, as a rule, rests on the ground. Similarly, we dismantle all layers of the coating and proceed to the preparation itself.
It is necessary to display the level of the future floor, for this:
- It’s worth noting right away that the best device for this is a laser level, however, you can get by with a hydraulic level (the cost of which is much lower);
- about 1-1.5 m from the threshold level of the entrance group . Next, we apply this mark to all the walls of the room;
- From each point on the wall, in reverse order, subtract the height selected in step 2 - we obtain zero floor level marks along the perimeter;
- From the zero marks we remove about 25-35 cm of soil;
- After removing the soil, level the surface horizontally and compact it (the best tool for this is a vibrating plate; if you don’t have it, you can use a heavy log). The task is to compact the soil at least 10 cm from the surface;
- We fill with gravel ( layer ~15 cm ) and re-compact (step 5);
- Ordinary construction sand (~8 cm layer) is poured onto the gravel, which is also leveled and compacted.
It is extremely important to constantly monitor compliance with the heights relative to the obtained zero points at each stage - from soil sampling to filling the “cushion”. If the project assumes hidden communications, they are placed in a “cushion”.
Waterproofing the base before pouring a concrete floor
If we work with soil as a base, waterproofing is mandatory. It prevents the liquid contained in wet concrete from leaving the soil prematurely. In the case of rapid moisture loss, the hydration process of concrete is disrupted, which in the future will certainly affect the strength and fragility of the slab, and cracks are also possible due to uneven shrinkage.
When the base is a sealed slab (for example, floor slabs of buildings), the waterproofing is installed optionally, and if it is present, we get a so-called “floating” screed. If you decide not to insulate, pay attention to local holes to avoid leakage of the mixture. The holes can be sealed with foam or sealant.
Waterproofing with polyethylene film under a concrete floor.
For waterproofing, a simple polyethylene film with a thickness of 150 microns (GOST) or another type of rolled material is usually used. The entire working area is covered with film, an overlap of ~15 cm must be made at the joints, and the joints are also taped. In places where it abuts the walls, the end of the film is brought to the zero mark, and is also secured with adhesive tape in a vertical position.
In some cases, the project requires thermal insulation of the coating, especially if it is a private house and the ground is the base. There are many modern thermal insulation materials, such as expanded polystyrene, polystyrene foam or expanded clay. Thermal insulation is laid on the prepared base (see previous paragraph), under the film.
Proper reinforcement is the key to the durability of a concrete floor
First, let's figure out why reinforcement is generally necessary in concrete slabs. Reinforcement performs two main functions - increasing the coefficient of elasticity (resistance to bending), as well as restraining the slab from breaking (cracking). There are a number of other functions - but this is a separate topic for the article, and does not directly relate to the section of concrete floors.
Double reinforcement belt with 10 mm reinforcement for concrete floor slabs on chairs.
The choice of type and calculation of reinforcement is made based on the requirements for the future floor. For example, if we have a weak foundation (loose soil), a double reinforcement belt is used to impart elasticity. Rods of corrugated reinforcement A500 are mounted in specified cells (usually 150x150 mm) in two “belts”, the distance between levels is ~10 cm. In this case, we will get a slab with a thickness of ~ 20 cm, provided that concrete grade B25 is used, strength to distributed loads will be about 6 t/m2.
These calculations are made approximately; clarification always requires engineering surveys. The strength of the slab will be influenced by the type of base, the diameter and size of the reinforcement cage cell, the grade of concrete and its filler (gravel or crushed stone).
If the base is strong enough (existing concrete slab), a mesh is used. A corrugated mesh made of BP wire (with an average diameter of 6 mm) performs the function of tensile restraint - so that the screed does not “spread” and does not form gaps (cracks) in the slab.
Reinforcement with VR-1 mesh with a diameter of 5 mm. It is used on a solid foundation - the floor slab of a building.
For the mesh to work properly, it must be installed at a certain distance from the base; for this, so-called “chairs” are used, the average height of which is ~ 6 cm. A mesh of any diameter does not increase the elasticity coefficient of the slab.
Installation of formwork and beacons
If pouring takes place in open areas or in large rooms, formwork is indispensable. Even at the stage of installation of the reinforcement frame, the area is divided into maps, according to which the filling will be carried out. The size of the map performed at one time is determined by the possible output of the team, on average it is 600 m2 per shift.
For formwork I use light and durable materials with poor adhesion to the concrete composition; an excellent solution is glossy (formwork) plywood. After monolithic work, the plywood is easily dismantled, leaving smooth edges of the slab. Due to its low adhesion to concrete, the material does not lose its properties and can be used repeatedly.
Beacons on adjustable brackets for screeding (for a house or apartment).
Beacons for the installation of industrial floors are firmly fixed by welding to brackets.
To obtain the surface at specified zero points (to the horizon), it is necessary to install beacons. Beacons are smooth steel profiles with low deformation properties. Beacons are fixed to brackets (or “grabbed” with plaster mixture) at a given floor level. After pouring and leveling the composition, the beacons can remain in the floor or be dismantled (depending on the type of floor, for example, when installing industrial floors, the beacons are always removed).
Preparing the mixture, pouring and leveling
Mixtures for pouring cement-based floors are different. If work is underway to install a screed over a large area or for industrial purposes, it is definitely necessary to order the ready-made mixture at the nearest concrete site.
Composition of classic concrete:
- Cement;
- Sand (river, without clay and impurities);
- Aggregate (gravel);
- Various chemical additives - PMB, plasticizer (optional).
If we are making a floor in an apartment or private house, we can limit ourselves to mixing cement and sand ourselves; of course, the strength of such a composition cannot be compared with real concrete, but it is quite sufficient for domestic use. For mixing, it is most convenient to use a construction concrete mixer (average cost - 7 rubles, but it can be rented).
Water, sand and crushed stone (use is not necessary for household screed) should be added to cement (grade no lower than M400) in the following proportions:
- 1 part cement
- 2 parts sand
- 4 parts filler
- 0.5 parts water
If, in the case of industrial floors, distribution over the area occurs by supplying the mixture with a concrete pump to different points, then leveling with vibrating screeds and, finally, the rule. When constructing a screed on your own, you can easily get by with a shovel and a rule. The finished mixture is evenly “thrown” in piles over the entire area and leveled using the rule.
Distribution of the concrete floor mixture over the area. Delivery by concrete pump.
Distribute the mixture from the farthest point to the exit. After which the surface is covered with plastic film until completely hardened. The film performs the function of retaining moisture. When moisture leaves the concrete prematurely, the hydration process is disrupted, the strength of the composition is significantly lost, and as a result, cracks form and the screed collapses.
Construction technologies do not stand still; now special polymer compositions in the form of varnishes - sealers - have appeared on the market. The sealer is applied in liquid form to the surface of the screed; when it dries, it forms a film, reliably clogging the pores while the slab dries. After 3 weeks it disappears without a trace.
Finishing device.
After the screed has completely hardened (28 days at a temperature of +10 degrees), you can begin installing the finishing layer of the floor; ceramic tiles, parquet flooring, laminate or linoleum are often used for apartments and private houses. For industrial premises, self-leveling polymer floors are used, or the resulting concrete floor itself acts as the final layer (with a reinforcing top layer in the form of topping or dust-removing impregnation).
Installation of beacons
Before pouring the floor in the garage, it is necessary to install beacons to ensure the flatness of the base. The use of purchased beacons made of aluminum allows us to guarantee the quality of the formed surface. Install and fix the control strips as follows:
- Mark the base of the room, observing a step of 0.5 m.
- Lay dense cement mortar or alabaster in accordance with the markings.
- Ensure the profiles are horizontal using a building level, pressing the planks into the array.
- Ensure that the cement mortar or alabaster becomes strong enough to be poured.
Placing beacons will allow you to create a flat surface