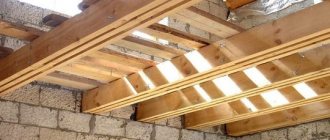
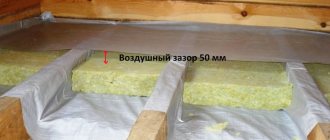
Diagram of a frame with a ventilation gap
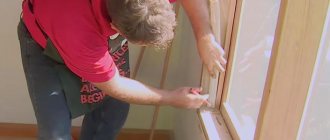
Stage 3: frame installation
If you plan not only to cover the walls with plasterboard, but also want to insulate them, then before constructing the frame, you need to create a ventilation gap that will ensure condensation is removed from under the insulation.
It is performed as follows:
- first of all, 2x2 cm slats should be fixed to the walls. They should form horizontal belts on the walls, fixed in increments of about 50 cm. To fix the slats, you can use ordinary self-tapping screws;
- Now you need to secure the vapor barrier film on the resulting sheathing using a construction stapler. Keep in mind that the film must be stretched so that a ventilation space is formed between the wall and it .
- at the joints the fabric should overlap, and the joints themselves can even be taped.
To make the ventilation gap work, you can drill several holes under the canopy and at the base of the walls. The latter must be filled with mineral wool and protected with mesh.
As a rule, when people ask how to cover walls with plasterboard in a wooden house, they are interested in the nuances of installing the frame, since this procedure is the most complex and at the same time responsible.
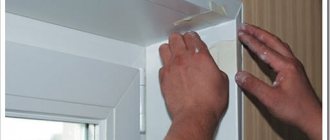
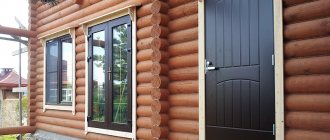
An example of a wooden frame installed on top of a ventilation sheathing
In fact, there is nothing overly complicated in installing a frame; the main thing is to understand the principle of its structure. These instructions will help you with this:
- First decide on the thickness of the frame. If, for example, the thickness of the insulation is 100 mm, the thickness of the frame should be 110 mm. If the walls are not insulated, then care must be taken to save space so that the gypsum board sheets are located as close to the wall as possible;
- then you need to retreat from the wall a distance equal to the thickness of the frame and mark a point on the adjacent walls;
- through the obtained points you need to draw vertical lines from floor to ceiling;
- then the resulting vertical lines need to be connected with horizontal lines on the floor and ceiling. To make straight lines, it is best to use a painter's cord;
- Next, you need to draw vertical lines on the wall, which will be covered with plasterboard, using a level or plumb lines. The step between the lines should be 50 cm. If the walls are insulated with mineral mats, the step should be taken a centimeter and a half less than the width of the mats, so that the latter fit tightly into the space of the frame;
- Now, focusing on the control lines on the floor and ceiling, you should secure the first rack from the corner. For these purposes, you can use the same brackets that are used to mount a metal frame. When attaching the rack, be sure to check its position with a level;
- then, according to the same scheme, a stand is installed near the opposite corner;
- To simplify the process of aligning the intermediate posts, threads should be stretched between the two outer posts, which will serve as beacons.
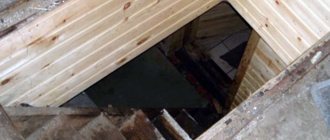
Finished frame with insulation and vapor barrier
Using this principle, a frame is installed on all walls that you want to cover with plasterboard.
The wooden frame, as well as the ventilation gap slats, also need to be treated with protective impregnation.
It must be said that in some cases it is possible not to install the frame. If the inside of the house is sheathed, for example, with SIP panels, and the walls are even, the sheets can be glued to the panels with starting putty . The latter is applied to the back side of the sheet in lumps in increments of 15-20 cm.
Covering a wooden frame with plasterboard
Stage 4: framing the frame
The next step is covering the wooden walls with plasterboard. The only thing is, in the case of insulating walls, before starting this work, you need to perform the following steps:
- First of all, you need to lay mineral mats in the space of the frame. At the same time , make sure that no gaps form at the joints of the mats, as well as between the mats and the floor or ceiling ;
- in the process of laying mineral mats, you immediately need to lay the wiring;
- Now we need to attach the vapor barrier film to the frame. As in the previous case, it should be stretched and overlapped.
Example of cutting drywall
Now let's start covering the frame. At this stage you will need to cut the sheets of drywall. To do this, you need to measure the walls, and then apply markings to the drywall.
I must say that cutting sheets is very simple:
- first of all, you need to cut the cardboard along the intended line with a sharp knife;
- then the sheet must be broken along the cut;
- after this, the cardboard should be cut with a sharp knife from the back side of the sheet;
- It is advisable to treat the edges with a special plasterboard plane, which makes them even and immediately chamfers them. The average price of this device is 450 rubles.
If you need to cut out a piece of complex shape from drywall, you can use a jigsaw.
As for the installation itself, this procedure contains practically no nuances. The sheets are fixed to the frame with self-tapping screws in increments of 25 cm. Each self-tapping screw must be recessed below the level of the drywall so that they do not interfere with further finishing.
Since the sheets are massive and quite heavy, it is more convenient to do the work together. If you don’t have an assistant, you can cut the panel sheets into smaller sizes.
Cutting chamfers from the ends of sheets
Stage 5: finishing
The final stage is finishing the drywall. This work is carried out according to the standard scheme, regardless of what type of walls are covered with plasterboard:
- Before you begin finishing, you need to prepare the surface of the drywall. To do this, you need to cut a 5 mm thick chamfer from the ends of the sheets at the joints;
- then a reinforcing self-adhesive tape made in the form of a mesh should be glued to the joints of the sheets;
Reinforcement of sheet joints
- Now the surface of the walls must be primed. The primer is applied in two layers using a paint roller . To make it convenient to dip the roller into the soil and squeeze it out, the liquid should be poured into a special tray;
- after priming the walls, you need to cover the joints of the sheets and the heads of the screws with starting putty, using a narrow spatula;
Puttying the joint of sheets
- Next, the starting putty must be applied to the entire surface of the walls, using a wide spatula or trowel. In addition, you will need a narrow spatula to apply the composition to the working tool.
In order for the putty to lay down in an even, even layer, the spatula must be placed against the wall at an acute angle and made smooth movements.
In the photo - applying starting putty to the walls
While applying the first layer of putty, you should apply perforated corners to all outer corners to make the corners even and also protect them from chipping. To align the internal corners, you can use a corner spatula;
- after the starting putty has hardened, the surface must be sanded using a mesh or coarse sandpaper to eliminate serious flaws on the putty surface;
- Now the walls need to be cleaned of dust - wipe them with a damp sponge or rag;
- then you need to apply two layers of primer again on the prepared surface;
- After the primer has hardened, the walls must be covered with finishing putty. It is applied in the same way as the starting one, but in a thinner layer. At the same time, you should work as carefully as possible in order to grind the surface less in the future;
Surface grinding
- The final stage is finishing putty with fine sandpaper, during which all defects on the surface of the walls must be eliminated . To do the job efficiently, it is necessary to provide bright lighting.
During the sanding process, a large amount of dust is generated. Therefore, before starting work, it is necessary to protect your respiratory organs with a respirator.
Here, perhaps, is all the information on how to properly sheathe walls with plasterboard in a wooden house. Now you can wallpaper them or, for example, paint them.
Conclusion
The process of covering wooden walls with plasterboard is not much different from installing plasterboard on other types of walls. The only thing that requires a special approach is the preparation of the foundation. In addition, the frame itself can be made of wood using the technology described above, which also contains many nuances.
You can get more information from the video in this article. If you have any questions regarding drywall installation, ask them in the comments and I will be happy to answer you.
September 28, 2021
If you want to express gratitude, add a clarification or objection, or ask the author something, add a comment or say thank you!
- February 27, 2021
- February 21, 2021
- February 20, 2021
- February 16, 2021
- February 15, 2021
- February 13, 2021
Latest replies on the forum
- Cinder block walls
How to cover cinder block wallsQuestion added: February 09, 2021 - 19:32
views
- Walls
Hello. Can you tell me how to put decorative stone on a putty wall?Question added: August 03, 2021 - 12:25
views
- Question about wall cladding in the bathroom
Good day. Having studied quite a lot of information, I could not come to a clear conclusion. Maybe you can help me. Situation …Question added: May 20, 2021 - 11:50
views
- Mystic... scary
Dear forum users, I want to know if anyone has had anything similar... I’ll say right away that alcohol and nothing else that clouds my brain...Question added: October 20, 2021 - 08:44
views
You might be interested
Today, many people are faced with uneven walls in their homes. This kind of problem is not uncommon, especially when it comes to wooden buildings. Fortunately, modern manufacturers offer consumers a variety of different materials to choose from that can be used to make floors even and smooth. Such coatings include sheets of plasterboard.
Peculiarities
Currently, drywall is rightfully recognized as one of the most popular and sought-after materials. This is due to its flexibility and affordable price. Such materials are used for finishing walls in private houses and city apartments, where uneven floors are common.
As a rule, walls in wooden houses have impressive differences in height. Therefore, to design them it is necessary to carry out high-quality alignment.
For this, you can use different materials (from cheap plywood to gypsum fiber board panels). Most buyers choose drywall for such work. Installation of such material is quite simple. All the work may take a home craftsman little time. In addition, installation of gypsum board sheets will cost users little. Due to these features, leveling walls with plasterboard panels in a wooden house can be called the best option.
Drywall is also distinguished by the fact that it can be finished with a variety of decorative materials. This can be paint and varnish coatings, wallpaper, different types of plasters, imitation brick and stone masonry. However, it is worth considering that drywall is a fairly fragile material.
It is not recommended to overload it with heavy and dense materials (for example, natural stone, which has an impressive weight).
In wooden houses, especially if they are built from logs and logs, it is impossible to glue wallpaper or install tiles without first leveling them. Drywall in this case is a real lifeline. It has various modifications. Due to this feature, you can choose suitable coatings for dry, warm, wet rooms (kitchen or bathroom). This does not mean that moisture-resistant boards are invulnerable and cannot be wetted with water. At the installation stage, it is recommended to additionally coat these materials with protective compounds.
Advantages and disadvantages
Drywall is a durable material that has its strengths and weaknesses.
First, let's look at what advantages such coatings can boast of:
- First of all, it is necessary to highlight the durability of this finishing material. High-quality drywall is not subject to rotting or destruction. If you treat this finish with care, it will last for many years without causing any inconvenience.
- Installation of plasterboard sheets is simple and quick. To do this, it is not at all necessary to contact finishing teams, who often ask a lot of money for their services.
- This material is lightweight, so working with it is optimally easy. Its installation can be easily accomplished without involving help.
- High quality gypsum board sheets are environmentally friendly and absolutely safe. They can be installed in a wooden house without worrying about the health of the household. As a rule, these coatings do not contain harmful or dangerous substances, so they can be installed even in children's rooms.
- According to experts, plasterboard sheets can regulate the indoor microclimate.
- Such coatings do not cause allergic reactions and do not emit unpleasant odors during operation.
- This coating boasts good thermal insulation characteristics. In a wooden house, this property is especially important. With such wall decoration, the rooms will always remain warm and cozy.
- GCR panels are flexible. Due to this quality, such materials can be used in the design of arched structures. The main thing is to choose a coating that suits the markings.
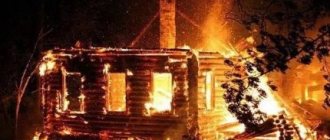
- These materials are fireproof. In the event of a fire on drywall, only the top layer, consisting of cardboard, burns out. In addition, special fire-resistant panels are available for sale. These advantages are especially relevant in the case of wooden and log buildings, which are fire hazardous.
- Unsightly communication systems can be hidden behind drywall.
- GKL panels are pliable canvases that can be easily decorated with decorative finishing. This can be wallpapering, painting them with different paints and varnishes, tiling or artificial stone.
- This material is vapor permeable, that is, it is breathable.
- Drywall has soundproofing properties, which is especially important for the relaxation of modern people.
- GCR coatings are inexpensive. A buyer with any budget can afford them.
- As a result of installing such coatings, the walls acquire perfectly flat and smooth surfaces.
Despite the large number of advantages, drywall also has its disadvantages:
- The main disadvantage of gypsum board sheets is their fragility. It doesn't take much effort to break this material.
- It is easily damaged and cannot withstand heavy loads. You need to be especially careful with this material during installation work. In case of damage, it is usually impossible to repair the panels.
- Although drywall has soundproofing properties, many consumers note that they are very insignificant. For example, this material will not save you from excess noise and creaking in an old house.
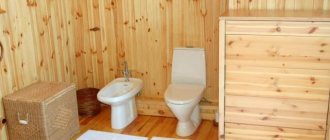
- Drywall does not like to come into contact with water. Even special moisture-resistant materials do not last long in high humidity conditions. Because of this feature, installation of gypsum board panels is not recommended in the bathroom or kitchen.
- It is not recommended to install plasterboard sheets directly on timber floors. Such walls can change in volume at high humidity, which can lead to damage to the plasterboard panels and their detachment from the base. In any case, you will have to make a frame.
Types of drywall
Currently, there are several types of drywall that can be used to decorate wooden walls in a country or village house. Let's take a closer look at the varieties of this material.
GKL
GKL - simple drywall. As a rule, it is used for finishing domestic and office spaces in which humidity and temperature are always at the optimal level. This material is gray in color and has blue markings. Under no circumstances should a simple gypsum board be installed in the kitchen or bathroom. In such conditions it will quickly fail.
GKLO
GKLO is a fire-resistant plasterboard. It is highly resistant to open flames. This effect is achieved by adding special reinforcing ingredients to the material. This material can be used to decorate walls in industrial premises, attics and even in ventilation spaces. GKLO also has a gray color. This material is marked with red paint.
GKLV
This type of drywall is moisture resistant. It contains antifungal components and silicone granules. Such components allow drywall to easily withstand high levels of humidity in the room.
To make the material more reliable and durable, it is recommended to cover it with various coatings (for example, waterproof paints or primer).
Such coatings are green and blue marked.
Drywall can vary in the type of edge. Let's outline their differences:
- PC – straight edge. Such materials are suitable exclusively for “dry” installation. They do not require laying joints. As a rule, such coatings are installed in several layers.
- UK – thinned edge. Such materials are covered with reinforcing tape and then puttied.
- ZK – rounded edge. These types of drywall are used only when using a putty mixture, but without additional reinforcement.
- PLC – semicircular edge on the front side. This material is not supplemented with reinforcing tape, but is subsequently puttied.
- PLUH - a semicircular edge, thinned on the front side. Such materials require reinforcement and putty.
Surface preparation
Before you proceed to installing plasterboard sheets on wooden walls, they must be properly prepared. If the house has just been built, you need to wait about six months to start finishing work. During this time, the foundation of the building will settle and the drywall will not crack. However, houses made of laminated veneer lumber shrink slightly and require less time.
- Before installing gypsum board sheets, the walls must be cleaned and freed from previous coatings, if any.
- Next, the wooden walls should be treated with a special protective compound.
- Insulate all cracks present on wooden floors.
- Sand the logs.
- At the preparation stage, it is recommended to draw up a drawing of all surfaces that require alignment.
How to sheathe correctly?
You can cover wooden walls with your own hands.
Let's consider step by step how to carry out such work:
- After preparing the base, you can make the frame. The sheathing may consist of metal or wood. It is recommended to coat wooden structures with protective agents so that they do not rot and are not attacked by parasites.
- Under the supporting guides you need to take a block with dimensions of at least 75x25 mm. For crossbars, parts 50x25 mm are suitable. Please note that the support must correspond to the width of the gypsum board sheets.
- To make the wooden frame stronger and more reliable, it is recommended to install the crossbars more often. As for the support, it should be in the central part of the panel. The crossbars must be placed at the joints of the sheets. Use plastic dowels for fastening.
- To cover the walls inside a wooden house, you can use a metal frame. It is more reliable and strong. Metal supports must be installed at the same pitch and all parts must be checked with a level. In this case, self-tapping screws should be used for fastening.
- After installing the lathing, heat-insulating material is laid, followed by a vapor barrier. The vapor barrier film must be attached by overlapping the material on top of each other.
- Install the frame so that its distance from the ceiling is 3-4 cm, and from the floor - 1 cm.
- When the ceiling and frame in the log house are prepared, you can proceed to the installation of gypsum plasterboard sheets.
- Mark the drywall where the vertical guides will be installed.
- Trim the top panel and fold it into the cut.
- Turn the sheet over and then cut the opposite side.
- Mark a 1 cm indent from the edge.
- Bevel the end edge at a 45 degree angle.
- Sand it with sandpaper.
- Drywall must be secured to the sheathing with self-tapping screws using a screwdriver.
- Fasten the sheets overlapping, install fasteners in increments of no more than 20 cm.
After this, you can begin the final finishing of the floors.
It is recommended to seal the seams remaining between the canvases with mesh and cover them with putty.
Useful tips
Take note of a few simple recommendations.
- Leave small gaps between plasterboard boards. This is necessary to avoid the appearance of cracks during the shrinkage of the building.
- Before installing the frame, be sure to close all the gaps between the bars that make up the walls. Tow, fur or a reliable sealant are often suitable for this.
- You should not start installing drywall in a wooden house if the room temperature is below 10 degrees.
- The frame must be floating, since the process of subsidence of the house does not end after a year and a half.
- If the inside of the house remains warm and heated all year round, the walls should be finished with 12.5 mm thick plasterboard. In unheated rooms it is recommended to use moisture-resistant material.
- If there is no groove at the drywall joints, you should cut it yourself. To do this you need to use a construction knife.
- To equip a wooden house, it is recommended to purchase plasterboard panels with fire-resistant qualities.
Wooden frames are reliable and environmentally friendly, but they are inferior in durability and wear resistance to metal sheathing. They need to be treated with protective compounds, otherwise mold or mildew will appear on them. In addition, these structures are subject to deformation due to temperature changes.
It is better to install insulating materials under the profiles, pinning them on the console. The cracks that remain after penetrating the insulation with the suspension must be sealed so as not to leave pathways for cold air from inside. Use only high-quality materials: they will last a long time and will not deform due to shrinkage of the house.
See the following video for features of finishing walls with plasterboard in a wooden house.
When the construction stage is completed and the turn of finishing approaches, the question of choosing the material arises. If the walls are not level, then plasterboard sheathing is ideal. In this case, you can do redevelopment, add various structures and additional partitions, or create arches, with the help of which you can conditionally divide the room into several zones. This finishing provides good protection from moisture to wooden walls and retains heat inside the house. This material is easy to work with, so anyone can handle it.
Advantages of finishing plasterboard walls in a wooden house
If you choose between clapboard and drywall, the second option will be cheaper. This finishing material is considered environmentally friendly, therefore safe for health, and it can also be used as wall insulation.
Drywall is easy to install and is lightweight. It can be used for both walls and ceilings. With its help you can hide all defects and surface irregularities, cover wires and pipes.
A structure made from a profile to which drywall is attached can be used for insulation or vapor barrier. It will help further protect the house from freezing, mold and mildew on the walls.
There is absolutely fireproof plasterboard for finishing walls in a wooden house. It is not subject to combustion due to its special composition. Thus, it will ensure the safety of the entire house and will not allow the flames to flare up.
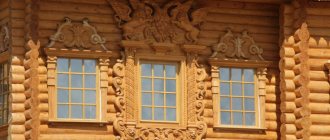
In addition, the perfectly leveled surface allows you to come up with various original interior options. You can make paintings or panels, paint or wallpaper, create different variations of ceilings or use tiles.
Is everything so good if you use drywall in a wooden house?
The process of covering gypsum board walls
First of all, we prepare the walls for plaster covering . There is nothing complicated here, since the surfaces only need to be thoroughly cleaned and treated with special compounds. Treatment is necessary so that fungus does not settle in the finished gypsum plasterboard wall and cause it to destroy the practically new structure after just a few years. The processing takes place in several stages so that each layer dries well. Antiseptic agents and protective compounds can be applied with a brush, roller or spray.
Next is the correct installation of the frame, wooden or metal. The base lies on the surface of the walls, and therefore these parts must be installed as evenly as possible. Use precise measurements, a level, a plumb line, a laser level, but install the frame evenly in relation to the wall and other planes.
Installation takes place so that the sheathing is strong and stable, capable of supporting the weight of drywall, decorative trim, and maybe even additional accessories that will be placed on the walls in the future. The ceiling covering is not much different: a high-quality frame, installation of plaster.
At this stage, try not to forget about the insulation that we wanted to put under the drywall, because it will need to be fixed into the wall after installing the frame, but before laying the drywall sheets on it.
Next, let's talk about puttying surfaces. Here I would like to recommend only one thing - work with good, high-quality, and even expensive material, do not try to save on yourself. Wall putty must be done carefully, alternating with soil, always with the participation of serpyanka, perforated corners, and other auxiliary elements. Remember that high-quality surface putty is the key to perfect walls
and good decorative finishing.
Finishing nuances
In addition to a large number of advantages, drywall also has quite a few disadvantages that should be taken into account when working. We list the main ones:
- Quite fragile material. Sheets must be carefully moved and transported, otherwise their integrity may be compromised. If you make walls from plasterboard, you need to remember that hanging heavy objects on it will not work. Or the profile structure will have to be strengthened in advance.
- It will not be possible to work with drywall if the thermometer in the work area drops below 10 degrees Celsius.
- Due to the use of a frame in plasterboard finishing, the area of the room is significantly reduced.
Drywall is a fireproof and environmentally friendly material. Construction stores offer different types of this material. Which type to choose for interior decoration of the walls of a wooden house with plasterboard?
Types of drywall
The following types of this material are presented on the construction markets:
- Standard drywall is a pressed gypsum mixture lined on both sides with sheets of cardboard. Can be used in rooms with low humidity.
- Moisture-resistant drywall. This material contains special additives that prevent the formation of fungi, mold and moisture accumulation.
- Reinforced plasterboard. It is based on fiberglass additives, so this material is stronger and more durable.
- Mixed type of drywall - it combines both types: moisture-resistant and reinforced. This material is not afraid of fire, moisture, or open rays of the sun.
Preparing walls in a wooden house
A newly constructed wooden building must stand for about six months for the foundation to settle. Only after this is finishing done. Only houses made of laminated timber do not shrink so much, so you don’t have to wait so long. The walls need to be cleaned and the old coating, if any, removed from them.
Then you need to treat the wooden beam with a special solution, insulate it and seal all the cracks. To do this, you can use moss, tow or sealant. Be sure to sand the logs.
Wood frame
As you know, natural wood is subject to rotting processes and fungal infection. Sometimes insects even appear in it. To ensure durability and moisture protection, it is necessary to treat and impregnate the bars with special antiseptic agents, and then dry them thoroughly.
Under the load-bearing supports, take a block of at least 75 by 25 mm. For crossbars, planks 50 by 25 mm are suitable. The support should be equal to the width of the drywall sheet. To ensure the reliability of the frame, you need to fasten the crossbars as often as possible. And the support should be located in the center of the sheet. Place the crossbars at the joints of the panels. Use plastic dowels as fasteners.
Tip: attach the block to the wall, drill a hole through for the dowel so that a mark appears in the wall. Drive the dowel into the wall, and then, again attaching the block, tighten the screw.
Sheathing the gypsum board base
Sheets of material are secured using self-tapping screws with a length of at least 20 mm. Fastening drywall is done using a screwdriver or drill with variable speed control. The sheet is installed on the frame and one edge is mounted, and then the opposite. When screwing in a self-tapping screw, you need to control the pressing force so that the head does not damage the top layer of the material, while it is slightly recessed into the surface (1-1.5 mm).
If you need to cut a sheet, first make markings on its surface on the front and back sides. Then an incision is made. By cutting through the cardboard, you can easily break off the desired piece. Irregularities in the cut can be easily smoothed out with the same knife or a regular plane. You need to attach drywall to wooden blocks, just like to metal slats, using self-tapping screws and a screwdriver.
Metal carcass
Before covering the walls in a wooden house with plasterboard, install a metal frame. It is more durable and reliable. The supports are also installed with the same measured distance and checked with a level. But they need to be attached to the sheathing, which is securely held on a wooden base. Self-tapping screws are also used for fastening.
When finishing the walls of a wooden house with plasterboard, some people glue the sheets directly to the walls, believing that they are quite smooth. However, this method is only suitable for concrete or brick walls.
There is also another method for finishing walls after shrinkage - creating new structures using sheets. In this case, the frame should be placed a little further from the walls and sheathed with sheets. It turns out that the partition is from scratch.
A lattice is created from the profiles, and a thermal insulation layer is laid between it. Then there is a vapor barrier layer of film. The film is secured by laying the sheets on top of each other, and then running tape along the seams. You can also install electrical wiring and hide pipes in the frame structure. It is better to insulate the wires in a corrugated pipe. It is necessary to first leave small distances in the frame racks, into which the cable can then be laid. It should fit tightly, for this you can use jumpers.
Install the frame so that there is a distance of 3-4 cm to the ceiling, and about 1 cm to the floor. To allow air to circulate freely during temperature changes, you can close such gaps with a plinth.
When the timber is prepared and the frame is built, you can move on to the next stage - covering the walls with plasterboard in a wooden house.
Useful tips
- Before leveling the walls, you should calculate the required amount of material for the work. To do this, the area of the surface to be finished is divided by the area of one sheet.
- Ceiling sheathing for plasterboard should not be made from a wooden block. Since it does not have a sufficient margin of safety to withstand the weight of the finish.
- The correct version of a metal frame for a room with wooden walls involves fastening the profiles using self-tapping screws.
- When installing lathing on a wooden ceiling, you should enlist the help of one or more people. You will need help when you need to sheathe the sheathing with heavy sheets. Even if you manage to lift them to a height with your own hands, you should take into account that the canvases are quite fragile and can simply crack.
- Before sheathing the inside of a wooden house, the walls should be prepared. To do this, all cracks are filled with construction foam. It is also important to exclude high humidity of the material. Although a gap will be created between the sheathing and the main wall, ventilation there will not be as intense, and if the walls are damp, the materials may become covered with fungus and mold.
- Before installing the frame under the drywall on the wall, you should select the material. If these are metal profiles, then the rack-mount type will need to be fixed to the profiles at the top and bottom using brackets. The main profiles are attached to the walls of the house with dowels. The distance between them should be maintained within 90 cm or less.
- Regardless of how the walls in a wooden house are leveled using plasterboard - without a frame or with its use, the sheets must be laid in such a way that they are staggered.
- The fastening of the sheets can be installed not on a wooden sheathing, but directly on the internal walls of the house. If irregularities larger than 20 mm were noticed before finishing, they should be leveled by applying glue in the form of cakes to the back of the plasterboard sheets.
- Before attaching the sheets, you should make sure that they have been cut taking into account the expansion joints at the top and bottom. To control the gap, you can lay pieces of gypsum board or foam plastic on the floor.
- The design of a kitchen or any other room after the glue has dried can be done in the traditional way. Typically, drywall is covered with wallpaper or tiles. The ceiling can be painted, which is the most affordable and fastest way to decorate surfaces in the house.
Attention! In order for the ceiling frame profiles in a wooden house to be installed as level as possible, the construction of the sheathing should begin from the most protruding point of the surface.
- If the frame, covered with plasterboard, will hide electrical communications inside, they should be laid in flexible metal tubes. They communicate with the house's grounding system.
- Standard cutting of drywall may seem like a daunting task for a beginner. In fact, this stage of the work is quite simple. According to the markings, it is necessary to cut through the cardboard layer of the sheet, and then lay it on the edge of the table and bend it. After this, the cardboard is cut from the reverse side.
Installation of drywall sheets
As a rule, this work is carried out by qualified builders. However, you can do it yourself. Let's look at how to cover the walls with plasterboard in a wooden house with your own hands.
- It is necessary to apply markings on the sheets of drywall where the vertical profiles will be attached.
- Using a knife blade, cut off the top sheet of the drywall panel and fold it into the cut.
- Turn the material over and cut the opposite side.
- Mark with a pencil an indentation from the edge of approximately 1 cm.
- Bevel the end edge at a 45 degree angle.
- Sand the bevel using sandpaper or sandpaper.
- To attach drywall to a profile structure, you will need self-tapping screws and a screwdriver.
- The sheets are overlapped.
- Self-tapping screws should be fastened in increments of no more than 20 cm.
After the installation of the plasterboard sheets is completed, the finishing stage begins. It is better to glue all the seams between the sheets with a special mesh and putty.
In this article, we reviewed detailed instructions for finishing a wooden house with plasterboard with your own hands. Turn your ideas into reality, create original multi-level ceilings, make shelving and partitions, or simply cladding walls. Make the structure reliable and durable so that you can hang decorative elements on the new wall in the future.
Marking walls for gypsum board cladding
Start work by marking the surface.
- Using a level and a plumb line, vertical lines are drawn from the corners of the room to the ceiling with an indentation of 5-10 mm.
- They are connected along the floor and ceiling with twines, creating a horizontally and vertically aligned rectangle.
- On the lower border of the rectangle, after 60 cm, marks are made for installing vertical posts.
Important! Before you begin covering wooden walls with plasterboard, you should make sure that all plumbing systems and electrical wiring have already been installed.