When planning the construction of a structure on a personal plot, each owner purchases raw materials based on his capabilities and the functional purpose of the structure. But the main criterion remains the long service life and reliability of the future building.
A brick foundation is an affordable option that you can build yourself. Although installing it will require a lot of effort, time and patience, the result will be impressive.
Let's take a closer look at the aspects of creating a brick foundation.
Thematic material
:
- DIY tire foundation
- Installation of a pile-screw foundation
The pros and cons of a brick foundation
Among the main advantages of such a foundation it is worth highlighting:
- No formwork installation required.
- Possibility of laying by hand.
- Selecting tape shapes.
- Reducing concrete consumption, which means saving money.
- Compatibility with other types of materials.
- Easily repairable.
- There is no need to involve special equipment or a team of workers.
- Good level of thermal insulation.
- If you perform high-quality waterproofing, then in terms of service life it will not be inferior to a concrete strip or monolith.
But it is worth considering the disadvantages:
- High labor intensity of work. Manual bricklaying takes a lot of time and effort.
- Mandatory reinforcement with reinforcement is required. Otherwise, its service life is reduced significantly.
- Brick has a high level of hygroscopicity. Due to this, its frost resistance is reduced.
In addition, this type of foundation can only be erected on a stable piece of land with a low groundwater level.
In some cases, it can be installed on moving soil, but provided that a reinforced concrete foundation is prepared underneath.
Which brick is better for building a basement?
Usually, when building a basement, the choice is between red and sand-lime bricks. Which brick is better for the plinth?
When choosing, you need to be guided by the idea that it is very close to the ground. All melt and groundwater will affect the condition of ceramite.
Therefore, you need to carefully study the technical characteristics of each type. These include: strength, durability and moisture insulation.
Remember! Cost is the last point that needs to be taken into account when building a basement. If you choose a cheap and low-quality option, think about your home in ten years. Repairs will cost much more than bricks!
Be careful when purchasing bricks. Take into account all the features of the climate and soil, then you can’t go wrong!
For what buildings can or cannot be used?
It is recommended to lay it out under light buildings on one floor. Among them:
- frame, wooden structures made of timber;
- gas silicate house or foam block;
- alcove;
- closed veranda;
- garage;
- bath;
- barn;
- fence;
- large greenhouse;
- outdoor oven.
Depending on the complexity of the design, a columnar or strip type is used.
You cannot lay such a foundation under two-story or three-story houses, where the walls will be made of brick or monolithic concrete.
There are no restrictions in the choice of material for cladding the facade of a building.
Choosing suitable types of bricks
Red fired solid (ceramic) is best. If we are talking about the construction of a furnace, then fireclay (fireproof).
Photo: construction of a brick plinth
Most often these types of raw materials are used because they:
- have a clay base;
- resistant to moisture;
- durable;
- durable.
They have no obvious shortcomings.
But it is important to pay attention to the quality of the material purchased. If the raw material is overcooked or not kept for the required time, it will take on a dull scarlet color and will have concave edges; over time it will begin to crumble, which will lead to the destruction of the foundation belt.
Clinker is suitable for cladding the facade. It is resistant to any manifestations of the external environment, lasts for decades, but its price is quite high.
White sand-lime brick should be used exclusively for finishing the basement of buildings made of block or wood. Despite its strength, it has high hygroscopicity and low frost resistance. The situation is the same with red hollow.
If you lay the base from silicate, then under the influence of moisture, after a few years, individual sections will begin to crack.
Advantages and disadvantages of brick construction
When building a brick foundation with your own hands, it is important to take into account not only its affordable cost, but also the main advantages of such a building:
- the ability to build a base of any shape and configuration without installing formwork;
- erecting a building with your own hands without involving third-party specialists and paying for their labor;
- compliance with laying technology during the construction of the foundation determines its service life of up to 40 years;
- If the masonry is damaged, you can repair the brick foundation yourself.
Resistance to a damp environment can be ensured through additional hydro and thermal insulation of the foundation base.
Choosing a brick for the foundation
For a brick foundation the following is used:
- Solid burnt red brick. It has good strength and water resistance. The following brands of brick are used: M-150, 175, 200, 250, 300. The number after the letter “M” shows the permissible load per square centimeter. It is also necessary that the frost resistance of the material (F) be in the range of 35–100, and the water absorption rate be from 6 to 20%. It is best to make the foundation from clinker bricks. It is fired at a temperature of more than 1200 °C, which makes it durable, frost-resistant and moisture-resistant. However, it costs significantly more.
Solid red brick is used for foundation work.
- Old, but intact brick. Broken brick reduces the strength of the foundation, as it cannot withstand the necessary loads, so it cannot be used for masonry. To construct a load-bearing frame, it is necessary to select whole bricks that have an even shape without cracks. The remainder can be placed in concrete as a compacting mass.
White silicate, fire-resistant and red slotted bricks cannot be used. Silicate and fireproof are not resistant to moisture, and slotted ones are not strong enough.
The material consumption is affected by the size, type, volume of the foundation and its depth. To calculate the number of bricks, it is necessary to multiply the volume of the base by the number of bricks in one m3 of masonry. This is an average of 460 pcs.
Technology and hand-made arrangement of the foundation
To understand how to properly make a brick foundation, you need to carefully study all stages of construction work.
Consistent reproduction of the necessary processes and compliance with building codes and regulations ensures the stability of the structure and the possibility of its long-term operation:
- land marking;
- land development procedure;
- arrangement of the foundation;
- laying bricks in the fill.
To carry out all procedures, you will need to purchase bricks and thermal insulation, waterproofing materials, and cement mortar in advance.
In addition, you will need a reinforcing mesh, and from construction tools it is important to prepare a container for mortar, a level and a tape measure, small pegs and a cord for marking the area.
Installing a drainage system to drain groundwater from the foundation: the easiest way to drain water from the houseRules for choosing workwear for builders: an overview of all the features
Strip foundation - step-by-step description of marking, installation of formwork and foundation filling (115 photos)
Types of brick foundations
There are two main types of brick foundations: strip and columnar.
Strip foundation
Strip foundations are more often used for permanent country houses.
The strength of the strip foundation allows you to build a reliable foundation for a country house
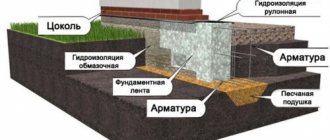
This type of foundation is a strip (tape). It covers the entire perimeter of the building and serves as a support for all the walls of the building. Load-bearing walls require a larger tape width. The strip base is used in the construction of houses with walls made of brick or stone and heavy ceilings, as well as in the arrangement of basements. With high-quality reinforcement, such a foundation can be erected on soils with a heterogeneous composition, consisting of sand and heaving loams.
Video: overview of types of strip foundations
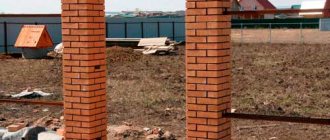
Columnar foundation
Columnar foundations are used for light frame, panel or wooden houses without basements.
A column foundation requires less brick than a strip foundation, but also withstands significantly less weight
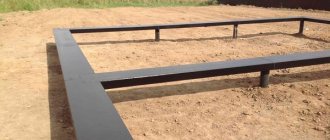
Brick pillars are installed in the corners of the building and at the intersection of walls and serve as support for heavy and internal load-bearing partitions. The pillars are connected by strapping beams that unite their heads. Walls are built on these beams.
Video: columnar brick foundation
Which foundation is better
In construction practice, both types of foundations are used, but strip foundations have higher strength characteristics. In addition, it is fundamentally important that moisture does not get into the soil that comes into contact with the brick. And it’s easier to do this by using a strip foundation with drainage and a good blind area.
Features of arranging a brick plinth
Before starting work, please read these recommendations:
- First, determine the thickness of the base. It depends on the material from which the house and the upper part of the foundation are made.
- Before laying ceramite, install waterproofing in the brick basement on a strip foundation. Thanks to it, moisture will not penetrate into the room.
- The bricks are laid flat. So that the next row overlaps the previous seams. When laying, you need to ensure evenness using a level.
- The brick for the base must be thicker than the material from which the load-bearing walls are built.
Take these features into account and avoid mistakes.
How to choose a brick for a strip foundation
Brick is the main material for a strip-brick foundation. The reliability and durability of both the foundation itself and the house or other structure as a whole will depend on its correct choice.
What brick should not be used for the foundation?
The construction of a foundation made of any (!) silicate and hollow bricks is unacceptable. I don’t think that no matter how good your waterproofing is, you cannot create a foundation from these types of bricks.
Fig.2 Sand-lime brick Fig.3 Hollow red brick
Which brick is better for the foundation?
For laying the underground part of the foundation, choose a solid red ceramic brick, high-quality fired. It is less susceptible to moisture than others and is characterized by high compression resistance.
Fig.4 Solid ceramic brick
The above-ground part of the foundation, the base and the upper floors can be laid out of white sand-lime brick. Such bricks can be used for an above-ground foundation only on a dry soil layer with low groundwater levels.
Brand of foundation brick
The correct choice of material grade plays a decisive role. It is necessary to take into account two main parameters - M (load per 1 sq.cm) and F (frost resistance - number of freezing-defrosting cycles). To construct the foundation, bricks of the M-150, M-175, M-200, M-250 and M-300 brands with frost resistance F 35-100 are used. The water absorption rate is also important. For underground masonry its value is in the range of 6-16%
Brick sizes
To build a strip-brick foundation, you can use standard bricks of the following sizes:
- single regular (250 x 120 x 65 mm);
- thickened (250 x 120 x 88 mm);
- modular (288 x 138 x 65 mm);
- modular thickened (288 x 138 x 88 mm).
Brick for the foundation: price issue
Today, prices for various brands of solid ceramic bricks vary from 8 to 20 rubles per piece (as of 2013). The final figure depends not only on the characteristics of the material itself, but also on the size of the purchased batch. The larger it is, the lower the price. Some retail outlets also offer delivery by vehicle with a crane manipulator - free or for a fee. In this case, unloading is accelerated, but you will have to leave the deposit value of the pallets. (A pallet can accommodate from 200 to 450 bricks).
Calculation of the number of bricks
The amount of brick required to build a foundation is determined based on the volume of the foundation. The volume is calculated taking into account the configuration and width of the tape, the depth of the laying and the weight of the future structure. For example, one cubic meter of brickwork described in our example will require 513 bricks. But we must not forget about the solution, which usually takes up about 0.25 m3 of the entire masonry. From here we get that there will be about 400 bricks in 1m3 of masonry. To calculate the total amount of material, you need to multiply the resulting volume by the number of bricks in 1 m³ of masonry.
Insulation and waterproofing for the foundation
When constructing a brick foundation for a house or other structure, the masonry must be protected from moisture and freezing. For this purpose, hydro- and thermal insulation materials based on extruded polystyrene foam (tiled), geotextile (rolled), cement-based (coated) or bitumen (sprayed) are used.
Fig.5 Sprayed waterproofing Fig.6 Rolled waterproofing
Reinforcement and masonry mesh
The brick foundation is strengthened directly during masonry work using longitudinal and/or transverse reinforcement. In the longitudinal direction, the masonry is reinforced with corrugated steel reinforcement rods (diameter 6-8mm); in the transverse direction, the role of reinforcement is played by steel wire mesh (wire diameter 4-6mm).
Fig.7 Reinforcement Fig.8 Masonry mesh
Cement mortar
For laying the underground part of a strip-brick foundation, a high-strength cement-sand mortar is used, and for the above-ground part it is permissible to use a mortar based on a cement-lime mixture with a similar ratio of cement and other materials in a ratio of 1:3.
Fig.9 Preparing cement mortar
When building on a site with high groundwater levels, the solution must contain waterproofing additives. The solution recipe generally depends on the type of soil.
Brick laying
Not knowing how to strengthen a brick foundation, in the process of laying bricks, a reinforced mesh is used, which goes deep into the cement mortar.
Foundation for a bathhouse: step-by-step description of construction, types of foundations and construction features (75 photos and videos)Foundation waterproofing: 115 photos of the optimal use of waterproofing materials
Foundation construction: main types, necessary materials and step-by-step instructions for installing the foundation (125 photos and videos)
After masonry is completed, it is necessary to ensure conditions for optimal settling and drying of the constructed foundation, and after 2-3 weeks it is necessary to concreting the soil.
DIY brick foundation
The brick foundation has not lost its relevance among developers building private houses, summer cottages and various household buildings.
The main advantages of a brick foundation
- Ease of construction. This foundation can be built even alone, since it does not have massive, voluminous parts.
- Possibility of construction in hard-to-reach areas. Brick foundations do not require the use of heavy machinery and expensive equipment, special tools and targeted delivery of materials. They can be erected in places where roads and access roads have not yet been developed, on slopes and heights.
- Stability of the structure. Brick foundations retain their flexibility throughout the entire life of the building, unlike monolithic structures and prefabricated reinforced concrete foundations.
- Reduction in cost at the preparation stage. To arrange these structures, complex preparations are not required, for example, installation of formwork or a reinforced base.
- Maintainability and reconstruction. During use, brick foundations can be built up and repaired, and individual masonry elements can be restored and replaced absolutely painlessly.
Preparatory stage
Those wishing to build a foundation of this type should know that not every brick is suitable for arranging the foundation of a building. It is advisable to prepare well-burnt clay bricks, which are resistant to high humidity and biological damage. For masonry, you need to prepare a high-quality mortar from seeded sand and high-quality cement.
The base area is calculated based on the design features of the building, its number of storeys, the total mass of the walls, roofing and other elements. To strengthen the foundation and improve its properties, the base of the base is made in the form of a concrete casting. Additionally, the finished structure is backfilled. An important parameter is the depth of the structure.
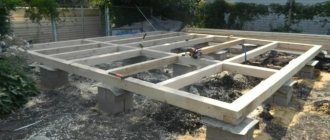
Columnar foundation construction technology
The foundation is erected on the basis of design and technical documentation, taking into account the size of the building and its design features, the total load and geodetic studies of the soil on the site.
Work begins with marking out the area for the future building along the axes.
Having decided on the type of structure, they begin digging trenches, which should be larger than the base of the house in order to install a waterproofing layer.
A sand cushion is created in the prepared pits, spilled with water and thoroughly compacted. Layers of waterproofing are laid on the sandy base, for which high-quality roofing felt or modern insulating materials of a new generation are used.
note
Installation of a columnar foundation is carried out in the form of free-standing columns measuring 510x510 mm (two standard bricks). Foundations are installed every 1500 mm, always at the intersection of external walls and in the corners of the building. For one-story and lightweight structures, the permissible dimensions of columns are 380x380 mm (one and a half standard bricks).
Qualified craftsmen must lay a metal reinforcing mesh through every 3 rows of masonry to increase the strength of the structure.
As a rule, finished brick columns should be 150 mm above the ground surface. To increase their durability and resistance to negative environmental conditions, they are coated on the outside with hot bitumen.
The top of the masonry is covered with roofing felt or other insulating material.
General recommendations
In areas with high humidity levels and high groundwater levels, foundation structures must be backfilled, filling the space between the trench walls and columns with coarse sand, gravel or crushed construction waste.
This technological technique allows water to be quickly drained from the foundation during operation.
In order to neutralize the negative impact of precipitation on the brickwork, a high-quality blind area is made along the perimeter of the building with a slight slope towards the site and a high-quality drainage system is organized.
Having finished building a foundation on your plot of land, you should remember that it is not recommended to leave it in the open air for a long period of time, for example during the winter, without reliable protection and insulation.
Instructions for constructing a strip-brick foundation with your own hands
Before starting work on the site, it is necessary to develop the configuration of the foundation and calculate its volume, taking into account the upcoming load (weight of walls, ceilings, roof) and soil properties. The width of the brick foundation should be calculated so that the strip is half a brick wider than the walls of the house. This allows you to conveniently lay the logs on the internal ledge when installing floors.
Instructions for marking the foundation can be read in the article: Marking for the foundation. Rules for constructing a rectangular foundation.
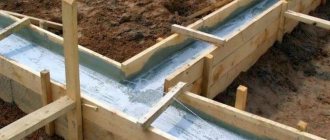
- Excavation work: a trench is dug under a strip-type brick foundation so that it is possible to lay a layer of waterproofing material on both sides along the masonry. On clayey and heaving soils, backfilling is necessary, so the width of the trench increases by at least 1 m.
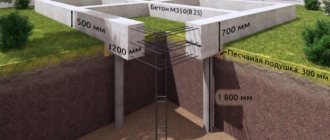
To calculate the depth of soil freezing in your city, you can use our calculator: Calculation of the depth of soil freezing. - Installation of a sand cushion with a height of 0.10-0.15 m. The sand is moistened and compacted until a smooth (level) surface is obtained.
- Laying waterproofing. For a simpler option, you can use ordinary roofing material folded in several layers, folded in the form of a pocket with vertical walls. It is advisable to use polymer materials for waterproofing.
- Installation of formwork and pouring a concrete pad 100 mm high. What is it for. By using a concrete base, you can increase the bearing capacity of the foundation. Concrete can be reinforced with metal rods and/or steel wire. (this stage is not mandatory, as it significantly increases the cost of the foundation) To calculate the composition of concrete, we suggest using our service: Calculator for calculating the composition of concrete.
- Carrying out masonry. Work begins after the concrete has completely hardened. The laying begins with the removal of the corners and is carried out by bandaging the seams of minimum thickness, in accordance with the “standards” of other brickwork.
You can read the process of laying bricks in our article “Do-it-yourself bricklaying”.
If subsequent plastering of the foundation is not planned, the seam is made flush. Otherwise, normal internal seams are acceptable. The seams between the foundation bricks must be filled with mortar. The external seams of the plinth are facing and should not be filled with mortar to a depth of 10-15 mm for better adhesion of the mortar during plastering. This type of masonry is called “wasteland”.
You can read more about seams on our website in the article “Seaming brickwork.”
On problematic soils, the masonry is reinforced.*
- After finishing the masonry work, the brick foundation will need time - about 2-3 weeks - for it to fully stand until the mortar finally sets.
- We have already said earlier that in areas with high groundwater and excessive moisture, it is necessary to carry out preliminary filling. But in addition to the sand cushion at the bottom of the trench, it is also carried out along the perimeter of the foundation. The space between its walls and the walls of the trench is filled with gravel, crushed stone, coarse sand or simply construction waste. This layer contributes to the accelerated removal of water during periods of prolonged rains and snow melting.
- To more effectively protect the foundation of the house from atmospheric moisture, a so-called beating is arranged - the soil surface is concreted along the perimeter of the foundation with a slope to the outside, which allows water to flow freely.
- Before erecting walls, you should re-insulate the foundation - this time its upper horizontal surface.
*How to reinforce a brick foundation
If the soils on the site where the house is being built are not stable enough, the strip-brick foundation must be reinforced. This design of the base will allow it to withstand serious mechanical loads even on problematic soils.
When carrying out work to strengthen the foundation, make sure that the reinforcement (2 belts of 2 rods each) is hidden under a layer of cement mortar to a depth of at least 2 mm. This will increase the thickness of the seam. For reinforcement, metal rods with a diameter of 6-8 mm are used. They are laid at a distance of half a brick from the side surfaces of the tape along its entire perimeter.
For transverse reinforcement, a mesh of steel wire with a diameter of 2.5-6 mm is used. If wire with a thickness of more than 5 mm is used, then weave in a zigzag manner.
Instructions for a columnar brick foundation.
From the author
Let's summarize this article. So the obvious things.
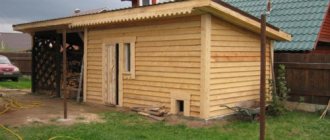
- A brick foundation takes place when it comes to stable soils with low groundwater levels. It is advisable to use for light structures: bathhouses, one-story houses, garages.
- We use only ceramic solid bricks with a frost resistance of at least 35 and a strength class of 150. Ideally, with maximum frost resistance and strength class.
- Brick is afraid of water, even the most waterproof. Therefore, a prerequisite for the construction of a brick foundation will be good waterproofing of the entire masonry.
- Brickwork must be reinforced with reinforcement or masonry mesh to increase its strength under mechanical loads.
- To increase the strength of the foundation, it is recommended to use a concrete pad under the brickwork. Although, as I understand it, for very light structures you can do without its use, especially in soils not subject to heaving. Still, such a concrete pillow is an additional expense of money.
Question: why use brick for a strip foundation, and not make a more popular and durable monolithic strip foundation from concrete and reinforcement? After all, as they write in books, the difference can be quite noticeable, namely 150 years for a monolithic foundation and 50 years for a brick foundation.
The first thing that should come to mind is the price, namely the cost of materials and the work itself. Let's try to count. We will not take reinforcement into account, since both concrete and brickwork are reinforced. We will also not take into account the labor costs themselves. Let's consider them more or less equal. In brick, this is the laying process itself, preparing the mortar. In concrete this is the installation of formwork, the creation of a reinforced frame. Provided, of course, that the concrete is poured using a concrete mixer.
Let’s simply calculate the cost of materials per 1 m3 of finished foundation.
Brickwork
According to the norms, 1m3 of masonry is 400 pieces. brick (250*120*65). The solution consumption rate per 1 m3 will be 0.25 m3. As a result, we get 4000 rubles. (400 bricks x 10 rub./brick) + 800 rub. (cement mortar) = 4800 rub. If we consider that we will lay the brick on a masonry mixture, then it will be even more expensive.
Table with consumption rates for bricks and mortar
Concrete
For 1m3 M-300 concrete we will need: 380 kg of cement, 0.5 m3 of sand, 0.8 m3 of crushed stone. As a result, we get 1500 rubles. (Portland cement grade 500D0) + 800 rub. (crushed stone) + 250 rub. (sand) = 2550 rub.
Comparison. The difference is exactly 2 times. By the way, if you order concrete with a concrete mixer, its average cost also fluctuates around 2500 rubles/1m3
The conclusion can be drawn as follows: a brick strip foundation is less durable and more expensive than a monolithic strip foundation.
How to make a brick foundation
The practice of laying a foundation with bricks is less common than a concrete foundation. But subject to certain conditions, the design has the right to use. Correct calculation of the load, high-quality material and strict adherence to the technological process will allow you to build a reliable brick foundation. The features of its arrangement will be discussed further.
Characteristics of a brick foundation
The use of brick support structures in construction has limitations. It is allowed to install it on dry, hard soil that is not prone to heaving, provided that the water level is low.
The construction of a massive building is not permissible; a brick foundation is intended for lightweight structures. Basically, it is used for a wooden house.
This is due to the properties of the material, which is characterized by:
- high level of rigidity;
- high hygroscopicity;
- poor resistance to low temperatures;
- strength indicators are at an average level.
A brick strip foundation can last from three to five decades if all requirements are met during construction.
Advantages of a brick support structure:
- The absence of heavy and large elements allows construction to be carried out without the involvement of special equipment or a team of workers.
- Ground movements will not provoke significant destruction; the base is more flexible than a monolithic concrete belt.
- Partial damage can be easily restored by replacing the masonry in certain areas.
- The arrangement of a brick structure does not require the installation of formwork, which facilitates the process of constructing the foundation.
However, the joyful picture is marred in places by the shortcomings of the material:
- Brick is hygroscopic and easily absorbs moisture, which negatively affects the strength of the foundation. In winter it freezes, and the number of freezing and thawing cycles is limited. High-quality waterproofing and insulation are designed to extend the life of the brick base.
- The cost of the material is higher than using concrete, and the service life is shorter.
- Not suitable for all land plots.
Important! If the soil is unstable, reinforcing the foundation will help strengthen the reliability of the brickwork.
Required materials
You can make a brick foundation with your own hands in a short time; for the work you will need the following materials and tools:
- Red brick;
- Boards for formwork construction;
- Sand or small crushed stone;
- Concrete mortar;
- Reinforcement – rods or mesh;
- Waterproofing materials – roofing felt, bitumen, primer, etc.;
- Shovel;
- Spatula for laying mortar;
- Rope and pegs.
Many people advise taking burnt red brick - its cost is significantly lower than a standard product, and its strength is no different.
Severe requirements are placed on these materials, as they affect the strength and integrity of the future structure.
- Bricks – fired solid brick with a high grade of strength and water resistance;
- Cement – strength grade not less than M400;
- Concrete mixture - the solution is mixed in strict proportions: 1 part cement and 3 parts sand (it is best to use river sand).
How to do it yourself?
The procedure for self-construction of brick foundation columns involves performing several successive procedures . They start with calculations and end with collection. Let's take a closer look at each stage of work.
Calculations
When starting to calculate the cross-section of brick supports, they are guided by empirical formulas to obtain the area of the sole suitable for holding the load from the structure.
The support area is affected by the dimensions of the design surface of the foundation base. It is usually customary to construct pillars with a square or rectangular cross-section.
When constructing a one-story building, it is more practical to build a square with sides of 0.38 m , or a rectangle whose dimensions are 0.38 * 0.25 m.
If a two-story building is planned, the cross-section of the pillars cannot be less than 0.5 * 0.5 m.
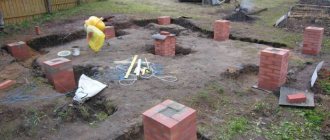
Marking
After preliminary cleaning of the building site, it is necessary to begin scrupulous cleaning of vegetation from the entire area . To prevent uneven terrain, it is necessary to immediately backfill all existing depressions with soil.
When the construction area is cleared and planned, marking begins. It is provided with metal pins installed at the points where the support posts are placed. Next, they begin excavation work, starting to dig along the pit marks.
Excavation
The work starts with the construction of recesses in which pillows will be placed for laying bricks on them . The excavation is carried out taking into account the dimensions of the calculated supports, and also provides an area for easy laying in a recess reaching 0.7 m.
Since excavation work is the most labor-intensive, special equipment is often used to carry it out.
Preparing the base
When the recesses are dug, a ten-centimeter layer of sand and crushed stone is poured onto their bottom . They definitely need to be compacted. After this, waterproofing is laid on such a cushion to protect the brick from ground moisture.
The base can be strengthened by pouring a 15 cm layer of concrete on top of the roofing material and placing reinforcement inside it. After a couple of days, it will be possible to begin laying bricks using the maximum strength cement mortar.
Masonry
In order for the bricks to reliably adhere into a strong support, it is necessary to use good cement (M-400 or M-500).
When laying, be sure to cover every three rows with reinforcing mesh . When carrying out masonry, we must not forget to check the rows for horizontal and verticality, using a building level.
The height of the supports must rise above the ground level by at least 20 cm. If the horizon has a slope, then this value refers to its highest point.
The masonry technology involves placing 4 bricks in each row , then the column will be square and have a void inside. It is filled with reinforcement, after which it is poured with concrete to significantly strengthen the structure being built.
Waterproofing of pillars
After completing the masonry process, it is necessary to additionally protect the columns from moisture. This activity is carried out using bitumen mastic vertically, as well as membranes to stop the rise of water upward.
Filling free space
To ensure that the mortar between the bricks dries slowly, so that it gains maximum strength, you must wait 7 days .
Then all the space remaining inside the recesses must be filled with gravel or crushed stone. This technology makes it possible to neutralize the effect of seasonal ground movements on the support.
Waterproofing the top of the supports and backing
It is necessary to lay a layer of roofing material on top of the brick supports, and then mount the Mauerlat on it . It is advisable to erect a fence between the pillars - filling the space with soil that can prevent cold air from penetrating under the lower surface of the building.
This event can also prevent free access to the base of the floor. This issue requires an individual decision, which depends only on the preferences of the future homeowner.
Mistakes during construction and ways to avoid them
Often, developers, after deciding to build a columnar foundation on their own, make mistakes that subsequently cause all sorts of problems.
They can be systematized by presenting a list of the most common flaws:
A significant defect in the constructed foundation is its uneven subsidence, which occurs due to inaccuracy in calculating the depth to which brick columns are embedded in the soil or their uneven deepening.- Brick supports receive an uneven load due to errors in planning its distribution (some forget about the desire to subsequently build on the second floor of the building and do not take its weight into account when calculating).
- When laying, they use low-quality materials - they buy cement of a non-recommended brand or one that has been stored for several years in the warehouse of a building materials store, they buy low-quality bricks (burnt out, with cracks), and they bring sand mixed with clay to the construction site.
- The actual state of the load-bearing characteristics of the soil was not taken into account when performing calculations.
To prevent these and other typical errors, it is advisable to order calculations from experienced specialists. It is also necessary to scrupulously monitor all construction activities as they are carried out.
Leveling the foundation with brickwork
The load-bearing walls of the building rest on the foundation. The secret to the stability of the structure depends on the evenness of each of its four surfaces. To level the bottom plane of the foundation you will need the following tools :
- shovel;
- construction plumb line;
- roulette;
- hammer;
- container for cement mortar;
- Master OK.
Creating a perfectly flat bottom plane of the foundation masonry at the bottom of the trench begins with the installation of a sand cushion. The lower plane is not visible, but its unevenness can lead to problems in the operation of the building. It will not be possible to level the uneven lower plane later; it is necessary to immediately make it perfectly level.
High-quality formwork allows you to obtain smooth internal and external surfaces. However, there are times when the foundation is not level, despite following all the rules for constructing formwork.
How to level a brick foundation? Methods for leveling the base surface
- Installing new formwork and pouring concrete solution allows you to cope with significant surface unevenness.
- Brick lining is important for eliminating minor defects in the base.
- Covered with a chain-link mesh, fixed with a thick layer of plaster.
- Covering with a layer of additional thermal insulation (expanded polystyrene, mineral wool) hides small irregularities.
Device
The base is an almost complete copy of a traditional reinforced concrete strip made of brick. It is located in a trench with a shallow immersion depth (recommended).
The problem with a brick strip is that it is unstable to moisture, so it is advisable to use this type of foundation only on soils that do not require deep immersion - sandy, sandy loam, ideally a rocky platform.
At the bottom of the trench, a sand and gravel cushion is installed, which performs leveling and drainage functions. The backfill layer is carefully compacted, after which a double layer of roofing material is laid to cut off capillary moisture from the lower soil layers.
After this, the tape is laid and other measures necessary for high-quality insulation of the base from moisture are carried out.
NOTE!
A leveling concrete layer about 10 cm thick can be poured on top of the sand and gravel cushion, strengthening the base for the masonry and reducing the risk of the tape being squeezed out when heaving loads appear.