A pile-grillage foundation on bored piles is a combined type of foundation made from support piles formed in the ground by concreting wells drilled in the ground. The second part of the foundation is a grillage that distributes the load on the pile field. This type of foundation has the highest load-bearing capacity and can be used to build large houses and private cottages from any materials.
A bored foundation with a grillage allows the construction of buildings on difficult soils: viscous, marshy, quicksand, heaving. A foundation on bored piles is indispensable in seismically active areas, areas with extensive networks of underground communications, as well as in soils with high alkalinity, where it is impossible to use screw supports.
Design advantages:
- increased resistance to vibration;
- possibility of construction under unfavorable geological conditions;
- ease of installation;
- lack of large volumes of earthworks;
- relatively low cost.
It is possible to make a bored foundation with a monolithic grillage without the involvement of specialists and professional equipment.
Flaws:
- danger of uneven settlement of supports;
- impossibility of constructing a ground floor and basement.
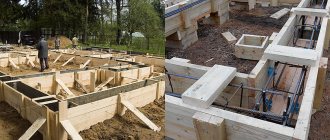
Stages of construction of a pile-grillage foundation
Preparatory work at the initial stage for this type of foundation will be the same as for any other:
- Clearing the construction site of bushes, grass, debris, large stones, etc.
- Marking the outline of the future building using pegs, construction cord and level.
- If a bored foundation with a buried grillage is proposed, then trenches are dug in accordance with the plan.
- For a hanging grillage, you can proceed directly to marking the pits for future piles.
At the next stage, work is carried out to create the piles themselves:
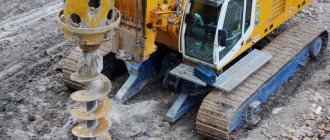
Drilling of the wells
If you plan to make your own foundation using manual drilling, then there is no need to talk about a well diameter of more than 30 cm.
For such work, you can use the well-known TISE drill, which also allows for hemispherical expansion in the lower part of the well.
You can use other designs of drilling tools: spoon, spiral, electromechanical.
Recently, permanent drills for soft soils have appeared on sale, which, after drilling, remaining in the ground, act as formwork for the future pile.
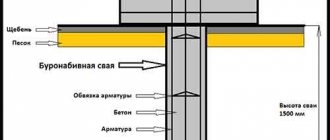
Manufacturing of internal formwork
For formwork in dry soils, it is quite sufficient to use roofing material rolled up and secured in the form of a pipe.
It allows you to protect the concrete of the pile from groundwater and freezing. If the groundwater level is high, metal or asbestos-cement pipes of suitable diameter can be used as pile formwork.
Laying reinforcement
The strength and reliability of future piles depend on the diameter and quality of the bundle of reinforcement rods.
For shallow well depths, the reinforcement package is prepared from the outside and then lowered into the formwork as a whole; for large depths, it is knitted and gradually lowered in parts.
If a pipe is used for formwork, the reinforcement can be prepared and laid in advance, then lowered into the well along with the pipe.
From above, the ends of the reinforcing wires should protrude from the formwork to the height of the grillage for subsequent connection of them together into a monolithic structure.
Pouring the solution
Preparation of the solution is no different from that for any other type of concrete work. The only thing that needs to be done first is to pump out the water that has accumulated in the well.
One of the advantages of this type of foundation is that all work can be divided into small stages, preparing and pouring concrete one pile at a time, without the need to prepare a large amount of solution at a time.
When all the piles are ready, you can proceed to the construction of the grillage formwork and filling it with mortar.
Installation of a bored foundation with a grillage
The implementation technology is described in SNiP 2.02.03-85 (formerly SNiP II-17-77). According to the documents, bored piles according to installation technology are:
- solid section - are universal, suitable for any soil;
- hollow section with a multi-section core - a complex option not used in private construction;
- with a compacted face - used for houses weighing more than 500 tons;
- fifthly, the technology includes blasting.
As can be seen from the classification, the only possible option for building a cottage is to build a foundation on solid-section bored piles, which have a simple design and L-shape.
To install a foundation with your own hands, you will need the following materials and tools:
- hand drill;
- casing;
- corrugated fittings 12 mm;
- concrete mixture;
- wire for tying reinforcement with a cross-section of 1.2-1.4 mm;
- waterproofing;
- insulation for grillage;
- boards for formwork.
In addition, you will need a standard set of tools: a tape measure, a laser or regular construction level, vibrating equipment for compacting concrete, etc. Concrete for filling wells can be mixed yourself or ordered from a concrete plant.
Characteristics of soil and its properties
Table of soil characteristics.
To more accurately characterize the soil and its properties, it is necessary to dig 2-3 holes 2 meters deep. All this is necessary because the soil on the territory is always different. Next, the site will become the foundation of the house - the foundation. In this way, the site for construction will be the most suitable and preferable, which will significantly reduce the problems that may arise when the foundation begins to form.
Construction site load:
We perform accurate calculations of the load on bored piles. Now you should collect all the building materials in one place - a pile. This calculation is quite simple to perform, since here it is necessary to use standard volumetric mass values in a free table.
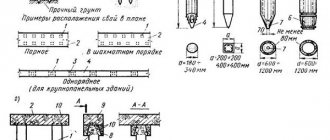
Bored pile installation technology: step-by-step instructions
Preparing the area and marking the future foundation
Preparation consists of clearing the area of debris and removing the plant layer of soil. If necessary, soil is added and compacted. The marking is carried out in accordance with the installation diagram for bored piles. The location of each well is marked with a milestone. In order not to make mistakes when marking, you can use boards or cords that will imitate the future tape grillage.
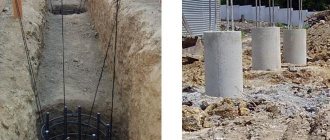
Well drilling
Drilling is carried out with a hand drill, which is buried to the required depth. During excavation, the soil is not thrown to the surface, compacting along the walls.
During the drilling process, it is necessary to control that the drill enters strictly perpendicularly, without deviating.
After developing a well, the diameter of which should be 5-7 cm larger than the selected diameter of the piles, the base is carefully compacted. If necessary, add a sand and gravel cushion of 10-30 cm.
Installation of casing pipes
Casing pipes prevent the walls of the well from crumbling and ensure safe work. According to the technology, pipes can not be used on dense clay soils and loams, however, when installing bored piles with your own hands, it is recommended to install them. It is much easier to install a reinforcing frame inside the pipe. In addition, the process of pouring and vibrating the concrete mixture is simplified.
Plastic, metal or asbestos-cement products of the required diameter can be used as casing pipes. If financial capabilities allow, then it is better to buy special casing pipes for wells that have prepared joints with convenient connections. The pipe is installed strictly vertically in the well. If a gap has formed between the pipe wall and the well, it must be filled with compacted soil.
Reinforcement
To create the reinforced frame, 12 mm reinforcement is used. According to Table 1, when building a cottage there is no need to use a complex reinforcement plan; 4 or 6 reinforcement rods are sufficient. The technology for connecting the reinforcing frame is very simple: the rods are arranged in a circle, forming a circle with a diameter 3-5 cm smaller than the size of the casing pipe. The rods are connected with wire. You can use clamps to secure them. Frame length = casing pipe length + 30 cm. The finished reinforced frame is installed in the well inside the casing pipe and buried in the ground.
The reinforcement cage must not come into contact with the walls of the casing pipes!
Pouring concrete mixture
The concrete used for pouring bored supports must comply with SNiP 2.03.01-84 and be at least class B12.5. For massive houses it is better to use B15 concrete. To pour concrete, a loading funnel is lowered into the wellhead. If you pour the mixture without a funnel, voids may appear. The concrete mixture must be poured slowly, each 0.5 m thick layer must be compacted for 5-10 minutes using a deep-well vibrating tool, and only then the next portion must be poured. You can start installing the grillage after the concrete has gained strength - after 3-7 days.
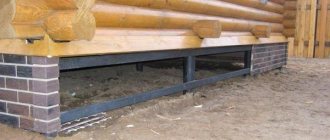
Working with piles
When all the supports are screwed in, make a grillage. The first step is leveling the height and filling with concrete. For this, the following can be used: board, timber, metal corner, beam.
The process of leveling the pile in height
Regardless of which material was chosen, it must be processed to extend its service life.
Formwork design for pouring the foundation grillage
A frame is mounted in it, which is secured using spacers. Then it is filled with concrete. After the concrete has hardened (this will take about a month), the formwork boards are removed. Concrete is treated with mastic for waterproofing.
We suggest you familiarize yourself with How to choose and make a foundation for a bathhouse
A layer of roofing material, also treated with mastic, is laid on top of it. After it has completely dried, you can begin building the walls.
The process of treating a pile foundation with mastic
After installation of screw piles, additional work is carried out. First of all, you should make sure that all supports are installed level. There should be at least 60 cm from the ground to the zero level of the house. We align all the piles so that they are in the same plane. For this you can use a grinder.
Next, the supports are concreted to give them strength. This will eliminate the possibility of tilting and deformation of the future foundation. It is also necessary to expel air from the cavities so that the foundation does not collapse in the future.
The mixture is poured into the internal void of the pile, it is also necessary to lay reinforcement, this will give the structure reliability. For this, a cement-sand mixture is prepared. Its consumption is 35 kg per 1 pile.
The final stage of mounting the supports is to weld the ends. After this, timber tying is performed. If you use a channel instead of a beam, then you can do without the heads. This will help you save a lot.
Working with a pile-screw foundation excludes the following actions:
- Adjusting the piles to the same level during screwing. This work is carried out after the installation of all supports is completed, otherwise it may provoke subsidence of the foundation in the future;
- Lengthening unevenly screwed in piles;
- Installation of supports less than 1.5 m into the ground;
- Creating preparatory holes for supports in the ground deeper than 50 cm;
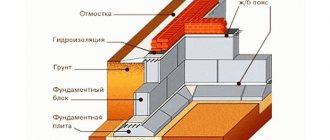
Grillage arrangement
A reinforced concrete strip grillage is made for the foundation of a private house. Lightweight structures, such as bathhouses and log country houses, allow the use of a wooden grillage. The simplest and least labor-intensive option is a low grillage, which rises 0.2-0.3 m above ground level. A high grillage up to 0.5-0.6 m can be used on wet soils to maximize the house’s elevation from the surface.
Stages of construction of a monolithic grillage:
Construction of the base and formwork
For low grillages, a gravel-sand cushion of 10-20 cm is used, on top of which a footing is laid - a 5 cm layer of lean concrete and waterproofing. Roofing material or waterproofing material is used as a waterproofing layer. The formwork is assembled from boards along the entire length of the grillage.
Reinforcement
The technology of tape grillage reinforcement involves the longitudinal laying of reinforcement bars, which are connected both to each other and to the reinforcement of bored piles. Proper reinforcement ensures a rigid connection between the bored support and the grillage. In stretched areas, 4 reinforcement bars of 20 mm are laid, in corners - 12-15 mm. To fasten the reinforcement into a single frame, vertical rods of 5-8 mm are used, the distance between them is 25-30 cm. The connection between the reinforcement frame and the grillage will look like this:
Pouring concrete
Concrete of class B12.5...B15 is poured into the formwork and compacted using vibration equipment. At an air temperature of +25 C, concrete must be periodically moistened. To ensure gradual hardening, the grillage must be covered with polyethylene. The final pile-grillage foundation on piles will be ready in 20-25 days.
Insulation of a bored foundation with a grillage
To create a favorable microclimate in the house, it is recommended to insulate the foundation. Piles buried in the ground do not need to be insulated; thermal insulation is necessary for that part of the grillage that is located above the zero level. Insulation and waterproofing of the base with a recessed grillage is carried out in the horizontal and vertical plane.
Thermal insulation is performed with foam boards or other foam insulation. It is impossible to use thermal insulators based on mineral wool, because... they intensively absorb moisture from the soil and quickly become unusable. The algorithm for creating hydro- and thermal insulation of a grillage is simple:
- Waterproofing is carried out: a layer of bitumen or rolled roofing felt. The top and sides of the grillage are waterproofed.
- The insulation boards are glued with glue and secured with dowel nails.
- Sealing of joints and corners is done using polyurethane foam or liquid polyurethane foam.
- The side walls of the grillage are finished with plaster or other decorative material.
Simultaneously with thermal insulation, a blind area is made, which also helps to conserve heat and remove moisture from the foundation.
A properly executed pile-grillage foundation on bored piles will last at least 100 years. The design does not require maintenance and is affordable.
You can ask your question to our author:
Load collection
Before calculating a bored foundation, it is also necessary to collect loads from all overlying structures. Two separate calculations are required:
- load on the pile (including grillage),
- grillage load.
This is necessary because a separate calculation of the pile foundation grillage and pile characteristics will be performed.
When collecting loads, it is necessary to take into account all elements of the building, as well as temporary loads, which include the mass of snow cover on the roof, as well as the payload on the floor from people, furniture and equipment.
To calculate a pile-grillage foundation, a table is compiled into which information about the mass of structures is entered. To calculate this table, you can use the following information:
DesignLoad
The dead weight of the foundations and grillage is determined depending on the geometric dimensions. First you need to calculate the volume of the structure. The density of reinforced concrete is assumed to be 2500 kg/cub.m. To get the mass of an element, you need to multiply the volume by the density.
Each component of the load must be multiplied by a special coefficient, which increases reliability. It is selected depending on the material and manufacturing method. The exact value can be found in the table:
Load type Coefficient