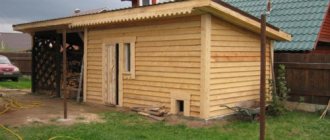
Becoming the owner of coveted acres of country land, many are faced with the question of how to build a shed without building a foundation with your own hands, with the least cost and effort.
Often a shed without a foundation is used to store tools, building materials, gardening equipment and sometimes serves as a makeshift shelter for the summer residents themselves.
First, it is better to draw up a visual diagram in which to mark all the zones and buildings.
Often, a shed does not serve an aesthetic function and is therefore perceived as something that needs to be disguised or hidden from prying eyes by placing it away from the house.
Since its installation will be done with your own hands, it is associated with an unprofessional, unpresentable and temporary structure.
Yes, and competently building a good foundation that would allow the barn to maintain its original appearance and functionality is not an easy task.
However, it is possible to turn a banal place for storing country rubbish into something quite solid and attractive.
Setting up a shed does not always require a foundation.
If this is a small one-story building made of wooden boards or beams, OSB boards or a metal cargo container, then other technologies can be used.
This will help anyone, even those far from construction, to build a high-quality shed with their own hands.
Lumber for building a shed
Knowing how to make a shed from boards without a foundation with your own hands, you need to choose the right starting lumber. The main materials for the construction of the building are timber and boards.
timber
For light construction, timber with a section of 50x50, 40x50 and 50x90 mm is used. Wooden elements are made from coniferous trees.
Since timber is the main load-bearing element of the shed structure, when selecting lumber, you need to pay attention to the absence of major defects in the structure of the tree.
Incorrectly dried timber may end up with a large bend. Such material cannot be used in the form of load-bearing vertical posts.
You need to purchase timber from those sellers where the material is stored under a canopy or indoors. In open areas, lumber absorbs rain moisture and loses its quality characteristics.
Board
The board can be edged or unedged. The facing board is also made with a device along the ends of the locking system - “tenon and groove”.
The cost of lumber depends on the quality of processing. For the construction of light buildings, boards with a width of 100–150 mm and a thickness of 15–25 mm are usually used.
Just like timber, the board must be taken from a dry room. The choice of board type depends on whether the structure requires expensive or cheap execution.
All lumber must be treated with an antiseptic before starting work. Some experts suggest the cheapest treatment method is to impregnate the wood with used machine oil.
In this case, you should remember that you can only store in the shed what will not be “afraid” of absorbing the heavy smell of machine oil.
Preparatory work
The board is great for assembling a shed.
In order to build a utility block without a base, you should start by choosing the correct location for it on the site. It is necessary that there is a convenient approach to it, and, at the same time, the barn does not bother anyone.
It is necessary to choose in advance the configuration, dimensions, style of construction and what materials it will be built from. It must be taken into account that the structure should not be very heavy.
For example, you cannot build walls of stone or brick, since these materials require laying a foundation. The best options are timber (solid or glued), small-diameter logs, boards (edged, not edged, even double-floored), as well as chipboard, fiberboard (for interior work), OSB boards, corrugated sheets, and lightweight metal.
You can use a ready-made metal container, subsequently improving its appearance with your own hands.
Foundation of the building
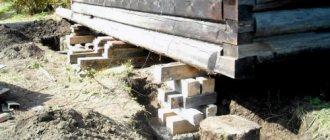
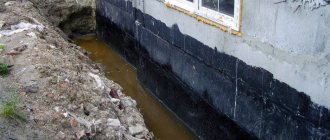
The absence of a foundation still requires the creation of some kind of supporting structure. First of all, the task of a barn support is to isolate the building itself from the soil foundation. A variety of materials are used for this.
The soil foundation on which the building will be erected plays an important role. If the soil is clay or peaty, then it is best to put the house on stilts. Short pieces of logs can be used as piles. On rocky soil or hard ground, small supports made of bricks, concrete tiles or other hard materials are laid.
The selected area for construction is covered with plastic film. The film is covered with a layer of expanded clay. This will protect the wooden structure from moisture penetration from below and will put a barrier against the flow of cold from the soil base into the room in winter.
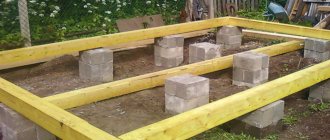
Point supports are placed in the corners of the barn and between them at a distance of 1.5 - 2 m. The supports should be laid out on crushed stone backing. All support points are controlled with a level. Any differences in height between the supports are eliminated with bedding.
To prevent moisture from penetrating into wooden structures from below, a layer of waterproofing is laid on the supports. The supports are simply covered with pieces of roofing felt.
Stages of construction of the base of a building without a foundation
How to make a shed base
Still, any building, including a barn, by definition must have one. The reader has two simple options to choose from. High speed of installation and minimum costs for the shed are guaranteed.
Option #1
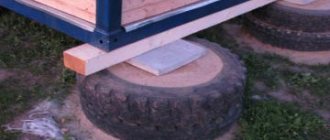
An often mentioned way to build a shed is on pallets. It is unlikely that such a technology deserves attention, given that such a base (made of wood) will rot quite quickly. With an expectation of 1 - 2 years, this is a good option, but this is more suitable for temporary structures that are installed on sites, for example, by builders and installers. This is not the best solution for the private sector.
Option No. 2
On supports. Someone will object that this is already a columnar type foundation. This is not entirely true - there are similarities, but small. The fundamental difference is in the depth of installation of the supports. For a small-sized wooden shed, they are dug in 50±10 cm. This is quite enough for the base to withstand a not so significant load.
After installing the posts, they are aligned on all planes, securely fixed in place, after which they are tied. The supporting frame is the foundation on which the shed will be built. It turns out that you won’t have to do any excavation work on the site (except for digging 4-6 holes) or preparing concrete mortar in large volumes. In fact, the barn is made without a foundation.
The advantage of this solution is not only the speed of construction of the foundation and the minimal cost of materials. Since timber, that is, wood, is used for strapping, it will not be difficult to install the frame posts on it with your own hands. Yes, and the barn can be slightly raised above the ground, even the structure can be leveled if the site is downhill.
Calculator for calculating the quantity and volume of lumber
What to consider during construction
It is advisable to start work directly when all preparatory measures have been completed. Since the supports (you can use fragments of timber or logs) will be in the ground, you should choose a method for processing them to protect them from rotting. The concept of “do-it-yourself” often implies that the owner makes do with improvised materials and not purchased materials and means.
A barn built using this technology has been standing on the author’s property for 12 years now. And there are not even indirect signs that repairs need to be done. By the way, the timber used for strapping should also be impregnated with mining.
Procedure for installing the base of the shed
Nothing complicated for those who are familiar with the technology of foundation construction.
- Marking the area for the barn.
- Digging holes. You need to try to ensure that their diameter is only slightly larger than the cross-section of the support.
- Bottom seal. It is advisable to load a little clay (but always oily) into each hole, and then compact this layer. It will protect the hole from penetration of liquid into it from below. Considering that the tree for the supports is coated with tar, this will be enough. The specificity of this method of constructing a shed excludes the possibility of using other insulating materials (film, roofing felt), since they cannot be correctly laid (and straightened) in small holes.
- Next is a layer of river sand or ASG.
- Installation of supports and alignment of each vertically and horizontally.
- Loading small gravel, broken bricks, etc. into the holes, compacting this mass.
- Filling holes with cement mortar. It must be made of a sufficiently liquid consistency so that it penetrates as deeply as possible.
After hardening of the artificial stone obtained in this way, you can tie the posts under the barn, that is, mount the support frame.
Option #3
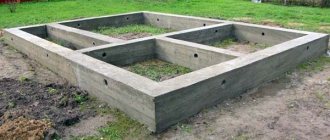
On the "sleepers". If the space allocated for the shed is fairly level, then this is the most convenient way to quickly build a shed. A timber is used (a log is not suitable in this case), which is laid horizontally. In order to make a small shed, 2 blanks arranged in parallel are enough. Under a larger structure (in width), it is advisable to mount a third one, the location for which is selected in the center.
Timber processing is carried out only by impregnation. Since the products placed on the ground are also the foundation on which the frame of the shed will be erected, the tree should not be coated with tar.
- Tracing the territory consists of marking the contour of the barn along the perimeter and determining the places where it is necessary to dig shallow (10 cm is enough) trenches. Timber will be laid in them.
- Preparation is identical to the method described above - soil compaction, clay, and so on.
- The bottom of each mini-trench is lined with P/E film, since the wood was not protected with tar. It makes no sense to use such a popular waterproofing material among summer residents as roofing felt. Within 3 years it will rot and the fungus will begin to destroy the wood.
- After laying the beam, it should be fixed to prevent horizontal displacement. There are two ways. An easier one is to drive pieces of reinforcement into the sides of the products, at the end parts. If a massive beam is chosen, and the barn is large in size, then 2–3 (depending on the length) through holes are drilled in each workpiece along the center line. Pins are also driven into them.
- The final stage is fastening the timber. All workpieces are connected with staples, metal plates, and corners. That's all - the strength and immobility of the base is ensured.
By the way, it is not necessary to dig trenches. You need to focus on your capabilities and local conditions. It is enough to fill the area with fine gravel, compact this layer well, and then lay the support beam on it.
There are a number of other methods for building a shed without a foundation. What they have in common is the presence of a support frame. The difference is in the columns on which it is installed.
There are also several options - reinforced concrete products, metal supports with plates, bricks and so on. The author did not consider other technologies for only one reason - the complexity of the connections. The supporting frame is made of wood, the posts are made of other materials. You can articulate it with your own hands, but why complicate your life by looking for a hammer drill, concrete drills, large metal drills or anything else.
Construction of a barn
The owners of the site can build a shed completely independently. If you have certain skills in working with timber, this will not cause any particular difficulties. The construction of the building can be divided into several stages.
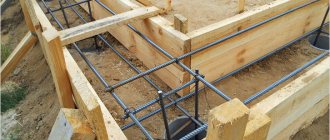
Support frame
The structure of a light building is a frame structure, where the load-bearing elements are made of timber. Wall and roof fencing is made of boards. The supporting base of the shed is made in the form of a frame made of timber:
- the timber is laid on supports;
- after laying the timber in the form of a frame, check the correctness of the geometry of the wooden rectangle using tape measurements along the diagonals of the frame;
- if the lengths of the diagonals differ by more than 20 - 30 mm, the fastening unit in one of the corners of the long diagonal is disassembled and the beam is shortened to the required size;
- The fastening points of the wooden frame in the corners are made in different ways. For this purpose, nails, screws and metal plates are used.
Mounting unit for frame and vertical stand with metal plates
barn frame
The load-bearing basis of the building is its frame made of timber. The wooden frame is formed as follows:
- Inside the support frame, logs are laid under the floor structure. The logs can be made of thinner timber, but their height is equal to the thickness of the frame timber.
- The logs are laid in increments of 900 – 1200 mm. The ends of the logs are attached to the support frame beam. Grooves are made in the frame and joist for fastening wooden elements.
- Vertical posts are installed on the finished frame. Vertical supports are placed at the corners of the building and between them in increments of 1.5 - 2 m. To prevent the vertical position of the racks from being disturbed, they are supported with temporary supports in the form of boards or timber.
- At the location where the door is installed, two posts are placed the width of the doorway. For the window opening, a timber frame is inserted, attaching it to the racks.
- If the length of one of the sides of the barn allows the installation of more than 5 racks, then a diagonal bevel from a board is installed in one of the openings. The slope provides additional rigidity and stability of the structure of the building frame.
- The upper ends of the vertical posts are tied with timber around the perimeter of the barn.
Wood frame diagram
Roof
The roof slope must comply with the requirements of SNiP according to local climatic conditions. Usually they make a pitched roof with a slope towards the rear wall. Rafters are laid along the top trim of the vertical posts of the frame.
A gable roof is usually made for the purpose of constructing an attic space. To operate an attic space, you need to calculate the load-bearing capacity of the wooden frame and plank flooring for additional load.
Attic gable roof
To prevent rain from flooding the facade of the barn, where the front door and window openings are usually located, the overhang of the rafters is made from 400 mm to 600 mm long. The roof overhang from the rear wall is allowed within 200 - 300 mm. On the sides of the barn the roof overhangs by 200 - 300 mm.
The plank flooring is nailed along the laid rafters. Rolls of roofing felt are spread on a plank surface. Strips of roofing felt are laid in rows perpendicular to the roof slope with an overlap of 200 mm on bitumen mastic. Along the slope, roofing material is nailed with slats in increments of 0.5 - 1 m.
In a more expensive version, the roof is made of slate or ondulin, the latter is produced in the form of corrugated sheets or flexible tiles.
On a gable roof, a galvanized iron ridge is installed along the junction of the two inclined surfaces of the roof.
Galvanized gutters are hung under the overhangs on both sides of the gable roof to drain rainwater from the walls of the barn.
Floors
Laying floors for a barn consists of installing plank flooring along the joists. They do it like this:
- The boards are cut to the length of the frame across the joists.
- Inside the shed, boards are nailed to the laid joists. To store heavy objects, floors are made of boards at least 25 mm thick.
- To close minor gaps between the boards, the floor is covered with linoleum or covered with fiberboard sheets.
To store wheeled vehicles, a small ramp is built in front of the entrance. It is made of monolithic reinforced concrete, brick or in the form of a metal welded structure.
Video “Do-It-Yourself Shed”:
Walls
The frame of the building is sheathed with boards 15 mm thick or thicker material in the absence of other lumber. For the installation of plank walls, unedged boards, lining, and profiled lumber are used.
The wooden frame is sheathed with boards in a vertical position and in a horizontal direction. It all depends on the requests of the owner of the site. The higher the quality of the lumber, the higher the cost of building the facility. A very simple structure is sheathed with cheap unedged boards.
If the barn is a representative room, then the walls are formed from high-quality processed boards.
American-style walls are a set of horizontal boards fixed above each other with an overlap of 2-3 cm. Such fencing gives the building an attractive appearance. Thanks to the stepped surface of the walls, rain moisture does not linger on the external fences. The boards are packed from the bottom up and do not form gaps between each other.
The walls of the barn, lined with clapboard, in the “American” style.
Cladding of the frame with clapboard begins from the bottom immediately along the entire perimeter of the building. If you cover the walls one by one, there may be a risk of mismatch in height of the rows of boards at the corners of the walls.
When a barn is built to store firewood, the frame is lined with a simple slab. The gaps between the boards facilitate ventilation of the room. Stored firewood will always be dry. Boards can be nailed not only vertically, but also diagonally.
Often the room is divided by a partition to separate property with different purposes. The partition is made from any sheet material (plywood, fiberboard sheets, chipboard). A small door is cut into the partition.
Openings in the walls
In small buildings, they make do with one entrance door and a window opening. In this case, you can use a used door leaf and an old transom for the window.
In a more presentable building, a plastic window and door are inserted. If large items are to be stored in the barn, then two door panels are hung in the form of small swing gates.
Window openings are best located on the western and eastern sides. This will allow you to “capture” more daylight.
Lighting
Internal lighting must be organized in compliance with fire safety rules. The connection diagram of the light sources must completely exclude the possibility of a short circuit. Any slightest spark can lead to irreparable consequences. The wooden building burns down in a matter of minutes.
To illuminate the interior of a building, it is best to use fluorescent lamps or spotlights.
Pros and cons of such a building without a foundation
Such outbuildings are practiced even by people who have lived in the countryside all their lives. If you build a barn without a foundation, it will have the following advantages:
- Time-saving construction.
- Budget option - no extra expenses for the foundation.
- It will take less effort to build it.
- Despite the lack of a foundation, the building will be strong and stable.
For the sake of fairness, it is worth mentioning the disadvantages of such a structure:
- The floor will have to be additionally seriously insulated so that the inhabitants of the barn do not freeze in winter.
- To prevent water from causing the wood to rot, the walls will need to be seriously waterproofed.
- A building without a foundation will last you 20 years, but with a foundation it will last you half a century.
- The construction site will need to be prepared in the most careful manner.
If all this seems trivial to you compared to the benefits, then you can get down to business with confidence. Wooden boards, even today, enjoy deserved popularity due to their low cost and durability.
In what cases will it be relevant to build without a foundation?
Armed with our recommendations, you will be able to build a shed in your country house without a foundation. This structure is suitable as a temporary building if subsequent redevelopment of the site is planned, and it will be possible to build a more permanent shed. Also, in warm regions of the country there is no need to spend money on extra building materials for the foundation.
Getting ready for construction.
- First comes the calculations and selection of material, waterproofing, tools and the shed design itself.
- Without a foundation, it is only possible to build a one-story structure, otherwise the ground will simply begin to sag in front of a multi-story structure without a foundation, and the walls and floor will collapse.
- Also, the earth may not support a building area of more than 20 square meters, and do not make the height of the barn higher than 3 meters.
- The building structure itself will be frame, i.e. First, the base is prepared, and then it is covered with boards, then with waterproofing, insulation and finishing.
Drawings - what sheds are like.
The simpler the project, the easier it will be for you to implement it alone. It can be rectangular or square, but in a room that is too narrow and long, the animals will feel cramped and uncomfortable.
We choose the material. Building material calculations
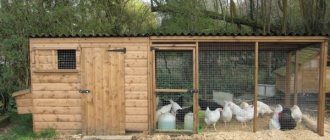
In order for a shed to appear on your site, you need to make it yourself. For this case, step-by-step instructions are included. But first you should understand the material from which it will be created. In this case, the following types of boards are suitable: spruce, pine and oak - excellent for constructing a barn for livestock. And why?
- They smell nice.
- They do not absorb foreign odors.
- Durable.
- Not susceptible to mold.
Oak bars for construction must be square/rectangular and have a cross-section of 100x100 mm or 100x60mm. In order to correctly calculate the necessary building materials, it is necessary to take into account the following points during construction:
- At the corners we will need 4 identical beams, 3 m 20 cm long. If the height of the walls is 3 m, then we will bury 20 cm in the ground during installation.
- Next, calculate how many transverse bars will be needed if they are located half a meter from each other. Moreover, they will be needed not only up, but also down.
- And now the boards - they need to be on the walls, and on the ceiling, and on the floor, and they will lie very tightly to each other.
- If you decide to build a classic barn with an area of 20 square meters, then you will need:
- Timber - 210 m - this will be 70 three-meter timber.
- Wooden boards 188 sq. m.
Approximate calculation of the number of wooden boards.
The exact dimensions of the future building will tell you the required number of boards for construction. Typically, the height of the barn is 3 m, length 5 m and width 4 m. First, we find out the area of the building - multiply the length by the height - 3x5. This is the area of one wall, and the wall parallel to it will have the same area. Next, multiply the height by the width - 3x4. We get the area of another, narrow wall. The wall opposite it will have the same number. The floor is equal in area to the ceiling. For their area, multiply the length by the width - 5x4. All that remains is to add up all the resulting numbers. It will be sheathed with boards both outside and inside. The resulting figure 94 must be doubled.
Insulation with waterproofing is calculated according to the same principle.
What insulation is better to use?
Even in the southern regions of our country, the barn requires insulation to make it more comfortable for livestock to stay in it. After all, they sleep on the floor, so it must be waterproofed and insulated. Otherwise, expect losses in livestock numbers.
For insulation you can use:
- Cotton wool (glass, stone, mineral).
- Polyurethane foam.
- Ecowool.
Cotton wool is considered a cheap material, but at the same time it absorbs moisture very well, so it begins to sag very soon. Therefore, it is better to take it into account only as a last resort. And glass wool is completely dangerous for animals. If it gets on their mucous membranes, the animal may die. Therefore, if the need for cotton wool arises, use mineral or stone.
Ecowool is more expensive, but it is environmentally friendly and absorbs less moisture. It is clean and retains heat well in the room.
Polyurethane foam is the most expensive of the insulation materials, but it is worth it - it does not allow moisture to pass through and retains heat in the room perfectly, and does not sag even with long-term use.
Moreover, even one layer will be enough, while any type of cotton wool is better laid in two layers.
We insulate the walls, floor and ceiling from moisture.
Waterproofing is a key point when building a shed without a foundation. The longevity of your building depends on it, on how well you carry it out. Moreover, this must be done literally over the entire area - and on the ceiling as well.
In general, waterproofing can be:
- painting
- sprayed.
- coating
- pasted over.
There is also the option of using bentonite mats, injections and membranes as waterproofing.
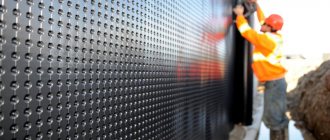
Coating waterproofing is bitumen, a pungent-smelling substance. Despite its cheapness, it is not a reliable method.
But pasted insulation against moisture is already a serious thing. This is a self-adhesive roll material. Paint insulation requires special equipment for application, based on the principle of powder paint. Layering by injection is very expensive in terms of finances.
But membranes/mats are also expensive, but they will last you at least 70 years. Therefore, if possible, it is better to choose them for waterproofing.
Necessary tools.
We have already chosen the project, and made calculations of the materials and costs for it. All we have to do is choose the right tool. Here's a list of what you'll need -
- plane.
- drill.
- saw.
- self-tapping screws
- screwdriver
- nails.
- hammer.
- building level.
- construction corner.
- pencils.
- cable for wiring into the room.
- construction stapler.
- marker for marking.
What else could you need?
- Wooden door with hinges.
- A small window, it doesn’t matter if it has a wooden or plastic frame. With it, the day will be brighter and there will be no need for daylight lighting.
- For partitions, use OSB panels.
- Light bulb with shade.
- A switch for her.
- Socket.
- Cement in mortar for pouring supports.
- Crushed stone with sand.
- Corrugated sheeting for the roof.
- Polyurethane foam.
Protective coating of external surfaces of a wooden shed
To protect wooden structures from the negative effects of the environment, protective coating of wood is carried out in three ways:
- annealing;
- varnishing;
- coloring
Annealing
Before installing the walls, the boards are annealed. This is done using a blowtorch. The essence of the process is that the open flame of the burner creates a charred layer on the surface of the wood. The charred layer creates a waterproof coating.
Under no circumstances should this be done on walls that have already been erected. Any careless movement may cause a fire. Annealing is done in a separate place for each board in turn.
Varnishing
External surfaces are coated with varnish for outdoor use. The wood is first impregnated with drying oil - this strengthens the structure of the wood and reduces varnish consumption.
Varnishing is done using a brush and roller. When performing work, personal protective equipment is used: goggles, a respirator, a gauze bandage and gloves.
Properly done varnishing will preserve the attractive appearance of the structure for a long time. During the operation of the building, it is necessary to monitor the condition of the varnished surface and promptly eliminate violations of the integrity of the coating.
Coloring
Paint the wooden surfaces of the shed with ordinary oil paint intended for exterior use. As in the previous case, before painting the wood is impregnated with drying oil.
Painting is carried out using personal protective equipment. Paint the walls with a roller or brush. It is necessary to always have a solvent on hand. They are used to dilute thick paint and remove various painting flaws.
Boards and slabs
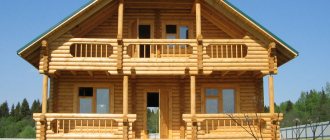
If you need to build a wooden shed with your own hands, but have financial difficulties, you can choose a budget option - a frame structure with cladding made of boards or wood-based slabs. Despite all its apparent simplicity and flimsiness, such a shed will last for decades, and if made well, it will fit perfectly into any backyard.
In this case, timber will serve as the material for the frame. It is easy to work with, and the resulting structure will have sufficient strength and reliability. This solution is perfect for wetlands, where it is impractical to build a permanent building on a foundation.
From all of the above we can conclude: wood is the best material for a shed. This is true. A wooden shed benefits from a number of characteristics:
- ease of manufacture;
- short work deadlines;
- availability of material;
- environmental cleanliness;
- the ability to build a cold and warm barn.
It is also worth noting the fact that the final finishing of a barn, like any other wooden structure, is characterized by extreme simplicity and an abundance of options. Any method is suitable here: from budget painting to original clapboard paneling.
Fire safety equipment
Wooden buildings are prone to fire quickly. Therefore, fire safety requirements must be complied with:
- A shield is installed near the barn with fire extinguishing equipment mounted on it, such as a hook, a shovel, an ax and a bucket.
- Sand must be stored in a closed container. In winter, it will simply be impossible to use frozen pieces of sand.
- If the natural reservoir is located far from the building, then it is better to store the water supply in a barrel or in an old bathtub.
- The fire extinguisher is placed on the outside of the wall so that it is protected by the roof overhang. Keeping a fire extinguisher inside a shed is pretty pointless. During a fire, the availability of the device is questionable.
Construction of a shed without a foundation will preserve the root system of the surrounding soil, save money on the construction of the structure, free up the usable area of the home from all unnecessary things and increase the comfort of gardening.