Every homeowner wants his home to be not only convenient and comfortable, but also durable, strong and reliable. In order for a private house not to require repairs several years after the start of operation, it is important to protect not only it, but also the foundation of the building. This can be done not only by properly designing and constructing housing, but also by ensuring the drainage of groundwater and precipitation. The drainage system allows the foundation to be protected from groundwater; as for precipitation, it is removed using a blind area. This element is not complicated, you can do it yourself, because it does not require a lot of effort, time or money. How to properly make a blind area around the house with your own hands? Let's figure it out.
Why do you need a blind area?
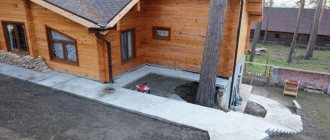
We have long been accustomed to the fact that there should be a path around the house: it gives the entire layout a finished look. Especially if combined with the finishing materials used to decorate the building. In addition, it is practical: you can walk along the path. And the fact that the path is a blind area, and its main purpose is to drain water, is a successful combination of the properties and qualities of materials and a well-thought-out design.
The main function of the foundation blind area is to remove sediment from it
If you look at it from a utilitarian point of view, the blind area drains rain and melt water from the foundation. The second very important practical task that can be solved with its help is to insulate the foundation. If you put insulation under the walkway, it will protect the house from freezing, which will greatly reduce heating costs.
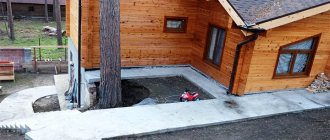
When should a blind area be done? Immediately after finishing the external walls, but before finishing the basement. Why is that? Because a compensation gap must be left between the finishing of the blind area and the wall of the house. This is an excellent path for water that flows down the wall of the house (falls on the walls during slanting rain, for example). But it is impossible not to make this gap - the foundation will collapse. It is also unrealistic to seal the gap hermetically. The solution is to make sure that water does not get into the gap in any case. This can only be achieved if the base trim hangs over the seam. Then the water will flow a few centimeters further from the seam, and then fall into the drainage grooves. This can only be done if you first organize the blind area and then finish the base.
Why do you need a foundation blind area, when to do it, we figured it out, now it remains to understand how to do it correctly.
Kinds
A soft blind area will add a little warmth to the design than cold and austere stone or tiles
Based on the type of surface, a distinction is made between hard and soft blind areas. The first is made of concrete, sandstone, asphalt concrete and other materials that ensure the strength of the coating. The second is made from mulched soil or soil with lawn grass, crushed stone or paving slabs.
Pros and cons of a hard blind area
The advantages of a solid blind area are its strength, maintainability and durability. But the disadvantages are that, being laid directly on the ground, it is exposed to negative effects at the moment of freezing and thawing of the water in it. This gradually leads to the destruction of the foundation and moisture entering the house.
You can avoid exposure to moisture by regularly carrying out repairs and sealing cracks.
Advantages and disadvantages of soft
Soft blind areas are increasingly used in construction, as they have several advantages over hard ones:
- It is not afraid of seasonal vertical shifts of the soil caused by the freezing and thawing of water at its base. There are no cracks in it through which moisture can enter the foundation, destroying it. It does not need to be constantly repaired, wasting effort, time and money on it.
- The technology for laying it is simplified, since you don’t have to adhere to the slope from the walls of the building.
- It is distinguished by its practicality and aesthetics. A successful choice of external covering - gravel, crushed stone, flowers, climbing bushes or lawn plantings - makes a building with such a blind area spectacular and original.
You can achieve greater efficiency during installation by using penoplex as insulation. It will help reduce the depth of seasonal freezing of the soil around it. Thanks to this, even in the presence of clay soil, installation will occur with less depth of the building’s foundation.
The only drawback of a soft blind area is the need for constant care. Lawn grass will need to be trimmed, weeds that have grown through the rubble will need to be removed, and decorative backfill will need to be cleared of debris.
Concrete blind area is ideal for our climate
Blind area dimensions
It is necessary to remove sediment from the foundation along the entire perimeter. That’s why a protective belt is made around the house. The width of the blind area is determined depending on the type of soil on the site and the length of the eaves overhang. In general, it should be 20 cm wider than the roof overhang. But SNiP sets minimum standards: on normal soils the width of the blind area is at least 60 cm, on subsidence soils - at least 100 cm.
The width of the blind area of the house is at least 60 cm on normal soils and at least 100 cm on subsiding soils
Blind areas around the perimeter of buildings must be prepared from local compacted soil with a thickness of at least 0.15 m. Blind areas should be arranged with a slope in the transverse direction of at least 0.03. The edge mark of the blind area must exceed the planning mark by at least 0.05 m. Water falling on the blind area must flow freely into the storm drainage network or trays.
From this passage it is clear that the depth depends on the technology chosen, but cannot be less than 15 cm.
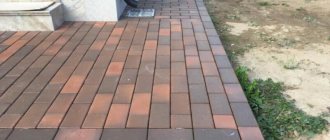
Why choose paving slabs?
Despite the fact that concrete protective covering is cheaper, many homeowners lay paving slabs. This happens because the tiles:
- long service life while maintaining the original appearance;
- it is possible to construct a blind area without the use of special construction equipment;
- the technology eliminates the laying of a reinforcing frame;
- ease of repair, dismantling and reassembly without extra costs;
- beautiful appearance and the ability to choose the desired color shade of the surface.
In addition, the technology for constructing such a blind area allows you to complete all the work yourself, without involving additional assistants. This way you can reduce costs and do this coating in your free time.
What does it take to get the job done?
To work on constructing a blind area from paving slabs, you will need the following materials:
- colored or gray tiles, equal in total area to the surface of the blind area, which will first need to be measured and calculated;
- roll waterproofing or thick polyethylene film to cover one and a half area of the blind area;
- geotextiles with an area equal to the size of the waterproofing;
- curb stone along the entire perimeter of the outer edge of the blind area;
- sand, quarry or river;
- cement grade of at least M300;
- crushed stone;
- ordinary clay;
- drainage collectors.
If you do the work yourself, you will need a set of tools, which includes:
- measuring tape at least 5 meters long;
- pegs and nylon cord;
- building level;
- bayonet and shovel shovels;
- rubber hammer;
- Master OK;
- container for mixing mortar and concrete.
After you have purchased all the necessary materials and prepared the tools, you can begin work. You can watch the progress of work and a description of its stages in the attached video at the end of the material.
Preparatory work
For quality installation, it is very important to properly prepare the base.
To do this, first of all, you need to remove the surface soil over the entire area occupied by the blind area of the house, which means that it is necessary to mark out the area of the future protective coating. The width of the covering should be at least 60 cm, but it is recommended to make the flooring from one meter to one and a half. The fact is that the wider the strip, the more convenient it is to walk along it, and the effectiveness of protection from water is proportional to the width of the blind area. But you need to remember that excessive width will lead to additional financial costs.
Using a tape measure, measure from the wall near the corner of the building a distance equal to the width of the blind area you have chosen and drive a peg into the ground. Repeat the action near the other corner. Stretch a cord between the pegs and you will see where you need to remove the soil.
Excavation
After marking, it is necessary to remove the soil from the work site. The depth of the excavation consists of the thickness of the tiles and 30 centimeters for arranging the base for laying. As a result, it turns out that you actually need to remove the soil almost to the bayonet of a shovel.
The first layer in the dug trench is a layer of clay, 8-10 cm thick. When laying it, it is advisable to make a slope away from the house. This will ensure better water drainage to the side. The clay must be compacted well. This can be done using a special construction mechanism or manually - with a tamper or shovel.
A layer of sand at least 5 cm thick is poured on top of the clay and compacted in the same way as clay - at a slope from the building.
Waterproofing works
The installation of the waterproofing layer itself does not take much time.
As a waterproofing material, you can lay roofing material, gilroizol or durable polyethylene film. Waterproofing and roofing felt are durable and reliable, but polyethylene costs less and is easier to install. But, despite the cheapness of polyethylene and the fact that many people use it, a choice must be made between good quality, durability and low price. You just need to roll out the rolls over the surface, cutting off the required length. The edge adjacent to the wall is bent with a slight rise along the surface.
Installing a curb
After waterproofing work, you need to install a curb in such a way that the blind area around the house made of paving slabs is strictly limited and does not have horizontal movements. The line for its installation is determined by the width of the tile and must be a multiple of its size. The trench for installing the curb stone should be 20 cm wider than it.
Now you need to mix the cement mortar with crushed stone at the rate of 1 part cement, 3 parts sand and 4 parts crushed stone. Lay part of the concrete in the trench and place a curb on it, and throw the rest of the concrete into the empty space between the ground and the curb stone.
When installing a curb stone, you must constantly measure the height of its position using a level or level.
Base structure
A layer of sand about five centimeters thick should be poured onto the waterproofing layer. This layer must be carefully leveled and compacted. If the sand is dry, then you need to moisten it, otherwise you simply will not be able to lay and compact it well. To level the sand, you can use a simple piece of plywood with a straight edge.
The next layer (see photo), 8-10 cm thick, should be compacted crushed stone. A layer of sand up to five centimeters thick is again poured over the crushed stone.
After this, all layers must be simultaneously spilled with water and compacted well.
At this point, the preparatory work with the foundation structure is considered complete.
Tile laying
It is best to start laying from the corner of the house. When laying, try to fit the individual tiles as closely as possible to each other. If this does not work, then determine for yourself the permissible gap and insert plastic crosses or simply wooden chips between the tiles. The gaps will allow you to make the masonry even, regardless of the quality of the material.
After all the paving slabs for the blind area around the house have been laid, mix the solution in a proportion of one part cement to three parts sand for subsequent fixation of the tile covering. The solution must be made thick, since the liquid mixture will quickly release water and the quality of the solution will decrease.
The volume of the prepared mixture should not exceed the quantity required at the moment (approximately for laying two dozen slabs). If you do more, the solution will begin to settle and thicken over time, and its layout will become difficult. Agree, you will not immediately sell the entire prepared volume.
Remove one row of already laid tiles from the sand and place a layer of prepared mortar on the sand. The thickness of the layer must be at least three centimeters. When laying, try to make the layer of mortar near the building a little thicker. This will create the necessary slope for more efficient water rolling.
Now lay the tiles in the place where they were before, but on the prepared cement mortar. When laying, use a rubber hammer to tap the tiles into place and level. You can use a flat and durable wooden slat, with which you can easily level several tiles at the same time.
Continue laying tiles in rows, but do not remove more than one row at a time. To check the quality of the masonry, use a building level. The rows should be laid horizontally perfectly, and in a line perpendicular to the wall of the house with a slight slope from it. This masonry technology provides a flat surface with a slope that allows unhindered drainage of water.
Timing after installation
When you have laid paving slabs on a sand-cement base, they need to be given at least two days to cure. At this time, you should not step on it or place heavy objects on it. The complete setting time of the cement mortar occurs on average in two weeks, depending on the outside temperature and humidity.
Device technology
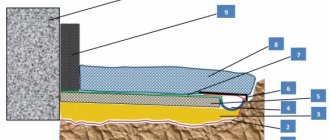
Any blind area consists of an underlying layer and a protective coating.
Backfill: what materials to use
The purpose of the underlying layer is to create a level base for laying the protective coating. Its thickness is about 20 cm. Sand and crushed stone are often used for these purposes, but native soil or clay can also be used.
The simplest design of a blind area made of clay
Sand and crushed stone are used on well-draining soils. In this case, sand is first laid, spilled and compacted. Then there is a layer of crushed stone, which is also compacted.
If the soil on the site is clay or loam, then it is better to use native soil. If, with such soils, crushed stone or sand is laid around the foundation, then water will certainly be present near the house. Because it turns out that the density of the soil outside the underlying layer will be higher. This will cause water to accumulate under the blind area. If, with this design, a drainage pipe is laid around the perimeter of the bedding, the problem will be solved. And it’s effective. But there will be more work, and the cost of the blind area with drainage will be higher.
Types of protective coating
The covering for the blind area must meet many requirements:
- should not allow water to pass through;
- must be frost-resistant;
- have increased abrasion resistance;
- should not be destroyed by water.
This could be paving slabs or paving stones. The shape and color can be very different - you select based on the general design of the territory and the houses of nearby buildings. The thickness of these materials is at least 6 cm; only in this case will they withstand harsh operating conditions.
The protective coating can be made of natural or artificial stone
You can use slabs or tiles made of natural or artificial stone, you can lay out the paths with large pebbles or pour crushed stones on top of all layers.
There is another type that is becoming increasingly popular - this is a soft blind area. It has few layers but works effectively. There may not be any hard or waterproofing layer on top: you can pour soil and plant grass or flowers. An interesting solution for a summer house or country cottage.
The principle of constructing a soft blind area
All these options are not bad, but the cost of their arrangement is quite high. If there is a need or desire to do it cheaply and cheerfully, your choice is a concrete blind area. There will be a lot of work, but the total cost is low.
General principles
Depending on the soil on the site and the purpose of the building, different materials and layer structure can be used, but there are some points that are always present:
- the blind area has a general slope “away from the house”, its minimum value is 3% (3 cm per meter);
- There must be an expansion joint of 1-2 cm between the protective coating and the foundation (lay roofing material in two layers, polystyrene foam or EPS, cover with sand, fill with sealant);
- when waterproofing and insulating the foundation, the material rises to the level of the blind area;
- the base should hang over the expansion joint and it should not interface with the protective coating (a gap of 1-2 cm is left).
Another popular type of protective coating for house formwork is paving slabs or paving stones.
How to make a blind area at home with your own hands
First, markings are made along the perimeter of the building using pegs and laces. The following is the order of work:
- The plant layer and some soil are removed. The depth of the trench depends on the size of the underlying layer and the thickness of the protective coating. Usually - 25-30 cm.
- The bottom is treated with herbicides. This is necessary to prevent plants from growing in this area. They are able to destroy even concrete and asphalt, and they grow instantly between tiles or paving stones.
- The bottom of the trench is leveled, forming the required slope and compacted.
- The underlying layer is laid and compacted, maintaining the slope. It is advisable to compact everything using a vibrating platform. Manual tamping is ineffective. Density is especially important when laying concrete, but it is advisable to compact it well under tiles or paving stones: it will not collapse or warp.
- A protective coating is laid.
- A drainage groove is formed.
It's very short and sketchy. Each coating has its own characteristics, and each needs to be discussed separately.
Preparatory work
For a concrete blind area, first make a marking, you need to drive pegs at its corners, and stretch a strong rope between them. Next, 25 centimeters of soil should be removed from the marked area. Immediately remove the soil away from the work site so that it does not interfere with you in the future.
Then you need to lay a layer of 15 centimeters of sand and pour it well with water, then it needs to be thoroughly compacted. After this, crushed stone is poured on top; this layer should be no more than 7 centimeters.
You need to lay a reinforcing mesh on the crushed stone; when joining at the corners, the mesh should overlap each other by 10 centimeters.
In this case, the concrete foundation will be reliable; when the soil bulges at the corners, the foundation will not break.
Concrete blind area around the house
The most widespread covering is concrete. It turns out to be the most inexpensive. Traditionally, the underlying layer consists of poured compacted sand (10 cm) sand, on top of which compacted crushed stone (10 cm) is laid. As already mentioned above, this scheme works normally on well-draining soils.
Construction of a concrete blind area for a house for different soils
If there is clay or loam around the house, make the underlying layer from native soil. To reduce the effect of heaving and avoid cracking, pour 10 cm of sand on top of the compacted soil, and then lay concrete on it. This way the concrete will crack less, but you will not get rid of cracking completely: especially in regions with harsh winters. In such conditions, it is better to make a blind area from crushed stone or pebbles - there will be no problems with cracking. If funds allow, they make it from tiles. For harsh winters, with correctly selected layers of substrate, they stand well.
In general, on heaving soils it is advisable to make drainage that will drain the water flowing from the tape. This will be an effective and reliable solution. All the rest are just half measures. The drainage pipe is positioned so that water from the coating enters it.
Rules for concreting a blind area
Formwork is installed and secured along the perimeter of the marked area. Most often, the board is of sufficient height, secured with pegs and spacers.
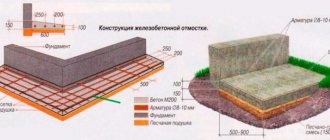
To reduce surface cracking, reinforcement is often used. To do this, a mesh of steel wire with a cell size of 10-25 cm is laid out on the finished underlying layer.
Diagram of a reinforced concrete blind area around the house
Wooden planks treated with antiseptics are laid on top of the mesh (if there is one). The thickness of the planks is 2.5 cm, and they can be treated with hot drying oil. These strips are damper joints that will prevent the concrete from cracking when temperatures change.
The planks are set while maintaining the slope from the house. The rule is then “pulled” along them, leveling the solution.
To make the surface strong and smooth, ironing is carried out. Almost immediately after pouring, while cement laitance is still on the surface, the concrete is sprinkled with cement (can be crushed several times) and rubbed with a trowel or plaster float. A thin but strong, smooth and slightly shiny surface is formed on top. It is very resistant to abrasion.
Do-it-yourself concrete blind area. To compensate for changes in concrete dimensions depending on temperature, wooden planks are laid
The last stage is concrete care. The path is covered with a damp cloth. During the week, it is regularly moistened (sprayed from a hose or watering can). The fabric should remain damp. To avoid hassle with watering, you can cover it with film, but it is more difficult to keep it in one place.
Concrete for blind area
For the blind area, standard sand and gravel concrete is used. Darkness is preferably at least M150. It can be higher: the higher the grade, the more durable the protective coating will be. The proportions for preparing the solution for the blind area can be selected from the table. They are given for concrete grade M400 - not very expensive, the characteristics are normal.
Proportions of materials for different grades of concrete
General information
Construction includes a set of tasks of varying scale and complexity.
All design solutions are of great value from a practical point of view. The construction of additional elements is intended to increase the level of protection of buildings and form an overall aesthetic ensemble. Existing types of blind areas around the house can create a reliable protective layer to preserve the foundation. Practical tests and observations have shown that as a result of such a solution, the building’s foundation can last several times longer.
The size of the blind area around the house is determined by several parameters:
- individual features of the structure (dimensions of the foundation, soil characteristics);
- general design of the house and surrounding area;
- functional purpose.
The last indicator also determines what the blind area around the house is made of. Each type of building material has unique characteristics and when using it, it is important to take into account the properties in contact with moisture, dust, and chemicals. The blind area is an integral part of the foundation and is developed in parallel with it for the comprehensive preservation of the building.
Insulated blind area
It only makes sense to install an insulated blind area in a heated house. In buildings for seasonal residence, in which above-zero temperatures are not maintained in winter, this makes no sense. The meaning of adding a double layer of insulation:
- create additional protection against freezing and reduce the likelihood of winter heaving;
- reduce heating costs.
How an insulated blind area works - it moves the freezing zone away from the foundation
If the insulated blind area of the house is laid at the design stage, then one more reason is added: if this detail is present, reduction factors are applied when calculating the depth of the foundation. That is, the foundation has a lower height, and therefore less cost.
An option for installing an insulated concrete blind area with a drainage system is demonstrated in the video. Everything is described normally, they just didn’t specify what to do if the layer of loose soil is more than 40 cm, which is required for the blind area. In this case, it must be filled with soil having a density higher than that located on the site. If there is clay on the site, then only that can be used. If it is loam, you can take either clay or loam.
One point: lay the clay not in a dry state, but diluted to a paste. The technology is old, but nothing better has been invented yet. It is laid out in layers, trying to avoid the formation of air pockets - water will certainly stagnate in them (or someone will settle).
Blind area made of crushed stone or pebbles
This is one of the types of soft blind area. It's easy to do it yourself. This system is used if there is a drainage system or the soil drains water well, and there is no clay or loam under the plant layer.
Soft blind area made of crushed stone
The order of work is as follows. A layer of geotextile is placed in a dug trench on a leveled and compacted bottom. This material is not thick, but very elastic. It will prevent crushed stone or pebbles from being pressed into the ground. And the path will not sag. Crushed stone is poured on top and compacted. Layer thickness 10-15 cm, fraction 10-80 mm. All.
If desired, the gravel blind area can also be made insulated. Then 50 mm thick EPS (extruded polystyrene foam) is laid in the trench on compacted and leveled soil, a high-density geomembrane is laid on top, and pebbles or crushed stone can be placed on top of it. But it is not advisable to walk along such a path.
Do-it-yourself blind area made of tiles or paving stones
There are several device options, but the most optimal and versatile are “pies” using geotextiles.
For example, one of them is shown in the figure. It can be used to construct a blind area on heaving soils with harsh winters. Note:
- both layers are attached to the wall with clamping strips;
- on the far side of the foundation, the geotextile rises to the ground level.
Construction of a foundation blind area for heaving soils
It is advisable to use geomembranes as waterproofing. They are made from high density polyethylene. By brand: you can take Tefond, Isostud, Fundalin, TechnoNIKOL Planter Standart, etc. They cost around 150-250 rubles/m².
Geotextiles are available in different brands and densities, with different functional purposes. Choose based on the geology of the site. Their price is from 15 to 50 rubles/m².
When constructing a blind area with your own hands, the main thing is to make sure that the water leaves the foundation and does not collect in the sand or crushed stone layer near the house. What will definitely happen if the soil is heaving (clay or loam), the underlying layer is made of sand and crushed stone, and there is no drainage.
We prepare the necessary tools and materials
The correct blind area is created over a long period of time and requires the following materials:
- Polyurethane sealant.
- Boards.
- Sand.
- Cement.
- Crushed stone.
We also need tools:
- Shovel (bayonet).
- Rule.
- Level (alcohol).
- Capacity.
- Putty knife.