Construction of the walls of a 6x8 frame house
The bottom trim and floor joists are made on the backing board. The section of the boards is 150 x 50. The material is the same larch. All connections between parts are made with foamed polyethylene gaskets.
Connections between boards are made using galvanized self-tapping screws 100 x 5 and, if necessary, fastening perforated corners.
The bottom trim is made of two parallel boards installed at a distance of 10 cm. The boards are connected to each other at the corners of the foundation strip and along its entire length every 1 - 1.5 meters. The space between them is tightly filled with insulation. In terms of strength, such a structure is practically not inferior to a solid beam of similar dimensions or several boards jointed in thickness.
In order to be able to work comfortably and safely, 18 mm thick OSB boards were laid on the logs. As subsequent events showed, they coped well with the role of the subfloor.
Now it's time to assemble the first wall. The frame is assembled from pine boards 150 x 50. The installation step of the vertical posts is 60 cm. In some places it turned out smaller - then you will have to cut the insulation lengthwise. To ensure spatial rigidity of the structure, it is necessary to install jib bars. Otherwise, the entire structure may end up like a house of cards.
We lay Isoplat between the bottom trim and the wall of the first floor. This insert will improve the soundproofing properties of the frame.
The installation of the wall was completed after dark, but very successfully.
Construction is moving gradually. The awning does its job - protects from rain. Another wall has been installed. There is progress.
At the end of October, all walls and internal partitions of the first floor were installed
A staircase to the future second floor has been completed.
Materials and components for flexible roofing were purchased, delivered and stored. The construction of the pediment frame begins - the ridge beam is installed.
The role of the roof is still played by the banner. Although it is cold, it is dry. As materials are purchased and delivered, they are stored inside the house and under the overhangs of the awning.
The interfloor ceiling is made of the same 150 x 50 boards connected by lintels. The result is neat cells, where mineral wool will then be installed during insulation.
The frame of the pediments, internal partitions of the second floor and the rafter system are slowly being built.
The cross-section of the rafters is 150 x 50. The installation step is 60 cm. We install jumpers between them every 80 cm. This will subsequently save time and material when insulating the roof. The insulation mats will simply need to be tightly installed into the resulting cells.
Roof structure:
- wind protection is laid on top of the rafters (Corotop film, density 140 g/m2);
- block 50 x 50;
- inch lathing;
- plywood 12 mm thick;
- soft roof (bitumen shingles).
We are finishing the roof. The 6 x 8 frame house is gradually taking on recognizable shape.
Installation of windows and doors in a frame house
The windows that were getting in the way underfoot finally waited their time. To finish all the work with the roof, attic windows were installed first. Then came the turn of the windows on the first floor:
- hall – four windows 1500 x 1500, single-chamber, one hinged, two tilt-and-turn;
- bedroom – one window 1500 x 800, single-chamber, tilt-and-turn;
- bathroom - two windows 1500 x 600 and 500 x 600;
- porch – 1500 x 600.
The last to be delivered and installed were the central window and balcony door for the second floor.
The windows were brought in several times. As they arrived, they were installed.
It’s already cold outside—winter. To heat the room, an Artox 5 kW heat gun was purchased. In order not to heat the street, empty door and window openings have to be temporarily blocked with improvised materials.
During construction, the doors are made of plywood. After completing the interior and most of the exterior decoration, the
Insulation of a 6x8 frame house
The project of a 6 x 8 frame house with an attic provides for insulation using Rockwool LightButts mineral wool. Looking ahead, I would like to say that in total about 40 m3 of insulation was used. This is not so little, and you need to think in advance about the logistics of supplying, placing and using the material.
Before installing the insulation inside the frame, you need to make sure that it does not fall out. To do this, we sheathe the entire structure from the outside with Isoplat. This material simultaneously performs the functions of wind protection, sound insulation and additional thermal insulation.
The size of the mats is 600 x 800 x 50. Thanks to the pre-set pitch of the posts in the frame, the whole process looks quite simple:
- print out the packaging;
- we install the insulation between the support beams in a spacer;
- If the sizes do not match (unfortunately, it turned out that way), we cut it with a construction knife to the required size.
The thickness is increased by installing the mats close to each other. There are three mats on the walls (total thickness 15 cm), four mats on the roof (20 cm).
Floor insulation is a different story. A comprehensive insulation scheme was used (combined use of penoplex and mineral wool).
Floor Pie:
- penoplex 50 mm;
- mineral wool – 100 mm;
- Corotop vapor barrier;
- OSB – 18mm.
Even at the initial stage, one-inch boards were nailed to the underside of the joists, acting as cranial bars. The penoplex will rest on the formed protrusions.
Since the material is not afraid of moisture, no insulation is required on the underground side. Penoplex slabs are cut to size with a hacksaw and installed between the joists.
Along the perimeter of the sheets and joints, where we had to fill up the area from scraps of material, we seal it with polyurethane foam. Cut off the frozen excess with a knife. This results in a continuous heat-insulating layer.
Place a layer of mineral wool on top. The principles are the same - tight installation and staggered installation so that the seams do not intersect.
We cover the surface of the insulation with a vapor barrier. This will help protect it in the future from moisture from the room. At the very end, we spread Vibrostack strips over the joists and install the OSB back and secure it with self-tapping screws.
The attic floor is insulated a little differently:
- we line the ceiling of the attic floor with Tyvek vapor barrier;
- the Isoplat plate is fixed;
- from the attic side, 15 cm of Rockwool is laid inside the ceiling;
- Cover the entire layer on top with thermal insulation again;
- We lay 4mm thick Vibrostack strips along the joists.
We lay a subfloor made of 18 mm OSB (the ceiling above the bathroom and bathhouse in a two-story 6 x 8 frame house is made of two layers of waterproof plywood 12 mm thick).
Heating and ventilation of a frame house
Projects of 6 x 8 frame country houses must include a heating source. And this construction is no exception.
The main source of heat is a wood-burning stove-fireplace. There are no plans for gas yet, you can cook with electricity, and a burning fireplace is simply beautiful.
Under the stove, even at the stage of foundation work, a small area was poured that was not connected to the main foundation. The dimensions of the base are 1.2 x 1.4 m. The height of the base is comparable to the tape. Half a meter is buried in the ground and the same amount outside.
Having found a good stove maker through recommendations, I discussed all the details with him and paid an advance. Next we started construction. I am mine, and the stove maker is mine.
Start - the base of the furnace
The master’s work is progressing well, and quickly enough it’s time to install the combustion chamber and screen. The door for the Pisla 510 fireplace was obtained relatively cheaply for 15 thousand. Managed to find it on sale.
The masonry of the fireplace is gradually progressing. It is a pleasure to watch specialists at work.
The future furnace has almost reached the ceiling. There are no severe frosts yet, which is very pleasing. And it inspires some optimism.
It just so happened that the last windows and the first fire coincided. We carry out the first heating. Since the stove still needs to settle, we heat it without fanaticism - carefully so as not to spoil all the work.
Over the course of three hours of heating, the temperature in the room rose by 10–15 °C. Considering that the thermal insulation of the house is not yet completely finished, there is no vestibule and instead of the front door there is plywood on hinges covered with a blanket, the result is quite decent.
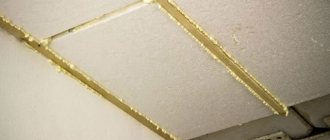
Now is the time to talk about ventilation. A frame house is essentially a sealed thermos. If there is no ventilation, then at best the air will be musty and stale. In the worst case, the insulation and wooden elements will begin to become damp.
For the ventilation system, I purchased a Domen Regio recuperator with a capacity of 250 m3/hour and a set of air ducts. The installation allows, in my opinion, to perform the most important function - to regulate productivity and, if necessary, to heat the supplied air. Heating is carried out using a built-in 1KW heating element. The maximum temperature of the supplied air can reach + 30°C.
In practice it looks like this:
- if we are leaving for a long time, we set the installation power to 5 – 10%;
- We return - we transfer it to full-fledged operating mode.
The installation of the recuperator on vibration suspensions, the routing of air ducts and the commissioning of the ventilation system were carried out by specialists from the company where the equipment was ordered. It should be noted that the system is working, there is a slight heating up and the impressions so far are very positive.
Installation of ventilation in a frame house. Recuperator
Installation of ventilation air ducts in a frame house.
It’s also worth talking about electricity. Entry into the house is carried out with a 5 x 6 cable. Accordingly, the following were purchased and installed:
- two-pole input circuit breaker;
- ABB distribution board;
- distribution boxes and strips;
- automatic machines 16-40A (10 pcs).
Wiring inside the house is carried out in a metal hose inside the walls. The passage through the load-bearing elements of the frame is made through pre-drilled holes.
DIY house 8 by 9
There are many configurations of a private house. In the construction literature, it is recommended to build an 8 by 9 house with your own hands. Such a slight difference in geometric parameters will prevent you from getting confused about the correct alignment of the main load-bearing elements. And the area of the built house is quite acceptable for one family.
Construction should begin with a study of the geology of the area and digging a trench or pit to the depth of the foundation base. Typically, the bottom of the foundation is built below the freezing depth of the soil.
If the foundation is intended to be monolithic, it is necessary to make concrete preparation under it with a thickness of 100 mm. This will protect the bottom layer of the reinforcement from corrosion, make it easier to separate the axes and eliminate the possibility of unplanned tilting.
Basic equipment
Private developers are offered many standard options for frame houses. These can be both standard and individual options. However, with a variety of solutions in architecture or design, there is the concept of basic equipment, which also includes the possibility of building with your own hands.
The basic package of a frame house includes:
- detailed drawing;
- a set of materials for joists, floors, floors, frames, bases, racks and walls;
- roofing materials: rafters, sheathing boards;
- finishing materials - boards for finished floors, lumber for skirting boards, internal corners, lining;
- external and internal windows and doors;
- sets of materials for vapor and waterproofing, as well as for insulation of frame-type houses.
As a rule, the foundation of the house is not included in the basic kit , because the choice of foundation is determined by the type of soil and soil. Laying a good foundation for a frame house is a difficult and time-consuming task.
Useful: SP 31-105-2002: basic requirements of the standard
Despite the fact that you can lay the foundation yourself, it is best to invite specialists to carry out such work. This is especially true for the construction of houses with more than one floor, intended for living at any time of the year.
Foundation plan
The construction of a house always begins with the installation of the foundation. But how to make it correctly without a clear drawing? It is important to understand that the piles or pillars must be located under the load-bearing vertical beams.
Sergey Yurievich
Construction of houses, extensions, terraces and verandas.
Ask a Question
Of course, the layout of the house can serve as an excellent plan for the foundation, but sometimes the drawings are supplemented by a section with a detailed plan for the location of the reinforcement.
Drawings of all walls and partitions
The layout of walls and partitions is completed by floor. Here we see the location of all intermediate beams and window and door openings. For a frame house, it is especially important to know the location of the windows, because this is not a log house in which openings can be cut after the final installation of the house under the roof. The places of window openings in the frame structure are reinforced with timber of a larger cross-section.
Often construction companies include a general view of the frame in a set of drawings. After all, it is difficult for the average person to understand the drawings without an overall picture of the frame. It looks something like this:
Rafter system plan
The project proposed for consideration by us has only a drawing of the rafter beams. For ease of installation, a drawing is also prepared with the dimensions of all elements of the rafter system.
Let's take the correct drawing of the rafter system from another project to evaluate all its advantages.
In such a drawing we see the dimensions and locations of all rafters, tie rods and supports. Even if you have no experience, you can install a roof on it yourself.
Drawing of the floor, subfloor, interfloor ceilings
These drawings are not very different from the drawings of walls: markings of beams, diagonals.
- A set of drawings for floors and walls also includes a section of the walls or floor: insulation diagram, films used, external and internal cladding, battens and counter-battens.
- Instructions and drawings for attaching individual elements to each other may also be attached here.
As a result, we get a whole book of detailed drawings of 40-50 pages. Without experience and appropriate education, it is difficult to understand them, let alone manufacture them. That is why it is better to entrust the construction of a residential building for complex projects to professionals.
Advantages
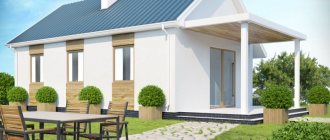
The 6x8 cottage has an area of almost 50 square meters. m. This layout of a private house has the following advantages:
- Low level of construction costs. The affordable price of the required volume of building materials will not cause too significant damage to the family budget in comparison with other projects;
- The period for delivery of the object is reduced. Even if brick is used, building a cottage will take no more than three months. A building made of wood or frame can be erected in a month;
- Compact size suitable for small families. It is easier to clean and carry out repair work in such a house.
You may be interested in: Children's room for a boy
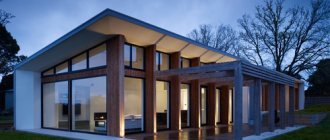
The cottage is used as a permanent residence and holiday home. If there is a larger house on the site, a 6x8 building is used as a guest house. Then it is not necessary to build an attic, attic and basement.
If a one-story 6x8 house is the main residential building, you can make an attic with a sloping or gable roof to increase the space. It is better to build it from laminated veneer lumber. This is a more expensive option compared to standard wood, but it is durable and strong. Construction from such material can be started almost at any time of the year, since they shrink less than rounded logs.
DIY 6x6 house. Video
If you are planning to build a small house, for example 6 by 6 meters, you should take into account that there will not be much comfort in such a building. This is a small building, more suitable for one or two people. You will be able to fully equip it with all amenities, but it will be impossible for a large family to expand into such a house.
The only advantage of such a building is the speed of construction and the saving of materials. You can see what a small frame house looks like in reality in this video from YouTube:
It’s easy to build a 6 by 6 house with your own hands. The result is a rather nice structure that, due to its dimensions, can withstand significant snow and wind loads. The heating costs of such a house are also minimal.
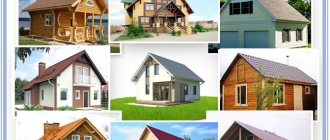
Here is a small selection of photos showing a 6x6 frame house built with your own hands. Photos from different owners, but the general concept of such a house is the same.
Insulation and finishing of the house
Sheathing materials can be selected depending on the preferences of the home owner. You can use plywood, wood-tile materials.
In any case, the thermal insulation must be protected on both sides with a vapor barrier film.
The roof planes (slopes) also need to be insulated, otherwise, at low temperatures, there will be large heat losses.
External cladding is carried out using:
- Vinyl/metal siding;
- Wooden lining;
- "Block house";
- Often used internally:
- Lining;
- Plasterboard panels;
- Plywood.
If hidden electrical wiring is needed, then this should be taken care of before sheathing. The same applies to other elements, for example, if there is a gas boiler, you need to take care of constructing a chimney. Its internal location will require pipelines to be laid through horizontal floors and the roof surface.
The same applies to drainage and water supply.
Installation of interior partitions can be done using metal and wooden frames. Just as is usually done when installing standard gypsum walls.
Tools and fasteners
If you are planning to build a frame house, it will be difficult without tools. I already have a list of the necessary tools on my website.
It is also better to purchase fasteners in bulk in advance. In a frame house, the following are used: 3.1-3.5×90 smooth nails, as well as 60 mm rough nails (for covering walls with OSB) and 70 mm (for covering floors or roofs with slab materials). It is better to build a frame frame yourself using a nailer, since the average frame frame requires 10-20 thousand nails. Take care of your hands! You need to purchase a hose, adapters, oil and a compressor for it. Well, don’t forget about special nails, I took 100 kg at once and there were almost no leftovers, and I also chopped 50 kg of ordinary nails by hand. Also buy 5 kg of 120 mm nails, sometimes they come in handy (but I didn’t tell you that).
You may also need self-tapping screws for gypsum plasterboard and gypsum fiber board, and it’s simply useful to have self-tapping screws on hand to temporarily screw on some element, and then nail it properly.
Also needed for frame construction are 6-9 mm staples. They are convenient for nailing hydro- and vapor barrier films.
Surely you will need concrete dowels (for installing windows) or anchor plates (for the same purposes). But it’s better not to use perforated fasteners; they are rarely useful in a frame house and only for special purposes.
Video about tools you will find useful:
Residential building project
Projects of houses made of 8 by 6 m timber are quite popular. On the one hand, such buildings have a quite acceptable area, and on the other hand, not much material is required for their construction. As a result, we get comfortable housing, built with moderate time and financial costs.
Layout option for a timber building
Typical designs for a 6x8 house made of timber are usually created according to a general scheme. In the table below we provide a description of the main design elements, but if necessary you can make adjustments:
| Project detail | Peculiarities |
| Material | Beam made of coniferous wood, with a cross-section of 150x150 mm (summer options can be erected from timber 150x100 mm). The partitions are erected from 140x90 mm timber. To facilitate installation and speed up shrinkage, it is advisable to use profiled products for air or chamber drying. |
| Base | Strip foundation with a depth of up to 50 cm relative to ground level. On soft soils, a pile foundation is allowed. |
| General scheme | Ground floor with entrance hall, living room, kitchen and bathroom. Attic or semi-attic floor with a small hall and bedrooms (one or two). |
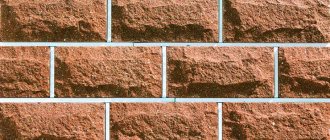
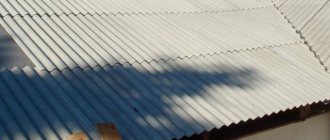
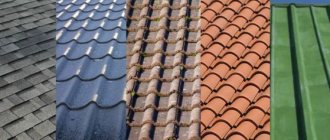
| Roof | Gable, on gables made of timber. Euro slate or metal tiles are used as roofing material. |
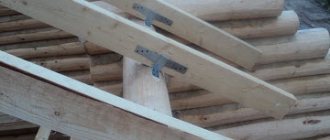
| Floors | Insulated, on wooden beams 150x150 mm. |
| Corner cutting type | On the root tenon (in the “warm corner”). |
Note! If you order the construction of a building from a specialized company, then by the time work begins, you must have an equipped and dried foundation. Also, we should not forget that most often the design of a two-story house made of 6x8 timber involves construction “under the roof”, and you will have to pay extra for finishing after shrinkage.
To build a log house, it is advisable to purchase a house kit - a set of parts that have undergone preliminary fitting and processing. If you are planning to save money and trim the workpieces yourself, then it is worth remembering that most often the beams are 6 m long. That is why you should choose a house made of timber 6 by 8 - an 8 by 8 m house - here you will have to buy one and a half times more It will take a lot of material and time to join the trimmed fragments.
It should also be remembered that in addition to the log frame parts themselves, we will need other building materials, ranging from concrete for the foundation and ending with wood impregnations. In total, a house made of 8 by 6 timber will cost us approximately 600-700 thousand rubles including work, and approximately 450 thousand if we perform the main operations ourselves.
Estimate for a frame house
Drawings of frame houses must include an estimate. This document indicates the detailed quantity of building material at each stage of construction, including in rolls, kilograms or meters. In addition, the estimate indicates the approximate range of market prices.
When building a house in stages, there is no need to spend the entire budget on purchasing materials. Materials can be purchased as construction progresses.
Drawings of frame houses
A drawing of a frame house is not just an official document for obtaining permission to carry out construction work. This is an important document, which is a guarantee that the built house will fully comply with the standards and be adapted to climatic conditions.
What does the drawing include?
All documents detailing the process of assembling and installing a house must be completed at the construction stage. In addition, the cost of the future frame house is described in detail in the estimate. There is also a list of all building materials that will be used for construction. As a rule, each such set is accompanied by images and photographs.
Features of house kits
Some companies offer to purchase a complete house kit for construction . Such a kit includes not only the main elements and a drawing, but also all the necessary lumber and insulation (sip panels). This makes it possible to build a one-story or two-story building with your own hands in a short time.
Advantages of purchasing a house kit:
- the customer receives a complete set of drawings and materials;
- all drawings are usually simple and understandable;
- in order to protect materials from precipitation, they are brought to the site gradually;
- The kit includes recommendations for additional insulation of the house;
- there is a roof installation project;
- Attached are diagrams and instructions for creating ventilation, electrical, sewerage and drainage systems;
- a full estimate provides the customer with the opportunity to determine the entire scope of construction costs.
A set of drawings and documentation for the construction of a frame house
Any finished drawing of a frame house is a voluminous document, the size of which can reach 100 pages. Each document contains a detailed plan, diagrams, and detailed instructions for assembling and installing the frame.
Conventionally, the entire instruction is divided into main parts, which make the entire construction process extremely simple and understandable. Both professionals and those who do not have serious experience in the construction industry will be able to study such instructions.
The instructions contain answers to all important questions that may arise during the construction of a frame house. This document contains answers to questions about how to provide wind, moisture and vapor protection to a new building. The construction conditions are described, as well as the principles by which window, door and other structures are selected. In addition, the document contains recommendations regarding the construction of a frame house with or without an attic.