When planning the installation of a fence, the question always arises about how to fix the supports. But for each site, the solution is selected individually, since it is necessary to take into account the type of soil, the depth of groundwater, the type of fence structure, and more.
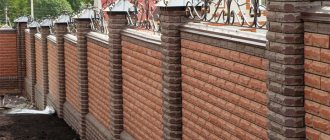
For massive fences on stable soils, it is recommended to choose concreting of pillars - this guarantees that the fence will last a long time. Concreting is done using several methods. By following the recommendations, you can do this yourself.
We recommend that you read:
- At what distance can you build a fence from your neighbor's house?
- Standards for planting trees in relation to the fence of a neighboring plot
Why is concreting necessary?
The main goal of this fastening method is to extend the service life and increase the stability of the structure.
Installation of supports with concrete mortar:
- Prevents the structure from loosening and makes the fence more resistant to wind loads.
- Increases the load-bearing capacity of the structure.
- Protects metal poles from corrosion.
But it is important to understand that supports can only be concreted on stable soils.
If you do this on heaving soil, then when it gets cold, they will simply start to be pushed out and the surface will become cracked.
You should not use the solution even if the groundwater level is high; in swampy areas it is better to choose other options.
It is important to maintain the proportions of the ingredients when mixing the solution so that it does not turn out too liquid or thick.
Factors affecting the installation depth of racks
Correctly determining the depth of the fence support posts means maintaining its integrity under unfavorable operating conditions. When performing calculations, the following factors should be taken into account:
- design features of the structure and its functional tasks;
- the magnitude of the maximum load taking into account external influences;
- characteristics and topography of the soil in a given area;
- level of occurrence and possible rise of groundwater;
- the degree of greatest soil freezing in a particular area.
To ensure better operating conditions and structural strength, fence posts must be buried below the freezing point of the soil.
Important! Correct calculation of the installation depth of fence posts is the main indicator of the stability of a structure. Since negative environmental influences and increased loads can cause partial or complete destruction of the entire structure.
In addition to determining the depth of the racks, it is equally important to secure them correctly. Depending on the operating conditions, there are several methods. Today we will talk about how to properly concrete pillars.
But this option is not always justified. If the site for the construction of a fence is located on soils with a high level of soil moisture, then when freezing, the water expands and can literally squeeze the concrete post upward. Thereby compromising the integrity of the overall structure. In this case, it is better to use the method of driving pillars, following the example of working with piles.
Types of fence posts
They are selected based on whether the fence will be temporary or permanent and what kind of fabric will be used to fill the sections.
Popular types of supports:
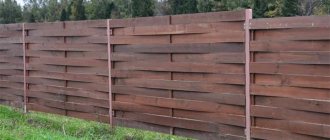
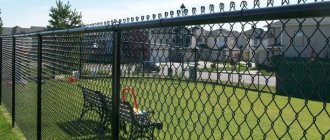
- Wooden. Recommended for lightweight fences made of picket fences, unedged or edged boards, and timber. Suitable for fences made of chain-link and PVC mesh. But even with proper treatment of wood against rotting and insects, its service life is limited. Follow the link to see detailed recommendations for choosing and properly installing wooden fence posts.
- Asbestos cement pipes. Less popular because they require careful installation. The pipe cavity is filled with concrete or left empty. Plugs are attached to the top, otherwise water that gets inside in winter will freeze and lead to the formation of cracks. Asbestos-cement pipes are used for fences made of concrete, welded or chain-link mesh.
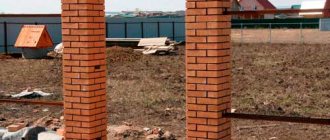
- Brick. For this type of support, you will need to competently draw up a masonry scheme and estimate the consumption of materials. For reliability, a metal pipe or a bunch of wire rods must be installed inside the trench, which will serve as reinforcement and strengthen the supports. Then cover them with bricks. Concreting of such fence posts should not be done spot-on, but rather poured together with a strip foundation. They are used for sectional fencing made of brick, stone, corrugated board, metal picket fences, and forged structures. Instructions for choosing materials, different masonry technologies, step-by-step installation of brick pillars.
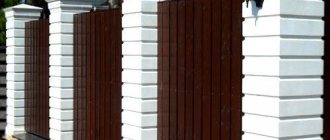
- Concrete. It can be delivered to the construction site in finished form or can be created at home. They look good in combination with spans made of concrete, stone, corrugated board, and forging. In the last two cases, to fasten the sectional material, even during the construction of the supports, it is necessary to fix special embedded parts. Concrete pillars must be installed on stable soils in warm weather so that they have time to shrink.
- Metal. The basis is taken from profile pipes of round or rectangular cross-section. The average section is 60*60 mm with a wall thickness of 2–3 mm. These are optimal supports for both lightweight and massive fences. In the absence of an anti-corrosion coating, they require pre-treatment with protective solutions. Tips for choosing metal poles.
When installing temporary fencing at a dacha, poles made of wood or metal can be driven into the ground. Hammering is also suitable as the main method of fixing small-diameter supports under a chain-link fence or PVC mesh.
But in order for a massive decorative structure to last longer, it is still better to concrete the pillars.
How to mount a pole using the strip method?
Use the following instructions:
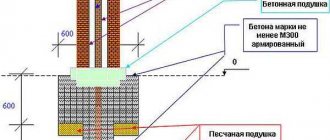
- It is necessary to dig holes for the posts and a trench (40 cm deep, 15-40 cm wide) around the entire perimeter where the fence structure will be mounted. Are you installing slate or corrugated fencing? The width of the ditch will be small, and for a brick structure it will be much wider. The main support does not have to be immersed deeply, because thanks to the strip foundation, wind and weight will not damage or weaken the structure.
- Formwork is required; fill the bottom of the ditch and holes under the pillars with a cushion (use crushed stone, sand, etc.) to a depth of 10 cm. Every 50 cm, drive in steel rods (in a checkerboard pattern). Select the length so that they are stable after being immersed in the ditch, and their upper ends are not visible after pouring the concrete. Install the posts evenly.
- Place a metal frame on the pillow in the form of 2 parallel rods with jumpers (every 20 cm). The jumpers in contact with the main pillar must be secured by welding or wrapped with wire. Place the second frame perpendicular to the rods 20 cm higher.
- Pour the concrete. The result is a multi-layer base for the post, which is designed even for the heavy weight of the fence.
The video shows how to concrete a strip foundation for a fence:
We carry out calculations
For sectional fencing made of corrugated sheets, siding, or metal picket fences, it is worth choosing a distance between spans of no more than 2.5 m, or better yet, less, in order to reduce the windage of the structure. A large distance between the posts will gradually lead to the skew of the fence.
The number of transverse or longitudinal logs is determined by the height of the structure. For a 1.5–2 m fence, two pieces, located 25 cm from the top and bottom of the canvas, are enough.
The consumption of the solution depends on the depth of pouring the pillars.
Determining the depth of concreting the supports
It is considered to be the soil level below the freezing point. For example, if the soil freezes to 1 m, then the depth should be taken with a margin of 1.1 m.
For most regions, the optimal depth is considered to be 1.5 m.
It is important to take this value into account when selecting the height of the pillars. So, for a two-meter fence it is necessary to take supports 3.5 m high.
To ensure the job is done well, you can order the services of craftsmen. They will not only install the posts, but also the entire fencing on a turnkey basis.
Preparatory work
First, you should measure your future fence. Once you know the total length, you can calculate the number of supports needed. If you use wave or flat slate as a fence, the distance between the posts should be less than 2 meters. If you use corrugated sheeting, 2 meters will be enough. Lightweight structures like chain-link mesh can be installed on supports that are located at a distance of 3 meters from each other or even more!
After this, markings should be made. We measure the area, divide its length by the length of the fence sections and add one - the resulting number means the number of columns. If the result is a non-integer number, the flight distance should be corrected.
Please note that when measuring and marking, you should note exactly where the structure will be installed. Do not forget to take into account the fact of installing a gate or gate.
Typically, the length of these elements does not correspond to the section markings, so the number of supports will not be determined accurately. An ordinary entrance gate is about 3 m wide, and the gate is only 1 m. Now you can start drilling or digging a recess for installation. If the site is located in a humid area where severe frosts are typical, it is better to abandon partial concreting and replace it with strip installation.
Partial fill
Using a mobile motor drill, you can make a neat hole or use a hoe. The hole should have a diameter 2 times larger than the size of the support, and lie to a depth of 30% more than the entire height of the structure. It turns out that if the height is 2 m, then the depth of the pit should be 1.3 m.
We insert a post into the finished hole, check the accuracy of the installation using a plumb line or level, then fill it with earth and compact it well. Then take the fence post grout and fill the surface. You need to install a cap on top so that when it rains, water does not get inside and cause destruction of the structure.
Point method
Dig a hole using a similar method. The bottom should be covered with crushed stone and sand mixture. On one side, weld a heel to the post to make it more stable. This time, as a support, you can use a flat sheet that will be wider in diameter than the pillars, or a lattice made of reinforcement.
Important! The structure should be lowered into the hole all the way, leveled and filled with concrete to the top. When pouring, compact the mixture using a steel rod.
If the site is located in an area with high humidity, the base of the post must be sealed (you can use roofing felt). The roofing material should be twisted into a ring, 0.2 meters larger than the size of the pit. This will prevent water from entering the concrete during the pouring process. Next, one edge should be closed in the “glass” using a plastic bag, and secured with tape. We place the structure in the meow and then do everything according to the usual scheme.
Tape mounting
Installing and pouring fence posts using the tape method includes the following steps:
First you need to dig holes for the pillars and an additional trench (0.4 meters deep, 0.15-0.4 m wide) around the entire perimeter where the structure will be installed. If you are installing a fence made of corrugated board or slate, then the width of the ditch can be made small, but for brick supports you should try hard. The main support cannot be immersed deeply, since thanks to such a foundation, weight and wind will not be able to damage anything and will not weaken the structure.- We make formwork, pour 10 cm of crushed stone and sand into the bottom of the ditch and into the hole. Drive in steel rods in a checkerboard pattern every half meter. The length should be chosen so that the rods are stable after being lowered into the ditch, and the ends are not visible after pouring.
- We lay a metal frame on the pillow. The frame jumpers that are in contact with the main post should be welded or wrapped with wire. The next frame should be installed perpendicular and 0.2 meters higher.
- Fill everything with concrete. You will get a multi-layer base for pillars that can withstand even a lot of weight.
Dry concreting
First, we drill a hole, make a glass from roofing felt, but without bottom insulation. Such a cylinder should be placed in a hole, and then the pole should be immersed, the heel should be lowered down. Everything should be leveled using a level, pour sand, gravel or other material between the glass and the supporting structure, and add water from time to time to thoroughly compact the layer.
Please note that, regardless of the type of concreting, first of all you need to install the outer pillars, stretch a rope between them, which will make it possible to evenly set the remaining gaps between the fences.
Preparing the site, materials and tools
The construction area is cleared of debris and vegetation. Markings are made using rope and wooden pegs.
Since metal supports are the most convenient to install, let’s consider the concreting process using them as an example.
To work you will need:
- Crushed stone of small or medium fraction. Used as a filler for concrete mortar.
- Clean sand.
- Cement grade M300 or M400.
- Drill with a diameter of 160–180 mm, length up to 2 m.
- A grinder and several metal discs.
- Hacksaw for metal.
- Construction level from 60 to 120 cm long.
- Marker and tape measure 5 m.
- Wire rods for reinforcement.
- Waterproofing material.
- Plastic sewer pipe with a diameter of 110 mm. For one pillar you will need a piece of 75 cm.
A wheelbarrow and a shovel will come in handy.
For a small amount of work, the solution is mixed manually in a trough or with a construction mixer. For a larger amount of solution you will need a concrete mixer.
Partial pouring process
You can drill neat holes with a mobile motor drill, or use an infantry shovel (hoe).
The hole should be 2 times larger in diameter than the diameter of the support, and lie to a depth of more than 1/3 of the entire height of the main structure. So, if the height is 2 m, the depth of the hole is 1.2 m. Insert a post evenly into the dug hole, use a level or plumb line to control it, fill it halfway with earth and compact it. Then pour the concrete mixture. Install a cap at the top so that when it rains, water does not get inside and destroy the structure.
Types of concreting and pouring pillars
Let's look at the methods of fastening supports that are suitable for different fences, and evaluate the advantages and disadvantages of each of them.
Methods of fastening supports: from left to right. 1 – driving method, 2-3 partial and full concreting, 4 – crushed stone butting, 5 – installation on screw piles.
Dry
Quite a simple fastening method. Significantly reduces construction time. It is used to install a temporary or permanent fence in a country house, around a private house.
Suitable for lightweight fabric such as chain-link, boards, picket fence.
Sequence of work:
- Use a drill to make a hole of the required depth.
- We wrap the post with roofing material or coat it with mastic.
- We level the support and, if necessary, attach spacers to the sides.
- Fill the hole to the top with a mixture of sand and cement.
- Sprinkle with water and tamp.
Among the advantages of this method:
- This is the optimal solution for clay soil or loam. The pillar will not stick out of the ground under the influence of frost.
- Installation speed. In a day you can secure all the supports for the country fence.
- The simplicity of the work allows you to do it yourself and not use special equipment.
For reliability and stability of the installation, it is recommended to weld a metal plate or spacers to the bottom of the posts.
Dry concreting is not suitable for wet, moving soils and massive, heavy fences.
Spot
Performed in the following sequence:
- Using a drill, we make 1.5 m deepenings. We tamp the bottom.
- We fill the bottom with a 30 cm sand cushion.
- We roll a piece of roofing felt into a sleeve and place it in the hole. It turns out to be a waterproofing glass.
- We insert a pillar into it. We check the verticality with a level.
- Mix a solution of M300 cement, crushed brick, and crushed stone.
- If necessary, we weld spacers to the post.
- Pour the finished mixture into the hole.
You can continue working with concrete pillars only after the solution has completely hardened.
Pros of spot filling:
- Suitable for any type of soil, with the exception of swampy ones.
- The supports can withstand heavy loads, so this is how you can fix fence posts made of corrugated sheets, bricks, or metal profiles.
- Resists well to environmental influences.
- If the technology is followed, the service life exceeds 20–30 years.
Among the disadvantages of spot filling, the labor-intensive process and the need to strictly adhere to the level of installation of supports are noted.
If you make holes in heaving soil that are not deep enough, the pillars will simply begin to be pushed out of the ground under the influence of frost.
Partial
This type of concreting should only be used on stable soil for structures that do not carry a high load on the pillars. Suitable for fence:
- made of PVC mesh;
- chain-links;
- welded gratings;
- picket fence;
- boards;
- polycarbonate.
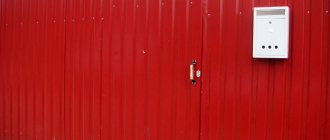
Photo: partial concreting of a square profile pipe
Unlike spot or full concreting, such fixation significantly reduces material costs and construction costs.
To secure the poles into the prepared holes, they can be rammed or simply driven into the ground.
The technology is similar to spot pouring, but only the lower part of the hole is filled with concrete. Time is given for hardening - up to 5 days, after which the top is covered with crushed stone and sand.
A second option for partial concreting is possible, when the bottom of the pit is compacted with a cushion of crushed stone and sand, and the top is filled with mortar.
If you want to make a small plinth for the fence, then you should build formwork for each post in advance.
Complete
This method has many modifications. Most processes are similar to partial concreting, only the well under the support is filled to the top with one solution.
There is another option for complete filling, when in addition to the well, the internal cavity of the column is also filled with concrete. In this case, it is important to place plugs on the support on both sides so that water does not accumulate inside.
3D model of the installed support
The bottom of the pillar must be waterproofed with roofing felt and wrapped in plastic film.
Used on stable soils under heavy fences. This method is reliable, ensures the durability of the structure, but requires a lot of materials and labor.
Using a strip foundation
Arranging the tape will take longer than any of the concreting methods, but the integrity of the foundation and pillars will make the fence more resistant to weather influences and wind loads. Suitable for rocky, sandy, heaving soil.
On stable soil, a shallow tape will suffice.
Regardless of the chosen method of fastening the poles, it is important to take a responsible approach to each stage of the work: from the purchase of building materials to the completion of installation. Then the fence will last a long time and will not need repairs.
Installation options and their features
The question of whether to concrete or hammer fence posts causes a lot of controversy both among ordinary developers and among specialists. There is no definite answer here, since each option has its own pros and cons; let’s look at them in more detail.
Installation methods
Three technologies have proven themselves best; they have the following features:
- Hammering supports . An option that does not require digging holes, preparing a solution and pouring it. The work is performed by driving a pole into the ground mechanically: using special equipment or manually. The second option is quite labor-intensive, especially if you have dense soil - hammering in an element is much more difficult than it seems at first glance;
When deciding whether fence posts should be concreted, remember that driving in is an unsafe and labor-intensive process
- Dry concreting . An option that involves digging a hole at least 120 cm deep, waterproofing it and then filling it with a cement-gravel mixture. Essentially, this is the installation of fence posts without concreting, although the technology is almost the same as the standard one, the only difference is in the mixture used. The technology is not suitable for all regions, and below we will tell you why;
You can strengthen the supports with dry mixture
- Traditional concreting of fence posts is a technology well known to most people. It involves digging a hole and pouring a concrete solution, which, after hardening, firmly holds the element. This option is suitable for most regions, but to get a good result, you need to do the work efficiently and accurately.
If you need a durable fence, concreting the posts will be the best solution.
Installation technology
First you need to decide on the materials for the formwork. It is necessary when concreting, because it allows you to form a support and protects the cement mortar from the effects of moisture contained in the soil. For this purpose, the following technologies are used:
- installation of supports in the form of asbestos-cement pipes, with concreting carried out along the entire length of the products, the recommended diameter is 150 mm or more;
- The formwork for the fence posts is prepared, filled with mortar, and after hardening, strong supports are obtained.
Preparatory stages:
- The site is being marked. The average distance between supports is 2.5-3 m.
- Determine the dimensions of the pillars. Their cross-section differs in shape and can be round or square. The recommended minimum dimensions are 60x60 mm. If you plan to install posts for a circular fence, prepare a hole with a diameter greater than 100 mm. The dimensions of the supports are determined taking into account the type of soil on the site and the weight of the fence structure.
- It is necessary to decide at what depth to install the pillars. The value of this parameter varies between 1.2-1.6 m. The choice should be made taking into account the level of soil freezing. On difficult soil, the depth of burial should be maximum.
- Well diameter. If you are deciding how to properly concrete fence posts, you should know that it is recommended to leave a reserve. This means that the diameter of the wells for the supports must be larger than the dimensions of the support. The value of this parameter varies from 150 to 250 mm.
- Determine the proportions of the mortar for concreting. For heavy structures and when installing a fence in areas with difficult soil, use a ratio of cement and sand of 1:2; on simple soils, it is enough to take components in proportions of 1:3 or 1:4. Add crushed stone, the fractions should be small or medium.
The concreting technology is also being implemented in stages. Option with formwork:
- Plank frames are installed in the holes.
- The material is waterproofed - the inside of the wood is protected with plastic film.
- If necessary, you can make reinforcement yourself - metal rods with a diameter of 12 mm or more are driven into the wells.
- Sand and crushed stone are poured onto the bottom, the thickness of each layer is 10-20 cm.
- Concrete is being poured.
- When the solution dries (this takes about 28 days), the formwork is removed.
If you plan to install metal poles, in this case concreting is done without formwork. The solution is poured into the space between the soil and the support. Sequencing:
- digging holes in the soil;
- arrangement of a sand cushion;
- installation of the pipe, checking the position with a building level, fixing with spacers;
- Concreting is carried out directly.
The space between the soil and the support can be filled with crushed stone in the form of large fractions or rubble stone. There is another concreting technology:
- a hole is made in the soil, the diameter of which is smaller than the cross-sectional size of the post;
- the supports are driven into the ground to the required depth; this method is suitable for metal products;
- thanks to this, the supporting structure fits tightly to the soil;
- Concreting is carried out in a different way - cement mortar is poured inside the column.
If ready-made supports are used, it is necessary to close them with plugs after installation. This way you can prevent moisture from penetrating inside.
Selection of material for supports
If a gardener decides to install a new fence and no longer return to it every year for minor repairs, then he needs to take seriously the issue of determining the material for the posts. Based on what the fence will ultimately be like, you should choose the material for the posts. Sometimes, on the contrary, there are already pillars, then the fence must be made such that the supports can support it without any problems. Typically, the following material is chosen for racks:
- Wood is the most affordable material. In addition, wooden posts are easy to process. Their disadvantage is their short service life.
- Asbestos cement - usually small-diameter pipes made from this material are chosen for racks. Gardeners do not really like such pipes, since they often break and it is very difficult to connect them with fence joists.
- Concrete - it will make eternal supports, but since the material is very heavy, the installation process is complex and time-consuming.
- Metal is a commonly used material for making supports. Both metal pipes and corners of different sizes are suitable for this. The only drawback is the need to periodically paint it.
- Brick - it is believed that when used, the most decorative fences are obtained. But still, this material has more disadvantages, so it is rarely used. And only a gardener with mason skills can install such a fence.
Having selected suitable supports, they begin to install them.
What should be the width and depth of the hole in the ground to install the posts?
The next task is to dig all of our stud holes, but first we need to determine the width and depth of the stud hole.
As a general rule of thumb, the hole should be 3 times the width of the post, so for our 10*10cm post, the hole would be 30cm wide.
In terms of how deep our post holes should be, again the rule is to have at least 25% of the post length in the ground. The fence is 1.8m high. must have a support of 2.4 meters with a minimum of 0.6m. in the ground.
So now that we know we need to dig a hole 30cm wide and 0.6m deep, it's time to start digging.
To dig holes, you can use a shovel or you can use special hole diggers if you have them. You can use a 300mm wide drill.
Pull out the peg before you begin, but try to keep the hole of the peg (left when you pulled it out) as close to your hole as possible so the measurements are as accurate as possible.
Check regularly how deep your hole is until you reach the desired depth.
Repeat this until all your holes are completed.
Process the bottom of each fence post
To add even more protection to each fence post (besides drainage and the fact that it's already primed), you can coat the base of the post with asphalt mastic that will sit underground
Place the posts in the holes and secure them in place
To do this you will need the stakes you used earlier and some extra slats.
Screw a piece of lath to the front of the post and another to the face side so that they are at a 90° angle to each other.
Starting with the first corner post, insert the post into the hole and place it about 3cm into the crushed stone. And secure with slats. Make sure the pole is in a strictly vertical position.
The posts are aligned using slats and stakes
The stakes and slats are secured in place and hold the posts straight until the concrete hardens.
Next, use a level to make sure the post is perfectly level and then screw the end of each batten to each peg.
Compact the crushed stone at the base. This will help support the pole and also ensure that it doesn't fall down. This will hold the post while you fill it with concrete and until it hardens.
Then repeat the above steps for the opposite corner post, for example the last post, once it is installed tie a rope between the two outer posts. This will give you a straight line so you can follow the remaining posts.
Then we repeat the above for the remaining pillars, making sure that they are located in a straight line.
Preparation of the solution
To fill the supports you will need a concrete solution. It consists of simple and easily accessible components:
- Portland cement grade not lower than 400;
- sand;
- gravel;
- water.
All these ingredients can be mixed in various proportions. The following composition has proven itself best:
- cement – 1 part;
- sand – 2-3 parts;
- gravel - 3-4 parts;
- water – 0.5-1 parts.
First, the bulk components are evenly mixed manually or using a concrete mixer, then water is added little by little with constant stirring.
In order to properly prepare a solution that allows high-quality concreting of fence posts, all ingredients must meet certain requirements:
- The shelf life of the cement should not be expired;
- the cement must be dry; the presence of dense caked pieces is extremely undesirable;
- the sand must be clean and sifted; inclusions of clay, fertile soil, plant residues, and debris are not allowed;
- gravel must be of a uniform fractional composition;
- It is highly advisable to wash the gravel with water to remove small particles of soil and debris.
Spot installation method
The hole is dug in the same way as the previous method. Cover the bottom with a layer of crushed stone and sand mixture. Weld a heel on one side of the post to increase its stability. The support can be a flat sheet, wider in diameter than the pillars, or a lattice of reinforcing bars.
Lower the structure all the way into the hole, level it and fill it with concrete solution to the top. Compact with a steel rod as you go.
If the humidity of the area is high, the base of the post should be sealed (for example, with roofing felt). Twist the roofing material into a ring, 18-20 cm larger than the depth of the hole. This way, water will not get into the concrete when pouring. Cover one edge of the “glass” with a plastic bag and insulate with tape. Place the structure in the hole and follow the usual pole installation scheme.
The video shows this type of concreting of pillars in more detail: