Functions and planning solutions
The functional and planning aspect of using the attic floor is determined mainly by the purpose of the building, and the planning features are related to the structure of the building and the rooms below. The attic floor can occupy the entire area of the building, or part of it, but, as a rule, within the limits of the underlying walls of the base building. Architectural and planning solutions can have a wide range, and premises can have any area and configuration.
When designing an attic floor, the choice of a planning option should be based on an analysis of the planning scheme of the base building, determined by studying the social needs of a given residential building and made in accordance with current regulatory requirements.
It is necessary to distinguish between three main types of attic floors:
- attic floor with the formation of a separate floor on one level;
- attic floor with two-level development;
- an attic floor with a spatial organization of a mezzanine floor with a two-level development of the upper floor of the base building.
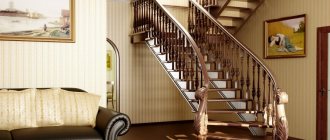
How to make an attic practical for living?
Every meter of living space must be decorated with comfort and taste. For a full-fledged stay, it is necessary to create a positive climate on the floor. In the summer, the heating of the attic increases; if ventilation rules are violated, in direct sunlight the attic floor turns into a stove. Climate control equipment in the attic is an important condition for year-round comfort on the floor. Natural ventilation often cannot provide comfort and maintain temperature in the attic floor. Wiring heating equipment requires certain skills. The use of good insulation under the roofing material has a positive effect on the good climate of the space.
It is difficult to give advice in matters of beauty and interior design. Housing design for each client is individual. It is possible to calculate in advance only standard projects using basic materials of standard quality. Designers advise that the arrangement of furniture and arrangement of free space be carried out using basic rules. 50% of the free zone is used for moving around the floor. Sloping levels of the slope can be used for the sleeping area and dressing areas.
Interior
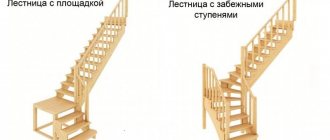
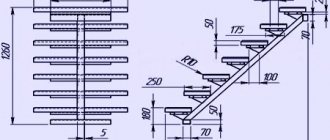
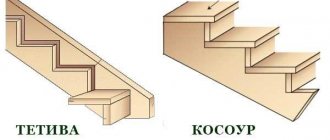
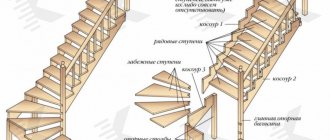
When designing the interior of the attic floor, you should take into account some characteristic geometric shapes of the premises. We are talking about the placement of stairs, the furnishings of the bathroom and toilet, kitchen, as well as the placement of doors. The free height of staircases in relation to sloping roof surfaces should be taken into account. There are no difficulties when the direction of the stairs is parallel to the slope of the roof or the stairs are placed along the middle axis of the building. Free height is usually not a problem, but the placement of possible parts and components of the roof structure should be taken into account.
The furnishings of the bathroom and toilet should be taken into account the sloping surfaces of the roof, limiting the full height.
Placing doors can be challenging not only because of determining the height of the doorway itself. Here it is also necessary to take into account the unhindered opening of the door, taking into account the sloping wall.
Shed roof
Structurally, this is a slope, which is located on two walls of different heights, thereby forming a certain angle of inclination. This roof option is the simplest, but is not considered attractive, since it is more associated with outbuildings. If the house has a large area, you will have to increase the angle of the roof. Such design changes will lead to large windage, which means the roof will not be able to last long.
Among the advantages are economic benefits, ease of calculation and installation. Another advantage is the light weight of the structure, which is quite easy to repair.
In general, this roof is not the best option, since you will need high-quality thermal insulation, which is difficult to install, and the attic will be small, so it will not be possible to place a living room here.
Fire requirements
Fire safety requirements, especially evacuation routes for the attic floor, depend on the planning structure of the base building: if the functions of the base building and the functions of the attic floor coincide, the staircase-elevator assembly of the building to which the attic is adjacent is used for escape routes; if the functions of the base building and the attic floor do not coincide, creating escape routes requires the installation of special communications, which can be located inside or outside the building and have isolated exits, including between two buildings.
It is allowed that there are no exits to the staircase from each floor of an apartment on two levels, provided that the premises are located no higher than the 6th floor and the apartment is provided with an additional exit. It is allowed to install emergency exits into the common staircase from creative workshops, provided that communication through the vestibule is possible.
When placing offices and offices in the attics of residential buildings with no more than 9 floors, entrances and emergency exits must be isolated from the residential part of the buildings. It is allowed to accept staircases of the residential part of the building as a second emergency exit, while the exit is provided through a vestibule with fire doors. A roof window can serve as a rescue opening through which people from the premises can be evacuated.
Advantages and disadvantages of a mansard roof
Arranging an attic space for living space is a complex process that requires knowledge of all the features of the house. To do this, it is worth finding out the advantages and disadvantages of the attic that characterize this design.
The attic is characterized by a set of features that should be taken into account during construction
The main advantage of arranging an attic space is the maximum rational use of the space under the roof. The attic also has the following advantages:
- aesthetic appearance of the house from the outside;
- the possibility of creating an original interior inside the attic;
- reducing heat loss through the roof;
- possibility of arranging an additional functional room.
Even a small attic can be used rationally.
The disadvantages of the attic are expressed in the complexity of arranging the room. To create optimal living conditions in the attic, thermal and waterproofing materials of the highest quality and safety are required. It is especially important to properly design the roof, install special windows and ensure high-quality ventilation of the under-roof space.
Important rules for designing an attic floor
The choice of planning option for the attic should be based on an analysis of the layout of the base building.
A huge role, depending on the level of visual perception, belongs to the lines and shapes determined by the geometry of the roof. An important condition for the placement of attic rooms is their relationship with the communication structure of the building - the foundation.
It is necessary to interact between the designed and existing engineering systems and ensure their collaboration. (In cases where the functions of the attic do not coincide with the functions of the main building, the development of special technical solutions is required).
Of particular importance are the shape and dimensions of the premises, the choice of translucent fencing (vertical or inclined windows), their placement, taking into account the construction of the interior in conjunction with the formation of architecture.
The structural design, material of enclosing structures and attic parts are determined taking into account the unity of the design and architectural forms of the base building (The use of lightweight structures, parts and products is the main requirement).
An attic with a steeply pitched roof requires a special approach to choosing roofing material, providing thermal protection, sealing and waterproofing.
The construction of an attic without relocating the residents of the main building requires a special method for maximum safety of work, limiting the weight of structures and parts, and constructing protection and safety elements.
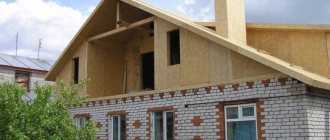
Construction of a second floor or attic
These are two options for how you can design the top. Having examined each option in more detail and the main characteristics separately, you can make your final choice.
The area of the room itself is of great importance. The photo of the second floor in a private house shows smooth walls and no beveled corners. Such features affect the visual expansion of the area.
When choosing to build an attic, you can also achieve this effect. In this case, pay attention to the design of the house; make bevels not from the lowest point, but retreating a certain distance. Thus, the room will be as comfortable and functional as possible. It is possible to install a domed roof.
It is worth determining the purpose of the extension. Choose for what purposes the room will be used. This could be a bedroom, or a children's room, or a living room.
Often this place is used as a workshop, or a separate office. You can also equip a bathroom or toilet, in which case a full extension to the second floor will be the optimal solution.
Many people consider the cost of two options. Based on practical experience, an attic is much cheaper than a full second floor. Saving money can include the purchase of materials that are used for wall finishing.
Basically, most of the funds are spent on arrangement, then insulation of the room, ventilation system. It is also necessary to install special roof windows. In the case of building a house, it is worth strengthening the foundation, that is, the foundation of the house. This all increases the final cost of the structure.
From a visual point of view, these options are perceived differently. If your goal is a strict, solid appearance of the building, then you should choose a full-fledged extension. More versatile in this case is the attic option.
By choosing the attic option, you can bring to life different styling ideas, decorate the overall exterior with decorative components and unusual decorations.
Attic floor structures
The design and geometry of the roof determines the architectural form of the crowning part of the building, and this, in turn, is the need to create unity of structural and architectural solutions in conjunction with the internal space determined by the functional purpose.
The choice of one or another architectural and construction system for the attic floor includes the determination of the load-bearing structure and fencing, as well as the organization of construction work at the site in the built-up part of the city.
For attic floors, it is recommended to choose lightweight structures and materials, since, on the one hand, their transportation to the floor should be as easy as possible, and on the other, the dead weight of the structures should be minimal, taking into account the load that will be transferred to the existing building.
These premises generally indicate that structures should be selected from wood-based materials or thin-walled cold-formed metal profiles. The use of stone and concrete materials to create a load-bearing structure for the attic floor on a building being restored or newly constructed is not recommended.
The roofing covering must meet the same prerequisites, that is, it must be made primarily of lightweight materials in the form of metal sheets, metal tiles, and the like. In cases where this is necessary in order to preserve the environment of an existing building, the covering is made of clay or cement-sand tiles, non-ferrous metal and other materials.
The internal cladding of the attic fence is made mainly of plasterboard sheets. It is advisable to carry out internal partitions by element-by-element assembly with lining with plasterboard sheets on racks made of thin-sheet profiles.
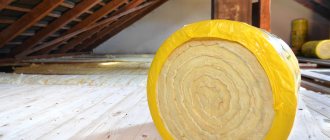
The attic floor is more susceptible to heat loss than the lower floors for the simple reason that there is no “thermal cushion” above it. It has a large total surface of contact with the external environment. Therefore, for reasons of comfort and economy, effective and thorough thermal insulation is necessary. With increased thermal insulation, more stringent requirements are placed on the thermal seal and its implementation. This seal prevents warm air from penetrating through the sealing layer. For thermal insulation, effective insulation should be used, for example, a mineral wool slab, with = 0.004 W/m oC according to calculation. A vapor barrier layer is provided on the inside of the insulation (facing the room), and waterproofing on the outside. It is also important that there is a sufficiently effective ventilation space between the top side of the insulating layer and the underside of the roof covering, which would facilitate ventilation and remove the inevitable flow of moist warm air that will penetrate through the vapor barriers and the insulating layer.
Gable roof
Such systems are also called tong systems. This is the simplest version of pitched structures. Despite its simplicity, the design of such a roof is quite attractive and allows you to diversify the image of a two-story residential building. The positive aspects include the following:
- The impressive area of the attic space makes it possible to arrange storage areas, install technological equipment or create an attic floor.
- The attic increases the thermal insulation of the house.
- Sedimentary water is removed as efficiently as possible.
- Easy to install.
- Acceptable price.
The disadvantages include the fact that as the area of the house increases, the roof area increases significantly. It is also important to consider the minimum permissible slope angle for different roofing materials.
Tip: you can significantly diversify the image of a house with a gable roof by using different angles of the slopes and original finishing of the gables.
Insulation of attics
The attic covering should not only protect the house from precipitation (rain, snow), but also prevent the cooling of the rooms on the upper floor. Warm air always rises, so the air temperature under the ceiling is on average 2°C higher than the middle height of the room. With the same thermal insulation capacity of the walls and roof, heat loss through the latter will always be greater, which is due to the large temperature difference between the outer and inner surfaces of the attic covering. In addition, the moisture content of warm air is usually higher than that of cold air, so condensation on the ceiling of the upper floor can form at higher temperatures than on the inner surface of the wall. Therefore, more stringent requirements are imposed on the thermal protection of roofing coverings than on external walls.
Heat loss through the attic is quite large, so properly insulating its coating can bring a tangible economic effect. When comparing two typical two-story houses with an area of 205 m2 with attics insulated in accordance with previous and new requirements, it was found that the modern level of thermal protection allows reducing heat loss through the coating by more than 3 kW and thereby significantly reducing the power of the heating system and reducing costs heating the house.
Icicles hanging from the roof pose a significant danger to people. In the process of knocking down icicles, there is a high probability of damage to the roof with all the ensuing consequences. One of the reasons for the formation of icicles in winter is insufficient thermal insulation of the roof covering. The snow, heated from below by the heat passing through the poorly insulated covering, begins to melt, and the water flowing from the roof turns into icicles. Only with well-performed thermal insulation will icicles not cause problems in winter.
Design features
The moisture content of warm indoor air is higher than that of cold outdoor air, so the diffusion of water vapor (both through the attic covering and through the outer walls of the building) is directed from the room to the outside. The outer (upper) part of the roofing is a waterproofing layer that does not allow water vapor to pass through easily and promotes the formation of condensation moisture on the inner (lower) side of the roof. The consequences will not be long in coming: despite the well-done waterproofing of the roof, wet spots and mold will appear on the inner surface of the roof covering, the thermal insulation qualities of the insulation will deteriorate, droplets of water will begin to fall from the ceiling (not due to a roof leak, but as a result of condensation of water vapor) .
Considering the negative impact of moisture on the thermal insulation characteristics of materials, the insulation must be protected from moisture by water vapor contained in the air of the room with a layer of vapor barrier material, placing it on the inner (bottom) side of the insulation. To remove moisture that for some reason has entered the heat-insulating material, a ventilated air layer should be provided between the insulation and the outer (waterproofing) layer of the roofing.
Very often, non-residential attic spaces are converted into residential attics, preserving the existing rafter system. At the same time, in an effort to minimize the additional load on the building’s load-bearing structures, lightweight insulation of low density is usually used. Under the influence of wind, low-density insulation is “blown through,” accompanied by heat loss; therefore, in order to maintain the heat-protective characteristics of the structure, a layer of windproof, vapor-permeable material must be laid on the surface of the thermal insulation adjacent to the ventilated layer.
When insulating an attic, you need to remember that heat loss occurs not only through the covering, but also through the end wall. Therefore, the gable of the house also needs to be well insulated in accordance with modern requirements.
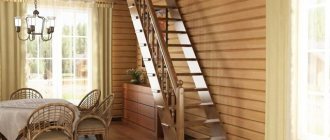
Mansard roof rafter system: instructions
If the height of the attic allows, you can make a flat ceiling instead of a broken one. However, as a rule, this option is the most optimal. You can install window units in such a way that the natural light in the room will be maximum.
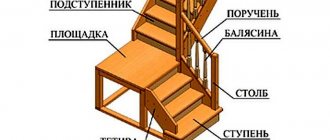
The design of the rafter system consists of the required elements:
- Rafters.
- Mauerlat (bearing beams).
- Racks.
- Lathing.
- Metal fasteners.
- Ridge beam.
- External covering.
- Insulation and steam/waterproofing.
The rafter system looks approximately as follows as in the photo:
Mansard roof rafter system
Mauerlat is the base of the rafter system. In fact, it is a beam fixed along the perimeter to the load-bearing walls of the building. If the house is built of logs, then the Mauerlat is considered the last crown.
Advice! To ensure that the attic roof is secured as firmly as possible to the frame of the house, the Mauerlat is additionally reinforced with metal elements.
Mounting the Mauerlat
So, the installation of an attic roof of a private house begins with the installation of a Mauerlat. In this case, it is advisable to lay waterproofing material between the beam and the wall. Next, the rafters are attached to the Mauerlat as follows:
To relieve the rafters of the lower slope, side internal purlins are installed. The main rafter system is called a “truss” (templates). There are two ways to install it: assemble it on the ground and lift it onto a box, or assemble it at the top.
The most time-consuming activity is to make and mount the first template and the last one. Next, the following structures are installed according to the given dimensions using a building level and stretched threads. When installing a classic attic, you need to focus on 3 points: the mauerlat, the junction of the slopes and the ridge.
Attaching the rafters to the support beam
Naturally, all lines must be clearly aligned and located at the same angle. The pitch of the templates is calculated based on future wind and snow loads and the capabilities of the house frame. The more often the better, but the final weight on the load-bearing walls of the building should be taken into account.
After the installation of the trusses is completed, they begin lathing, as shown in the video in this article. These are cross bars that give rigidity to the system.
Next, a “roofing pie” is placed on the sheathing, consisting of several layers:
- Vapor barrier.
- Insulation.
- Waterproofing.
- Duplicate (counter) battens.
- Roofing material.
The vapor barrier material is nailed or “targeted” to the rafter sheathing. Next comes the insulation, waterproofing is attached on top, a counter lath and the last stage is the roofing material. The interior of the attic also needs to be insulated and insulated. Next, you can begin finishing the walls and ceiling.
Roof pie
Advice! Before installing the rafter system, you need to think about where the windows will be located so that you do not have to subsequently compromise the integrity of the structure.
It should be taken into account that the rafter system is made of boards and is therefore subject to the destructive influence of humidity, fungi, and insects. Therefore, it is imperative to treat the wood with antibacterial compounds and primers.
You also need to pay attention to good ventilation . Especially if there are no windows planned in the attic. The easiest way is to install wall supply valves. Or, if there are windows, use a modern air exchange option: install double-glazed windows with built-in ventilation ducts.
Ventilated window design diagram
Insulation of attic coverings
Structurally, the attic covering consists of a system of rafters installed in increments of 600...1000 mm. The space between the rafters is filled with heat-insulating material (insulation). It is recommended to use mineral wool slabs based on basalt fiber or fiberglass as an insulating material. Thermal insulation boards or mats can be laid in one or several layers, and the total thickness of the insulation layer depends on the thermal conductivity coefficient of the insulation, the value of which must be indicated in the certificate of conformity.
A ventilated air layer is arranged between the insulation and the roofing. On the inside (bottom) side, the attic covering is protected with a vapor barrier material and finished with plasterboard sheets, lining, etc. If the cross-sectional height of the rafters is less than the required thickness of the insulating layer, wooden blocks are attached to the rafter legs with screws or nails. Insulation boards are placed between them in such a way that there is an air gap between the thermal insulation and the roof. If the cross-sectional height of the rafters is insufficient, horizontally located wooden antiseptic bars can be attached to them. In this case, one layer of insulation is located between the rafters, and the other - between the horizontal bars.
Ventilated air layer device
The width of the air gap between the insulation and the roof depends on the profile of the coating material. In the case of using profiled sheets of galvanized steel, tiles, metal tiles and other corrugated sheets, the thickness of the ventilated air gap must be at least 25 mm. When installing a roof made of flat sheets (asbestos-cement sheets, galvanized steel, soft bitumen tiles, rolled materials,...), an air layer of at least 50 mm thick is required. Ventilation of the air gap is carried out through holes in the eaves and in the ridge.
Protection of insulation from blowing
On the side of the ventilated air layer, the heat-insulating material must be protected with a windproof, vapor-permeable membrane. The use of vapor-proof materials such as roofing material or polyethylene film as a windproof membrane is completely unacceptable! It should be noted that special membranes perfectly allow water vapor to pass through, but do not, however, allow water in the liquid phase to pass through, and therefore prevent the insulation from getting wet as a result of moisture condensing on the inner surface of the roof covering from the side of the air gap. This property of materials makes it possible to reduce the thickness of the air gap to 25 mm, regardless of the profile of the roofing, which is especially important when insulating an attic along existing rafters: an air gap of small thickness eliminates the need to install additional bars on the inside of the rafter legs. The height of the rafter leg will be sufficient to accommodate insulation of the required thickness and provide a ventilated air gap.
When building a new house, windproof material is laid over the rafters and secured with wooden blocks. When installing an attic in an existing attic, windproof, vapor-permeable material is attached with special slats to the existing rafters. The membrane also protects the insulating layer from moisture from precipitation (rain, snow) entering the air gap during strong winds or through leaks in the coating. The material is laid on the insulation with an overlap of 150...200 mm along the dotted lines marked on the material sheet, and attached to the structure with wooden slats, nails, staples or glue.
Vapor barrier device
On the inside (bottom) side, the thermal insulation material is protected from moisture by water vapor contained in the air of the room by a layer of vapor barrier - plastic film, glassine, roofing felt or foil vapor barrier material. The material is laid with an overlap of 100 mm and the seams are taped with adhesive tape. The use of adhesive tape not only ensures the tightness of the seams, but also allows you to reduce the amount of overlap to 100 mm (both vertically and horizontally) regardless of the roof slope. The film is attached to the rafters or beams with thin wooden slats. Foil materials are laid with foil towards the room, and it is advisable to leave a small gap between the vapor barrier and the inner lining. In this case, the shiny surface of the aluminum foil will reflect thermal radiation coming from the room to the outside and reduce the amount of heat loss through the attic covering.
From the inside, the attic room is lined with plasterboard sheets, plywood, boards or lining, which are attached to wooden bars or metal profiles installed on the inside of the rafter legs.