Goals and objectives
Before building a chicken coop or planning the environment inside it, you need to consider:
- age and number of birds;
- the season in which the house will be used;
- the need for regular disinfection and cleaning of the chicken coop.
To maintain the stable functioning and veterinary-hygienic condition of the chicken coop, the poultry farmer must ensure:
- ventilation;
- lighting;
- insulation, waterproofing and heating of the building, especially if the structure is designed for the winter period;
- the right materials that are easy to wash and dry.
Before arranging a chicken coop and providing it with feeders, drinkers and perches, you should take care of the optimal microclimate.
Comfortable microclimate in the chicken coop
The productivity, growth and condition of the bird as a whole depends on many factors: lighting, temperature and air humidity. Even in summer, you should maintain a healthy microclimate inside the chicken coop and provide protection from drafts and moisture. To do this, after assembling the structure and covering the walls, it is necessary to carry out thermal and waterproofing of the walls, floor and roof.
Thanks to available materials and small tricks, furnishing a house will cost several times less. For work, you can take inexpensive sheet foam, mineral wool and other materials.
If you plan to keep birds in the chicken coop only during warm periods, this design will prevent drafts and protect the chickens from overheating. To build a winter chicken coop in mid-latitude climates, thermal insulation alone is not enough; you also need to think about the heating system. Usually it is of an autonomous type or connected to the home one.
Poultry farmers often use panels or infrared lamps for heating. They are effective, economical, easy to install, non-irritating to birds, and do not heat the air itself, but only the area under the infrared radiation zone. When equipping a structure with these devices, it is necessary to take into account that there should be a distance of at least 50 cm from them to the bird, and it is better to enclose the lamps with protective lattice covers.
Insulation
Insulation and heating - these two issues are very closely connected: in a warm chicken coop, even in severe cold, you can do without heating. There are many examples. No matter how economical heating is, it ends up costing a pretty penny. Therefore, it is much more cost-effective to build a well-insulated shed right away than to pay annually for heating it later.
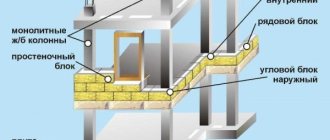
Any modern materials can be used as insulation. They can be stuffed from the inside or outside. The main selection criterion is most often cost. The most optimal is polystyrene foam. It is inexpensive and has excellent thermal insulation ability: a 5 cm thick slab replaces a 60 cm brick wall. Mounted with glue or long nails with plastic washers, you can put pieces of some kind of plastic.
Insulating a chicken coop with mineral wool
You can also use mineral wool and polystyrene foam. But mineral wool requires membranes on both sides. On the outside they install a wind-hydro-protective one with one-sided vapor permeability (vapors must be removed from the insulation). From the inside (indoors) it is not permeable to steam.
Expanded polystyrene is definitely good. The characteristics are even better than those of polystyrene foam; even mice don’t like it. But it's expensive. But you don’t even have to sheathe it: the slabs are even, smooth, and can also be colored.
You can also use natural insulation: hammer sawdust between two planes, coat it with clay mixed with sawdust, etc. In terms of heat conservation, such insulation is inferior to modern materials, but costs practically nothing. So such methods are also used. For the southern regions with mild winters, “folk” insulation is more than enough, but even in the central part, and especially in the North, they are probably not enough.
It was about the walls. The ceiling in the chicken coop must be insulated: warm air accumulates under the ceiling. If it is not insulated, it will always be cold. If you line the bottom with cardboard (it holds heat well) or any board material (plywood, OSB, fiberboard, gypsum fiber board, etc.), and throw sawdust or lay hay on top of the attic, it will become much warmer. And if you insulate according to all the rules, it’s generally great.
Floor insulation is done according to the same scheme as for a house: subfloor, joists on it, insulation between them, finished floor on top. Make it as warm as possible: you won’t regret it.
Not everyone makes wood floors. There is also adobe - clay is mixed with straw and allowed to dry, or concrete. The coldest is concrete, but if you add enough sawdust, it will be fine. And if, suddenly, you also make a concrete floor with insulation (at least wall up the bottles), it will be absolutely great.
Option for floor insulation in a chicken coop
When you are still planning a winter chicken coop with your own hands, consider the presence of a vestibule. This small extension can significantly reduce heat loss, and therefore reduce heating costs.
The internal arrangement of the chicken coop is described here.
Ventilation and lighting
Infrared lamps can be used for both heating and lighting. But even the dim light from them is not the best option for birds at night. For proper rest, chickens need to be provided with darkness.
To save electricity, you can install windows in the room. If you are planning an all-season design, you should take care of durable frames that do not allow cold air to pass through.
Good ventilation will prevent unpleasant odors inside the chicken coop and normalize temperature and humidity, which can increase during the active life of the bird.
Chicken coop for 10-20 chickens: choosing and making a foundation
The type of foundation depends on the type of material chosen. If this is a frame building or timber or logs will be used, the most optimal is a columnar foundation. The costs in time and money are minimal, reliability is sufficient, and possible distortions of the columns are compensated by the strapping and elasticity of the material.
Even a small chicken coop is better placed on a base
If the walls are built from blocks of any type, brick, shell rock and any similar material, a strip foundation is needed. There are more costs, but there is no other way to do it. An even better option is a slab foundation, but the costs are even higher. But the slab can be used as a subfloor, and with such a foundation any frost heaving is not a problem.
Preparing the site for the foundation
To build a chicken coop for 10 chickens with your own hands, first clear the area. It is necessary to remove all the fertile layer. Its thickness can be 20 cm or more, and maybe only 5. In any case, we remove everything, including stones, roots, etc. We level the area and compact it. For tamping, you can use a piece of large diameter log with a crossbar-handle nailed on top.
You can also use stones. It is only important to remove the fertile layer
It is necessary to remove the soil because the animal and plant remains in it under the building begin to rot. So it is necessary to remove the fertile layer of soil. We carry out further construction work on the cleared and leveled site.
Columnar foundation
The foundation pillars for the poultry house can be made of brick, but the easiest way is to use concrete blocks 20*20*40 cm. They fit perfectly. If you are building a chicken coop for 10-20 chickens, it is unlikely that your structure will be larger. The longest side length that can be is 4 meters. If the winter is snowy, you can put three supports on this side: two at the edges and one in the middle. If the length of the chicken coop wall does not exceed 3 meters, we place only supports in the corners.
In the selected places we dig holes that are slightly larger in size than the future pillars. The depth of the holes is 25-30 cm. Pour medium-fraction crushed stone onto the bottom and compact it well. The thickness of the compacted layer is 15 cm. We pour sand onto the compacted crushed stone and tamp it well too. Blocks can be placed on this base. They need to be placed “on the horizon”. To do this, you can use pegs with a rope stretched along the level, or you can put even planks on the blocks, lay a building level on them and use it to navigate.
Wooden and frame chicken coops are usually placed on such blocks
Once the blocks are aligned, you can begin laying the strapping. This is either a beam (for frame or timber construction) or a log. The strapping beam/log must be treated with impregnation. Under them, on the posts, it is advisable to lay a piece of roofing felt or waterproofing material folded in two layers (a modern and improved analogue of roofing felt). That's it, you can continue building the chicken coop.
Strip foundation for a chicken coop
A strip foundation is usually made for a chicken coop for 20 chickens, which will be built from any building blocks, wood concrete, adobe, shell rock, brick, etc. To make a concrete strip, you will have to dig a trench at least 50 cm deep and at least 35 cm wide along the perimeter of the future building. Try to make the walls of the trench even, and if the soil is loose, with a slight slope.
The bottom of the trench is cleared of stones and roots, leveled, and compacted. Crushed stone of medium fraction is poured onto the bottom, leveled and compacted. Layer thickness - 15 cm (compacted). Construction sand is poured on top and compacted. The thickness of the layer is about 10 cm. Next, formwork is assembled from boards in a trench for pouring concrete. The formwork panels should rise above the ground by at least 10-15 cm. In this case, the floor of the chicken coop will be slightly raised.
Strip base - for serious buildings or very difficult soils
To increase resistance to soil movements during frost heaving, reinforcement is placed inside the strip foundation. In this case, two rods with a diameter of 10-12 mm (ribbed, not smooth) are sufficient, which are located at a distance of about 15 cm from each other. The distance from the rods to the formwork panel is at least 5 cm. The distance from the bottom should be the same or greater .
The last step in constructing a strip foundation for a chicken coop for 10-20 chickens is pouring concrete. The grade of concrete is M150, it’s not worth doing less. The proportions are standard: for 1 part of M400 cement we take three parts of medium-fraction crushed stone and four parts of dry sand. Water - 0.7-0.8 parts. Mix everything and pour it into the formwork. Having leveled the top edge, cover the foundation with film and wait 1-3 weeks. If it is warm (+20°C and above) we wait a week, if from +17°C to +20°C - two, if less than +17°C - three. After which you can remove the formwork and continue construction.
Remember that the concrete foundation, even for a chicken coop for 10-20 chickens, must be waterproofed. It can be coated twice with bitumen mastic, or you can lay two layers of roll waterproofing. If the humidity in the area is high, it is better to use both.
Floor and walls
The design of the chicken coop must have a door for cleaning the floor from droppings, old bedding and other debris. Before arranging a deep bedding of clean, dry straw and sawdust, you must first sprinkle a layer of lime on the floor. The litter itself should be at least 10 cm. In the cold season, the layer is made thicker. As the old litter gets dirty, replace it with a new one.
Heating
It is difficult to overestimate the importance of properly installed heating for a winter chicken coop. All poultry house owners know this: at above-zero temperatures, laying hens feel great and lay eggs well in winter.
Related article: Decorating with decorative stone: is it possible to glue decorative stone to wallpaper?
Electricity
If electricity is supplied to the chicken coop, you can heat it with fan heaters or infrared lamps. fan heaters . Not in the sense that they are cheaper, but in the sense that they will use less electricity over the winter. There are two types of automation: temperature and time. Naturally, to heat a chicken coop it is better to take one that reacts to temperature. As soon as it gets cold, say, to 0°C, it will turn on; when it rises to +3°C, it will turn off. In general, you choose the settings yourself. The method is effective and quite popular.
Chickens are also often heated with infrared emitters . But they do not heat the air, but objects that fall within the range of the rays. They are hung above perches and several above the floor. If the birds are cold, they gather under them. It can be cold in the chicken coop, the main thing is that its inhabitants are warm. This is exactly what happens with infrared heating. One caveat: IR lamps burn out from frequent switching on/off, so it is advisable to turn them off very rarely. For people, they burn for months, fortunately they “draw” little electricity.
It is also important to know about the operating features of IR heating lamps (they are for lighting, do not confuse them). The surface of the lamps heats up; the design of the lamp itself is not adapted to such loads. Plastic sockets do not hold the lamp well, but finding ceramic ones is a problem. To ensure fire safety, it is better to make a wire cage for the lamp. This way, the chickens won’t get burned, and if the lamp falls out, it won’t break and the litter won’t catch fire.
Oil radiators are ineffective: high consumption, little heat. Homemade devices with an open spiral are effective, but very fire hazardous, and you will have to leave them on. This is too much of a risk.
IR lamp heater in a mesh casing
Boiler and stove
There is also a heating option - a boiler and radiators. But these are dreams for most. They also heat it with a potbelly stove, a wood-burning boiler, or build a small brick stove. Moreover, they try to route the pipe through the chicken coop so that it provides maximum heat. If the stove is iron, it can be lined with brick, like an iron pipe. Once heated, the brick retains heat for a long time. With normal insulation, one heating is enough for a couple of days.
Heating a chicken coop by decomposing sawdust
There is a way to maintain positive temperatures without heating - using the heat released during the decomposition of sawdust. But it only works if there is normal (at least) insulation. Sawdust is poured onto the floor. The first layer is poured in the fall, before the first cold weather. The layer is about 10-15 cm. It lies for a month and a half.
This bedding is much better than hay: chickens do not get sick, since sawdust regulates humidity well. They also love to rummage in the litter, and are constantly busy with this, so the laying hens do not get fat even with plenty of food and limited walking.
Chickens with sawdust feel great even in the cold
After 30-50 days, add a fresh portion of sawdust (you can tell by the smell and appearance). And this time, too, about 10 cm. Then - again. By the end of winter, a layer of about 50 cm has accumulated. Moreover, even in decent cold weather, the temperature inside the chicken coop remains at least 0°C, which is enough for laying hens. If you bury yourself in such litter, it will be about +20°C. What chickens do in the cold: they dig holes and sit in them. This is sawdust: a decomposition reaction occurs, releasing a large amount of heat.
Article on the topic: Design and arrangement of a pond at the dacha with your own hands - options and photos
In the spring, the entire mixture is taken to the compost heap, after some time it will become an excellent fertilizer. But one more thing: in the fall, you have to put a high board in front of the door so that the bedding doesn’t spill out. Walking is uncomfortable, but the draft from under the door is eliminated.
Nests and roosts
Nests and perches occupy an important place in the arrangement of a chicken coop. They are made from plywood, boards and other materials. Experienced poultry keepers often use other items as well. These can be plastic containers, baskets or buckets that are lined with bedding.
For perches, beams or poles are used. Bars of rectangular or square cross-section must be processed - corners must be rounded and the surface polished with sandpaper.
Perches in the first row should be at a height of about 50 cm, on the second and subsequent ones - at a distance of 35 cm from the previous ones. It is important to design the rows in such a way that the birds do not sit on top of each other. The optimal distance from the wall to the perches is at least 25 cm.
Ideas for original chicken coops for every taste
We are talking about dried water reed (lat. Phragmites Australis), growing along the shores of lakes and in floodplains. Our country has rich reed resources. The best quality material grows in the estuaries of the Krasnodar region. It is not surprising that a truly industrial procurement of material for natural roofing has been established there (including the following steps: reed mowing, drying, clearing leaves, binding into sheaves of different heights and sizes, packaging in “packs” of 70-80 sheaves). Vegetable roofs are characterized by combined qualities that only Nature itself could provide. They do not require under-roof ventilation, hydro-, steam- or thermal insulation. Growing in water, roofing reeds are water-repellent. In rainy weather, reed roofs absorb water very slowly, completely saturating only the surface layer 3–5 cm thick with moisture. Waterproofness of the coating is achieved through special installation techniques. There are several types of it. For example, Polish knitting of reed roofs is one of the most labor-intensive. Moreover, as a result, it produces a relatively loose roofing sheet. The tightest knitting is achieved using Dutch technology, now recognized as the most reliable and durable. The best results can be achieved only when using even stems with a diameter of up to 6-8 mm. It should be noted that each project of performing high-quality work on installing a reed roof requires the use of source material (sheaves of peeled reed), of different lengths and shapes and age - no more than a year. If you, Marina, come across crooked or twisted stems as raw materials, it is difficult to expect high quality, since the latter reduce the density of the roofing sheet . And this, in turn, leads to a decrease in the moisture resistance of the coating - the main consumer parameter of the roof.
The stem-like structure ensures air exchange and self-ventilation of the roof, that is, it allows the coating to “breathe.” Roofing reeds also have thermal insulating qualities. The thermal conductivity coefficient of the material is comparable to that of mineral wool slabs (0.042 W/m·ºС – versus 0.037 W/m·ºС for a basalt heat insulator, for example, from Rockwool). Therefore, it is not surprising that a roofing covering 35–30 cm thick fully meets modern thermal requirements. The material is characterized by an attractive picturesque quality. Reed roofing softens the sharp outlines of the rafter system. Reed is supplied in sheaves. The material is laid on top of the sheathing, attached to the rafter system exclusively with self-tapping screws (without the use of nails). The base must have high rigidity and resistance to deformation. For one square meter of reed roofing , depending on the project, there are from 30 to 50! fastening points. For each roofing covering there is a certain interval of roof slope. Thus, for reed it is determined by the factor of the impossibility of moisture penetration when draining from the roof. Therefore, in addition to the angle of inclination, the length of the rafter leg also plays a role. So, with its size 2-2.5 m, experts undertake to make a reed roof with a slope of only 18º. As practice shows, during this sprinting two-meter path, raindrops do not have time to penetrate the roofing sheet. However, if the length of the rafters approaches five to seven meters, it is necessary to increase the slope to at least 35º. To increase the service life of the roof without significant restoration measures, it is necessary to take into account the designed roof inclination angle of 45 degrees and above! I will send information about the manufacturer of this beauty to your mailbox.
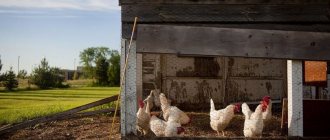
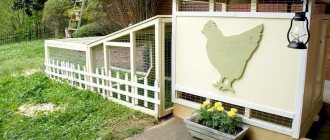
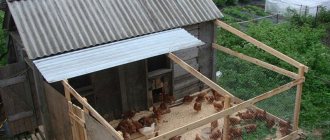
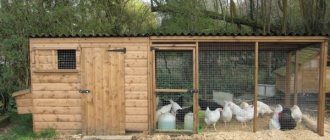
Arrangement of the corral
For walking chickens, it is necessary to provide an equipped area along with the chicken coop. If you plan to raise poultry in the summer, the pen should be arranged in such a way that it does not face the hot side, but at the same time is not constantly in the shade. You also need to take care of cleanliness and make sure that plants that are dangerous to chickens do not grow in the pen area. And of course, exclude unpleasant surprises for the bird in the form of unwanted guests.
The pen is constructed from a fine-mesh metal mesh, which is attached in a tensioned position to poles located at the corners of the area. The height of the fence is usually at least 2 meters. The mesh size should be small enough so that the bird does not get stuck in it.
Chicken coop foundation
There are options. They most often build on posts - they make a columnar foundation. It happens - they make a shallow pile or strip. But this is the case if the material chosen for the walls is heavy, or which requires a rigid base: brick (ceramic, silicate, adobe), foam and cinder blocks, shell rock, etc. For light buildings made of wood - frames, timber, logs - it is enough to fold the columns or install ready-made foundation blocks (you can make them yourself).
Related article: Swing gates made of corrugated sheets for a summer residence - do-it-yourself manufacturing and installation
These are posts for a frame barn for chickens
In the case of columnar and pile foundations, supports are placed in the corners and 2-3 meters in between them. The load on the base will be small, so they rarely work too hard.
Internal arrangement of a chicken coop: useful tips
Experienced poultry farmers always know a few tricks for arranging practical and comfortable chicken coops:
- It is important to monitor the length of daylight hours in the chicken house. Excess light negatively affects the behavior of birds: they show aggression, spoil eggs in nests and peck at smaller relatives;
- nests at the same level with the floor are not the best option, since more cunning individuals will certainly adapt them to sleep;
- for greater egg production, it is enough to place the nests in the most shaded corner;
- the perches should be correctly positioned with ledges on the wall on the opposite side of the nests;
- To make it easy for chickens to climb to the top of nests and perches, ladders and inclined ladders are installed for them;
- Feeders and drinking bowls should be arranged above the floor level in such a way that it is convenient for the birds to use them, but at the same time they cannot climb into the water or feed;
- It is best to place drinkers and feeders closer to the wall between perches and nests. They should be within sight of all the inhabitants of the chicken coop.
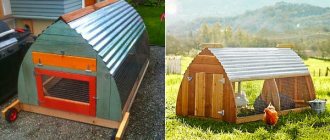
More interesting examples of chicken coop designs are presented in the following photos.
Do-it-yourself chicken coop from scrap materials.
A German farmer turned an old kitchen cabinet into a small chicken coop.
This scrap coop is fully compliant with EU chicken housing specifications and provides enough space for three hens to collect and lay eggs.
The cabinet compartments contain storage areas for sand, straw, feed and eggs.
Tiny curtains have also been made for the chickens as they prefer to lay their eggs in the dark.
Chickens need space to roam, so the coop is placed in the backyard to give them plenty of room to roam.
A chicken coop made from scrap materials shows how modern methods of keeping chickens can be implemented using non-standard means.
As you can see, in the construction of such a seemingly simple thing as a chicken coop, there are many nuances and important points, lack of knowledge of which can negate all efforts.
But despite this, anyone can build a good chicken coop with their own hands.
The main thing is to arm yourself with the right knowledge and think through all aspects of the design in advance. You can build a chicken coop according to our drawings, or, taking their basis, modify its structure to suit your needs.
Please share your experiences and tips on this topic in the comments!