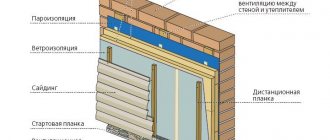
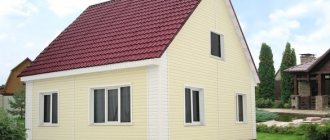
Siding refers to ventilated facades. This means that it is not mounted flush against the wall, but with a ventilation gap. Air can circulate freely between the wall and the finish, preventing the formation of dampness, mold and mildew.
This effect can be achieved through the use of lathing. In addition, the use of such a frame for siding allows you to evenly distribute the load on the walls of the house.
Plus, thanks to the frame, siding can be mounted even on uneven walls, without any preliminary preparation. This reduces the time and cost of decorating the exterior of your home. As a result, even a rickety wall will look smooth and neat.
In general, the lathing is an irreplaceable thing. And we strongly DO NOT recommend installing siding directly on walls, without a fastening system. In this article we will look at how to make sheathing for siding correctly.
What kind of lathing can be used for siding?
For siding, one of three types of sheathing is used:
- metal;
- wooden;
- plastic.
Metal sheathing for siding
made of galvanized profiles with a cross-sectional area of 60x27 mm. It is durable and not subject to changes due to temperature changes or high humidity. In addition, it can withstand heavy loads.
There is, perhaps, only one limitation on the installation of metal sheathing: you should not do it in the heat, when the metal heats up and expands. The fact is that when the temperature drops, the facade may become deformed.
Wooden sheathing for siding
cheaper than metal, but also less durable, susceptible to the negative effects of moisture, temperature changes, requires special processing and is subject to combustion.
The lathing is made from wood with a moisture content of 12-15%. If this indicator is higher, the wooden blocks will need to be dried in the fresh air for at least a month. Otherwise, during the drying process, the tree will change its geometry and pull the siding along with it. The façade will be skewed.
For lathing, bars with a cross section from 30x40 to 50x60 mm are used. Before use, they must be treated with antiseptics and antifungal compounds to protect against pests and fungi, as well as fire-resistant agents. Wooden sheathing can only be installed in dry weather.
Plastic fastening system for siding
has not been used for very long. Plastic does not burn, does not rot or rust, and is easy to install and operate. But the most important thing is that such lathing is made specifically for plastic siding and has comparable expansion coefficients. This means that the panels do not deform due to changes in temperature and humidity. You can install plastic sheathing in any weather.
A visual comparison of the advantages and disadvantages of all three types of sheathing is given in the table below.
| Characteristic | Wooden sheathing | Metal sheathing | Plastic sheathing |
| Strength | Durable enough. | The most durable. | Durable enough. |
| Weight | Middle weight category. | The heaviest type of lathing. | The easiest one. |
| Effect of moisture | When exposed to moisture, the strength of the frame decreases, and fungus and mold can develop. | Resistant to moisture. But low-quality material can rust if damaged. | Resistant to moisture. |
| Impact of temperature and humidity changes | Changes in temperature and humidity cause wood to swell or shrink, which can lead to deformation of the entire façade. | It has a fairly rigid mount. The influence of temperature and humidity during operation is minimal. | It has a comparable expansion/compression coefficient, due to which the sheathing changes shape “in unison” with the siding panels, which avoids deformation. |
| Fire safety | Combustible material. | Non-flammable material. | Does not support combustion. |
| Installation features | The wooden sheathing must first be treated with antifungal, protective compounds and septic tanks. | The heaviest type of lathing. Therefore, installation is quite labor-intensive. | Simple installation, does not require special skills or tools. |
| Installation restrictions | Do not install during rain or frost. | Installation at very high temperatures and during frosts is not recommended. | Installation is possible in any weather. |
Recently, wooden sheathing has been used less and less and, as a rule, only for log houses. In all other cases, a metal or plastic analogue is preferable.
Do-it-yourself siding lathing: basic principles of installation
The sheathing is installed around the entire perimeter of the building where siding is planned to be installed - including roof gables and all openings. Depending on the type of siding, it can be installed horizontally or vertically.
- For traditional horizontal siding, the frame is mounted vertically.
- To install vertical siding - horizontally.
The pitch of the sheathing for siding depends on the type of its construction and the type of siding, climatic conditions in the region where the house is located, the likelihood of strong winds, hurricanes, etc. On average, it is 40-60 cm.
Installation of sheathing under siding begins with surface preparation:
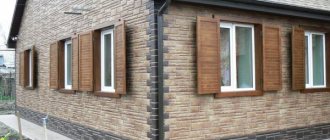
- Remove all protruding elements - window and door frames, shutters, drainpipes, etc. Once the work is completed they can be returned to their place.
- Check external walls. If they are damaged, worn out, cracks appear or some elements are loose, all this must be corrected.
- Clean the walls from dirt, outdated or peeling finishes.
- The walls of wooden buildings must be treated with an antiseptic.
- Mark the walls. Determine the pitch of the sheathing and make markings where the profiles (or bars, if we are talking about wooden sheathing) will be installed. It should be taken into account that the heavier the siding panels, the smaller the sheathing pitch should be.
After this, you can proceed directly to installing the sheathing.
Features of installation of lathing when insulating walls
Today, there are three options for insulating walls under metal siding:
- frameless;
- interframe;
- on a cross frame.
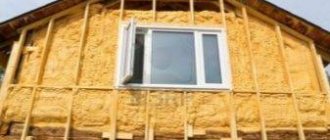
Frameless insulation of walls intended for siding is the simplest and most economical option. Insulation in this case is carried out with roll insulation, glued to the wall using glue that has good adhesion. After fixing the material, sheathing under metal siding or siding panels made of another material is laid on top of it.
Inter-frame wall insulation involves the use of rigid thermal insulation boards attached between the frame elements. The thickness of the bars in this case is selected so that it approximately coincides with the thickness of the insulation. A special vapor-permeable film is laid on top of the frame. The clearance required for ventilation needs is provided by using additional bars.
Cross-frame insulation is the best option for weather protection, avoiding the appearance of “cold bridges” and implying the use of several frames and perpendicular placement of thermal insulation material. In this case, work is carried out in the following sequence:
- hanging a structure made of the selected material on the wall;
- laying thermal insulation;
- installing a second structure on top of the first;
- filling the voids of the second structure with insulation;
- laying vapor barrier;
- fastening metal siding.
How to make a frame for siding: step-by-step instructions
The algorithm for installing the sheathing is as follows:
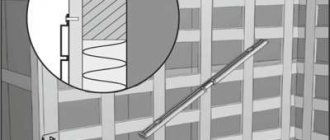
- Installation of the sheathing begins with corner (guide) profiles. Use a building level or plumb lines so that the sheathing and, accordingly, the facade are installed level. Distances to the wall can be adjusted using straight hangers or leveling wooden pads.
- Stretch fishing line, nylon thread or cords between the corner elements of the sheathing. They will serve as a guide for setting subsequent profiles. If you have a laser level, that will also work great.
- Make markings and use a hammer drill to drill holes for brackets or metal hangers. The first option is more stable, suitable for metal profiles. Metal hangers can be used for wooden sheathing.
- Lastly, frame profiles are installed around the perimeter of window and door openings. They are mounted to other elements using building corners. The previously removed trim will be attached to them.
- When the installation of the sheathing is completed, measure the plane of the installed corners. After this, you can begin installing the siding.
If you plan to install siding with insulation, the sheathing design will be similar. Only the distance between the wall and the profile will change.
You can make a lathing made of wood or metal yourself. In the first case, you need to select bars of the appropriate size and fasteners. It is better to give preference to coniferous wood. The thickness of the beams depends on the type of finish. This is the cheapest way to make your own sheathing. But do not forget that the service life of such a fastening structure and the entire facade will depend on the quality of the timber, its initial moisture content and treatment with protective compounds.
For metal lathing, galvanized steel or aluminum profiles of various types are used. The most common dimensions of elements are 60x27 mm, length 3 and 4 m. Galvanized screws or dowels are suitable for fastening. Their type and dimensions depend on the material and weight of the sheathing. The correct sheathing for siding must be made taking into account all these nuances. Otherwise, the panels may become deformed during operation.
Securing the starting J-profile
Cladding a house with siding with your own hands at the next stage involves the following procedure:
- Finding the lowest point on the sheathing using a level. It is necessary to measure 50 cm upward from this point and mark this point (for example, with a loosely screwed screw).
- Sequential marking of lines with self-tapping screws along the perimeter of the building.
- Pull the cord at a distance of 50 cm from the bottom along the screws.
- Marking the location of corner profiles on slats. The profile is laid to the corner, its edges are marked.
- Fixing the first starting profile along a rope with a gap of 6 mm from the future border of the corner profile.
- Fastening the remaining starting strips with a gap between adjacent ones equal to 10-12 mm for thermal expansion.
- Checking the level of the starting bars.
Installation of the starting profile
The profile must be mounted perfectly level. If there are deviations at this stage, the entire siding of the wooden house will be distorted.
Ready solution
If you do not know exactly how to properly make a sheathing for siding, what technical characteristics of the fastening system are necessary for a particular type of siding, choose a ready-made solution from a panel manufacturer.
So, I developed a special plastic sheathing that is suitable directly for branded siding. Moreover, different types of panels have their own profiles. For example, for the Alta-Siding and Canada Plus collections, a D 4.5 profile was made, for Block House siding - VN-01 and VN-02.
The company also provided two options for installing siding - with insulation (then 138 mm studs are used) or without it (53 mm studs).
Installation of such a ready-made system does not require special skills or equipment. The algorithm of actions is simple:
- Select and order the necessary elements from the company’s assortment.
- Set the horizon around the perimeter of the house and make markings.
- Collect profiles.
- Secure the bottom heel of the profile horizontally.
- Align the profile vertically using a level and secure the top heel.
- Secure the middle heel.
- Sequentially install the remaining profiles in increments of 30-40 cm.
- For corners and openings, use a flat profile with a metal corner element.
- Check the accuracy of installation vertically and horizontally and finally align the profiles using a hexagon. After this, you can install the siding.
Material selection
The first step is to decide on the material for the sheathing. If you choose a wooden beam, it should have a cross-section of 4x4 cm or 5x5 cm. You can use a thinner beam, but then it will not be as strong and reliable as necessary, and may not withstand the weight of the siding panels. To choose good quality wood, pay attention to the following factors:
- Humidity indicators. The beams under the sheathing must be thoroughly dried, otherwise during operation it will begin to shrink, and this will negatively affect the entire structure.
- Parameter matching. For the sheathing, you need to use timber of the length and cross-section indicated in the documentation.
- No defects. For the manufacture of lathing, only smooth bars are suitable, without knots, cracks, traces of biological influence and other defects.
Important: for lathing it is better to use wood that absorbs less moisture and, accordingly, lasts longer. For example, larch wood.
Required Tools
Here we list a set of tools that you will need when making wood sheathing.
- Construction plumb line and twine rope. They are necessary in order to insert an indentation from the facade in a strictly vertical position during the preparation of the walls - without slanting to the side.
- Nylon rope. It is necessary to set marks for aligning the sheathing parts strictly vertically and horizontally.
- Level. It will be needed in order to control the even position of the sheathing in the horizontal and vertical directions.
- Pencil/marker. With their help, you will apply marks on facade walls, sheathing bars and thermal insulation material.
- Yardstick. Necessary for determining intervals and parameters.
- Carpenter's table. Necessary for working with wooden elements.
- Jigsaw. With its help, solid bars are sawn into separate parts of the required size.
- Hammer. Will be needed for drilling holes in the load-bearing walls of a building.
- Hammer. Use it to drive nails and dowels.
- Screwdriver. Used to drive self-tapping screws to connect wooden slats to brackets.
- Gloves. Necessary to protect hands from damage.
Important: when working with wooden slats, a jigsaw can be replaced with a circular saw by choosing a disk with suitable teeth.
Advantages of the Alta-Profile siding fastening system
The Alta-Profile plastic sheathing was designed specifically for the company’s branded siding. This gives it a number of advantages:
- You do not need to select bars, profiles and fasteners to match the finishing parameters. I've already done it for you. An optimal system has been developed for each siding series. All you have to do is name the color you like and the parameters of your home to calculate the required number of elements.
- The material from which the sheathing is made is similar to siding. Therefore, even with sudden temperature changes, profiles and panels will expand and contract “in unison.” This means that the siding will not deform in any weather conditions.
- The Alta-Profile siding fastening system is very easy to install. This does not require professional tools or construction experience. After carefully studying the instructions, even a beginner can handle the job.
- The façade mounting system includes everything you need. You don't have to waste time and effort, for example, searching for studs of the required length and cross-section.
- The shape and size of the profiles correspond to the siding panels and additional Alta-Profile strips. You don't have to “adjust” them according to geometric parameters.
- Using the Alta-Profile facade fastening system, you can carry out exterior finishing with or without insulation.
- Alta-Profile lathing does not burn, does not emit harmful substances when heated, does not rot, does not rust, does not crack due to fluctuations in temperature and humidity, is moisture resistant and does not require special care.