Frame houses are prefabricated structures due to the use of prefabricated elements. An important role in ensuring their reliability and comfort is given to wall panels.
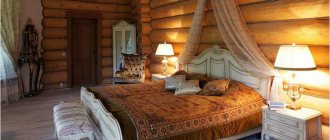
The multilayer structure is a “pie wall of a frame house.” To select the optimal option, you should analyze its design and technological features.
Frame structure: what material is it made of?
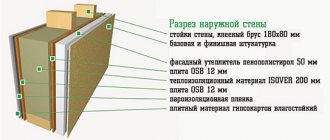
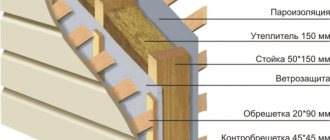
The correct diagram of a wall pie in detail looks like this:
- The first, outer layer is an external finish with a decorating function. Typically, materials are used that do not weigh down the structure too much: block house, siding, lining, OSB.
- The second layer is a vertical sheathing (board, timber or metal profile). This element is necessary for installing the finishing coating and providing a ventilation gap.
- The third layer is a windproof film with a waterproofing function. A modern multifunctional membrane-type film (Izospan A, Nanospan A, etc.) is best suited.
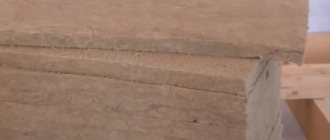
- The fourth layer is a protective element. It is made from wood-fiber boards (OSB, chipboard, fiberboard). The most common option is OSB board with a thickness of 15 mm. This layer adds rigidity and increases the efficiency of the insulation.
- The fifth layer is the power frame. It provides the mechanical strength of the panel. The classic option is a wooden beam measuring 150x150 mm. Sometimes they are made from thinner timber 150x50 mm.
- The sixth layer is the first layer of insulation (mineral wool, ecowool, expanded polystyrene or other rolled thermal insulation materials). In fact, it is combined with the previous layer, because slabs or sheets of thermal insulation are located between the frame posts. The most common materials: mineral wool, ecowool, expanded polystyrene (foam).
- The seventh layer is the second layer of insulation. It is laid between the elements of the horizontal sheathing.
- The eighth layer is lathing in the form of horizontally laid boards (beams) or a metal (most often aluminum) profile.
- The ninth layer is a vapor barrier. The best option is a multifunctional membrane in the form of a film with microscopic holes for air circulation (for example, Izospan B).
- The tenth layer is intended to level the wall. As a rule, it is made from OSB sheets or plywood.
- The last layer is drywall for finishing.
What are frame houses made of? One of the main materials for making “wall pie” is wood (timber and board). Its humidity plays an important role. It is necessary to use lumber with a moisture content of no more than 12-13%. An increase in it by only 2% leads to a deterioration in thermal insulation properties by almost 2 times. Therefore, it is quite obvious that frame houses are not built from boards of natural moisture.
In addition, during the drying process of wet wood, significant shrinkage occurs, which can lead to deformation of the entire structure. Thus, wood with natural moisture is not suitable for making a “pie”.
How a frame house pie works
A proper frame house pie includes several layers of sequentially laid materials . In the direction from the interior to the street it looks like this:
- Frame sheathing made of sheet material (plywood, plasterboard, OSB) - serves as the basis for interior decoration, imparts rigidity to the wall structure, and protects the insulation from external damage.
- Vapor barrier film is a barrier to the penetration of water vapor from the living space into the thickness of the insulation.
- Thermal insulation material (ecowool, expanded polystyrene, etc.) - ensures the preservation of heat in the house and participates in the formation of the microclimate in it.
- External wall cladding (moisture-resistant plywood, OSB) - performs the same functions as the internal one.
- Waterproofing membrane - protects the insulation “pie” from moisture penetration from the street, and additionally provides wind protection. ABOUT
- Facade facing material - additionally protects the walls from external influences, gives the building an aesthetic and finished look, and shapes its style.
Note! Vapor barrier is laid on the warm side of the building, waterproofing and wind protection - on the cold side, from the street.
Useful: Using DSP in a frame house
The average thickness of a frame wall structure with insulation is 250-300 mm (for central Russia). If the house is being built in northern regions with a harsh climate, the wall “pie” may include another layer of thermal insulation material. It is laid between the beams of the mounted sheathing. In this case, the value increases by another 50-60 mm.
Construction Features
Dachas
When building a summer house (accommodation from April to September), you can use economical options for “pie walls” . It does not have high requirements for insulation, but it is necessary, at least with a minimum thickness (5-10 cm). Mineral wool is usually used.
Summer buildings, as a rule, are small in size, which makes it possible to reduce the size of the load-bearing elements. In particular, a timber (board) 4-5 cm thick is used for the frame.
You can dispense with the protective layer (OSB board). There is no need for a ventilation gap, because The dew point is not calculated at all. The number of layers of the “wall pie” is reduced to 4-5.
Despite the lightweight design, the summer house has a decent weight . In addition, despite the absence of residents in winter, the snow load is active and therefore requires accounting.
In order to minimize the thickness of the wall, but maintain mechanical strength, it is recommended that the frame be made of boards 4-5 cm thick and 15-20 cm wide.
Taking into account the simplification of the design for a summer house, the wall thickness does not exceed 15-18 cm. Its optimal value is 12-14 cm. This design is quite sufficient for protection in case of slight cold, from heat, noise and wind.
Housing for winter living
For permanent residence, you need a house that can withstand any climatic influences possible in a given region. It is necessary to take into account the low air temperature outside in winter and the significant temperature difference between inside and outside the room.
Comfortable living can only be ensured if there is effective insulation with a thickness of about 15 cm.
To prevent the accumulation of condensate, a ventilation gap (vertical sheathing) 20-30 mm wide is required. Taking into account the operation of heating devices, a mandatory condition is the presence of a reliable vapor barrier. The question often arises: what should be the thickness of OSB for frame walls? A full protective layer is provided by an OSB board (OSB-3) with a thickness ranging from 10-22 mm .
In other words, the “wall pie” must have a full set of the above layers. In this case, the minimum wall thickness will be 20-22 cm, and taking into account the external decoration - 25 cm.
The optimal thickness depends on the size of the structure, the total load taking into account the snow layer on the roof, and climatic conditions.
It is calculated based on the established thermal resistance for a given region and the thermal insulation properties of the materials used.
Step-by-step construction instructions with photos
The content of the article
1 Step-by-step construction instructions with photos 1.1 Step 1: Foundation for a frame house 1.2 Step 2: Bottom frame and floor 1.2.1 Install the frame and logs 1.2.2 Insulation and flooring 1.3 Step 3: Frame walls 1.3.1 Installation step and section of racks 1 .3.2 Bevels or braces1.3.3 Corners of a frame house1.4 Step 4: Overlapping1.5 Step 5: Rafter system and roofing material1.6 Step 6: Insulation2 Video instructions for installing frame houses
We recommend: Do-it-yourself staircase to the second floor: types and installation of second floor stairs in a private house
There are several different technologies for frame house construction, but the classic method of construction is Canadian. It is also called the platform method, since first the floor of the frame house is assembled, and then the skeleton of the walls is assembled on it, like on a platform. We'll tell you how to build a house using this method. It won’t be difficult to figure out the rest: only the sequence of actions is different.
Step 1: Foundation for a frame house
Choosing a foundation is a separate complex and voluminous topic. The geological picture on the site, the height of the groundwater, the weight of the building and the seasonality of living in it, the region in which construction takes place, snow and wind loads are taken into account. But in general, foundations for frames are most often piled, piled-grillage or strip foundations.
In our country, the palm in do-it-yourself frame house construction belongs to the pile-grillage foundation. It is quickly built, requires small material investments, is correctly calculated and built, and is reliable. Combining the advantages of both pile and strip, it evenly transfers the load to all supports.
More reliable when constructing a pile or pile-grillage foundation are TISE piles. Due to the widened heel, they have a greater load-bearing capacity and better resist heaving forces.
Construction of a pile-grillage foundation with TISE piles
You can drill holes for piles using a hand drill or a motorized one. As formwork, use roofing material rolled into pipes of the required diameter (at least three layers must be rolled), secured with tape. Other options are asbestos-cement or PVC pipes of suitable diameter. Three or four reinforcement rods are installed inside the piles, connected to each other in the form of a triangle or square. The reinforcement rods are cut so that at least 0.7-0.8 meters protrude above the surface of the pile. Everything is filled with concrete of a grade no lower than M25 (read about concrete grades here).
After pouring the piles, the tape formwork (grillage) is installed, and the reinforcement is laid and tied into it. Longitudinal rods are connected to bent reinforcement outlets from the piles. At this stage, holes are left in the tape for supplying communications and ventilation (insert sections of plastic pipes across the tape).
The strapping beam will subsequently be attached to the foundation strip. To install it, studs are fixed in the tape. They are installed in increments of 1-2 meters. From each corner, 30 cm are retreated in both directions. Here, studs are required, the rest depending on the dimensions of the house, but at least every 2 meters. Please note that it is the studs that connect the frame of the house to the foundation. That’s why it’s better to deliver more often. And one more thing: no matter how short the wall is, there must be at least two studs.
When everything is ready, the concrete is poured.
Filled grillage. The foundation for a frame house with your own hands is ready
After pouring the concrete, so that it does not dry out, but gains strength, it is better to cover it with polyethylene (look at the photo). If the temperature after pouring the foundation remains within +20°C, construction can continue after about 3-5 days. During this time, under such conditions, concrete will gain more than 50% of its strength. You can work with it freely. When the temperature drops, the period increases significantly. So at +17°C you need to wait about 10 days.
Step 2: Bottom Rail and Floor
To prevent the wood of the frame from drawing moisture from the concrete, cut-off waterproofing of the foundation is necessary. The safest way to do this is with bitumen mastic. And it’s better - in two layers. You can also use roll waterproofing. Roofing felt is cheaper, but it breaks over time. Waterproofing or other similar modern material is more reliable.
You can coat the grillage once with mastic, and roll out waterproofing on top. Another option for cut-off waterproofing under a frame house is two layers of waterproofing coated with mastic: the closer the groundwater is, the more thorough the waterproofing should be.
The first layer is liquid waterproofing. While it is not dry, you can glue a layer of rolled waterproofing on it.
Then the beds are laid - boards measuring 150 * 50 mm. They must be dry, impregnated with bioprotective and fire-retardant compounds. The edge of the bed is aligned with the outer edge of the foundation. In the necessary places, holes are drilled for the studs (the diameter of the hole is 2-3 mm larger than the diameter of the stud). Then the second board is laid. It is placed so as to cover the joint of the first row. It turns out to be a castle.
The second board is laid so that the joints overlap
In general, you can lay one beam of 100-150 cm, but its price is much higher than two boards, which together give the same thickness, and properly fastened two boards have a greater load-bearing capacity, although their installation takes more time. To make them work as a single beam, they are knocked down with nails in 20 cm increments in a checkerboard pattern.
We install the harness and logs
Next, a strapping board is attached to the bed. Its dimensions are also 150-50 mm, but it is placed on the edge. Aligned along the outer edge of the foundation, nailed with long nails (9 cm) to the beam every 40 cm.
Installation of the piping: according to the instructions, the assembly of the frame house continues with the installation of the piping to which. the floor joists will rest
The next stage is installation and installation of the logs. These are the same 150*50 mm boards placed on edge. They are attached with two oblique nails (9 cm) at the end to the trim board, two nails on the right and left to the bed. So each lag is on both sides.
Example of installing floor joists
The photo shows that the first joist is installed close to the second - this way the load is better transferred to the foundation. It is installed along the second edge of the bed. The installation step is 40-60 cm. It depends on the length of the span and the cross-section of the lumber used: the longer the length, the smaller the step.
Layed and secured floor joists
If the logs are long and there is a cross beam, as in the photo above, to prevent the logs from “moving away,” jumpers are placed above the cross beam. Their length is equal to the step of installing the logs minus the double thickness of the board: if the step of the log is 55 cm, the thickness of the board is 5 cm, then the jumper will be 45 cm long.
Insulation and flooring
After the base for the flooring has been installed, it is time to insulate the floor. It can be done in different ways, with different materials. We will show you an economical option - with polystyrene foam boards with a density of 15 kg/m3 (more is possible, less is not possible). It is, of course, not environmentally friendly, but it is the only one that is not afraid of moisture and can be installed without a subfloor. The estimated thickness of the insulation is 150 mm, two layers are laid: one 10 cm, the second 5 cm. The seams of the second layer should not coincide with the seams of the first (they shift).
To begin with, a 50*50 mm cranial block is packed along the lower edge of the log. It will hold the foam.
At the bottom you get a frame made of a cranial block, which will prevent the polystyrene foam from falling out
The foam is cut with a regular hacksaw. The blade can be used on wood - it cuts faster, but you get a torn edge, or on metal - it goes slower, but the edge is smoother. The cut slabs are laid in two layers, the seams overlap. Then they seal the perimeter with sealant to ensure waterproofing.
Laying foam
Next, lay the subfloor from boards, level it and lay plywood on top (preferably FSF 5-6 mm). To prevent the rough flooring of boards from warping, lay the boards alternating the direction of the wave. If you look at the cross section of the board, the annual rings go in a semicircle. So, you need the arc to look up and down (see photo).
How to lay plank flooring correctly
You can do without plank flooring. Then the thickness of the plywood should be at least 15 mm. Consider what is more profitable in your region and choose.
We recommend: Floors
In any case, the sheets should be laid in a spaced pattern - the seams should not match (as in brickwork). Also, do not forget to leave a gap of 3-5 mm between the sheets of plywood to compensate for changes in size when humidity changes.
The second stage of building a frame house has been completed: the floor has been laid
The plywood is attached with self-tapping screws 35 mm long (preferably white ones - less waste) around the perimeter in increments of 12 cm, inside in a checkerboard pattern in increments of 40 cm.
An example of using frame technology to build a wooden shed is described here.
Step 3: Frame Walls
There are two ways: the wall frame is assembled (all or part, depending on the size) on the floor, then raised, positioned and secured. Sometimes with this method, OSB, gypsum fiber board, or plywood are attached directly to the floor on the outside of the frame: the rigidity is greater. This technology is called frame-panel or “platform”. Factories generally operate according to this principle: they build ready-made panels according to the design in the workshop, bring them to the site and only install them there. But frame-panel house construction is possible with your own hands.
One of the options for assembling a frame wall, names of elements
The second method: everything is assembled gradually, locally. The beam of the bottom frame is nailed, the corner posts are set, then the intermediate posts, the top frame, etc. This is the technology called “frame house construction” or “balloon”.
Assembling the wall frame with your own hands can be done gradually (balloon technology) or in block-boards (platform technology)
Which one is more convenient? It depends on how many people work and whether it is possible, at least periodically, to attract help. Working on the floor is faster and more convenient than jumping up/down a stepladder countless times. But if the section is assembled large, then it will be difficult even for two people to lift it. The solution is either to call help or to break the wall frame into small segments.
Installation step and cross-section of racks
Corner posts should be 150*150 mm or 100*100 mm, depending on the load and the required width of the insulation. For a one-story frame house, 100 mm is enough, for a two-story frame house - at least 150 mm. The intermediate posts are the same in depth as the corner posts, and their thickness is at least 50 mm.
The installation step of the racks is selected taking into account the load, but in reality it is more often selected based on the width of the insulation. If you will be insulating with mineral wool in rolls or mats, first find out the actual width of the material. The gap between the posts should be 2-3 cm less than the width of the insulation. Then there will be almost no waste, no gaps and cracks through which heat will escape. The density of installation of insulation in frames is the main point, because only it will serve as protection from the cold. The slightest violation will lead to the fact that the house will be cold. Therefore, the selection of insulation and its installation must be treated with full attention.
An option for gradually assembling the frame of a house: corner posts are placed and secured, the top frame is immediately mounted on them, then the vertical posts are installed at a selected step
Fastening the racks is possible in several ways: with wooden dowels, with a notch or on corners. The cut into the board of the bottom trim should be no more than 50% of the depth. The corners are attached on both sides. Fastening with dowels is an old technology, but difficult to implement: long dowels are planed, a hole is drilled obliquely through the stand and beam of the lower trim, a wooden tenon is driven into it, the excess of which is cut off. It works well if the wood used is dry. If not, drying out and loss of fastening rigidity is possible. Installation on reinforced corners is much easier.
According to Canadian technology, the beams to which windows and doors are attached are made double. There is more load here, therefore the support must be more powerful.
Reinforced counters near windows and doors are a must. This is the only way a frame house built with your own hands will be reliable
Read how to make a gazebo out of wood (also using frame technology) here.
Bevels or braces
If the outer cladding is planned to be made of high-strength slab material - OSB, gypsum fiber board, gypsum fiber board, plywood - temporary slopes are installed from the inside of the room. They are needed to level and maintain geometry until the outer skin is attached. The strength of this material is sufficient to create the required structural rigidity.
If the cladding is planned to be made up of linings, etc. installation of permanent jibs is required. Moreover, the best option is not those that are placed on several racks, but four small pieces for each: two on top and two on the bottom (as in the photo below).
Such braces will give sufficient rigidity to the walls of a frame house.
Please note that in the photo above the racks are prefabricated: two boards are nailed together along the entire length in a checkerboard pattern. Such racks have even greater load-bearing capacity than solid ones and cost less. This is a real way to reduce construction costs without losing quality. But construction time increases: you have to hammer in a lot of nails.
Corners of a frame house
The most questions arise when constructing corners. If you place a beam in a corner, then there seem to be no difficulties, except that the corner turns out to be cold. In regions with short and mild winters this is not a problem, but in central Russia it requires some kind of solution.
Even with this option, the corner will be colder
There are several ways to make the corner of a frame house warm. All of them are shown in the diagrams, so it’s clearer.
When building a one-story frame house, you can do this
For a residential second floor, corners are made in one of these ways
After assembling the frame, it is most often sheathed on the outside with OSB, plywood or other similar material.
The construction of the woodshed is described in this article.
Step 4: Covering
The floor beams rest on the beam of the upper frame. There are several mounting methods:
on supporting steel brackets; on the corners; with insert;
Notching - the depth of cut should not exceed 50%! t (MISSING) of the thickness of the beam of the top frame. It is hammered on top with two nails, which should go into the harness at least 10 cm
Corners are a common method. You can use reinforced ones, but not necessarily
Perforated staples - shape may vary
Fastening the ceiling beam using metal brackets
The dimensions of the beams and the pitch of their installation depend on what will be on top. If there is a second residential floor or attic, the cross-section is taken larger, the step is made smaller: so that the floor does not sag. If only the roof and attic on top are assumed to be non-residential, these are completely different calculations and dimensions.
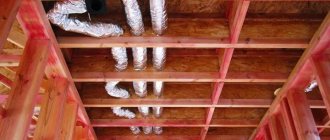
In this one-story frame house, the floor beams also support the rafters. Therefore, they are extended 30 cm beyond the perimeter of the walls
If a second floor is being built, the ceiling is sheathed with the subfloor of the second floor. This will make it easier to work on creating the second floor of a frame house. Its assembly is no different from the construction of the first one. The only reason is that all the lumber has to be hauled to the second floor.
Step 5: Rafter system and roofing material
When developing a house project using frame technology, the most popular are a gable or mansard roof. Their device is no different. All the same principles and calculations. The only limitation concerns the weight of the roofing: it must be a light material, the load from which wooden beams and ceilings can withstand.
This is what the frame looks like before the sheathing. If the walls are not sheathed, slight vibrations are felt when working on the rafter system. The outer skin makes the frame much stiffer
A gable roof with a raised puff was chosen
For ease of fastening the rafter legs, a 50*50 mm block was nailed along the edge of the floor beams. There was a groove made under it in the rafters. During installation, they first simply rested against the block, then fastened
We recommend: Insulating the floor in a wooden house: we do the insulation of the floor in the house with our own hands
To fix the rafters in a given position before the sheathing was filled, temporary jibs were used
Another relatively inexpensive technology for building a house from aerated concrete is described here.
Step 6: Insulation
A frame house can be insulated with any of the materials available on the market with the appropriate characteristics. All of them are imperfect, but all problems have standard solutions.
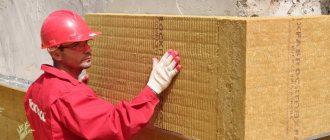
The most popular insulation for frame walls is basalt wool. It is available in the form of rolls or mats of different densities. It is more convenient to install mats in walls: they are denser and hold themselves well due to the pushing force. To do this, as mentioned above, their dimensions should be 2-3 cm larger than the distance between the frame posts. The mats, of course, are additionally fixed with special fasteners, but it is more convenient to work with than with a soft roll.
The most common type of frame wall insulation
Mineral wool has high thermal insulation characteristics and good sound insulation. But there is also a serious drawback: it is afraid of getting wet and it must be protected on all sides not only from moisture (rain), but also from the penetration of steam. Therefore, from the side of the room it is covered with a layer of vapor barrier membrane, which prevents vapors from penetrating inside.
On the street side, the thermal insulation made of mineral wool is covered with another membrane, but of a different type with different characteristics: a hydro-wind-protective vapor-permeable membrane. It is not blown through, it does not allow moisture in liquid or gaseous states to pass through from the street side, and vapors can escape from the insulation: the vapor permeability is one-sided. After installing the insulation, only finishing work remains. Actually, that's it, construction is over.
This is what a basalt mat looks like installed between the posts
Now you know how to build a frame house. The detail of some processes is far from complete, but you have a general assembly sequence. Perhaps another video from a professional carpenter who has been building frame houses for decades will help you (see below).
3
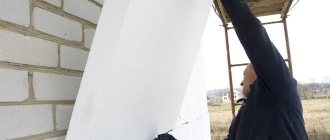
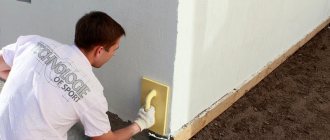
External cladding
The cladding material gives the skeleton of the structure some rigidity and takes away a certain part of the load. In this regard, when choosing, it is necessary to take into account its mechanical strength and tendency to shrink during operation. The original shape of the walls should be preserved for many years and not be subject to negative environmental influences.
You should also pay attention to the pliability of the material, which makes installation easier. When cladding yourself, this point is of great importance, since the amount of material and time costs completely depends on it.
The following materials can be used to perform work related to cladding the external walls of a frame house:
siding; timber; block house; corrugated sheeting.
All these options have such qualities as the ability to create protection from wind and precipitation, burglary, as well as aesthetics.
Video Photo
Is it possible to build in winter?
Frame houses have an important advantage - they can be built at any time of the year, incl. in winter. This is due to the lack of “wet” technologies during installation.
However, to ensure winter construction, it is important to consider the following recommendations:
- The foundation must be erected in the warm season and gain the necessary strength by winter.
- It is necessary to provide reliable approaches to the site and routes for the supply of materials.
- The construction site must have a hard surface to prevent getting stuck in mud. A possible option is geotextiles for car parks.
- All building materials must be reliably protected from moisture.
Work should be planned taking into account the short winter day. In general, the problem of winter construction of a frame house is associated only with the correct organization of the process.
What is mineral wool, what are its capabilities?
Mineral wool slabs
Many people are perplexed - to build a good, warm brick house, the walls need to be made at least 50 cm thick. Is 15 cm of mineral wool really enough to replace all this? Yes, specialized thermal insulation materials are much more effective than the same bricks, and even a thinner frame wall will be warm. However, for this to happen, you need to understand the properties of the material and other parts of the entire structure.
Mineral wool refers to a group of materials of similar structure, made from raw materials of inorganic origin. The structure of such insulation consists of microscopic fibers intertwined into a single mass. Air is trapped between these fibers, which is a heat insulator.
- Mineral wool is made from glass, slag (metallurgical waste) and some rocks. The type of raw material will greatly affect operational parameters.
- Each of the listed materials is non-flammable, which allows the use of such insulation in rooms where the temperature is high. They line the walls of fireplaces, chimneys and stoves.
- You can buy mineral wool in the form of sheets of standardized sizes, rolls and toroidal rings. The first type is very convenient for laying walls and sloping roofs, the second is for horizontal floors, and the third is used for lining chimney pipes of a suitable cross-section.
Insulation of floors with rolled mineral wool
Types of mineral wool
Choosing insulation for a frame house is a rather difficult task. In construction stores you can buy the following:
| Type of mineral wool, photo: | Description: |
Glass wool | It is not worth buying it for insulating residential premises; this material has several serious disadvantages. It consists of small and very sharp fibers that get clogged even under thick clothing. They can also penetrate the respiratory tract, causing irritation of the mucous membranes and allergic reactions. However, if you do buy it, you will need to seal the insulator with a vapor-permeable film. The advantage of this insulation is its price, which averages 150 rubles. per square in two layers. In centimeters this equals 10. |
Basalt wool | A more advanced and safer material is stone wool. It is mainly made from basalt. The material turns out to be less hygroscopic, resistant to mechanical and vibration loads. It has lower thermal conductivity for the same material thickness, but the price is higher. There is no glass in the composition, so the material is considered harmless, but it also chips quite well. Basalt is a very hard mineral with a high melting point. Cotton wool from it can withstand heat of +1000 degrees Celsius. Even when exposed to a burner flame, it simply turns black and slightly charred. |
Stitched slag wool with foil layer | Slag wool is made from blast furnace slag remaining after iron smelting. This material has many disadvantages, but holds heat a little better than glass wool. |
Interesting to know! More expensive insulation materials have an additional foil layer. It creates a heat reflector effect - the material will be more effective than pure analogues.
Pros and cons of mineral wool as insulation
What general properties do mineral wools have? Should I even take them for home insulation, since there are so many other materials on the market, both artificial and natural?
Table of density of mineral wool and other insulation materials
Let's start with the positive aspects:
- An important point is that mineral wool is of no interest to rodents who like to live in layers of insulation. They especially like the foam they eat. Insulation after the colony multiplies will turn into nothing in a very short time, and few people will like to listen to the constant rustling overhead.
- Resistance to high and low temperatures - the material does not burn, which makes it indispensable in different situations.
- Thermal efficiency is at a high level.
- The material is easy to install - anyone can handle the task.
The negative qualities are as follows:
- Different models contain phenol-formaldehydes, which are constantly released into the air. The issue of the dangers of mineral wool is still not resolved, but many people use it everywhere. Modern materials contain a minimum of harmful resins, which is why they are officially considered harmless.
- The material is very dusty, which not only complicates working with it, but can also create inconvenience during operation. This property is especially pronounced in slag and glass wool. When working with them, be sure to wear protective clothing, hide your eyes, close your hands and airways.
- Moisture is destructive for all types of mineral wool. Their hygroscopicity will differ, but the essence is approximately the same - the water inside increases the thermal conductivity properties. Research shows that when the humidity in glass wool increases by just 2%, the thermal insulation properties decrease by 10%.
Therefore, it is so important to correctly assemble the frame walls and cover the insulation on all sides. How to do this will be explained in the following chapters.
Modular construction
Recently, the construction of modular houses has become widespread . In essence, this is the construction of their house kits, which are assembled on site, like a constructor without additional fasteners.
The set contains frame elements (wooden beams or metal structures) and sections (panels) with a standard size of 240x480 cm. The sections are autonomous, which makes it possible to assemble various combinations.
You can change the number of rooms. The maximum height of a modular house is 3 floors. The roof can have a flat, single- or double-slope shape, depending on the purpose of the building.
Modular structures can be used to assemble residential (summer and year-round), industrial, office and utility buildings. Assembly time is 2-3 weeks.
Another direction in the construction of frame houses is the use of ready-made wall panels .
Of particular interest are SIP panels. They are a layered structure of two layers of OSB sheets, between which thermal insulation material is placed. All layers are bonded together with polyurethane glue, and the process is carried out in a press at a pressure of 18 tons.
Mineral (basalt) wool, fiberglass and foamed polymers (expanded polystyrene and polyurethane foam) are used as insulation. The most popular are SIP panels based on polystyrene foam.
This material has excellent thermal insulation properties (thermal conductivity coefficient - 0.037-0.040 W/mhdeg) , low water permeability, and high biostability.
Vapor permeability is at the level of wood. The durability of such panels is more than 60 years.
SIP panels are available in standard sizes . Their thickness can be 11, 12, 17, 20, 22 and 27 cm. Panels up to 20 cm are used for partitions, and those of greater thickness are used for load-bearing walls and ceilings. Panel widths – 62.5, 100 and 125 cm. Lengths – 40, 50, 80, 250 and 280 cm.
Main features of insulation of frame buildings
What distinguishes frame buildings from any others? Lack of filling inside with base material. All walls, ceilings and roofs are hollow, which means that such a house cannot, by definition, be warm without taking appropriate measures. Therefore, it is thermally insulated all around.
Wooden skeleton of a frame house
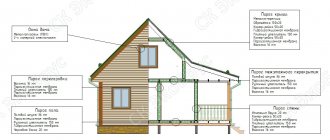
The structure consists of the following parts:
- Foundation - its type influences the need to insulate the floor and the choice of method for this procedure.
- The lower frame is a perimeter frame made of powerful wooden beams, which carries the loads from the walls and transfers them to the foundation.
- Joists are boards installed on edges that break up the space inside the ceiling formed by the bottom and other frames. The purpose of this element is the base for the floor.
- The walls consist of a series of vertical posts - corner and intermediate. In some places, the racks can be connected by horizontal and inclined jumpers to strengthen the frame.
- An upper frame is installed on top of the racks, which will be the base of the roof or the next floor.
- The rafter system is a sequence of inclined boards that define the shape of the roof and create a base for the roofing material.
A frame house in section - the diagram shows the location of the insulation.
The boards from which joists, posts and rafters are made have their own width - usually 150 mm, although they can be smaller. This distance is filled with mineral wool or other insulation materials. In fact, you get a real “layer cake” from different materials that will protect the internal filling from water, wind, fire, and make the structure beautiful.
Insulation is installed in all of the listed parts of the house, including internal partitions and ceilings, since in addition to heat-insulating properties, it also has sound-proofing properties. Noise transmission is one of the significant disadvantages of frame buildings.
American and Canadian do-it-yourself technology
A house using American technology is a prefabricated structure based on a wooden frame. All main elements are manufactured at the factory.
Distinctive features:
- using only well-dried wood;
- the structure is assembled not from timber, but from edged boards (in the frame there is a board 5 cm thick);
- reinforcement of openings is provided by double and triple racks made of boards;
- above the opening the board is mounted on an edge;
- the top trim is made of double boards;
- the corners of the frame are made using a special technology (“California” or closed corner);
- large glazing area;
- two-story design.
A standard American house can be assembled in 1-2 weeks. The frame is installed using the “platform” technology, on a specially prepared site (joists, insulation, OSB-board covering).
The frame is sheathed on the outer and inner walls with OSB boards, between which thermal insulation is laid (most often, mineral wool). A vapor barrier is placed between the insulation and the slabs. Exterior finishing is provided by siding, decorative panels, artificial stone and other materials.
The basis of Canadian technology is a frame assembled from vertical and horizontal profiles . Insulation is placed between the frame elements. The cladding is made with OSB boards with a thickness of at least 12 mm. The rafter system is covered with plywood.
A vapor barrier made of thick polyethylene film is applied over the insulation. Mineral wool is used as insulation. Sometimes a combined option is used - a layer of mineral wool covered on both sides with polystyrene foam. For the frame, a board (timber) measuring 5x15 cm is usually used.
If the construction technology is followed, frame houses using American and Canadian technology have a service life of at least 60-70 years. Durability often exceeds 100 years.
Steam and waterproofing of wall pie
In frame houses, a special membrane is used as a vapor barrier layer laid on the side of the premises. It does not protect the wall cake from moisture 100%. The film allows some vapor to pass through, but this is necessary to normalize the microclimate in the house.
To prevent moisture from damaging the insulation and wooden structures, the premises must be well ventilated, and high-quality materials must be used for the walls to help remove moisture from the insulation.
Some craftsmen use durable polyethylene film . It does not allow moisture to pass through, but also requires a powerful ventilation system. Otherwise, in combination with plastic windows, the film will turn the house into a kind of greenhouse.
How to attach a vapor barrier membrane:
- Using a construction stapler or galvanized nails, the material is fixed to the beam;
- at the junction of the membrane, an overlap of 10-15 cm is made;
- The connections are glued with special tape.
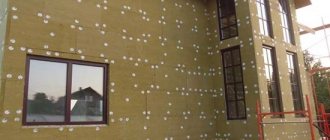
When laying a vapor barrier, it is important that the material does not bunch up and there are no tears. Additionally, the membrane is fixed with slats, forming a sheathing for sheathing with sheet material . It also provides ventilation in the wall cake, preventing it from getting wet.
Waterproofing a frame house pie is done in the same way, but from the outside of the wall. For this, a superdiffusion membrane with a vapor permeability of 800 g/sq.m. is used. m or more. The facing material is installed on the lathing laid on top of the waterproofing.
All stages of the construction of the external walls of a frame house can be completed without the involvement of a team of craftsmen. It is enough to strictly adhere to the technology, follow the recommendations given by material manufacturers, and several assistants.
A variety of methods for using ecowool
The second most popular material for thermal insulation of frame buildings is ecowool. But here it is better not to experiment and entrust the work to professionals. Mechanized backfilling will ensure the required density and uniformity of laying. There are three methods of using ecowool:
- dry "spray";
- wet application;
- glue method.
The dry method is applicable for horizontal surfaces, inclined closed cavities, filling interfloor ceilings and non-demountable structures. The packing density of ecowool using this method is 45-65 kg/cubic meter. m depending on the slope.
Wet technology is suitable for vertical open walls. Ecowool flakes are moistened and applied to the surface under pressure. The density of the thermal insulation layer is about 65 kg/cu.m. m.
The adhesive method is similar to the previous one, but instead of water, an adhesive component is added. Advantages of the technique: high adhesion of the insulation to the wall, elasticity of the material and low deformation after drying. The adhesive method is indispensable for thermal insulation of flows from below; this option is also suitable for treating walls.
The issue of insulating a house needs to be thought through at the construction stage. This is more profitable from a financial point of view and technically correct. Structural elements are insulated as the building is erected, and there is no need to carry out major repairs to the building after commissioning.
Specifics of insulating a house made of sandwich panels
The insulation of any building must be comprehensive - from the foundation to the roof. Canadian houses are no exception.
Only a comprehensive approach to insulation will give real effect
These are lightweight houses that do not require a strong foundation, and if the project does not include a basement or lower floor, then in many cases the foundation is placed on stilts. And in order to reduce heat loss through it, a heat-insulated intake (base) is installed.
In most cases, floor insulation of a house made from sandwich panels follows the classical scheme, in which wooden ceiling beams and cross beams act as load-bearing components, and mineral wool is installed between them. To prevent the heat insulator from “falling out”, it is held from below by a sheet of boards (a mesh is used as a replacement). A base floor is laid on top as a base for the final covering.
Insulation of frame walls with mineral wool is carried out according to the following scheme: it is placed between racks and spacers, which are covered with sheet-type materials or boards. The cross-section of the timber for the racks determines the thickness of the layer min. cotton wool, but this condition is not considered the main one when selecting the size of load-bearing components. To strengthen the walls of a house made of sandwich panels, especially on one floor, a stand with a cross section of 50 x one hundred and fifty millimeters is sufficient. For southern regions with “mild” winter temperatures, this thickness is min. cotton wool is absolutely enough. However, for other regions it is not enough.
Scheme of a frame wall with a beam 150 mm high
The use of timber with a height of 200 mm is often excessive from the point of view of the load-bearing parameters of the frame, and in such cases it is more economically useful to add additional insulation from the outside.
Important! What is the minimum layer thickness? cotton wool is needed to insulate a house can only be shown by a calculation carried out on the basis of the current standard, taking into account the specifics of the region and the parameters of all fencing surfaces. The insulation work of the roof depends on the nature of the use of the attic space
Non-residential, or “cold”, attic floors are insulated exclusively along the ceiling. For attics and used attic floors, in which engineering equipment is installed (for example, hydraulic accumulators, ventilation systems and cooling), the roof itself is insulated
The insulation work of the roof depends on the nature of the use of the attic space. Non-residential, or “cold”, attic floors are insulated exclusively along the ceiling. For attics and used attic floors, in which engineering equipment is installed (for example, hydraulic accumulators, ventilation systems and cooling), the roof itself is insulated.
From the point of view of thermal engineering, the walls of a house made of sandwich panels are single-layer. In order for them to become three-layer (structural material/heat insulator/structural material), the thickness of the outer layers of the enclosing surface must be more than 50 mm in accordance with the thickness of the insulation material not less than 1/1.25 (clause 8.11 SP 23-101- 2004). However, in reality, the structure of the walls of a house made of sandwich panels has 5 main layers, not counting the facade decoration and interior. A vapor barrier film (on the room side) and a hydromembrane (on the street side) are placed between the sheathing and thermal insulation. And such placement is dictated by the characteristics of the min. cotton wool.
Insulation materials
With proper development of the frame, there comes a time when the presence of cold bridges can be neglected, just to be on the safe side by increasing the insulation layer by 5–10%. However, how can one determine whether the thickness and thermal resistance will be sufficient to reduce heat loss to the required values?
A building is considered energy efficient if it loses no more than 100 kWh of thermal energy per square meter of total area in one year. Sometimes the total heat loss is determined by the maximum possible power of the heating equipment. Knowing the height of the enclosing walls and the length of the perimeter, it is enough to simply calculate the total area of the enclosing surfaces, divide them by type and calculate the share of the walls in heat exchange with the outdoor environment. Considering that the heating period is at least 180 days, it is easy to determine to what value the thermal conductivity of the walls should be limited in order to maintain the initial heat balance.
To select the required thickness of insulation, take into account its thermal conductivity and temperature difference, which depends on the internal climate regime and the thermometer mark on the coldest five-day period. It should also be taken into account that the thermal conductivity of the insulation may increase over time or change throughout the year. If the calculation of heat loss was not carried out based on the maximum heating power, the temperature difference can be determined by the average temperature mark in January-February.
The right pie for the ceiling or roof
A lot depends on the insulation of the upper plane of the house. You can read about the methodology for working with flat roofs in a separate article on our website. However, for “shaped” roofs, ceiling insulation will be similar to wall insulation.
The roof pie of a wooden frame house consists of several layers of insulation, active protection, and decorative layers. This layer performs several important functions:
- Prevents sudden changes in room temperature during the warm season;
- Protects the building from precipitation;
- Prevents moisture accumulation under the roof and on the ceiling;
- Retains up to 30-40% of heat inside the house (warm air always tends upward);
- Provides additional ventilation of rooms.
The order of laying materials has a number of features. First of all, some of the work will have to be done from a stepladder or scaffolding, the other part from the roof plane. Good beams made of metal or thick wood will not only provide a base for the roof plane, but also provide good insurance for workers.
The structure of the roofing pie is practically independent of the type of roof. If the house has an attic, mineral wool is still mounted on the ceiling and then the thermal protection layer is duplicated on the slopes under corrugated sheets or false tiles.
The roofing pie diagram looks like this:
- The vapor barrier layer is a thick membrane that allows the roof to “breathe” but does not allow moisture and harmful bacteria to pass through. Serves as high-quality protection against condensation and precipitation. From below, this layer is “supported” by an OSB sheet or drywall. It prevents the insulation from falling out of the horizontal cells;
- Heat insulator - placed in cells between beams. Protects the building from heat loss;
- Waterproofing is an important layer of the roofing pie. Serves as protection against external moisture that may accumulate in the attic. Sheet is laid overlapping sheet on sheet, often blown with foam, filled with resin or compositions based on epoxy resins;
- Ventilation system - is a lathing that allows air to circulate inside the cake.
For a pitched roof, the frame model looks the same. Installation features depend on the angle of the roof. It is often necessary to cut sheets of insulation (for hipped roofs). There are also problems with laying wool in niches of unusual shape (trapezoidal or parallelograms).