What is SIP
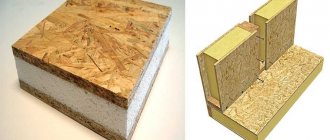
A structural insulating panel, consisting of two sheets of OSB along the edges and a core of insulation, is the material from which houses are built using the so-called Canadian technology. A
structural insulating panel, consisting of two sheets of OSB along the edges and a core of insulation, is a material from whose houses are built using the so-called Canadian technology. Being a finished product produced in an industrial environment, the panels are completely ready for building a house, they can be of different sizes, thicknesses and the variability of the insulation filling is allowed; prices for ready-made house kits made from sip panels can be found here
Bonding of sheet materials is carried out using an adhesive composition, and it is necessary to comply with the technological features of gluing: any omission is fraught with a violation of the quality indicators of the finished product. That is why gluing is carried out under a pressure of 15-19 tons, which allows the material to be used not only for arranging wall structures, but also as floor slabs and roofing.
Main advantages
SIP is a structural insulation panel. For its production, OSB and thermal insulation material are used. In order to connect the three layers, a special type of polyurethane glue is used. Expanded polystyrene is used as a thermal insulation material. Unlike ordinary polystyrene foam, it is not flammable. When exposed to high temperatures, it does not emit toxic substances. To provide additional rigidity, a wooden block is placed inside the SIP panel.
SIP panels are an ideal option for construction in any climatic conditions. With the help of SIP elements, the construction of a house is carried out in a very short time. The material is also lightweight. High thermal insulation rates are not inferior to brickwork.
Features of SIP panels:
- High level of thermal insulation. Comparison: a 174 mm thick panel can replace 2.5 meters of brickwork.
- Expanded polystyrene does not allow extraneous sounds and noise into the room.
- Light weight material. On average, 1 m2 weighs only 15-20 kg. This makes it possible to use a simple foundation and not spend a lot of money on its arrangement.
- It will take only a few weeks to build a house with an area of 50 square meters.
- There are no restrictions on weather conditions for construction.
- Environmental Safety. The panels do not emit any toxic substances and there is no odor.
- You can do the installation yourself; you don’t need any special equipment.
Panel composition
The advantages of sip houses are provided due to the composition of this material. It consists of the following elements:
- The basis of such a product is OSB board. These slabs are made from long and narrow chips, laid in multi-layers and compacted so that they lie perpendicular to each other on all sides of the sheet. This production technology increases the flexibility of the product under loads in different planes; such properties are not found in ordinary wood. Often, chips based on pine or aspen are used for sip panels. These boards are 97% wood, the rest is made up of connecting components. The structures are treated with a special water-repellent solution, which provides protection from moisture, rot and mechanical stress.
- Expanded polystyrene is also used, which has low thermal conductivity and is light in weight. During manufacturing, gas is added to the polystyrene mass. Depending on the properties of the product, the substance can vary greatly; for example, carbon dioxide is used for fire-resistant structures. A sheet of such a product with a thickness of only 11 cm is capable of providing a level of thermal insulation comparable to a wall consisting of sand-lime brick 2 m thick.
Composition of a sip panel
Knowing what a sip panel is, what their pros and cons are, it is not difficult to figure out why this material is so often used for the construction of buildings.
Planning the floors of a house made of SIP panels
Multi-storey buildings built using sandwich panels are very convenient to construct due to the modular design of the material itself.
1.The walls on the lower floor must be covered with a prefabricated slab. On its plane you can build another floor, and on it another, and so on. The most important point is the reliable fastening of all elements located in different directions.
2. The ceiling should not allow the walls to collapse, but then the problem of protecting the end appears.
3.The easiest way to cover the panels is with a crown made from a board. The cut array should be placed at the top end of the wall. Then you need to install another similar board on the edge, attaching it to the crown using self-tapping screws.
4.It is best to collect this part on the ground. It must be attached to the embedded beams, which are located on the inside of the panels, as well as to the frame racks.
5.Next you need to install the beam system on top of the crown. The floors themselves must be fastened with jumpers. It is important to remember about the offsets in each of the rows. After completing the installation work, you can begin laying insulation and filing on the lower floor of the rough ceiling.
Types of sip panels
By their types, main combinations and characteristics, you can determine the purpose and size of the elements
Based on their types, main combinations and characteristics, you can determine the purpose and dimensions of the elements:
- OSB, PPS, OSB are some of the most common European panel standards. The slab is 1.25 m wide, 2.5-2.8 m long with a thickness of cladding and insulation equal to the thickness of the panel, which is for PPS sheets: 100, 150, 200 mm, and for OSB 6-25 mm. Manufacturers most often use chipboard with a thickness of 9, 12 mm, and the dimensions of the finished products are variable and depend on the application, for example, narrower elements are produced for roofing and floor slabs (625, 600 mm). Subject to technology, this standard model can withstand a load of 10 tons of vertical format and 2 tons of transverse format. The weight of a panel with dimensions (mm) 2500*1250*174 is 56 kg.
- DSP, PPS, DSP – the dimensions of this sip panel are 1.2 width and length up to 3.0 meters. Belongs to flammability class G1, weight 120 kg. Experts say that the use of these elements in construction allows you to get a house that is in no way inferior in functionality to aerated concrete blocks, but SIP panels are cheaper and more practical, and also lighter in weight. But there is a drawback - fragility. In addition, this type of product is slightly higher than standard panels.
- SML, PPS, SML are panels that use glass-magnesium sheet, therefore, with dimensions of 1.22 * 2.44 m, the weight of the element is 68 kg. A distinctive quality is the reinforcing layers, which is why the slab has high strength indicators. Moreover, SML does not burn (class NG is assigned), it is easy to saw, is easy to hammer nails, finish and has excellent adhesion to all construction plasters. The use of “Standard” class elements for internal wall partitions is shown, but the premium class is ideal for arranging external walls. Disadvantage: exposure to aggressive environmental influences.
- OSB, MB, OSB - panels with mineral wool as insulation have classic standard dimensions, but the width of the insulation cannot be more than 150 mm, which means the finished product cannot be thicker than 174 mm. The environmental friendliness of mineral wool has been confirmed, but the weight is much greater than that of other insulation materials. The density of the material is 115-150 kg/m3, the weight of the panel is up to 90 kg, so the material is used quite rarely for the construction of private houses. Manufacturers often replace OSB with SML, achieving exceptional fire safety of the product, but the weight will be 110 kg, and the price will skyrocket.
- OSB, PPU, OSB - an element also having standard dimensions with a layer of insulation of 60 mm. It is difficult to call the design a sip panel, since the technology is strikingly different from the regulated one. Polyurethane foam is much stronger than polystyrene foam, but using the product in large quantities is financially expensive, so this is rather an exception to the rule, for example, if an extremely thin layer of insulation material is required or construction is carried out in regions with high humidity, which means the use of polystyrene foam is not recommended.
Types and purpose of SIP panels
Despite the differences in the materials used for the production of SIP panels, they are combined according to a single structural scheme. They all have a core made of fibrous or foam filler, lined on both sides with protective or protective-decorative sheets. The binding of separate layers into a single structure is carried out using polymer adhesives based on polyurethane.
OSB-3 + expanded polystyrene
This is the structure of the most common type of SIP panels produced using Canadian technology. Widely used in low-rise private construction, as it has high strength and practicality combined with an affordable cost. It is suitable for both frame and frameless assembly of structures, but the height of houses made from it is recommended to be limited to two floors.
OSB-3 + polyurethane foam
Although a panel of this type is noticeably stronger than its counterpart with an expanded polystyrene core, it is not widely used in private construction due to its rather high cost. On the contrary, “sandwiches” containing a polyurethane foam layer are in demand in commercial and industrial construction during the construction of multi-story buildings. They use profiled metal as a supporting frame.
OSB3 + mineral (basalt) wool
The development of structures with mineral wool filler is credited to Russian manufacturers. The low thermal conductivity of a SIP panel of this type is comparable to that of a foam panel. At the same time, on the one hand, its main comparative advantage is a significant improvement in fire-fighting properties. On the other hand, there are some operational shortcomings. It requires good waterproofing, since mineral wool, even when treated with hydrophobic substances, remains a fairly hygroscopic material. When such slabs are used without proper waterproofing in a humid climate, their thermal efficiency gradually decreases by 10-15% per year. In addition, over the years, wool can become compacted under the influence of gravity, as a result of which the thermal insulation properties of the upper parts of the walls become below design standards.
Fiberboard + polystyrene foam/basalt wool
This variety was also developed by Russian manufacturers of SIP panels. Although fiberboard cladding has better fire protection characteristics than OSB, its use has some design limitations. They are dictated by the width of the fiberboard sheets, which is much smaller than that of OSB and does not exceed 600 mm. Accordingly, when building a house, it is necessary to install a larger number of such panels, and this increases the number of installation operations and their total labor intensity.
Glass magnesite + foam plastic
The combination of these materials is also known as a stone SIP panel. The composition of the outer shell slabs includes magnesium oxide, perlite and fiberglass. A characteristic advantage of glass-magnesite cladding is its high fire resistance, so it can be recommended for installation in buildings with high fire safety requirements.
IMPORTANT! The weight of SIP panels with outer shells made of fiberboard or glass magnesite is significantly higher than that of their counterparts with OSB coatings. Their installation may require the participation of several people, as well as the use of lifting techniques. However, fiberboard and glass-magnesite surfaces are somewhat better suited for applying decorative plasters.
Drywall + polyurethane foam
Allowed for use exclusively in interior work. For example, for the installation of self-supporting interior partitions with a minimum number of supporting frame elements. Such panels can significantly speed up the process of planning zoning of premises.
Galvanized steel + polyurethane foam
In “sandwiches” based on them, sheets of metal profiles are used as the outer shell. They are the most durable, but expensive products. They are widely used in the construction of industrial buildings or commercial real estate.
Classification of SIP panels and manufacturing technology
In terms of shape, SIP panels fully correspond to the description common to all types of panels - they are a flat, large-sized element, the length and width of which significantly exceeds the thickness. The difference is that the outer plates on the end sides protrude above the polystyrene foam layer (usually by 50 mm), forming a groove along the entire length of the end. This design feature is necessary for fixing the panels on the strapping beams during the construction of walls, ceilings or roofs.
Basic dimensions, mm:
- Length 2500, 2800
- Width 625, 1250
- Thickness 110, 120, 170, 200, 220, 270
including expanded polystyrene 100-250 and OSB 10-12
SIP panels with a thickness of up to 120-124 mm are suitable for internal partitions and external walls in one-story buildings; over 124 mm - external walls, partitions, floors, interfloor ceilings, roofing.
The production of sandwich panels with mineral wool, polystyrene foam or FRP-1 comes down to bonding the inner and outer layers using glue and cold pressing (pressure 30 tons per m²). Urethane foams are called casting foams, because they are not used in the form of slabs ready for gluing, but are poured between linings fixed parallel to each other, where they foam and harden.
Main technical characteristics and components for manufacturing
SIP (an abbreviation for Structural Insulated Panel) is a three-layer structural material used in the construction of frame buildings for various purposes. OSB sheets are used to make the outer layers, and insulation is used for the inner layers. They have long become synonymous with budget-friendly and efficient construction. In Canada, northern European countries and the United States, housing accounts for more than 80% of the total stock.
For the production of external parts, steel, asbestos-cement, aluminum or wood bases are used. But builders themselves mainly refer to the term SIP specifically for products of the latter type.
The outer moisture-resistant layer determines the type of SIP. Suitable for their production:
- plywood base;
- plasterboard sheet;
- fiberboard (Green Board);
- gypsum fiber sheet;
- OSB (oriented strand board).
To provide heat and sound insulation, the following types of foam plastics are used:
- mineral wool based on basalt fiber;
- polyurethane foam;
- fiberglass;
- expanded polystyrene;
- phenol-formaldehyde foam.
The layers of the slab are connected under a pressure of 18 tons using a special polyurethane glue. It allows you to achieve strength and integrity of the product.
Lightness and compact size facilitate convenient transportation and installation. In comparison with other foundations for construction, they are not inferior to them in terms of their quality characteristics, and are also more profitable.
The main advantages of using SIP panels
Houses built from them meet all standards of thermal protection, environmental friendliness and resistance to various environmental factors.
By choosing and purchasing SIP panels for the construction of a commercial, residential or warehouse building, you get excellent construction characteristics.
Characteristics of SIP panels
| Strength , kgf/cm² | The adhesion of the outer layers (with polystyrene foam and mineral wool insulation, respectively, should be at least):
The SIP panel is capable of withstanding a vertical load of up to 10 tons and a transverse load of 2 tons per 1 m² (350 kg is enough for the construction of cottages). |
| Volumetric weight , kg/m³ | Foamed polystyrene for SIP panels is used with a density of 25, 35, 50 |
| Thermal conductivity of plates, W/(m °C) |
|
| Geometry violation | The OSB board does not warp or deform from temperature changes or moisture, since it consists of wood chips that are completely devoid of the shortcomings of solid wood. Peeling a log destroys the interconnections of wood fibers, thereby removing internal tension (which cannot be said about peeling plywood veneer). In addition, OSB-3 has increased strength due to the technology of forming chips into layers (adjacent particles are located perpendicular to each other), then pressed at +200°C into a monolithic mass with a glossy surface. |
| Disease susceptibility | The binder of the OSB board includes a wax emulsion, which eliminates the appearance of fungus, mold, and insects without any additional bioprotection. |
| Shrinkage 0 | Absent - immediately after completing the assembly of the house kit, you can begin external and internal finishing. |
| Water absorption | Water absorption in 24 hours. PSB 0.5-2.1% and OSB-3 - up to 12% |
| Fire resistance | The fiberboard panel, for comparison, belongs to the low-flammable materials of group G1. Houses made from SIP panels correspond to the III degree of fire resistance - fire containment for 1 hour. |
| Price | from 1700 to 5500 rub./piece. |
| Sound absorption | Using polystyrene weighing 25 kg/m³ as an example: 44 dB with a panel thickness of 148 mm, 56 dB with 188 mm. |
| Maximum number of storeys of a building | 2 floors + attic. |
Quality standards and panel characteristics
Unfortunately, the set of components for the manufacture of SIP panels does not always meet the criteria set by the industry standard. In the Russian Federation there are GOST standards. They prescribe the use of polystyrene foam with a density of 25 kg per cubic meter and OSB boards with a thickness of at least 9 mm.
But on the mass market you can find frankly low-quality building materials. These are SIP panels with a record low price, which is obtained by using polystyrene foam as insulation. This material is not recommended for use in building a house, since it is less durable, the strength of the composite is incomparably lower, and, in addition, it has potentially dangerous properties.
Most manufacturers support a single standard in terms of the size of the finished SIP panel. The material has the following characteristics:
- dimensions 2500 (2800) in length, thickness 1250 mm, roughly speaking, the height of the ceilings depends on the choice of specific geometry;
- a layer of expanded polystyrene of at least 100 mm;
- OSB thickness is at least 9 mm.
If we consider the Russian standard and SIP panels, the properties of which correspond to it, a slab with standard dimensions is characterized by a weight of 39 to 44 kg. This is the lightest and thinnest material from which interior partitions are made at home.
There are other classes of SIP panels on the market for home construction, which are not always included in the recommended standard for indicators. The main difference is in the polystyrene foam used. There are products made in Germany with a density of 15 kg per cubic meter. It has slightly lower thermal conductivity, but much less weight. The use of such insulation is associated with the desire to reduce the weight of house structures and gain a reserve of indicators during the construction of the foundation.
Important to know: The use of expanded polystyrene in the manufacture of SIP panels
Main advantages and disadvantages
Of course, any technology has both its advantages and disadvantages. The main advantages are in the areas of convenience and the comfort received. Projects made from SIP panels will be a smart choice, since the buildings being constructed have the following advantages:
- Thermal insulation of slabs. Canadian houses are distinguished by the best degree of thermal insulation, in comparison with which brick is noticeably inferior. According to experts, to achieve the same low loss coefficient for brick, a wall thickness of at least 2.5 m will be required, despite the fact that the standard panel thickness is 17 cm.
- Excellent sound insulation. Despite the thickness of the panel, polystyrene foam prevents the penetration of noise from the street well.
- Light weight overall design. 1 m2 of panel has an average weight of 15-20 kg, depending on the thickness. For example, a similar area of brickwork can easily exceed half a ton. This leads to the following advantage: houses made of SIP panels do not need a powerful and expensive foundation; for the Canadian type, a shallow strip foundation is sufficient.
- Short construction time. Structures made from SIP panels are built in a matter of weeks. For example, a two-story country cottage with a total area of 50 m2 is built “turnkey” in 3 weeks.
- Construction can be carried out at any time of the year; according to this criterion, SIP panels have no restrictions.
- Due to the light weight of the panels, they are easy to transport and unload, which allows you to significantly save on delivery and loader services.
- The panels are resistant to aggressive external environments, including biological ones. For example, such as mold or mildew.
- SIP panels, the price of which starts from $25 per m2, will be an excellent alternative to other building materials, both in terms of cost and ease of construction.
- Due to their environmental friendliness and health safety, SIP panels are used for installation in any type of building; they do not leave behind construction waste and do not emit allergenic substances.
- Easy to install panels. They do not require special skills or equipment. Any work, from the construction of a small extension to the construction of a cottage with several floors, essentially only requires the presence of the panels themselves, self-tapping screws, polyurethane foam and a set of basic simple tools.
Tests have shown that SIP panels have significant mechanical strength, which can withstand longitudinal and transverse loads well. Indicators of 10 tons per m2 for longitudinal and 2 tons for transverse floors are a convincing factor.
The list of advantages of SIP panels is very convincing. However, it also has some disadvantages, sometimes overblown by supporters of brick and concrete:
- flammability,
- environmental hazard,
- resistance to rodents.
Many buyers are primarily concerned about the fire resistance of SIP panels, since OSB boards are 90% wood. However, there is no reason to worry as they are treated with a special agent called a fire retardant. As a result of its use, the fire resistance of the slab increases up to 7 times compared to ordinary wood. Expanded polystyrene used in such panels has self-extinguishing properties, so even when the material is exposed to an open flame, the flame does not spread to adjacent structures.
From an environmental point of view, the material does not pose a danger to humans. Adhesive components certainly emit harmful volatile compounds into the atmosphere, but their quantity is not capable of causing harm to health.
Now it is important to consider the rodent problem. As you know, they are able to enter a home in different ways. There is a concern that polystyrene foam will become a favorable environment for rodents to enter. However, such a problem was not noticed due to the fact that the insulation material is covered on both sides with boards and OSB boards. Resin-impregnated shavings provide a good barrier against pests because the material has sufficient strength. The insulation is inedible and for this reason is not of interest to rodents.
In the event that SIP panels are used to construct buildings not using “Canadian” technology, but as building materials for cladding frame structures, it is worth remembering that some other disadvantages will also appear:
- Drafts are often observed at joints. This drawback is easily eliminated with the help of mounting tape and is irrelevant for “Canadian” houses.
- In the absence of insulation, individual areas begin to freeze.
- Condensation accumulates at the junction of the slabs and the frame, which will lead to the appearance of joint defects.
- There is a possibility of cosmetic damage to the slab due to careless transportation or cutting. In this case, you will need to cover the scratches with a protective layer of primer.
Another drawback, which is sometimes overly emphasized, is the presence of toxic formaldehydes and phenols, which were widely used in the production of chipboards. However, this problem is not significant, since the amount of substance used in production is that does not exceed the limits established by sanitary safety in class E1.
Application and installation
Before building a new house from sip panels , design documentation and estimates are prepared. A detailed analysis of the future design, study of shortcomings and risks is also carried out. Errors are corrected, and only then construction begins. The construction process involves four stages:
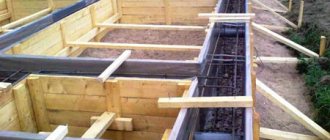
1. Laying and strengthening the foundation. In order for the structure to be reliable and serve for many years, care must be taken to waterproof the lower part. Water-repellent material is applied directly to the surface of the foundation and secured with a strapping beam.
The fastening technology is made using anchor bolts. The plinth ceiling is mounted using wooden joists and sip panels. For a reliable connection, self-tapping screws, wood screws and polyurethane foam are used.
2. Installation of sandwiches on timber. The logs and connecting beams are attached to the base using self-tapping screws. Each panel is leveled and only then securely fastened.
3. Giving the panels the desired size. If the building according to the project has several floors, then the slabs must be precisely adjusted to each floor. This will speed up the process, calculate costs or purchase missing items.
4. Direct installation/ finishing of walls for houses made of sip panels. They start with the corner panels and attach them to the bottom trim using self-tapping screws. Then they work on the ends of the corners and wall spans, tightening is carried out with self-tapping screws in increments of 5 cm.
The work is carried out similarly for each span: first the corner panel, the racks go in both directions and the slabs are fixed. The wall of the first floor (upper part) is treated with polyurethane foam and the top trim is made. The attic floor is performed in exactly the same way as the basement floor. What are the pros and cons of sip panels ?
Characteristic advantages:
* Reliability. Houses made from sip panels are durable, regardless of the method of operation. Moreover, they do not need to be constantly maintained from a technical point of view.
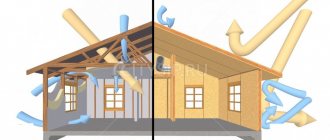
* Unique thermal insulation. Statistics and tests have shown that buildings made of sip slabs are several times warmer than brick/panel buildings. The “thermos” principle helps to save on energy resources. Such buildings are relevant in Russian cold regions.
* Soundproofing. There are panels with soundproofing coating. It is a coating of various fibers that muffle sounds (fiberglass, fiberglass, staple fiber).
* The relatively light weight of the building material allows the construction of a non-massive foundation. After creating the box, you can immediately begin building the roof or finishing, which significantly shortens the construction period. The construction process does not require specialized equipment; electrical tools are sufficient.
* The affordable cost of sip panels makes it possible for the most ordinary people to build houses. Work can be carried out regardless of the time of year. After contact with sip panels, a clean area is always maintained, which ensures environmental friendliness and preservation of the landscape.
To be honest, such material has practically no drawbacks. If you carefully analyze the photo of sip panels , you can list the risks to which they are exposed:
* Optimal service life is 50 years. If you follow all the instructions and observe timely maintenance, the house will last twice as long.
* There are certain types of sip panels that are not treated with fireproof coatings. The flammability of the structure increases several times.
* Low noise insulation occurs when errors are made during installation. If the work is done in accordance with all the rules and regulations, then residents should not “hear” any discomfort.
* Low ventilation rate. The structure of any house must be airtight, and to ensure proper ventilation, a specially equipped system is needed.
* If the surfaces of the plates are treated with an antiseptic and a special composition against rodents, then their damage is reduced to a minimum.
The notorious Canadian technology for constructing frame dwellings using sip panels allows you to save on the construction of the foundation. According to estimates, it turns out to be 3-4 times cheaper than for a brick house.
To build a brick building will require a whole team of builders and a period of 18-24 months. For Canadian, only three months is enough. Regarding heating: the heat loss of a house made from a sip panel is 5-6 times lower than that of a brick one.
A Canadian house warms up quickly, retaining heat rather than releasing it. Transportation of all material will be reduced to one or two times. For example, transporting building materials for a brick house will require more than a dozen times. And this means all the time, money and moral damage.
Features of construction using Canadian technology
In order for the construction to be reliable and durable, you will need to take into account the features of using sip panel technology. These include:
- You must try to choose the highest quality materials. Only high quality panels can withstand all the pressure placed on them. Some manufacturers may use poor quality adhesive, which will lead to rapid unsticking of structures. Also, low-quality materials can lead to easy ignition of the structure and the release of harmful substances during a fire. The choice of manufacturer must be approached with full responsibility.
- When choosing a foundation, it is better to give preference to screw piles or strip monolith. This will reduce construction costs.
- The special manufacturing technology of the panels provides them with high rigidity. Thanks to this, the construction of the building can be carried out at any time of the year, even at low temperatures. After construction, the building does not shrink and is protected from seasonal soil movements.
- Particular attention must be paid to the frame that will support the walls. For exterior decoration, it is better to use thicker varieties of vulture structures; ordinary panels are suitable for interior partitions.
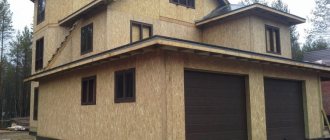
Construction of a house from sip panels
Knowing the characteristics of sip panels and the disadvantages of their use, you can build a building without any special complications. The main thing is to carry out all work step by step and in compliance with technology.
Assembly of sip panels
The assembly of such material must be carried out with careful monitoring of the reliability of the connection of each section of the structure. The main fastening points for sip panels are:
- Areas where the floor structure joins the main part.
- Elements for fastening wall corners.
- Joints connecting walls, ceilings and roofing.
- Elements that fasten the roof to the panels.
Assembly from sip panels
All installation procedures for joining structures must be additionally strengthened using self-tapping screws and fixed with special foam for installation. Although the material has good thermal insulation properties, if assembled poorly, the problem of drafts may arise. Cold air can enter spaces where panels are poorly connected to each other. If such complications arise, you can get rid of them using construction tape.
How to build it yourself
There are two ways to build a house from SIP panels with your own hands:
- Buy a house kit for a specific project from a company that deals with this, and assemble it yourself. Not all companies agree to this, but many have a supervising installation service. This is when a company specialist supervises your installation.
- Buy slabs. Cut them to the required sizes, purchase timber, do it all yourself. In this case, all responsibility for the quality of construction will fall on you. If you have carpentry skills or have someone to help you with, you can choose this option.
Briefly about what a house kit is. This is a set of ready-made SIP panels, wooden beams of the required size and fasteners for the construction of a specific house. All components are cut at the factory and numbered. When assembling, you use the resulting blocks in a certain order. The process is reminiscent of building a house from a children's construction set, only you are assembling a real house.
Building a house from SIP panels when ordering a house kit is like playing construction kit
A house kit is good if everything is done accurately. This is not only about the quality of SIP panels (it must be checked separately), but also about the use of dry wood (chamber drying) , and about the accuracy of the cut. The edges of the panels must precisely “grab” the beam, the two panels must be joined with an expansion gap of about 3 mm - all this is achieved using precise equipment.
Reference. The expansion gap is the required distance that is left between building materials that are subject to expansion (dilatation). If a house is being built in a region with a humid climate (for example, the Leningrad region), then it is imperative to leave an expansion gap, otherwise the OSB will swell. In dry climates, there is no need for a gap between OSB.
Useful tips when choosing SIP panels
First of all, it is important to remember, and if necessary, constantly remind yourself: “quality doesn’t come cheap.” Most of the problems that arise when buying SIP slabs happen precisely because of the wrong choice towards cheapness.
The primary problem that arises when purchasing slabs from an unscrupulous manufacturer is the use of low-quality glue. There have been cases when, during production, glue was applied unevenly to the surface of the insulation, moreover, in simple stripes by hand. As a result, the OSB layer is easily separated from the insulation when exposed to some force.
The second, often common problem, especially inherent in domestic and Chinese manufacturers, is the use of low-quality polystyrene foam, which easily burns, while releasing harmful particles. It is important to remember that high-quality material does not propagate combustion and is self-extinguishing.
From the above, it makes sense to highlight a few useful tips that will help when choosing and purchasing:
- Before ordering a batch, it is advisable to personally verify its quality,
- there is no need to chase cheapness, since in this case “the miser pays twice”, and not everyone can afford to order a second home,
- slabs must be ordered directly from the manufacturer or from reputable dealers,
- It is advisable to request the option of payment on delivery, in extreme cases an advance payment. Firms with a low reputation often require 100% prepayment. The “money in the morning, chairs in the evening” factor in this case will work against the buyer.
In general, it is necessary to note that even high-quality German manufacturers make allowances for errors in the dimensions of the slabs. Nevertheless, the Egger concern is distinguished by the generally recognized fact of the consistently high quality of its products, followed by Glunz with a small gap. Both manufacturers have a high reputation, confirmed by more than one decade, and thanks to them, SIP panels, which can easily be purchased at any construction market, will delight you with their quality and reliability.
Reviews from panel home owners
According to the owners, the house is warm and comfortable. The only problem for residents is ventilation. Such cottages resemble a thermos with sealed walls. The ventilation system in them often has to be forced. There is not enough natural air flow. The walls made of SIP simply do not let him into the house at all.
Positive reviews
- 4 times stronger than wooden frames; 2 times warmer than wooden houses; 5 times faster in construction than houses made of brick and aerated concrete; have a usable area increased by 12% with the same building footprint; unlike frame houses, they do not have “cold bridges”; unlike gas-foam concrete, wooden and brick houses they do not shrink; unlike frame and gas-foam concrete houses, they do not contain volatile elements; are not subject to rotting, damage by insects and are much less susceptible to damage by rodents than frame houses; absolutely safe for humans and the environment, easy to finish, because... have perfectly smooth wall surfaces and corners. © SSergey, forumhouse.ru.
- I built a frame house with my father and friends in three months, it’s been standing for three years now, the flight is normal. © Revolt, forum.onliner.by.
- And I will build it myself from sip panels on chicken legs (piles) - it’s built quickly. and time is money. Build a house from silicate, and then cover it with polystyrene foam so that it is warm)) is there no fumes? + pour half the cost of the house into the foundation. Only sip. The main thing is to think through the supply and exhaust correctly. What else can you use to build a 120 sq. m house for 25-30 thousand? © LANTAN, forum.onliner.by.
- I have been building vulture panel houses since 2010, mainly in the suburbs, I communicate with former customers, everyone is very happy, the houses are warm, they are quickly assembled, the walls are perfectly smooth (finishing is a pain), over the years I have made slabs for myself and over the winter while at home I assembled my house and covered it. comments like it will fall apart are written by someone who built from blocks and spent a lot of money on time and nerves. build without hesitation, quickly, inexpensively, warmly, reliably. © sanik1975, forum.onliner.by.
- I don’t know how ECO-logical all this is, but it is quite logical that those who do not have such a house insist that such houses are bad, and those who have such a house insist that they are good. I have! Therefore, I will focus on the fact that before allowing these technologies (especially abroad), real experts in this matter assessed the risks. In general, I try to think less about how much harmful there is in our everyday life - what we eat, what we breathe, what we wear, what we use... And how much health we lose by conflicting (including virtually) I’m looking forward to the warmth and snow melting at the dacha so that I can start decorating our neat little house, which is waiting for us to devote time to it amid the avalanche of worries...© Forest Dacha, dacha. wcb.ru.
- I agree, this is modern technology, we started our activities with houses made of chopped logs, over time we realized that people want something economical, quickly erected and warm. I built it once and forgot about it. No caulking is needed. There is really one disadvantage of sip panels, poor sound insulation. But this can be solved with sheets of plasterboard during interior decoration. © alexandermos77, dacha.wcb.ru.
Construction stages: photo report
Construction of a house from SIP panels, like any other, begins with the selection and construction of a foundation. A pile foundation is considered optimal for a lightweight house. This is exactly what is done in most cases when starting the construction of a house using SIP technology. Sometimes it is impossible to install a pile foundation:
- on hard soils that are too expensive to drill (rocks);
- on unstable soils with low bearing capacity (peat bogs);
- in the presence of cavities in the rock mass.
In these cases, they make a strip or slab (more often USHP is an insulated Swedish stove). They are much more expensive, but more reliable.
A strip foundation or in the form of a slab is also suitable
Once the foundation has been selected and calculated, its construction can begin.
Making a pile foundation
Since foundations are most often made from screw piles, we will illustrate exactly how they are made. Piles are screwed into the ground manually (if the soil and strength allow) or using special equipment. The height of the heads is 80 cm above ground level, the distance between the piles is no more than 2.5 meters.
Screwed piles and caps welded to them
The heads are welded to the installed piles, and the strapping beam is attached to them (in this example, 200*200 mm).
Important! The joints of the timber must be located on the heads. When laying the strapping beams, do not forget to coat the locks with a protective compound (bitumen mastic) before joining.
There is no support under the joint - you can’t do that!
To protect against rotting and insects, the strapping beams are impregnated with a protective compound. Roofing material was laid in two layers under the timber (on the heads).
We attach the timber to the heads and coat it with a protective compound
This stage takes from 3-4 days to a week. It depends on the complexity of the soil, whether you work with the equipment or turn it yourself. Now you can start laying the floor slabs, but before that you should familiarize yourself with the methods of connecting them.
How to connect SIP panels: basic principle
When connecting panels, a wooden dowel (beam) or a thermal key (a piece of SIP panel of smaller thickness) is inserted between them. As mentioned above, in our country the technology using a frame is more popular, i.e. Dry timber is used as a key. It is this option that we will focus on.
The beam is inserted into the groove and fixed using self-tapping screws and/or nails, which are twisted/hammered through the OSB into the body of the beam. If you have a nail gun, we initially recommend tackling the panels with “yellow” wood screws 40-50 mm long, and then punching the joints with rough nails 50-65 mm long in increments of 10-15 cm.
The following can be used to fasten SIP panels: “yellow” wood screws, galvanized screw nails, galvanized rough nails. Do not use “black” hardened screws - they break off and quickly corrode
There is always a risk that the connection will be leaky, and the entire construction technology of SIP panels is based on the thermos effect, that is, on maximum tightness. Therefore, before assembling this unit (and any other), foam is applied to the side surface of the panel. It fills all the cracks, providing the proper level of heat and moisture insulation.
The main unit when connecting SIP panels: joining two panels end-to-end
Note! The picture above shows a dowel made from double timber. Often such recommendations are perceived incorrectly, and in order to save money, unplaned edged boards 50x150x6000 mm of natural humidity are purchased. Once the board dries, the joint is unlikely to remain sealed.
If you are not limited on funds, we recommend using solid timber from dry planed wood, chamber dried
When making a composite wooden dowel 100*150, in our opinion, it is preferable to use three dry bars with a cross-section of 50*100 mm - in this case the connections overlap (see video below).
If we are talking about wall panels, then it makes sense to insert and secure the dowels in advance.
The foam was applied, the beam was inserted, and secured with self-tapping screws. Foam was applied to the side edge of the second slab, the groove was placed under the protruding part of the beam, an expansion gap of 3 mm was set, and secured with self-tapping screws. The foam that came out of the seams during the installation process is cut off after polymerization.
This is what it looks like
This technique, with minor modifications, is repeated in any connection of SIP panels. The diagram of this node is presented above.
After cutting the slabs, it becomes necessary to remove polystyrene foam to the required depth. For these purposes, an electric thermal knife (cutter) for foam plastic is used. They come in various designs, but the thermal knife must be equipped with a limiter. Only in this case will you be able to remove polystyrene foam exactly to the required depth. “Overdoing” can lead to the appearance of cold bridges at the junction of the panels.
Electric foam cutter with installed cutting depth limiter
You can make the cutter yourself, but you should not forget about safety precautions when working with electric current .
First overlap
The first floor is nothing more than a floor that does not require insulation. As melted, it is assembled from SIP panels with a thickness of 224 mm and a width of 625 mm. With such a width of the slabs, the wooden beams are spaced at intervals of about 60 cm, which is enough to withstand the load.
If you have slabs with a width of 1250 mm, then they need to be sawn lengthwise into two equal parts.
When installing the ceiling, the panels should be laid like bricks in masonry - with the seams mismatching (staggered). This is necessary to ensure that the seams do not warp when humidity increases.
These are the pieces that floor blocks should be cut into when using 1250 mm wide slabs
To protect the bottom OSB board from moisture, each of the boards is coated on one side with the same bitumen mastic. You can use other compositions with similar properties.
Assembly of SIP floor panels for the first floor
When connecting the slabs, a mounting beam is laid between them (diagram in the previous paragraph). The beam is attached at the edges to the frame (with long nails), and the edges of the slabs are attached to it using self-tapping screws.
We cover the side sections of the slabs (all floors) with an edged board of a suitable size. We apply foam to the side surface of the slab using a snake, then we place a board and fasten it through the OSB with self-tapping screws into the end of the board.
Closing the floor sections
A starting (crown) board is laid on top of the sandwich along the perimeter, on which the SIP wall panels will rest. It is laid around the perimeter and in those places where partitions will be installed.
Method of fastening the first floor and thrust beam
The crown boards are fastened with nails/screws, but to be sure, they were secured through and through with studs to the pile heads. Holes were drilled for the studs. A pin is driven into them and tightened with bolts.
Walling
We continue the construction of a house from SIP panels: we are installing the walls of the first floor. For this work, it is advisable to have two assistants, then the process will go faster and easier.
We place the first panel so that it “fits” onto the crown board
Wall installation begins from one of the corners. When installing, the panel is “slipped” onto the installed starting board with a recess in the lower part (first apply a layer of foam to the board or the end of the sandwich). The panel is placed, aligned vertically, attached to the starting board on both sides with self-tapping screws in increments of 10-15 cm.
Assembly of the wall slab to the strapping beam
Foam is applied to the side surface of the installed slab, and another slab is set at an angle of 90°. An embedded board (end block) is pre-attached to its side part, the thickness of which is equal to the depth of the groove. Like the first one, this panel is attached to the strapping starting board.
We fasten the corner from sandwich panels
In addition, we fasten the corner using long self-tapping screws.
As a rule, self-tapping screws with a length of 220 to 280 mm are used
The length of the self-tapping screw must be such that it passes through the slab and the entire thickness of the embedded board. The installation step of this fastener is 40-50 cm.
The principle of assembling the first floor wall
Next, the walls from SIP panels are assembled according to the same principle: we place a beam between the slabs (if it was not inserted previously), and attach the next slab to it and to the bottom frame. Simple and fast.
In window and door openings, for more reliable fastening, you can install metal perforated reinforced corners. The element is optional, but adds rigidity and inspires confidence.
External walls and partitions are immediately erected
The installation of partitions from SIP panels follows the same principle: we attach a crown board and partition blocks to it. They can be the same thickness as for external walls, but thinner ones can be used. The decrease in sound insulation properties is compensated by the interior decoration.
To save money, partitions can be made using frame technology. Then initially only the frame can be installed, and its cladding can be transferred to a later period. It is more convenient to do this when the roof is already installed.
In a house, frame partitions can be made from SIP panels
Interfloor ceiling
To install floor slabs in the grooves of wall panels, boards are installed on foam and self-tapping screws. They create a harness for installing the ceiling.
Preparing the piping for the interfloor ceiling
Next we lay the floor slabs. If the partitions are assembled from SIP panels, their load-bearing capacity is quite high and no additional reinforcement measures are required. If the partitions were assembled using frame technology, we make the upper beams reinforced: they are assembled from three boards glued together. For greater strength, the beams can also be fastened on both sides with self-tapping screws.
Reinforced beams
Floor slabs made of SIP panels are laid on the finished frame. They should be no more than 625 mm wide and should be laid staggered (with the seams mismatched). Since the panels are narrow, there is a lot of wooden beams in the ceiling. Due to this, such a floor can withstand loads in places where there are no floor beams.
This is what it looks like from above
We fasten the laid slabs to the framing beam with self-tapping screws or nails. The edges of the OSB are at the top and bottom to each intermediate beam. After securing the installation of the ceiling, we close the open side sections along the perimeter of the building according to the same principle: foam + edged board. For greater rigidity, in those places where the floor beams pass, we fasten the floor panels with long self-tapping screws (220 mm) all the way through.
A couple more angles
This stage after assembling the first floor does not seem difficult. Everything is the same, only the work is at height, tightening the sandwich panels takes longer and is more difficult than installing them.
Second floor walls
The second floor in this project is an attic, so the wall panels are low. We also install partitions at the same time as the external walls. Before installing the roof, an embedded beam is installed in the upper open groove; roofing SIP panels will be attached to it.
The outside is much taller
Standard panels will have to be cut to fit the gables, since the shape is non-standard. The installation and connection of the wall panels themselves on the second floor is no different.
Roof made of SIP panels
Special sandwich panels are used for the roof. Under them, the ends of the slabs are cut at a certain angle, which is determined by the angle of inclination of the roof slope. Here, just as with flooring, you can get by with a minimum of beams, because each connection has its own beam. Therefore, the rafter system is not assembled.
For a roof made of SIP panels, beams need a minimum
Skate decoration
The roof of a small to medium sized house is made of SIP panels and usually has a central ridge beam. Here two planes of the roof converge. This node can be designed in two ways (in the pictures below). The first one is symmetrical. The sandwich panels are cut at an angle, and the top of the ridge beam is cut at the same angle. Two planes are fastened with long self-tapping screws through the panel to the beam on both sides. The fastener installation step is 30-40 cm.
Method of connecting two roof planes on a ridge beam with slabs sawn at an angle
In this method, there is no usual timber between the two slabs; they are connected only with foam. After the foam has polymerized, the excess is cut off, the seam is treated with a waterproof sealant, after which a protective strip - made of metal, plastic, etc. - is put on the ridge. - depends on the type of roofing chosen.
There is another way to join roofing SIP panels on the ridge. The second method does not require cutting the slabs at an angle, but one part of the panels must be longer (by the thickness of the roofing slab). The beam is still cut at an angle, the slabs are joined at right angles, and fastened through and through with long self-tapping screws to the beam.
Docking without undercuts
This connection uses embedded end bars. They are installed as usual - using mounting foam and self-tapping screws. To block the access of moisture to the under-roof space, the junction of the two panels is also additionally coated with a waterproof sealant.
There is an option to install a roof from SIP panels without a central beam. There are roofing options with two load-bearing beams that are located off-center. These can be either specially laid floor beams, or partitions assembled from SIP panels or using frame technology. In the second case, it is better to strengthen the beams (make them prefabricated with glue and nails).
If there are two rows of partitions or two load-bearing beams
The most difficult thing in this unit is to cut the embedded beams at the right angle. This can be done on the ground, which greatly simplifies the task. The panels are fastened through the slab with long self-tapping screws to the floor beams or mortgages in the partitions. Also, two planes are fastened together at the junction point - on opposite sides with long self-tapping screws.
Roof and wall panel connections
For laying SIP roofing slabs, wall slabs are cut at the required angle. The inner part of the OSB is higher than the outer part. The foam plastic is “cut” at the same angle, and the edges of the embedded beam are trimmed. It is this part that is the most difficult if you did not buy a house kit, but are building a house from SIP panels using standard panels, cutting them to the required dimensions with your own hands.
How to connect wall and roof SIP panels
If you have the appropriate equipment, cutting them at an angle is not a problem. The problem is cutting the foam between the OSB boards to the required depth. You can select the core using a thermal knife, and then remove the residue purely mechanically. Most likely, the cut will still not be smooth, so you will have to add more foam to fill the unevenness.
If the roof overhang is made without insulation
In the pictures, the roof overhang is also made of slabs with insulation. This is easier to implement, but it is an unreasonable expense. To save money, the length of the SIP panel is taken up to the intersection with the walls, and then only the timber goes (as in the photo). In this case, the beam is made composite: one part is longer by the amount of the overhang, the second is shorter and ends where the wall ends.
Features of joining roofing slabs
The connection of two roofing slabs occurs in the same way as others: timber, foam, self-tapping screws. But since precipitation is possible here, it is advisable to seal all seams.
Assembling a roof from sandwich panels
To improve the tightness, all seams on the roof are additionally coated with waterproof sealant. First, the hardened foam is cut into a plane with the roof, then a sealant is applied. After filing the overhangs, we can consider that the construction of a house made of SIP panels is completed. Install windows/doors, connect communications and the home is already suitable for habitation. Finishing can be done immediately after installing the box.