Window trim options
The basic rule when choosing platbands is that their material matches the material of the window. If you have a wooden window, then the frame should be wooden; if it is plastic, then plastic.
Although there are exceptions, in the form of a successful combination of platbands and windows made from different materials.
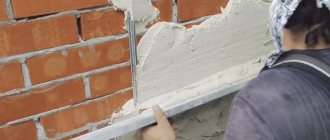
Wooden trims
Wooden trims are made from planks at least 30 centimeters thick. The width of wooden platbands can be different, depending on the profile pattern and design. The profile pattern of simple wooden trims is made using a milling machine.
Advantages: affordable price, easy installation.
Disadvantages: poor design, poor resistance to moisture and temperature changes, the need for regular painting or varnishing.
Release form: rounded or beveled planks with a convex pattern, or smooth, 1.5-2 meters long.
Area of application: hiding installation seams on wooden windows. Additional protection of seams from environmental factors.
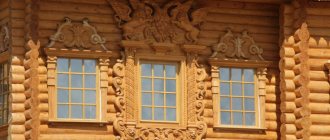
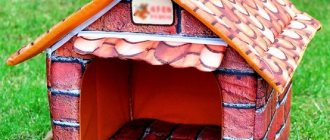
Carved platbands
Carved wooden trims are made manually or using a jigsaw. There are many options for the pattern of platbands: from simple ornaments to sacred symbols that protect the house from evil spirits.
Making carved frames yourself is a job that requires carpentry skills. If you want to make platbands with your own hands, but do not have experience, choose a pattern without complex elements.
Advantages: very beautiful appearance, the ability to improve the facade of the house without significant financial investments.
Disadvantages: high price, difficulty in manufacturing, fragility, need for regular painting.
Release form: depending on individual order or design developed by the manufacturer.
Scope of application: decorating windows and the facade of the house, hiding installation seams.
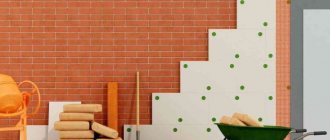
Plastic trims
Plastic trim is the general name for planks made of plastic, polyvinyl chloride and foam. Plastic trims are often included with the installed plastic window. Due to the specific nature of the production of this type of platbands, they cannot be made at home.
Plastic platbands can have a regular or carved pattern. The planks are installed using special fasteners, liquid nails, glue or double-sided tape.
Advantages: moisture resistance, long-term operation, easy installation.
Disadvantages: fragility of some products, small choice of design when simulating carved frames.
Release form: smooth, carved or with a profile pattern, 1.5-2.5 meters long.
Scope of application: hiding installation seams on plastic, sometimes wooden windows. Additional protection of assembly seams from environmental factors.
MDF platbands
Due to poor resistance to moisture, it is recommended to use medium-density fiberboard trims only for interior window decoration. MDF slats are great for wooden windows, especially if they match the color and texture of the wood.
The platbands are fastened with nails, screws or glue.
Advantages: low price, good appearance.
Disadvantages: poor resistance to moisture, inability to use for exterior decoration.
Release form: smooth, rounded or with a profile pattern, 1-3 meters long.
Scope of application: interior decoration of wooden or plastic windows.
Aluminum trims
Aluminum trims are mainly designed to hide assembly seams when installing windows and stained-glass windows made from the same material. In appearance and design, aluminum trims strongly resemble plastic strips.
Aluminum trims are fastened using a special profile or latches.
Advantages: durability, long service life.
Disadvantages: poor combination with windows made of other materials.
Release form: aluminum strips with various types of patterns except carved ones, 1.5-2.5 meters long.
Scope of application: external and internal finishing of windows and stained glass windows made of aluminum.
Platbands with threads
Carved window frames are common among wooden window trims. They are distinguished by carvings, which are relevant in Russian-style wooden house construction.
To make such planks, you need to contact a master carver or have the appropriate tool:
- Jigsaw;
- Electric planer;
- Grinder machine;
- Sandpaper.
The first three devices can be eliminated if you have a copy milling machine. In this case, you can even abandon the stencil through which the patterns are drawn. The main thing is to have the original strip.
Functions of platbands, their pros and cons
There is an opinion that the platband is an exclusively decorative element. Indeed, skillfully made, it decorates the house, but its role is not limited to this.
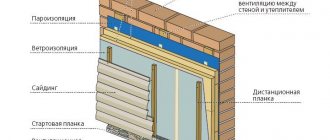
The casing protects the building. There is always a gap between the window frame and the wall. This is especially true in the case of a wooden structure, wood breathes. The gap can become a channel through which moisture and dust enter the wall.
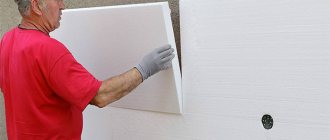
In modern construction, the problem is solved with the help of mounting mass. Foam is an excellent insulator, but it breaks down when exposed to sunlight and must also be protected. Even when using foam, installing platbands on windows in a wooden house is mandatory.
Window trims are:
- original appearance of the building;
- noise protection;
- additional thermal insulation;
- an excellent opportunity to visually adjust the shape of the building;
- ease of updating the exterior (it is enough to change a few finishing details).
Platbands have very few disadvantages. These are high demands on the quality of work and the need to provide protection from atmospheric influences, which is especially important in the case of using boards and wood-based materials.
Materials used for the manufacture of platbands
Window trims in a wooden house can be made from various materials. In most cases, wood is used. It is the wooden platbands that are in perfect harmony with the walls made of that material.
Wooden carved frames on windows
But it is possible to use the following materials:
- wood;
Wooden frame
- plastic;
Plastic platband
- MDF.
MDF trim for windows
Wooden platbands
Platbands made from natural wood are very practical and can be used in any interior. Such platbands can perfectly complement the style of the house with an interesting detail and emphasize its individuality. You can apply a beautiful ornament or pattern on wood trim.
Natural wood frame for window
Designer advice: To make the trim and walls of the house look harmonious, it is better to use the same type of wood. If the texture is the same, the platbands can be given a different color using special paints or compounds.
Wooden trims are loved by designers because of the ability to diversify their shape or apply decorative reliefs. Platbands made from other materials are difficult to process.
Wooden frames can be given any shape
Despite all the advantages of wooden platbands, there are still several disadvantages to their use. Wood is quite susceptible to temperature changes and high humidity. At low temperatures, its deformation and structure changes are possible.
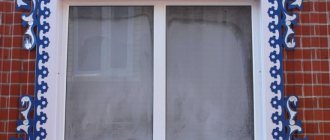
Plastic trims
You can find windows in wooden houses that have platbands made of plastic. This material is practical and convenient, both in operation and in manufacture. Plastic platbands can have any shape and color, their color can even imitate natural wood.
Plastic trim for windows in a contrasting color
An obvious advantage of plastic trim is its resistance to deformation caused by humidity, high or low temperatures. Also, its service life is much longer than that of wood.
Plastic platbands have a long service life
As for its installation, it also does not cause any particular difficulties. Here you can do without additional fasteners. The platbands are attached to the built-in elements and no traces of nails or screws are visible on the front side of the platbands.
Installation of plastic platband on a window
It is worth noting one significant drawback of plastic. These are its artificial components included in the composition. It is rare that the owner of a wooden house agrees to install plastic trim on the windows, thereby reducing its environmental friendliness.
Installation features
The finished casing is mounted to the window opening in the following ways:
installation on a blind tenon. Such parts are installed on the inside. Special holes are created in the frame for them. Glue is applied to the tenon and it is inserted into the groove. Such fasteners protect the platbands from dust and moisture;
Installation of complex multi-component elements will require some skill
a through tenon is used. In this case, the joint must be carefully treated with varnish. Similar techniques are used if the window is wooden. For installation on metal-plastic, special liquid glue is used.
What kind of care is needed?
Installed platbands require regular maintenance.
Wood should be treated with special compounds that provide certain impregnations against wood parasites, cracking and unexpected fire.
The original structure of wood requires care and precision when working with the material.
Carved products are primed, varnished or painted. Such treatments are carried out every few years. This will extend the life of the products and also maintain their attractive appearance. If products made of plastic or metal are installed, they do not require special care.
It is important to protect products from corrosion and sometimes renew the paint.
Making beautiful frames with thematic patterns with your own hands will allow you to decorate window openings in an original and unusual way and add a special twist to the intended architectural style.
Materials from which window casings are made
The decoration of the facade of the house varies. The framing of the window openings matches the style of the facade. Platbands are strips made of various materials. They perform several functions. The first is to hide gaps and cracks. The second is decorative.
Platbands are mainly used from the following materials:
- tree;
- plastic;
- tin;
- MDF.
Installation can be done by professionals. Or you can install them yourself. There is a wide range of different models of planks.
Attention! In the old days, people could use the patterns on the slats to determine the social status of the residents of the house.
Wood
Wooden cashing is used in wooden houses. Different varieties are used to make platbands. Wood tends to dry out over time. Therefore, every year the product must be painted with wood enamel. Carry out repairs. If severely worn, replace.
The main advantage of wooden structures is various options. They can be smooth, carved, openwork. The choice is up to the owners. They are used both on the street and on the inside of the house.
Wood is an environmentally friendly material. Easy to process. Installation does not require special skills. Mounting methods are different. You can add any color. Fits into the interior of the house.
Plastic
Plastic products have advantages over other materials. In terms of price, they are classified as cheap structures. Light in weight. Installation does not require special skills. The service life is not limited. It fades when exposed to ultraviolet light.
Installation of platbands
Installation of wooden platbands
You can install wooden trim on the window using nails, screws or glue. The strips are attached to the sides and top of the frame. In some cases, the casing is also installed on the lower part of the window, if this is provided for by the design.
For beautiful joining of simple platbands, their edges are cut at an angle of 45 degrees. This can be done using a hacksaw and a miter box.
If the window is located deep in the opening, the platbands can be placed on the wall using extensions.
Attaching the platband to the wall depends on the material from which it is made. For a wooden wall, it will be enough to use nails or screws; for a concrete or brick wall, dowel screws.
Installation of carved platbands mainly depends on their design and composition. The carved platbands are joined in such a way as not to disturb the overall pattern.
After installation, the platbands are treated with wood impregnation, then painted or varnished.
Installation of plastic and aluminum trims
Correct installation of plastic and aluminum trims requires the presence of a special installation profile that is attached to the frame. Platbands are installed in a groove located on the profile. In the absence of a profile, the platbands are installed on snap fastenings attached to the frame or wall.
In rare cases, plastic trims can be secured with glue, but this type of fastening is unreliable.
When using telescopic platbands, fastening is carried out by inserting the edge of the strip into the groove, which is located on the frame.
It is not recommended to install plastic and aluminum trims with screws and dowels, unless this is provided for by the design, since this leads to a deterioration in their appearance.
Foam plastic trims are attached only with glue.
Installation of all types of platbands is recommended only after finishing the walls and façade.
Wooden window frames
The material from which wooden window frames are made is planks more than 0.3 m thick. Their width may vary depending on the artistic design and design.
Wooden trims with a slotted pattern are made on a milling machine.
- Low price;
- Easy to install.
Negative sides:
Insufficient service life in humid climates and temperature changes. To protect against external influences, periodic painting or varnishing is required;
They are produced in the form of strips from 1.5 to 2 m in length of various shapes with or without a relief pattern. They are used to hide and protect the joints of window frames and walls from climatic influences.
Basic Rules. What not to do
Below is a list of rules that will help you avoid the most common problems.
- It is recommended to use a board 3-4 cm thick as the starting material.
- Don't jump into complex patterns right away. First, it is better to practice on ordinary round parts that are easy to make with a drill.
- The width of the workpiece should be such that it is enough to cover the ends of the walls and protect it from moisture.
- Carved elements should be placed along the grain of the wood - this will prevent cracking.
When choosing a stencil, it is better to pay attention to patterns with large elements, since small ones will look crumpled, as a result of which the finish will not have the desired decorative effect.
Important! Before starting work, you should calculate the future costs of time and money, as well as the feasibility of the idea itself. In the absence of high skills in working with wood and interest in the process itself, it is easier to buy ready-made platbands.
Moreover, it is advisable to first familiarize yourself with photographs of different products. This way you can find a suitable option or get inspiration for creating something yourself.
DIY making
Among all the existing varieties, wooden overhead trims are most suitable for self-production. You can limit yourself to a simple model made of smooth boards. Having basic carver skills, it is not difficult to make carved wood frames with your own hands.
Of course, their manufacture will require a lot of effort and skill from the home craftsman, but the result is worth it.
Important! The quality and durability of a wood product directly depends on the type of wood used. Oak and ash are the most durable, but this material is extremely difficult to process.
Beginning craftsmen should start with soft woods: alder, linden, aspen.
Selection of drawing
With all the abundance of options, wooden platbands can be divided into three large groups:
- slotted;
- with an applied pattern;
- carved.
The peculiarity of slotted platbands is that the pattern is formed by through cuts in the board. In overlays, the pattern is cut out separately and attached to the platband using glue or nails.
The last type is the most complex, but it also looks more impressive, since the relief is cut directly onto the surface of the part.
Whatever option is chosen before starting work, it is worth making a simple drawing of the future product. You can sketch a drawing on it, this will allow you to evaluate the attractiveness of the platband and avoid mistakes during its manufacture.
The choice of drawing directly depends on the wishes of the master and his qualifications. A beginning carver should choose a simple geometric or floral design. It is better if it contains only large elements.
You can make a sketch yourself or choose a ready-made one and print it.
To transfer the image onto the tree, just cut out the outlines with scissors, resulting in a practical template, or use carbon paper.
Manufacturing of frame and carved elements
For simplicity and reliability of fastening the platbands, a frame is made. This is a rectangle, the internal dimensions of which correspond to the dimensions of the window, and the width is selected in such a way as to ensure reliable fastening of the component parts of the product.
The configuration of the frame for carved window frames in a wooden house is selected individually.
The frame can be cut from a single sheet of OSB or other moisture-resistant wood-based board. A more reliable and durable model is assembled from boards. Corner joints are made using tongue-and-groove joints or overlapped.
Only a master with the appropriate skills can make a platband with a large area of relief carving. It’s better to start by making slotted parts. With the right design, such a product will be no worse than a carved one, and its production will not take much time.
Advice! The best tool for creating an incised pattern is a jigsaw. To get a good result, it is worth combining an electric tool and a manual one. Electric ones are easier to work with, but they are inconvenient for making thin cuts and cutting out small parts.
Final processing
It is important to protect wooden parts from moisture. To do this, the wood is impregnated with an antiseptic. If work is carried out on a recently assembled log house, you can use the same composition for impregnation that was used to protect the logs.
Otherwise, it’s easy to buy an antiseptic in a specialty store.
After the impregnation has completely dried, they move on to decorative finishing. Paint or varnish is used as decoration. The choice directly depends on the wishes of the owner and his vision of the finished facade.
Paint or varnish is applied with a brush; no preliminary primer is required; modern antiseptics, in addition to protection, perform other functions.
Assembly
The platband, especially if it is a complex product with a cornice and a canopy, is assembled on a flat horizontal surface. First, the frame parts are connected. It is recommended to use adhesives as fasteners and reinforce joints with wooden dowels.
Sometimes it is not possible to use wooden fasteners. Then you need to pay maximum attention to protecting nail heads and screw heads from moisture. Otherwise, rust will spoil the appearance of the platband and contribute to its rapid destruction.
To hide the fasteners and protect them from water, it is recommended to use a “camouflage” mixture of sawdust and wood glue.
Process of installation of platbands
After all the preparatory work is completed, it is time to begin installing the platbands. All parts of the platbands are interconnected and fastened with nails, spikes or glue. Often glue is used as an additional material to connect parts of the platband.
Installation of window trim with liquid nails
If the fastening of the platbands occurs on hidden or through tenons, then installation work is performed as follows:
1. on the window frame and platband, mark the places where the tenons and holes for them will be located;
2. Spikes are installed on the window frame. Spikes can be made yourself or purchased in a store;
3. holes are drilled on the platband in the previously marked places;
4. the last stage - the platbands are fixed with spikes.
Installation of platbands on windows in a wooden house with self-tapping screws
At the first stage, it is important to evenly distribute the hole for the fasteners and the tenons themselves. This is necessary so that the load is evenly distributed along the entire perimeter of the platbands. After this, holes are drilled for the tenons, and they themselves are installed on the window frame.
The actual process of installing the platband consists of aligning the holes for the tenons with the tenons themselves. It is important that all the tenons line up with the drilled holes. In order to securely fix the spikes in the holes, you can use special glue. It will give reliability to the structure and secure the platbands well.
Installed platbands on windows in a wooden house
Often, ordinary screws are used to fasten platbands. This, of course, will simplify the process of installing them, but at the same time it will spoil the appearance of the product. When installing in this way, all holes should be treated with a special compound that will prevent deformation when moisture enters.
There are no special problems with the installation of platbands made of any material. For this, basic skills in working with tools are sufficient.
After installing the platbands in a wooden house, all that remains is to periodically care for them and monitor their condition. In order for them to serve for a long time, experts advise taking the stage of preparing the platbands before installation with great responsibility and using high-quality products as impregnations.
Platbands for windows in a wooden house
Thanks to high-quality preparation and installation, window frames in a wooden house will last for many years and will protect the house from moisture, dust, heat loss, cold and drafts, and will also decorate the house and give it a unique look.
Methods to prevent moisture from seeping under cashing
Even a skillfully made high-quality platband will not fit perfectly tightly to the wall. A gap is formed into which moisture will inevitably enter. Over time, it can destroy the material and, through the gap between the frame and the wall, reach the internal trim on the windows in a wooden house.
This cannot be allowed.
There are several ways to prevent wicking:
Finnish platband.
Its main feature is a wooden canopy over the window. The base of the canopy is recessed into the wall. The gap is sealed with frost-resistant sealant. The design has an attractive appearance and provides maximum protection from precipitation.
Metal visor.
This option is similar to the previous one, but a piece of standard ebb is used to make the visor. It cuts into the wall, the joint is also sealed.
Bottom harness.
Additional visor, only at the bottom of the window. It protects the opening from moisture and adds individuality to the building as a whole.
Platbands for windows in a wooden house, both on the inside and outside of the wall, are an important component of the interior and exterior.
Preparation for installation of platbands
The installation of platbands on windows in a wooden house is preceded by a preparation stage. Firstly, all necessary measurements are taken from the already installed window. It is important to choose the correct width of the platband. It should completely cover the contour of the window frame. Secondly, before installation, all necessary work is carried out with wood or other material used for platbands.
Stages of installing platbands on windows in a wooden house
If wood is used as a material, then the trims cut to size are processed or decor is applied to them before installation. The treatment uses compounds that reduce deformation and protect against insects from penetrating the wood. Platbands made of MDF and plastic do not require pre-treatment before installation.
Installation of plastic trim on windows in a wooden house
Expert advice: it is important to use completely dried wood for platbands. If the wood is still damp, it may become deformed during the drying process.
After the trims are cut out and prepared on them, it is necessary to determine the fastening points and mark the places where they will be joined to each other. If there are any holes, they must be prepared in advance. Platbands made of any material must be sanded well before installation.
After the platbands are prepared, it is necessary to prepare the place for their installation. The joint between the window and the wall must first be insulated, since after the platbands stop, this will no longer be possible.
Installation of MDF trim on windows in a wooden house
Before you begin installing the platbands, you need to decide on the method of attaching them.
There are several types of fastenings for overhead trims:
- using nails;
- dull thorn;
- through tenon.
Fastening with nails is the simplest, but this leaves marks on the platbands that are difficult to hide. Also, this installation method can damage the material or create additional stress on it during installation.
Fastening platbands with nails
Installation on blind tenons implies the presence of small protruding parts on the window frame itself and holes for them on the platbands.
Installation of platbands on blind tenons
A through tenon is the same type of fastening, only the hole in the platband is made to cover its entire thickness.
Connecting parts of platbands with through tenons
How to choose the right wood?
Wooden frames are popular. At the same time, the performance of the product depends on the type of wood chosen.
The following options are worth considering:
- Ash, beech and oak are hardwood varieties. They are durable, but difficult to cut patterns on;
- It is much easier to process soft hardwoods - linden, aspen and alder. You can even carve patterns on their surface by hand. Such surfaces must be carefully treated with special compounds;
- It is recommended to create small elements from cherry and apple trees that can be attached to the base;
- Pine and birch are characterized by ease of processing and good performance properties.
Helpful information! Different combinations of wood types can be used. In this case, special protective impregnations should be used.
The nuances of choosing the right wood
To create truly durable and beautiful structures, it is important to pay careful attention to the choice of wood and its varieties:
- hard (oak, beech, ash): they are durable, but making cuts on them is not very easy;
- soft (alder, linden, aspen): perfectly amenable to processing, but require pre-treatment with special compounds;
- apple and cherry branches: perfectly convey the smallest patterns, attached by attaching to the base;
- birch, pine: easy to process;
- combinations of different species: require mandatory processing, allow you to create an original window frame.
Methods of fastening platbands
Options for attaching platbands to windows depend on the material of the frames themselves, the type of frame and even the type of building facade. During installation, the following requirements must be taken into account:
- Minimal damage to the platband fasteners: the installation locations of the fasteners are marked in advance.
- Preserving the aesthetic appeal of the casing after installation: it is recommended to select an installation method in which the appearance of the platbands will be minimally changed.
- Additional protection (closing) of fasteners after installing the casing: mostly concerns self-tapping screws, the heads of which, depending on the material of the casing, can be rubbed with a special wax pencil or closed with plastic plugs (this option is also applicable for door casings).
Installation of plastic and metal trims
The simplest installation is carried out for metal platbands, since it does not require lengthy adjustment of parts. The frame is cut according to the size of the window opening and installed using self-tapping screws. Dowels for fasteners are first installed in a brick or stone wall. To securely fix a small window, 3 screws are enough for the top and bottom trim, and 3-4 for the side trims. Plastic cashing is also quite simple to install, but it requires the most accurate marking of the areas where the fasteners will be located. Installation of self-tapping screws, which will be located under the platband, is carried out in the frame itself or in extensions (casing in a solid wood house), if any. Nipples are first put on the screws. Afterwards, the platbands (hollow flashings with special grooves inside for nipples) are applied to the fasteners and tapped. Thus, the nipple fits tightly into the groove and snaps into place. According to this scheme, the installation of platbands is carried out both outside and inside the building - to create a neat transition to the slopes.
Features of fastening wooden platbands
Installation of any type of wooden platbands should be carried out with the maximum possible concealment of fasteners. That is why, before installing such elements, it is recommended to carefully consider the installation method and prepare for it. Additionally, you need to consider the following installation rules:
- First check the accuracy of the abutment of the elements and carry out the installation itself at a level.
- After direct installation of the elements, it is necessary to treat the wood with impregnation, antiseptic varnish or paint. This will prevent the destruction of the wood structure due to the negative effects of moisture and temperature. If such treatment is carried out before attaching the platbands, then it will simply be impossible to guarantee the safety of the wood at the locations of the fasteners.
- When selecting fasteners, take into account the softness of the type of wood from which they are made. While soft rocks will be minimally damaged by nails, hard rocks may crack in the future where the fasteners are located.
Simple in shape from moldings
Installation of simple-shaped wooden platbands begins with adjusting the parts (if necessary, individual elements are adjusted, edges are cut at an angle of 45 degrees). Further installation can be carried out according to the following scheme:
- Hidden or through spikes (dowels). In the first option, blind holes are prepared for dowels on the back side of the platbands. In the places where they are attached (often in the casing), similar holes are prepared and prepared dowels are installed in them. Then the trim is simply “packed” around the window. In the second option, these spikes will be visible, and the hole on the casing will be through.
- Small nails or wood screws. The platbands are nailed along the perimeter of the frame (on the casing), so that the fasteners used are practically invisible. The fasteners should be placed in one row (to maintain the attractiveness of cashing).
Fastening carved platbands
Installation of carved platbands is not difficult if they were initially made according to the exact measurements of the window opening that will be framed. It must be taken into account that the patterns carved on the frame must match exactly. After the final “trying on” of the platbands, they are installed. Finishing nails (with small heads) are often used for fastening. They are invisible on the assembled frame, so they are ideal for decorative elements. Additionally, you can connect individual parts of cashing to each other using spikes (dowels). They become necessary when installing heavy and even bulky wooden frames. With the light weight of the platbands, the need to use dowels simply disappears.
It is better to nail finishing nails in inconspicuous areas of the frame to maintain the attractive appearance of the trim.
How to attach platbands to a log wall
If any type of platbands can be attached to log buildings without any problems, then for log buildings the installation of window frames requires special preparation. For wavy facade walls, installation can be carried out in one of the following ways:
- leveling the wall;
Initially, the logs are cut down to obtain a relatively flat area with minor depressions. You can level them with putty. The size of the areas removed around the perimeter of the window should be equal to the size of the selected platbands or literally 1-2 cm larger (for volumetric and shaped frames).
- use of an auxiliary beam.
In this option, pieces of timber are nailed to the casing, which will serve as the basis for installing the platbands. The resulting cracks can be caulked or blown out with foam and covered with putty.
The nuances of creating templates on your own
To prepare the platband, you need to develop a design and implement it using a stencil. The latter allows you to transfer the picture to wood.
Not every person has drawing skills. You can simply find and print the pattern you like, the main thing is to maintain a consistent style. Patterns of strict geometry and vegetation should not be combined.
Subtleties of creating a template:
- Harmony of the color palette of external walls and decorative elements.
- Selection of the optimal size.
- Choosing the best type of coating.
- Details are written along the direction of the wood grain.
Purpose of framing
The purpose of window casings, first of all, includes framing the facade of the building, creating its unique style, a kind of “face”.
In addition, they protect the space between the frame and the window opening, preventing dust, dirt, precipitation, and sounds from the street from entering the house.
Previously, platbands were considered a kind of protection, a talisman for the home against the penetration of evil spirits.
This was evident even from the patterns that depicted plants and mysterious figures, which necessarily carried a special meaning.
Today, such a design, provided that it was chosen correctly, can modify the geometry of the structure: expand or extend.
The meaning of carved elements
When planning to decorate window openings with such structures, it is important to first study their meaning:
- the sun and kokoshnik are symbols of energy and life;
- the snake personifies wisdom, fertility;
- the cross represents the harmony of the spiritual and material worlds;
- vegetation gives a feeling of unity with nature;
- earrings are a sign of the hospitality of the owners of the house;
- the silhouette of a bird is a traditional connecting element.
Owners of wooden houses should spend a little time and add elegance to their home. This is not only beautiful and stylish, but also good protection for the home from adverse factors.