Content
- Why do you need a vapor barrier for walls?
- Installation procedure for vapor barrier
- How to check the vapor barrier in a house?
- Tips for vapor barriers Which side should the vapor barrier be laid against the insulation?
- What is important to remember when vapor barrier walls?
- Possible mistakes when vapor barrier walls
Vapor barrier of a house is the most important stage in construction, because it is perhaps the main attribute that allows you to preserve the properties of insulation and the durability of the frame of the house itself.
If a house is attacked from the street by snow, rain and other precipitation, then inside it is the people themselves who become the main creators of destructive moisture. Steaming kettles, heating, hot water in the bathroom, and even breathing itself contributes to the formation of additional moisture. A vapor barrier helps keep a home dry and warm by keeping steam from flowing from inside the room.
Therefore, if you want to keep your house warm for many years, then a vapor barrier layer is simply necessary.
Primary base for installation and its preparation
The most common question related to the installation of this insulating product is the question of the correct choice of the front side of the film. The answer to this question requires knowledge of the entire construction process in which vapor barriers are properly applied. The very first thing you need to do is prepare the primary base on which the insulating film will be mounted. As a rule, such a base is made of lumber, which must be extremely clean, dry and coated with a primer.
The principle of operation of a vapor barrier is to prevent excessive moisture in the structure and maintain its ventilation.
The installation process is then divided into areas of application. For example, to insulate a roof structure, it is necessary to immediately lay a vapor barrier, whereas when building walls and floors, it is correct to first lay insulation. Waterproofing is mounted on the insulating layer, on which the vapor barrier is laid. Tension is not required when installing such insulating material, but this does not mean that the film can be left hanging.
The membrane film should not be perforated with staples or nails, so as not to violate its integrity. As a rule, the installation of this insulating material must be done using a strong adhesive tape, which can glue the material to the primary base with the utmost quality. This material, insulation, is produced in rolls, which allows you to cut a strip of the required length. The finished strips are mounted between each other with a slight overlap in order to organize a complete layer of insulating material with the correct side.
The use of this type of insulating material during construction suggests the following positive qualities:
Scheme of simultaneous functioning of vapor and waterproofing films.
- residual and excess moisture will evaporate better without forming condensation in the structure;
- appropriate regulation of the microclimate in the room or under the roof;
- a significant increase in the service life of each individual building type product that can be used in the construction of a house.
Vapor barrier materials can be laid directly on the roof. To do this, it is better to use solutions such as heated bitumen solution, special varnish and mastic. This method of laying insulating material is relevant only for certain types of roofing structures, which are most often found in high-rise buildings and those houses that are covered with soft roofing products. Grout types of insulating material can be covered with cement mortar, which is grouted in accordance with all existing requirements and standards.
Why do you need a vapor barrier?
Vapor barrier of walls, as mentioned above, does not allow the insulation to absorb moisture, which then changes its declared thermal conductivity, i.e. ability to retain heat. In addition, it protects the house from freezing, which occurs when steam encounters negative temperatures (the phenomenon of moisture condensation is called the “dew point”), and, therefore, increases the life of the house.
Vapor barrier is important for a number of other reasons:
- Minimizing the risk of black mold;
- Saving money on heating and air conditioning;
- Reducing the risk of corrosion of structural elements;
- Protection against waterlogging and freezing of enclosing structures;
- Reducing the risk of material deformation due to over-moistening with steam and freezing;
- Protection of internal structures from waterlogging.
At the same time, it is important to remember that waterproofing (or hydro-wind protection) and vapor barrier are not the same thing. It's very easy to understand the differences. Vapor barrier protects the house from the inside (from everything that emits steam), waterproofing – from the outside (from atmospheric phenomena and condensation).
One of the best solutions for vapor barrier at home is the two-layer membrane Isover Paranet (B). It will solve all the problems discussed above and will completely satisfy you with the price-quality ratio.
Vapor barrier membrane ISOVER Paranet (B)
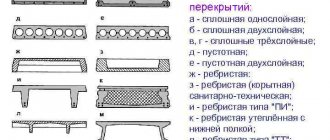
Main types of vapor barrier material
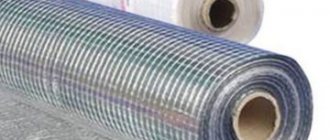
Vapor barrier is most often presented in the form of polyethylene film.
This material is so common that most people do not even know about its analogues presented on the shelves of hardware stores. The main indicators of a quality material are fire resistance, strength and low heat conductivity. Modern vapor barrier material can be divided into:
polyethylene film with reinforced mesh.
It can be found in two versions: with perforated reinforcement and without perforation. Perforated products have specific holes that allow moisture to pass through for rapid evaporation. There are no such holes in the material without perforation.
In most cases, such material is quick and easy to install, and there is virtually no waste. In some cases, products may be supplied with a foil coating, which allows the film to reflect heat. A similar material has found its application in baths or saunas; polypropylene film.
If we compare the vapor barrier made from polyethylene, this material is somewhat durable and is also resistant to ultraviolet radiation. It is used during the construction process to preserve the already erected part of the structure. The maximum effect of the film is obtained at the moment of moisture absorption, since one of its sides is impregnated with a special composition of cellulose and viscose.
The main positive qualities remain the minimal cost of vapor barrier and resistance to damage; materials that are made on the basis of spunbond. Vapor barrier is used for installation of “cold” rooms, for example, the roofs of a building; aluminum foil is used for maximum protection against moisture penetration; cardboard, which is laminated with polyethylene film, is used in those buildings where heating occurs according to the cycle principle; vapor barrier material based on bitumen. Most often this is liquid thermal insulation, which is applied to the surface using a roller or brush.
There are five different types of bitumen. They depend on temperature indicators. The main disadvantage is that this composition is destroyed if the ambient temperature drops below the value specified in the instructions; membrane thermal insulation.
They are also called “breathable” film. They are capable of passing a lot of steam. When using such a material, there is no need to install a separate space between the heat-insulating material.
Vapor barrier materials
Specially selected material in a particular case can correct some features of the process of creating a vapor barrier.
Film, bitumen lubricant or membrane are not the only ways to isolate steam. Results can also be achieved using a special vapor barrier. It is used for roofing or installation in special places in the room.
A film installed under metal tiles that is resistant to high temperatures.
The main reason for using such thermal insulation material is the fact that the roof quickly heats up from the Sun.
This film is protected from ultraviolet radiation without losing its properties. This process is necessary if the construction is not completed. The material is applied to the entire surface;
Film with aluminum foil.
Such material is capable of removing a certain amount of heat, thereby earning special demand among users. The film has found application in private houses and cottages. In the summer heat, excessive heating of the roof can be observed here, and this material does not allow heat to be transferred into the room.
Vapor barrier with strict characteristics.
This type of vapor barrier will be needed in some cases when installing a roof. It resembles roofing felt. In some cases, when constructing such a structure, it is necessary to create a small gap between the vapor barrier insulation.
Material with special adhesive ends.
If there is a need to insulate a room not with one piece of film, but with several, then this material is used.
Also, such installation of insulation will be required when there is a need to completely seal the room. This material is often used in places where there is high humidity - near the sea or in the mountains. They cover the roof during repairs.
Installation procedure for vapor barrier
Installation of vapor barrier can be divided into 5 stages. At the first stage, if the house is not new, the cladding is dismantled down to the wooden frame of the wall. At the same time, the insulation and wood are checked for damage - if any are found, they need to be repaired.
The next key stage is drying the walls and mineral wool. If this is possible, it is better to carry out work in the warm season, since in winter the installation process will be complicated by weather conditions. If the house is being built from scratch, then sequential installation of walls and insulation can be carried out without preliminary operations.
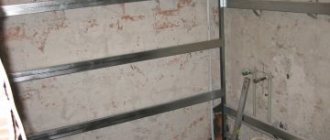
Then the installation of the membrane begins. It is rolled out along the entire length of the wall and cut so that in the corners it is possible to overlap (10-15 cm) onto the adjacent wall. Fastening is done on each vertical board of the frame using a stapler, followed by gluing the staples with vapor barrier adhesive tape of the Paranet type from ISOVER.
By analogy, the entire vapor barrier is attached, and the joints are taped with vapor barrier tape. A frame of slats is installed on top of the ISOVER adhesive tape, which simultaneously presses the vapor barrier and serves as a frame for the cladding. In this case, galvanized nails or self-tapping screws are used, which are attached in increments of 60 cm.
Since the thermal insulation layer occupies about 70% of the frame walls, it must be protected as much as possible from moisture so as not to lose the declared properties and not move away from the frame. Regardless of the purpose of the room in the house, the method of attaching the vapor barrier must be selected correctly. The vapor barrier is attached to wooden structures with a stapler, followed by gluing with vapor barrier tape, and to other types of structures - with a special sealant.
Proper fastening of the vapor barrier, with gluing of all joints and junctions, as well as possible damage and places of passage of pipes or other communications, allows you to achieve the required level of protection.
Membrane structure and operating principle
The membrane consists of several layers of film with microscopic perforations. The holes are not able to let a drop of water through, but easily allow steam to pass through. Inside the membrane, moisture is distributed over the entire area, evaporates, or flows down through internal channels.
Vapor barrier prevents the penetration of wet vapors into the heat-insulating layer and prevents condensation from falling on wooden and metal structural elements. When wet, thermal insulation ceases to perform its function, accumulates moisture and becomes a source of threat to the wooden and metal structures of the building. Over time, wet insulation develops mold, which spreads to nearby areas and can affect a large area.
A properly installed vapor barrier becomes an impenetrable obstacle to moisture and locks it in. Moisture remains outside the heat-insulating cake, but this leads to the accumulation of vapors inside the room. If some of the moisture nevertheless penetrates into the thermal insulation (through fastening holes, at the junction of the strips, small damage in the film), it is blocked there and begins its negative destructive effect. Ordinary PVC film often provokes such consequences.
A vapor barrier membrane has the property of allowing moisture to pass in one direction, preventing its reverse penetration. Manufacturers even regulate the degree of this penetration, producing vapor barrier materials with different technical characteristics. This allows you to select a membrane with the parameters required in each specific case. Thanks to the correct choice of vapor barrier, optimal ventilation conditions are created in the room while simultaneously conditioning the internal heat-insulating layers. At the same time, the vapor barrier must be attached in strict accordance with the technology, otherwise moisture penetration bridges will arise, which will significantly reduce the overall effectiveness of the protection.
How to check the vapor barrier in a house?
The vapor barrier is performed as a continuous loop, as it must withstand the pressure of water vapor from the inside, this is similar to the air pressure on the walls of a balloon. To check the quality of the installation, special equipment is even used, which pumps air through a special valve with a fan installed on the front door and creates excess pressure, i.e. “It’s like it’s inflating the house” - in this case, all the windows and vents in the entire house must be closed. In the same way, the tightness of the vapor barrier is checked in rarefied air, when a fan with a valve on the front door blows air out of the house with the windows and ventilation openings completely closed. From all the gaps, torn places and unglued joints, after a few minutes cold air begins to blow (it is very clearly visible on the thermal imager), which allows you to detect and correct even small defects and errors, keeping the house warm for many years.
How to attach a vapor barrier to the ceiling, floor and ceilings
If an unheated attic is located under a pitched roof, the ceiling underneath must be insulated. In this case, the film is attached from below, to the load-bearing floor beams, and is secured using elements of the rough ceiling or the finishing frame. It is also necessary to install a ventilation gap between the insulating layer and the finished ceiling to remove moist air.
When insulating a floor above a cold basement, a vapor barrier is placed on the floor beams on top, protecting the insulation from warm water vapor rushing into the basement, where the partial pressure is lower. To create a ventilation gap, the film is not stretched, but is placed between the beams on insulation, the thickness of which is less than the height of the beams. Logs are nailed on top, and flooring is laid on them - boards or a base for linoleum, carpet or other material.
Below are a few rules to consider during installation:
- vapor barrier is carried out in enclosing structures separating heated rooms and the external environment;
- always placed between the insulation and the cladding for internal finishing;
- vapor barrier and cladding for internal finishing must be separated by a ventilation gap to remove water vapor.
Installation of vapor barrier and insulation on the roof
Video: laying vapor barrier film
A wide range of vapor barrier films and membranes produced by domestic and foreign manufacturers allows you to select a material that best suits the temperature and humidity conditions of the room and the climatic conditions of the construction area. The correct choice of insulating material will make it possible to obtain the desired effect at minimal cost.
Material updated 04/27/2017
Vapor barrier tips
Which side should the vapor barrier be laid against the insulation?
Perhaps the main question that arises when vaporising walls is which side to mount the membrane on. The answer is simple, polyethylene film is laid on either side, because... they do not differ from each other, but the ISOVER vapor condensate film Paranet (B) is installed with a smooth surface to the insulation, and the rough side remains facing the inside of the room. In this way, it is possible to minimize the accumulating water in the form of droplets on the fleecy surface of the film at maximum humidity in the room, and also to retain this moisture until ventilation or turning on ventilation and air conditioning, preventing it from collecting in puddles.
What is important to remember when vapor barrier walls?
- Joints with an overlap of about 10-15 cm are glued with a special vapor barrier tape or double-sided vapor barrier tape;
- Laying starts from the bottom and is performed vertically from bottom to top (the canvases are rolled out horizontally);
- The material must always be pulled tightly, especially in the case of vapor barrier walls;
- Fastening is done with the staples of a construction stapler and through slats, followed by gluing holes and damage;
- Ensure that the materials are tightly tensioned.
Possible mistakes when vapor barrier walls
The most common mistakes are related to poor-quality installation of the vapor barrier film. Yes, it can be fastened incorrectly: for example, the sides are mixed up or pulled too tightly, which can lead to a breakthrough in the vapor barrier.
Another constant mistake is using a vapor barrier film on the outside. Remember the difference between waterproofing/hydro-windproofing (needed just for working from the street) and vapor barrier!
Sometimes decisions arise on materials that allow for the absence of a vapor barrier - this is a mistake. In houses with mineral wool insulation (read how to choose it correctly), a vapor barrier membrane and a hydro-windproof membrane must be present.
If you vapor barrier your house correctly, it will help you arrange your life so as not to suffer from heat loss and enjoy the warmth on cold winter evenings.
Specifics of the vapor barrier device
A vapor barrier is a thin, almost weightless film material that blocks moisture from entering the body of the roofing pie and rafter system. This barrier is installed on the inside of heated rooms to prevent getting wet and subsequent rotting of the thermal insulation and wooden roof frame.
If you do not install a vapor barrier, moisture accumulated in the thickness of the insulation will contribute to heat loss. After all, water is an excellent conductor, transmitting both electrical and thermal waves through itself. Then, instead of the task assigned to thermal insulation, which is to insulate the house, the wet material will create a feeling of dampness and dank cold in the rooms.
In addition, the accumulation of moisture in the roofing pie will invariably lead to the settlement of colonies of fungal microorganisms. As a result of their life activity, the wooden elements of rafter structures will quickly lose their load-bearing capacity and become completely unusable. The same thing will happen with insulation and other components of the system.
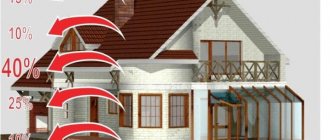
The vapor barrier is always installed as the first layer, if we consider the roofing pie from the side of the space being developed. Since the air, containing vapors of all types and of any origin, is warmer and lighter than itself, but in a less humid and colder form, the vapor, together with warm air currents, according to physical regulations, rushes upward.
According to the natural direction of steam movement, protection against it is installed in the upper zones of rooms with a characteristic high degree of humidity, along the ceilings and slopes of equipped heated attics. The entire wall is protected with a vapor barrier if it separates two rooms with sharply different operating conditions.
As an example, let’s take a partition between an ordinary living room and a home sauna or steam room. In this case, the vapor barrier is placed on the side of the bathhouse objects, and if they are located in the attic or on the second floor, then they are also placed on the floor as a ceiling.
Materials for constructing a barrier
Before we begin to analyze the principles that determine how to correctly and where to lay vapor barriers, it is worth studying the materials used in this area and their defining characteristics.
The most ancient option, protecting roofing systems from moisture coming from inside houses, was crumpled clay, laid in a dense layer on ceiling beams with decking. In terms of insulating and environmental qualities, it is unlikely that it has yet found competitors, but the method of constructing such a barrier is not always and not applicable everywhere. True, in eco-houses they give preference to it.
Later, clay was replaced by glassine, which did not have high insulating properties. In addition, it is too easy to accidentally break, which creates significant complications during operation and does not bring joy during maintenance and operation. No one has yet completely abandoned glassine; it is used in budget buildings, and sometimes roofing felt is used instead.
The era of the reign of glassine was interrupted by polyethylene, which was ahead of its predecessors both in terms of technical data and technological indicators. It is easier to work with, it is quite durable, but is not resistant enough to mechanical stress such as punctures and breaks. And ordinary polyethylene can easily be destroyed by traditional atmospheric phenomena: sunlight and low temperatures.
Due to the poor resistance of polyethylene films to phenomena that could critically damage them, improved materials began to be developed based on these polymers. Their creators sought to reduce the disadvantages and enhance the advantages of polyethylene, which was also joined by polypropylene along the way.
As a result of the persistent work of developers of vapor barrier materials, the consumer is now presented with the following options:
- Reinforced films with a base of polyethylene and polypropylene. These are modernized versions of their predecessors of the same name, but with optimized resistance to UV rays and fluctuations in thermometer readings. They are used both in pitched roofs and in ceilings.
- Foil membranes. Polymer films with the working side covered with aluminum foil. They are used where increased heat-saving qualities are required, for example, in steam rooms, because when properly installed they serve as a reflector that reflects heat waves.
- Anti-condensation membranes. Universal roll materials that can play the role of both vapor barrier and waterproofing. On the side of steam movement, these materials are endowed with a rough surface that prevents dew from falling. The side facing outwards is smooth and water-repellent.
The listed types have significantly, but not completely, replaced the position of glassine with unreinforced polyethylene. Outdated vapor barrier materials are still used to this day in insulating floors; they are laid under backfill insulation such as expanded clay or dried earth. They are used in cold roof structures of cottages and cabins, in the construction of which insulation was not pursued as a goal.
The principle of taking into account vapor permeability
Vapor permeability is an important characteristic in construction. It indicates how many grams of water contained in the air flow can pass through 1 m2 of insulation or building material in one day. Literally all products used in construction have the designated quality, but their capabilities differ radically.
Brick, all types of foam blocks, and wood allow steam to pass through with varying degrees of intensity. If structures made from them are not equipped with thermal insulation, then a barrier against vaporous moisture is not constructed. The evaporation will simply pass through the slopes and walls with ceilings to the outside, where there is a deficiency of it for the majority of the year.
If structures are equipped with insulating material, there is an urgent need to install a vapor barrier. This more complex scheme usually combines options with different abilities to transmit steam, and some of the building materials generally tend to accumulate moisture that is harmful to them.
It is better not to allow evaporation into the roofing pie of an insulated roof at all. And if something managed to penetrate, then this saboteur moisture should be removed as quickly as possible by all methods available in construction. The list of methods is headed by organizing ventilation of the under-roof space and the attic itself.
With rational and correct construction of the roof structure, steam and condensate formed due to the difference in temperatures outside the roof and inside the heated space do not linger in the roofing pie at all.
The solution to the problem lies in the technologically proven arrangement of the components of the insulation system, which are “lined up” as vapor permeability decreases as follows:
- Vapor barrier. Polymer film with the least ability to transmit moisture suspended in the air. The technical data sheets of most such materials indicate vapor permeability in hundredths and tenths of one gram, which the film can pass through in 24 hours. True, there are options with permeability of several units.
- Thermal insulation. Mainly wadding and non-extruded foam materials with a higher vapor permeability than the previous layer. When selecting insulation for an attic or ceiling, this factor must be taken into account.
- Waterproofing. A polymer film with vapor permeability exceeding that of insulation, or at least equal to it.
An insulation system constructed in this way is perfectly protected from the accumulation of steam and condensate. Even if the vapor barrier does allow a certain amount of fumes to pass through, they will not linger in the insulation. After all, its ability to pass steam is higher. Then, in the path of the steam there will be waterproofing, which is even less likely to retain evaporating water from its inside.
When a certain amount of vapor enters the thermal insulation layer of a well-designed roofing pie, the protective mechanism of the roofing system comes into play. Moisture is removed along with ventilation flows running through the vents, or flows into a gutter along the outside of the anti-condensation film.
Installation of insulating material on your own
The main feature of laying vapor barrier material is the material used in construction, which may have its own properties and methods of maintenance. In other words, before installing the insulating film, you need to familiarize yourself with the features of the material chosen for construction. For example, lumber can be treated with special solutions and impregnations, which will prevent the formation of mold and mildew under the protective layer of film. After this, you can begin installing the insulating film itself with the correct side facing the frame.
So, the beginning of work involves determining the required amount of insulating film, which will allow you to avoid the problem of a lack or excess of the membrane. In order to make the correct calculation of the consumable material, it is necessary to find out the total processing area, to which you will need to add about 15 percent of the reserve. Such a reserve is needed in order to properly overlap the film, and in order to prevent a shortage of material in case of damage. Now it’s time to prepare all the necessary tools, without which it is almost impossible to do further work.
Ruberoid is excellent for vapor barrier of flat roofs.
Such tools include a pencil, tape measure, stationery knife, adhesive tape or stapler, if the selected insulating material allows for its use. It is better to install the canvas before the work on insulating the room is completed. Before starting installation, it is worth checking that the selected side of the film is correct, which is necessary for proper operation of the insulation. Laying the film requires very little tension, which will not allow the material to fold or create folds.
It is worth recalling that the vapor barrier is laid with an overlap of about 50 mm, which allows you to create a complete insulating layer. Each strip is connected to each other with adhesive tape, which is not capable of damaging the integrity of the film itself, which in the end is quite good. It is also necessary to inspect the entire strip of material used, which will eliminate the possibility of holes and defects on the surface of the insulating material. The strips must extend onto the surface of the walls by at least 150 mm, which is necessary for the highest quality insulating layer.
Now it’s worth focusing on the issue of the correct location of the selected insulating film. As a rule, there is no general standard in this matter, because quite a large number of varieties of insulating material provide different types of fastening, which allows you to install the material in place. There are types of film that do not have an inside or front side, which, in turn, simply eliminates this question. But there are also films, the incorrect placement of which can lead to the complete opposite of the protection effect.
For example, a membrane film is created in order to release wet fumes from the room, while preventing moisture from entering. If such a film is mounted on the wrong side, the effect will be the opposite. Namely, moisture from the street will get inside the room, and the vapors formed there will not be able to get out. In other words, such work will only worsen the condition of the building, significantly reducing its service life.
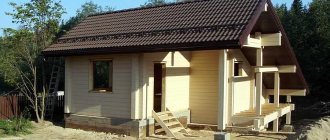
Recommendations for vapor barrier of frame structures
You need to understand how to properly install vapor barrier in frame houses. To do this, you must first install the membrane on the required side, and then secure it to the racks with a stapler. Next, you should glue the joints using special tape or mastic.
When using ecowool, polyurethane foam, polystyrene foam as insulating material and provided there is an effective ventilation system, a vapor barrier layer in the frame structure may not be required.
Organization of vapor barrier for frame structures
If there is still a need for vapor barrier, then one of two possible schemes should be used:
- The vapor barrier is sewn onto the frame posts. How to attach a vapor barrier in this case? First, the film is fixed on the racks, after which the walls are lined with clapboard, plasterboard or other interior finishing materials. This option can be used in buildings used for seasonal purposes, which are not needed during the cold season. These include guest buildings, country houses, and workshops. This option involves ensuring effective ventilation of the structure.
- It involves installing a layer of sheathing (horizontal or vertical) above the membrane. The lathing is necessary to provide an air gap of 30 to 50 millimeters from the wall surface. This option is advisable to use in permanent homes or buildings that require intensive use during the cold season.
The choice of installation scheme for vapor barrier in a frame house should be made based on the expected intensity and seasonality of use of the room.