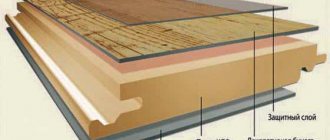
Can flooring be inexpensive, reliable and easy to install? There is a material that combines these incompatible properties. This is a laminate floor. Therefore, it is the most popular among other types of coatings. To lay laminate flooring with your own hands, you need to know the characteristics of the material and the subtleties of working with it so that its service life is as long as possible.
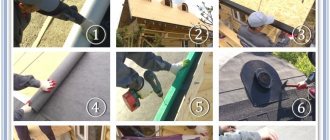
Laying laminate
The main question that arises when choosing a floor covering is whether it is possible to install it yourself? Yes, and very easy! You just need to know the technological features. We will tell you how to lay laminate flooring yourself, with step-by-step instructions. You will be able to carry out high-quality assembly yourself, without resorting to the expensive services of professional craftsmen. Our detailed article will introduce you to all the secrets and features of laying this flooring.
Buying laminate
Before buying laminate, you should familiarize yourself with the parameters that affect its quality and cost. It happens that a laminate of the same quality and characteristics differs significantly in price. This is because some manufacturers include a markup for branding and marketing gimmicks in the price.
Which laminate to choose?
So, what to look for? Laminate varies in classes, 21-23, 31-33, and thickness, from 4 to 12 mm. The optimal thickness of this flooring should correspond to the type of room where it is intended to be installed. The laminate class is indicated by two numbers, where the first indicates the type of room, and the second is the wear resistance coefficient, which implies impact resistance and moisture resistance. For example, if a laminate of minimal thickness and light load is suitable for a bedroom, then for a kitchen it is better to choose a higher class.
For a clearer understanding, let’s look at the classes in more detail:
| Laminate class | Wear resistance level | Room type | Thickness mm |
| 21 | Easy | Bedroom | 4 |
| 22 | Average | Hall, living room | 5 |
| 23 | High | Kitchen, hallway, children's room | 5 |
| 31 | Easy | Utility rooms | 6 |
| 32 | Average | Office rooms | 6-10 |
| 33 | High | Cafes, shops, gym | 12 |
The table shows:
- classes 21, 22, 23 are intended for domestic use , and 31, 32, 33 - for commercial use ;
- the greater the thickness, the higher the load level.
Table with laminate classes
The class of laminate affects its cost . Therefore, the choice of increased thickness for home use is not always justified. Yes, class 33 has maximum moisture resistance, wear resistance and shockproof properties. But its main purpose is public places with high traffic, and for the same kitchen in the house, class 23 laminate will work perfectly.
There is also such a nuance as the manufacturer’s warranty. The warranty period from the manufacturer can vary from 15 to 30 years .
Sellers may cite this parameter as a strong argument in favor of coverage at a higher cost. Don't delude yourself. The plant guarantees the service life of the coating, the installation of which was carried out by certified craftsmen.
What type of surface can laminate flooring be laid on?
The base can be any previous coating - cement, tile, wood, linoleum. It is only necessary that this surface be hard and level. Therefore, you must first make sure that it is level enough. After which you can begin assembling the laminate. A deviation of 1 or 2 mm is permissible, no more. Only if this condition is met, the board will not sag, but will lie flat and tight. With a larger difference, the laminate board may crack or break. Check if there is a deviation using a rule or profile.
Important: laying laminate flooring is only possible on a clean, leveled base without cracks, unevenness or other defects.
Installation on concrete floor
It is best to lay laminate flooring on a concrete floor. A self-leveling base is perfect. If there are unevenness on the concrete floor that exceeds the permitted standards, they need to be leveled. In the case of a cement floor, everything is easy - just pour a special screed. Concrete is therefore considered the best base for flooring.
If the concrete floor is smooth and clean, you need to lay a substrate . What types of underlays are there for laminate flooring?
- foamed polyethylene, budget option;
- expanded polystyrene;
- durable cork material;
- multilayer substrates made of different materials specifically designed to perform this function.
Underlays for laminate
If there is a need to level the base, it must first be prepared for filling with a self-leveling mixture - cleaned and primed. The thickness of the first poured layer must be at least 10 mm. When the surface has dried, re-priming is carried out and another layer is poured. It is better to close the room for a day or two to avoid the appearance of defects on the surface of the screed.
The floor boards should be laid after the filled mortar has reached at least 50% strength. I would like to note that the screed dries completely in 70-80 days. You don’t have to wait for 100% drying if you use plastic film as a backing.
Preparing a concrete floor for laying laminate
After reading the material completely, you will know how to lay laminate flooring on a concrete floor yourself.
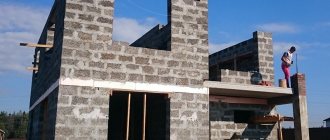
Laying laminate flooring on a wooden floor
One of the frequently asked questions is: can laminate flooring be installed on a wooden floor? In general, this is risky. Especially if the wooden covering is aged. According to technological standards, it would be more correct to remove it, then replacing it with a full-fledged concrete base. In this case, it will be necessary to do all the necessary work on bedding, thermal insulation, and preparation of the reinforcing belt. Only after this can you make a concrete screed. Once the mixture has hardened, you can begin laying the laminate panels.
Laying chipboard on a wooden floor
Until the filling is done, it is possible to install a heated floor system. Is it possible to lay laminate flooring on heated floors? Yes, if a special type of laminate board is used. It does not deteriorate from heating.
Completely replacing the old wood covering with concrete is a very expensive undertaking, both in terms of cost and time. Therefore, they usually prepare a wooden surface for installation of laminate flooring without replacement. Unless, of course, the floor is completely old. If the logs and boards are damaged, it is better to re-lay them or make a screed.
Disadvantages of wood covering as a base:
- parts can “walk” in height;
- there is a high probability of squeaking when walking;
- the logs are drying up.
There is no need to lay laminate flooring on a creaking base. We need to find and fix the loose planks. They can be additionally screwed or nailed.
Preliminary preparation of the wooden base begins with cutting off excess pieces protruding above the surface. The cracks need to be filled with putty.
Laying chipboard on a wooden floor under laminate
Before laying laminate flooring on a wooden floor, you need to lay leveling material on it. Typically plywood is used for this. The optimal thickness of the plywood sheet for leveling is 10-12 mm. Plywood sheets are screwed with self-tapping screws. If there are differences greater than permissible, you will need slats of various thicknesses to level the plywood.
It will be better if the joints of the plywood sheets do not coincide at the corners. This way the load on them will be distributed evenly. still impossible to fit the sheets tightly . Wood has the ability to change. Temperature and air humidity affect the condition of the tree. Therefore, there must be small gaps between the sheets of plywood. They are needed to avoid distortions if the tree begins to “move” - dry out or expand.
If the wooden floor has not been damaged and the plywood sheets are laid evenly, such a base for the laminate will last a long time.
Laying on linoleum
In many apartments, linoleum is laid on the floor. And when it’s time to change the floor covering, a completely reasonable question arises: is it possible to lay laminate flooring on linoleum? Usually there are no contraindications to this. There is even some positive aspect. Linoleum provides additional sound insulation.
Laying laminate on linoleum
But there are cases when you should not use linoleum as a base:
- Uneven floor. If there are holes, swellings, or large differences, it is better to remove the linoleum and pay attention to leveling.
- The covering is very old. Linoleum that has begun to deteriorate will swell. This can ruin the laminate flooring, not to mention the aesthetics.
- Highly soft linoleum is undesirable as a base. This is fraught with the appearance of squeaks on the laminate when walking.
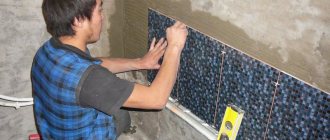
How to design difficult places
How to lay laminate flooring is theoretically clear. If you already have laminate flooring, you can practice on a small area - then it will become clearer. But there are always some problem areas in the rooms that you don’t immediately understand how to fix. In any case, there are two such areas - pipes and the door frame. How to lay laminate in these places so that you can’t find fault? In principle, this is not difficult. You need a ruler, a drill with bits, a hacksaw and pads that will close the gap at the pipes.
There's no need to do that
Connection to the door frame and threshold
In order for the laminate to lie nicely and without gaps near the door frame, it is advisable to lay it with the frame already installed. If you haven't installed the doors yet, you have time to get started while the laminate is curing. When installing the box, you need to make it a little shorter - the saw blade should fit between it and the floor. If the box is already standing, you can trim it.
How to beautifully design a joint with a door frame
When laying, the laminate is slipped under the racks, so there will be no gap. But how to design the joint between a laminate and another coating is a whole separate topic. And if the doors open onto a tiled corridor, there are additional methods for joining laminate and tiles. The simplest and most obvious is the threshold. They come in different varieties, so there are already a lot of options here. If you don’t like the thresholds at all, there is a cork compensator. It's almost invisible.
How to beautifully bypass pipes
The second difficult place to decorate beautifully is the pipe exit from the floor. We cannot live without heating and there are pipes in almost every room. Let us remind you once again: there must be a gap of at least 5-7 mm around the pipe. Having placed the board against the wall, mark the middle of the pipe with a pencil at the required distance. We measure the diameter of the pipe, add 2 cm to this value (at most 1.5 cm), we get the diameter of the hole that needs to be drilled in the laminate. It is difficult to find a drill with such a diameter, but a “crown” type attachment is possible.
How to go around pipes with laminate if they are on a short part of the board
After making a hole (or two, if necessary), draw a straight line through the center of the holes and cut off part of the board along it. We install the laminate, insert the cut piece behind the pipes. If everything is done as it should be, great. We coat the joint with glue (universal, for wood) and install everything completely. And we close the gap with overlays. They are available in wood color, white, black, and shiny. There are plastic or metal-like ones. In general, options are possible.
If the pipes are on the long side of the laminate
If the pipes fall on the long part of the laminate board, the technology changes slightly, but the essence remains the same. You just need to cut out the area in the form of a trapezoid.
Underlay for laminate
On the prepared base, leveled and cleaned, you must first lay the substrate. The main role it plays is to protect the interlocking joints of the laminate from the destructive effects of external loads. This is achieved by absorbing steps on the floor and redistributing pressure on it.
Laminate flooring substrates
The substrate also has additional properties:
- hides small irregularities of acceptable sizes;
- muffles noise;
- insulates.
Types of substrate
Foamed polyethylene. This is the most affordable type. Therefore, it is very popular. The advantages include increased moisture resistance and low cost. The polyethylene foam backing is produced in rolls, which simplifies working with it. The low price justifies its obvious disadvantages: low thermal conductivity, sensitivity to ultraviolet rays, lack of sound insulation.
Types of underlays for laminate
Polyethylene foam is short-lived. He quickly loses his shape. The level of damping, or cushioning, in other words, decreases over time. Because of this, the locking connections will quickly become loose. In short, polyethylene foam significantly reduces the lifespan of a laminate floor. Therefore, it is advisable to use it only under a cheap coating with a comparable service life.
Polyethylene foam backing
Important: polyethylene foam backing is only suitable for cheap laminate flooring.
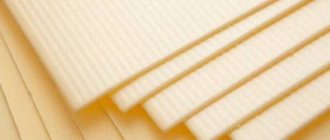
Expanded polystyrene . This type of substrate is average in cost and quality. Foamed polystyrene has the ability to hold its shape well and muffle noise. The surface of the substrate has a high density, so it smoothes out small irregularities well. In terms of cost, polystyrene foam is more expensive than polyethylene, but more affordable than cork backing. Release form: slabs and rolls. Due to its reasonable cost combined with good properties, this material is used more often than others. The only argument against is the impossibility of laying it on a heated floor.
Polystyrene foam backing
Polyurethane on foil . It is recommended as a substrate if there is a heated floor system. It has the best properties required for a substrate. The price is a little cheaper than cork. The properties of the substrate directly affect the service life of the laminate. Therefore, buying a good underlay for expensive laminate flooring is a justified investment.
Polyurethane on foil
Important: a foiled polyurethane laminate underlay is suitable for heated floors.
Cork backing . It is made from natural cork chips. Release form: rolls. This is probably the best underlay for flooring. Undoubted advantages: durability, load resistance, high thermal insulation properties, good noise insulation. There are also disadvantages. Cork substrate does not like heat and moisture. In addition, it must be laid on a perfectly flat surface due to its low leveling ability. When laying, the joints must be taped with tape so that there are no gaps.
The type of premises where cork can be used are living rooms, without heated floors, where there is low or normal humidity and there is no risk for the covering to be flooded with water. Despite its excellent properties, natural cork laminate underlays are rarely used. This is due to the high price.
Cork backing
Bitumen-cork on cellulose . The cost is close to cork. Suitable for use with a heated floor system.
Important: the best and, at the same time, the most expensive substrate is natural cork. But it is not suitable for heated floors.
In addition to the above types of substrate, many new products appear on sale. Basically, these are little-known materials that have not undergone any testing. Therefore, it is better to follow the manufacturer's recommendations. They are usually indicated in the instructions on the package.
Bitumen-cork substrate
Is plastic film needed under laminate flooring?
The main purpose of the polyethylene film under the substrate when laying laminate is to protect against moisture penetration from the inside. If there is a basement with high humidity under the floor, the use of film is simply necessary. It is laid under the substrate with an overlap and taped with tape.
Polyethylene film for laminate
There is also a risk of moisture appearing from below when laying on a cement screed that is not completely dry. This is a problem with almost all modern new buildings made of monolithic concrete. The screed takes more than 2 months to dry. Many are not ready to wait that long. Even expensive, highly wear-resistant laminates deteriorate from moisture and begin to swell and creak. Therefore, it is advisable to use polyethylene film.
Important: many laminate flooring manufacturers recommend always using plastic film during installation.
How to lay the underlay
Now let's look at how to properly lay the underlayment under the laminate.
You need to start laying out or rolling out the backing material along the wall from which the installation will take place. As a result, the underlay should cover the entire length of the floor along the desired wall. It is better not to cover the entire floor of the room with a substrate at once, so as not to walk on it. The next strip along the wall should be laid as needed.
Laying the substrate
The joints must be tightly aligned and taped. If there are small gaps between the joints, it's okay. is not allowed , so the laminate must adhere evenly to it.
To speed up the process, the edges of the substrate are sometimes secured with a construction stapler. But it’s better to spend a little more time gluing with tape than to then listen to the not-so-pleasant sounds of staples rubbing against a laminate board.
Important: do not lay the underlay overlapping.
DIY laminate installation tools
Before starting installation work on laying laminate flooring, you must prepare all the necessary tools.
Tools
- Hammer and hammer. They are needed to adjust the laminate panels to each other. A block of wood is suitable as a finishing tool. Do not knock directly on the panels, as the locks may be damaged.
- Stationery knife. Needed to open packages.
- Square, pencil, tape measure. Will be needed for marking.
- Wedges. They will be needed to maintain the required gap between the wall and the covering.
- Montage. Using a special bracket, the boards of the last row are laid.
- Electric jigsaw. A jigsaw is needed for sawing boards. You can even cut laminate with any hand saw that you have at hand. Small cuts are required - the board is sawn across.
How to cut laminate correctly
When cutting, the laminate should be face up. This will prevent burrs from forming along the edges of the front surface.
To make the cutting line smooth, use metal guides - rulers and squares.
Cut the laminate
The last row requires special attention. Boards for this row almost always have to be sawn lengthwise.
What tools will you need?
But before laying the laminate, if you plan to carry out the work yourself, you should stock up on the necessary tools and special installation accessories. Power tools you will need:
- jigsaw or, alternatively, a hacksaw;
- a hammer drill or, in some cases, the power of a drill-driver is quite enough.
Necessary tools for laying laminate
You will also need:
- “mallet” - a special wooden or rubberized hammer;
- painting knife;
- a finisher, which is a special device in the form of a wooden block used to fit the laminate;
- wedges for creating gaps;
- mounting bracket for laying the outermost (closing) row.
In addition, you should not forget about a marking pencil and measuring instruments: tape measure, square, water level.
For more information about the tools for laying laminate, watch the video:
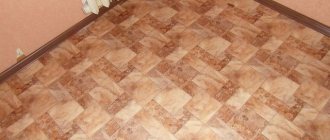
Laying scheme
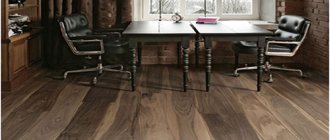
A frequently asked question is how to lay laminate flooring, along or across the room. There is no special rule in this regard. There is only one subtlety, the observance of which is recommended, and only for visual effect. If you lay the laminate board perpendicular to the window opening , then the light will fall along the seams, and they will become less noticeable. Laminate flooring can also be laid across. In this case, the joints of the boards will simply be more visible. Laying it diagonally looks very nice and visually expands the room. But this option is more complicated - it requires skill, and there will be more waste.
laying laminate
In general, during installation the most difficult parts are the assembly of the first and last rows. When laying the first one, you must maintain gaps along the wall. The last row will take a lot of time to saw the boards and join them in the doorway with the covering in another room.
The main rule for proper installation of laminate flooring is the offset of the seams. Each transverse joint should be 400 mm from the next. This way the load will be optimally distributed over the entire surface, and the coating will be more wear-resistant.
The assembly of the next row always begins with a piece of the previous plank. Each even row should begin with such an incomplete piece. This assembly option is considered traditional. It is called "half-board offset layout." Odd rows with this option always start with a whole panel.
Important: the distance between the transverse seams of adjacent panels must be at least 40 cm.
You can also lay the laminate board with a ladder. When installing in this way, the minimum permissible seam displacement must be observed. Usually this parameter is indicated on the packaging. The first row starts with a whole plank, the next - with 1/3 of the full length, the third - 2/3. You will get a kind of ladder.
Instructions for laying laminate flooring yourself
The installation technology for this floor covering is always the same. There are only peculiarities when connecting boards depending on the type of lock.
Instructions for laying laminate flooring
Now let's look at step-by-step instructions on how to lay laminate flooring with your own hands.
- First you need to prepare, vacuum and level the surface of the base.
- When the surface is cleaned and leveled, if necessary, lay overlapping polyethylene film. The edges are secured with adhesive tape.
- Now the substrate is laid out or rolled out in strips along the desired wall. The joints must fit tightly. They are also sealed with adhesive tape.
- Wedges are placed around the entire perimeter. Their thickness is 10 mm. They will create a small gap between the floor and the walls. Due to this, air circulates around the floor covering. This will help prevent damage to the laminate when the room is very hot or humid.
- The first row should begin to be laid on the side opposite the door. All panels of the first row should rest against the indentation wedges. Each panel fits into the adjacent one.
- The last plank of the row may be too long. It needs to be trimmed, taking into account the prepared indents.
- The next strip of panels should start with half or a third of the board, according to the diagram.
- All rows are laid sequentially.
- The boards of the final row will need to be cut lengthwise. The main thing is not to cut off the tenon.
If the shape of the room is geometrically correct, installation difficulties should not arise.
Important: the laminate must adapt to the temperature and humidity of the room before installation. Therefore, a couple of days before the intended installation, you need to bring the packages with the flooring into this room.
Types of lock connections
Before laying the laminate, you should determine the type of interlocking connection of the selected type of material and select the installation method. If the laminate is equipped with:
1) with the “groove-tenon” system, then you should use the adhesive method, which practically repeats the principle of laying parquet boards. This option provides:
- increased connection strength;
- protection against moisture getting into the seams.
But this installation method requires certain skills and is quite labor-intensive. In addition, it does not ensure the durability of the coating, since the seams gradually dry out. An option to avoid this problem is to use laminate sealant , which has the necessary elasticity.
Minor repairs involving the replacement of one or two boards are quite problematic; the process of dismantling the covering for the purpose of its subsequent re-laying also becomes impossible.
2) the “LOСK” locking system, in which the laminate panels:
- first they are laid horizontally, maintaining the required gap between them;
- then the “tenon” of the board is mechanically aligned with the “groove” of the board of the adjacent row;
- and finally, the ends of their row are joined.
3) the “CLICK” locking system – the most convenient and reliable, which is also:
- the simplest and most affordable to implement, so it is worth paying attention, especially to those new to construction and repair who are deciding how to lay laminate flooring with their own hands and do it efficiently and quickly;
- the panels are also connected using the tongue-and-groove system;
- the main difference from the previous type is the joining at an angle of 30 degrees, after which the board is tilted and pressed to the base;
- Finally, using a mallet and a block, the panel is “hammered” into the adjacent board, until the characteristic sound of the end lock connection is activated.
See the video for types of locks:
How to eliminate joints between multi-level coverings of adjacent rooms
We looked at how to properly lay laminate flooring. But there is one more important point.
Often during installation, multi-level joints are formed between the laminate and the threshold or flooring of adjacent rooms. How to deal with them?
They are easily neutralized using thresholds. If you need a straight joint, a metal threshold will do. It is the most durable. For joints that are curved, there are flexible thresholds.
Types of thresholds:
- single-level - the most common, designed for joining laminate flooring in adjacent rooms;
- multi-level - used for joining a laminate floor to another surface, the level of which differs in height;
- one-sided - used for joining with doors;
- corner - for connecting coverings at an angle of 90 degrees.
Installation of skirting boards
After completing the coating installation process, the installation of skirting boards begins. They must be selected in accordance with the colors and parameters of the laid material. It is best to choose designs with internal fastening, as they are really attractive and also do not require fasteners.
Different types of skirting boards require different types of fastening to the wall, so you should first read the instructions. If the wall is not too smooth, then it is better to opt for plastic skirting boards. Wooden models are suitable only for perfectly smooth walls.
When installing skirting boards, it is attached to special grooves, and you need to make sure that they are not at the same level as the gap between the laminate and the wall.
Thus, if you understand well how to lay laminate flooring, this process will not cause difficulties. Every person who has completed this work will leave only positive comments about its complexity, since in fact it is simple and efficient. This allows you to save on wages for hired workers, and also guarantees an excellent result, which will be provided by the required material.
Clip for attaching the plinth to the laminate. Installation diagram for the plinth.
Installation methods depending on the type of lock
Installation methods for laminate flooring depend on the type of lock on the board, Click or Lock. It is impossible to confuse them, because the manufacturer indicates on the packaging which connection is used.
Installation method with Click connection
This technology involves assembly without a hammer. The boards are assembled sequentially. Each subsequent panel must be brought to the already installed one at an angle of 45 degrees. Then the tenon must be inserted into the groove, pressing lightly. The castle received this name because of its characteristic feature. When the tenon fits into the groove, it makes a clicking sound. With this technology, the panels are first fastened with lateral connections, and then longitudinal ones.
Click installation method